Search results for: 'RF Link Transmitter - 434MHz'
- RF Link Receiver - 4800bps (434MHz)SKU: WRL-10532 Brand: SparkfunThese wireless receivers work with our 434MHz transmitters. They can easily fit into a breadboard and work well with microcontrollers to create a very simple wireless data link. Since these are only receivers, they will only work communicating data one-way, you would need two pairs (of different frequencies) to act as a transmitter/receiver pair.
- 433Mhz RF link kit (Seeed Studio)SKU: SS113990010 Brand: Seeed StudioThe kit is consisted of transmitter and receiver, popular used for remote control. Basic Specification: Frequency: 433Mhz. Modulation: ASK Receiver data...$11.20 AUD, inc GSTAs low as $10.42 AUD, inc GST
Out of Stock
Sign up to get notified when it's available to order.
- 433MHz wireless RF transmitter and receiver kitSKU: SS114992733 Brand: Seeed StudioThis is a complete wireless transmitting and receiving the kit, which can be applied to simple data wireless transmission, wireless remote control, anti-theft alarm system, etc. The kit is composed of ASK transmitter and receiver modules with superior performance and low cost. The carrier frequency can be 315MHz or 433MHz.$9.35 AUD, inc GSTAs low as $8.70 AUD, inc GST
Out of Stock
Sign up to get notified when it's available to order.
- Grove - 433MHz Simple RF link kit (Seeed Studio)SKU: SS113060000 Brand: Seeed StudioThis kit is used for one way wireless communication at a frequency of 433MHz and includes a transmitter module and a receiver module. The twig configuration...$24.50 AUD, inc GSTAs low as $22.78 AUD, inc GST
Out of Stock
Sign up to get notified when it's available to order.
- 2KM Long Range RF link kits w encoder and decoder (Seeed Studio)SKU: SS113990018 Brand: Seeed StudioThis is a super long range 433mhz RF link kit Comes with VCO , PLL technology, steady Frequency and super anti-jamming ability. You can directly use it...$40.85 AUD, inc GSTAs low as $37.99 AUD, inc GST
Out of Stock
Sign up to get notified when it's available to order.
- RF Explorer UpconverterSKU: SS114991131 Brand: Seeed StudioRF Explorer Upconverter is a high-performance RF frequency mixer to enable input frequency ranges from 100KHz to 250MHz in RF Explorer Spectrum Analyzer and other devices such as SDR and wideband radios.
- RF Explorer WSUB1G PLUS - SlimSKU: SS114991830 Brand: Seeed StudioRF Explorer WSUB1G+ is a powerful, high performance digital spectrum analyzer covering the 1GHz frequency range starting at 50KHz.The new SLIM model offers an outstanding robust design, a more convenient USB connector on the side and larger internal battery capacity
- nRF905 RF Transceiver ModuleSKU: CE04055 Brand: Core ElectronicsThis SPI module adds a versatile 433Mhz radio to your project.
- RF Explorer LCD screenSKU: SS308010000 Brand: Seeed StudioReplacement LCD for RF Explorer devices Custom model designed specifically for RF Explorer Included sticker foam for PCB assembly
- RF Explorer®Pro - Touch Screen Spectrum AnalyzerSKU: SS114993046 Brand: Seeed StudioThe RF Explorer®Pro is an highly-integrated RF analysis and optimization instrument, that presents the ability of a Spectrum Analyzer, Power Meter, and...
- RF Explorer - 3G Combo (Seeed Studio)SKU: SS109990009 Brand: Seeed StudioRF Explorer is a handheld digital spectrum analyzer, a very affordable tool for work in all popular frequency bands. It is based on a highly integrated...$494.95 AUD, inc GSTAs low as $460.30 AUD, inc GST
Out of Stock
Sign up to get notified when it's available to order.
- SparkFun Pro RF - LoRa, 915MHz (SAMD21)SKU: WRL-15836 Brand: SparkfunThe SparkFun Pro RF is a LoRa®-enabled wireless board that marries a SAMD21 and a long-range RFM95W to make a compact and easy-to-use IoT Arduino board. With its...
- RF Explorer - Raspberry Pi Touch screen HolderSKU: SS114992067 Brand: Seeed StudioThis useful Acrylic custom designed holder is the perfect for the Raspberry Pi 7" official Touchscreen. It helps keep the Touchscreen in a right angle, and takes very little desk area.
- RF Explorer Signal Generator ExpansionSKU: SS114991658 Brand: Seeed StudioRF Explorer Signal Generator Expansion adds major improvement to the standard RF Explorer RFE6GEN Generator. The new generator expansion board includes important functions requested by our most demanding customers. By adding this expansion board the RFE6GEN becomes an RF Explorer Signal Generator COMBO.
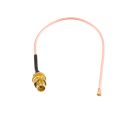
- RP-SMA to uFL/u.FL/IPX/IPEX RF Adapter CableSKU: ADA852 Brand: AdafruitThis RF adapter cable is super handy for anyone doing RF work. Often times, small electronics save space by having a pick-and-placeable u.FL connector (also called...
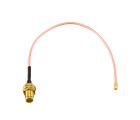
- SMA to uFL/u.FL/IPX/IPEX RF Adapter CableSKU: ADA851 Brand: AdafruitThis RF adapter cable is super handy for anyone doing RF work. Often times, small electronics save space by having a pick-and-placeable u.FL connector (also called...
- RF Explorer RFEM2.4G PLUS ExpansionSKU: SS114991828 Brand: Seeed StudioRF Explorer RFEM2.4G PLUS is an expansion board compatible with RF Explorer WSUB1G PLUS models. It can be assembled in PLUS models only. This expansion board adds 2.4GHz band support, covering frequency ranges used by WiFi, Bluetooth, wireless video, ISM applications, etc.$139.95 AUD, inc GSTAs low as $130.15 AUD, inc GST
Out of Stock
Sign up to get notified when it's available to order.
- RFM69HCW Wireless Transceiver - 434MHzSKU: COM-13910 Brand: SparkfunThis is the 434MHz base RFM69HCW Wireless Transceiver that is found on our RFM69 Breakout. The RFM69HCW is an inexpensive and versatile radio module that operates in the unlicensed ISM (Industry, Science and Medicine) band, a set of frequencies set aside for low-power, short-range, license-free radios. It’s perfect for building inexpensive short-range wireless networks of sensors and actuators for home automation, citizen science and more.
- RF Explorer 6G Combo PLUS - Slim (Seeed Studio)SKU: SS114992145 Brand: Seeed StudioRF Explorer 6G COMBO+ is the most powerful Spectrum Analyzer model, covering the full 6GHz range starting at 50KHz up to 6.1GHz with no gaps or limitations.
- RF Explorer ISM Combo PLUS - Slim (Seeed Studio)SKU: SS114991829 Brand: Seeed StudioRF Explorer ISM COMBO+ is a powerful, high performance digital spectrum analyzer covering the 1GHz frequency range starting at 50KHz, and 2.35GHZ to 2.55GHz for scanning the popular 2.4GHz band.
- RF Explorer 4G Combo PLUS - Slim (Seeed Studio)SKU: SS114992146 Brand: Seeed StudioRF Explorer 4G COMBO+ is a powerful Spectrum Analyzer, covering the full range starting at 50KHz up to 4GHz with no gaps or limitations. A future firmware license feature will allow it to expand the range up to 5.1GHz.
- SMA RF connector (PCB edge mount)SKU: WRL-23187 Brand: SparkfunPCB edge mount - SMA RF connector. Perfect for prototyping with the GPS and Cellular devices that require an antenna connection...
- MCX Jack to SMA RF Cable AdapterSKU: ADA1532 Brand: AdafruitThis RF adapter bit is great for anyone doing RF work. If your receiver/transmitter/transceiver has an MCX connector but you really want to tie it to an SMA antenna...
- MCX Jack to BNC RF Cable AdapterSKU: ADA1531 Brand: AdafruitThis RF adapter bit is great for anyone doing RF work. If your receiver/transmitter/transceiver has an MCX connector but you really want to tie it to a BNC antenna...
- SMA Jack to RP-SMA Plug RF AdapterSKU: ADA920 Brand: AdafruitThis RF adapter bit is great for anyone doing RF work. Depending on the dev-board and antenna you have, you may be faced with either RP-SMA or SMA connectors. Unfortunately...


PiicoDev Transceiver | Getting Started Guide
A radio transceiver is a device that can both transmit and receive radio signals, making it the perfect tool for communication on the go and remote projects! The PiicoDev Transceiver™ is a 915MHz radio that can send short messages up...

Pycom LoPy Overview
Note: With the rollout of TTNv3, the "Setup" section of this guide no longer works - but we're keeping it here for posterity. Let us know on our forums if you need help getting started with the new method. The two main standards at work in...

Mobile Networks - Where Can My IoT Device Connect?
The Internet of Things (IoT) describes the network of physical objects that are all around us which are blessed with sensors, software, and other technology for the purpose of connecting and exchanging data with other devices and systems al...

Pycom FiPy Getting Started
Say you want to build a sun-tracking solar panel. You could add a tiny computer, like an Arduino, to control it. That might be all you need. But what if you need to connect to it to control it from somewhere else? Connecting it into your ho...

Makerverse Micro SD Adapter - MicroPython Guide and Data Logging
Introduction This guide covers how to connect the Makerverse Micro SD Card Adapter to a Raspberry Pi Pico and program a basic data logging script in MicroPython. To follow along, it's best to have: A Makerverse Micr...

Identify Electrical Connectors
There are a ton of electrical wire connectors, too many to elaborate on in a single guide, however there are a couple of connectors that as a maker you will come across. Often when starting your way into the electronics world all you need ...
 Controlled Lights with MakeCode: Adafruit Circuit Playground Express")
Infrared (IR) Controlled Lights with MakeCode: Adafruit Circuit Playground Express
The latest Circuit Playground board, the Adafruit Circuit Playground Express comes equipped with an onboard IR transmitter and receiver! This can be used to communicate with TVs and other household devices. You can also use infrared remote ...

Natural Disaster Sensor Project for Micro:bit
The Micro:bit is a feature-packed development board that’s perfect for the classroom or the beginner programmer. Each Micro:bit has a built-in radio that can transmit and receive signals sent from other Micro:bits. The radio has a ran...
 Controlled Lights with CircuitPython: Adafruit Circuit Playground Express")
Infrared (IR) Controlled Lights with CircuitPython: Adafruit Circuit Playground Express
The latest Circuit Playground board, the Adafruit Circuit Playground Express comes equipped with an onboard IR transmitter and receiver! This can be used to communicate with TVs and other household devices. You can also use infrared remote ...

Understanding ESP32 Naming Conventions
Espressif is a constantly ground-breaking company that produces lots of really cool development modules which includes the ESP32. ESP32 Boards, ESP32 Dev-Kits, and ESP32 Modules (the part that gets soldered to the Board/PCB) are all about ...

Our Adafruit Circuit Playground Express Overview
Adafruit has done it again with the new and improved Circuit Playground Express. This new version of the Circuit Playground is packed with even more sensors, and capacitive touch ready connection pads. This is a great board for makers ...

Pycom FiPy Overview
This is the Big Daddy of the Pycom range of devices. The Pycom FiPy has all these connection capabilities (with one tiny caveat): Wi-Fi 802.11b/g/n 16Mbps LoRa (all regions, not 433MHz) Sigfox Cellular LTE (Cat-M1/NB-IoT) Bluetooth L...
?")
What Are DotStar LEDs (APA102/SK98225)?
So in case you haven’t heard yet, digital LEDs are the go-to solution for any project that uses RGB LEDs and you want to avoid the rat's nest that ensures when using multiple RGB LEDs, each colour requiring its own connection. Digital...

Introduction to Bluetooth
Nowadays, everything is going wireless. Phones, computers, game controllers, consoles, everything! Wireless technology has allowed us to use electronic devices with an untethered freedom which just isn’t possible with clunky cables ...

Raspberry Pi Pico W vs. Pico | What's the difference?
IntroductionThis article will compare the Raspberry Pi Pico, and Pico W. Aside from the obvious difference (the Pico W has wireless connectivity), there are a few smaller and more subtle differences that are worth considering.Physical Comp...

Boards of a Feather
Have you ever used an Arduino board, and wanted to hook it straight up to a JST connected LiPo battery but knew it wouldn’t work? Or maybe you wanted a microcontroller with built-in wireless capabilities? Well, Adafruit has developed...

Circuit Playground Express TV Remote
Have you ever lost or broken a TV remote before it's time? Have you ever wanted to spice up the way you change channels or inputs on your TV? Have you got a greedy housemate who always steals the remote off you? If any of these are the case...

Our Siglent SDG1032X Arbitrary Function Generator Review
Let's take a look at the new Siglent SDG1032X Arbitrary function generator. We're looking at yet another example of the closing gap between hobbyist and pro gear - the growing feature set and capabilities of entry-level equipment continues ...

How to Use HC-05 Bluetooth Modules
So we’ve taken a look at what Bluetooth is in our Introduction to Bluetooth tutorial, and hopefully, you’ve found our Choosing a Bluetooth Module For Your Project tutorial useful in deciding which Bluetooth module is right ...

Raspberry Pi Pico W | Overview, Features and Specs
IntroductionLet’s take a look at the Raspberry Pi Pico W - a WiFi-enabled development board from Raspberry Pi. This overview article will explore the Pico W features and specifications. As always, there are additional resources at th...

Circuit Playground Express Workshop for Educators and Beginners
Welcome to the Circuit Playground Express Workshop! This workshop is geared toward educators and coding beginners, who want to get started programming with this easy to use platform. We will go over everything you need to know to get you st...

Effective Ways To Detect People Using Common Sensors
In this guide, we'll look at common methods of detecting people and some of the different sensors you can use to detect people in your next project.Sensors covered in this guide: PIR Sensor RCWL-0516 Microwave Radar SEN0395 mmWave Rad...

Arduino Boards, Compared
We're going to compare each of the Arduino Boards available to Maker's and Electronics Enthusiats. We'll discuss the features of each board, provide an informative pinout diagram with tonnes of detail, and toward the end of the article, pro...

PiicoDev RFID Module - Guide for Raspberry Pi
Radio Frequency IDentification (RFID) uses electromagnetic fields to identify and communicate with tags. Each RFID module emits radio waves that energise the passive tag, which then responds with its own identifying number or data, as reque...

PiicoDev Distance Sensor VL53L1X - Raspberry Pi Pico Guide
Introduction This guide will help you read distance data in millimeters from your PiicoDev® Distance Sensor and a Raspberry Pi Pico To follow along, it's best to have: A Raspberry Pi Pico with pins soldered (pointing down) A Piico...

PiicoDev Pressure Sensor MS5637 - Raspberry Pi Pico Guide
Introduction This guide will help you read barometric pressure from your PiicoDev® Pressure Sensor and a Raspberry Pi Pico To follow along, it's best to have: A Raspberry Pi Pico with pins soldered (pointing down) A PiicoDev Press...
Raspberry Pi Pico Workshop for Beginners
Welcome to the Raspberry Pi Pico Workshop, where you will learn everything you need to know to hit the ground running and start making your own projects with the Raspberry Pi Pico and MicroPython. This workshop is designed for complete beg...

PiicoDev Motion Sensor MPU-6050 - Raspberry Pi Pico Guide
Introduction This guide will help you read motion data from your PiicoDev® Motion Sensor and a Raspberry Pi Pico To follow along, it's best to have: A Raspberry Pi Pico with pins soldered (pointing down) A PiicoDev Motion Sensor M...

PiicoDev Buzzer Module - Guide for Micro:bit
Introduction Let's play tones and melodies on a PiicoDev® Buzzer Module with a Micro:bit. This guide will cover connecting the hardware, running an example to make sure everything works and playing simple melodies. Of course, the Micr...

Track Airplanes up to 400km Away with a Raspberry PiAware - FlightAware
It is time for an Airplane Tracking Raspberry Pi! The final setup here will let you personally collect data on the exact whereabouts of airplanes over 400km away. It will update one to four times each minute. Be passenger planes, cargo air...

PiicoDev Buzzer Module - Guide for Raspberry Pi Pico
Introduction Let's play tones and melodies on a PiicoDev® Buzzer Module with a Raspberry Pi Pico. This guide will cover connecting the hardware, running an example to make sure everything works, and playing simple melodies. To follow ...

PiicoDev RGB LED Module - Raspberry Pi Pico Guide
Let's get started with the PiicoDev® 3x RGB LED Module. In this guide, we'll connect the LED Module to our Raspberry Pi Pico and get it working with some example code to display colourful patterns. To follow along, it's best to ...

PiicoDev RGB LED Module - Microbit Guide
Let's get started with the PiicoDev® 3x RGB LED Module. In this guide, we'll connect the LED Module to our Raspberry Pi Pico and get it working with some example code to display colourful patterns. To follow along, it's best to ...

PiicoDev RFID Module - Guide for Raspberry Pi Pico
Radio Frequency IDentification (RFID) uses electromagnetic fields to identify and communicate with tags. Each RFID module emits radio waves that energise the passive tag, which then responds with its own identifying number or data, as reque...

PiicoDev Magnetometer QMC6310 - Guide for Raspberry Pi
Let's get started with the PiicoDev® Magnetometer. In this guide we'll connect the Magnetometer to our Raspberry Pi, get it working as a compass, and read the magnetic field strength of a nearby magnet. Finally, we'll remix the code to ...

PiicoDev Capacitive Touch Sensor CAP1203 - Micro:bit Guide
Let's get started with the PiicoDev® Capacitive Touch Sensor. In this guide, we'll connect the PiicoDev Capacitive Touch Sensor to our Micro:bit V2 and get it working with some example code to detect touch events. We'll also remix the c...

PiicoDev Magnetometer QMC6310 - Guide for MicroBit
Let's get started with the PiicoDev® Magnetometer. In this guide, we'll connect the Magnetometer to our micro:bit, get it working as a compass, and read the magnetic field strength of a nearby magnet. To follow along, it's best to...

Program a Micro:Bit in your Web Browser
In this article, we'll program a Micro:bit v2 using a web browser. We'll connect a Micro:bit to our computer, open python.microbit.org and begin coding our first script. Contents What You'll Need Connect your Micro:bit Open the Progr...

Internet of Things with Pycom and Adafruit IO - From Zero to Hero
Introduction We’re going from zero to hero. Starting from nothing we’ll get a WiPy communicating with Adafruit IO, an IoT service out on the Internet. We’ll be able to send data from the device to the cloud and control th...

PiicoDev Colour Sensor VEML6040 - Raspberry Pi Pico Guide
Introduction Let's read colour data from a PiicoDev® Colour Sensor with a Raspberry Pi Pico, and create a colour sorting machine. This guide will cover connecting the hardware, downloading some example code and remixing it. ...

PiicoDev Colour Sensor VEML6040 - Micro:bit Guide
Introduction Let's read colour data from a PiicoDev® Colour Sensor with a Micro:bit V2, and create a colour sorting machine. This guide will cover connecting the hardware, downloading some example code and remixing it. To f...

PiicoDev RFID Module - Guide for micro:bit
Radio Frequency IDentification (RFID) uses electromagnetic fields to identify and communicate with tags. Each RFID module emits radio waves that energise the passive tag, which then responds with its own identifying number or data, as reque...

PiicoDev OLED Module SSD1306 - Micro:bit Guide
Let's get started with the PiicoDev® OLED Module SSD1306. In this guide, we'll connect the PiicoDev OLED to our Raspberry Pi Pico and get it working with some example code to display text, shapes, and animations. To f...

PiicoDev Potentiometer - Getting Started Guide
This guide will help you get started with a PiicoDev® Potentiometer - an intuitive input device that allows you to easily interact with your project. PiicoDev Potentiometers are available in two flavours: Rotary and Slider. We'll ...

Pycom Bluetooth
Bluetooth is a low-power radio technology used to link devices wirelessly. Most commonly recognised as the way to link a mobile phone to a car or speaker, it has many uses beyond that. The "low power" aspect is not a shortcoming, as a large...

PiicoDev Capacitive Touch Sensor CAP1203 - Raspberry Pi Pico Guide
Let's get started with the PiicoDev ® Capacitive Touch Sensor. In this guide, we'll connect the PiicoDev Capacitive Touch Sensor to our Raspberry Pi Pico and get it working with some example code to detect touch events. We'll also rem...

PiicoDev 3-Axis Accelerometer LIS3DH - Getting Started Guide
This guide will help you get started with a PiicoDev 3-Axis Accelerometer. We'll walk through some examples to read acceleration, infer tilt angle (from gravity), and detect tapping and shaking. An accelerometer is a device that mea...

PiicoDev Air Quality Sensor ENS160 | Getting Started Guide
The PiicoDev® Air Quality Sensor is based on an ENS160 multi-gas sensor that detects Volatile Organic Compounds (VOCs). These measurements are run through some algorithms to produce standardised outputs like Air Quality Index (AQI...

Raspberry Pi Pico W | Connecting to the Internet
IntroductionIn this guide, we'll get a Raspberry Pi Pico W connected to the internet using WiFi. To demonstrate the connection we can query a webpage, or get the current time from a time service. To follow along, all you'll need is: A R...

PiicoDev Magnetometer QMC6310 - Guide for Raspberry Pi Pico
Let's get started with the PiicoDev® Magnetometer. In this guide, we'll connect the Magnetometer to our Raspberry Pi Pico, get it working as a compass, and read the magnetic field strength of a nearby magnet. Finally, we'll remix the c...
 RV-3028 - Getting Started Guide")
PiicoDev Real Time Clock (RTC) RV-3028 - Getting Started Guide
This guide will help you get started with a PiicoDev Real Time Clock. We'll set and read the time/date, observe the power-backup capability, and configure the RTC with an alarm. A Real-Time Clock (RTC) is a timekeeping device that accurat...

Cura 2 LulzBot Edition: Installing or Upgrading
In November of 2017, our friends over at LulzBot released a major software update to their Slicing software, Cura. In this tutorial, we will look at what Cura is and does, the process of installing Cura 2 onto a PC already running Cura 21.x...

How to Update Firmware on Rigol Oscilloscopes
This tutorial will show you how to update the software on your Rigol Oscilloscope. This will unlock the latest features as well as solve some bugs. What you will need. Rigol Digital OscilloScope (1054Z or 1104Z) USB thumb drive (any wi...

PiicoDev Button | Getting Started Guide
Buttons are a ubiquitous user interface - of course, you've seen them everywhere! The humble button is often the fastest way to create a control interface for your project too. This guide will help you get started with a PiicoDev® Butt...

PiicoDev Servo Driver PCA9685 | Getting Started Guide
This guide will help you get started with a PiicoDev® Servo Driver module. We'll take a tour of the module and walk through some examples to drive common servos. Servo motors are integrated motors that contain their own power circuitr...

PiicoDev OLED Module SSD1306 - Raspberry Pi Pico Guide
Let's get started with the PiicoDev® OLED Module SSD1306. In this guide, we'll connect the PiicoDev OLED to our Raspberry Pi Pico and get it working with some example code to display text, shapes, and animations. To ...

7 Colour E-Ink Display For Raspberry Pi | Inky Impression 5.7" (7 Colour ePaper/eInk HAT)
It has finally happened, they figured it out! The new frontier of Colour Electronic Paper is here and I'm very impressed. People have been demanding this ever since the first E-Paper readers hit the market in the noughties. That black and ...

PiicoDev Ambient Light Sensor VEML6030 - Micro:bit Guide
Introduction This guide will help you read light intensity data from your PiicoDev Ambient Light Sensor and a Micro:bit. To follow along, it's best to have: A Micro:bit A PiicoDev Ambient Light Sensor VEML6030 A PiicoDev adapter for ...

Use a ESP32-CAM Module to Stream HD Video Over Local Network
Cameras in combination with artificial intelligence create arguably the most powerful sensor you can ever put on a microcontroller. So that’s exactly what we will do here with an ESP32-CAM Development Board that sports an inbuilt 2MB...

Fingerprint Scanner with Raspberry Pi Single Board Computer - Unlock with Biometrics!
Let's unlock Biometric Control on our Raspberry Pi Single Board Computers! Biometric Technology uses unique physical or behavioral attributes that are individual to each person and not (easily) replicable. Extraordinarily everyone on Earth...

PiicoDev Ultrasonic Rangefinder | Getting Started Guide
Similar to how bats echo-locate and how submarines use sonar, the PiicoDev® Ultrasonic Rangefinder uses sound waves to measure the distance to an object. It sends out a high-pitched sound wave, which bounces off of the object and comes...

3D Printing Cheat Sheet
Wouldn't it be great to have a single image, that encapsulated a tonne of handy 3D printing tips and information to hang on the wall behind your 3D Printer? Well, we agree so much so that we've gone ahead and created this infographic/cheat ...

PiicoDev Ambient Light Sensor VEML6030 - Raspberry Pi Pico Guide
Introduction This guide will help you read light intensity data from your PiicoDev® Ambient Light Sensor and a Raspberry Pi Pico To follow along, it's best to have: A Raspberry Pi Pico with pins soldered (pointing down) A PiicoDev...

Resin 3D Printing Cheat Sheet
Nothing beats a good cheat sheet. So wouldn't it be great to have a single image, that encapsulated a tonne of handy 3D printing tips and information and have it be ready to hang on the wall in your own Makerverse. Well, we agreed so much ...

PiicoDev Pressure Sensor MS5637 - Micro:bit Guide
Introduction This guide will help you read barometric pressure from your PiicoDev® Pressure Sensor and a Micro:bit To follow along, it's best to have: A Micro:bit V2 A PiicoDev Pressure Sensor MS5637 A PiicoDev Adapter for M...

Getting Started with Particle Internet Button
Slowly but surely the electronics industry is moving away from discrete microcontrollers and towards boards that have sensors and extra functionality built in. This means that rather than buying a microcontroller and then needing to connect...

PiicoDev Distance Sensor VL53L1X - Micro:bit Guide
Introduction This guide will help you read distance data in millimetres from your PiicoDev Distance Sensor and a Micro:bit. To follow along, it's best to have: A Micro:bit A PiicoDev Distance Sensor VL53L1X A PiicoDev adapter for Mic...

Makerverse Audio Kit Guide | Play Music and Generate Tones
IntroductionWelcome to the guide for the Makerverse Audio Kit. This kit will allow you to build a music player, a musical keyboard, and a sound effect soundboard! To follow along you will need: The Makerverse Audio Kit The Makerverse ...

WS2812 / NeoPixel Addressable LEDs: Raspberry Pi Quickstart Guide
--- NEW UPDATED GUIDE CLICK HERE ---This tutorial is aimed at getting some instant gratification from your WS2812 LEDs (also known as NeoPixels). We'll briefly cover a bare-bones setup for Raspberry Pi. This tutorial will work with ANY mod...

PiicoDev Distance Sensor VL53L1X - Raspberry Pi Guide
Introduction This guide will help you read distance data from your PiicoDev® Distance Sensor and a Raspberry Pi single-board computer To follow along, it's best to have: A Raspberry Pi (model 3, 4, Zero W) This tutorial will u...

PiicoDev Ambient Light Sensor VEML6030 - Raspberry Pi Guide
Introduction This guide will help you read light intensity data from your PiicoDev® Ambient Light Sensor and a Raspberry Pi single-board computer To follow along, it's best to have: A Raspberry Pi (model 3, 4, Zero W) This tut...

Using Teensy with Arduino IDE
If you’ve come looking for how to get your Teensy board up and running using the Arduino IDE, then you’ve come to the right place. Whilst you can use the standard Teensy loader application to flash compiled code directly to yo...

How to Use Ultrasonic Sensors
ECHO…echo…echo…echo… We’ve all had fun shouting into a cave or large space and hearing our voice coming back to us at some point during our childhood. And if you’re like me, a fully grown adult who...

Convert an Image to a Vector Graphic for Laser Cutting
Interested in creating designs to be laser cut? In this tutorial, we will learn how to use Gimp and Inkscape to convert a graphic image to a vector image that you can cut on a laser cutter! In order for the job control software to turn you...

Pico Armour - A 3D Printable Case for the Raspberry Pi Pico
A super quick article for those who just got their hands on the Raspberry Pi Pico and want to keep it safe and snug in a case. Either with a resin printer or fused filament printer both can produce excellent cases. It was very pleasant prot...

PiicoDev Motion Sensor MPU-6050 - Micro:bit Guide
Introduction This guide will help you read motion data from your PiicoDev® Motion Sensor and a Micro:bit. To follow along, it's best to have: A Micro:bit v2 A PiicoDev Motion Sensor MPU-6050 A PiicoDev adapter for Micro:bit ...

PiicoDev Pressure Sensor MS5637 - Raspberry Pi Guide
Introduction This guide will help you read barometric pressure data from your PiicoDev® Pressure Sensor with a Raspberry Pi single-board computer. To follow along, it's best to have: A Raspberry Pi (model 3, 4, Zero or Zero W)...

Setting up 8Bitdo Controllers in RetroPie
Hey there, are you loving the vintage gaming experience that is RetroPie? Wait, you haven’t heard of RetroPie. No! You’d better go and check out our Gaming Kit for RetroPie tutorial ASAP. Oh good, you now know the awesomeness t...

Wi-Fly with Feather Boards
I’ll level with you; the idea of microcontrollers and wireless networks was a little daunting to me initially. How on earth was I going to connect and control it with Wi-Fi?! But when I eventually I waded into the world of networking ...

Using Slicer for Fusion360 for Laser Cutting
Laser cutting is a very fast production and manufacturing method that has one limitation. You can only cut flat surfaces! Well don’t let that stop you from creating 3D objects and sculptures with a laser cutter, Fusion360 has a great ...

Detect Speed with a Raspberry Pi, Camera and OpenCV
[Update – Until there is correct compatibility of OPEN-CV with the new Raspberry Pi ‘Bullseye’ OS I highly recommend at this stage flashing and using the previous Raspberry Pi ‘Buster’ OS onto your Mi...

Pan-Tilt Hat with Raspberry Pi - Quick Start Guide
Pimironi Picade Pan-Tilt Hat lets you mount and control a pan-tilt module right on top of your Raspberry Pi palm-sized computer. Setting up a Pan and Tilt system has never been easier with absolutely no soldering required! Pe...

Waveshare 5.5 Inch AMOLED Screen for Raspberry Pi
Ever wanted a pocket computer with a Full HD screen (1080x1920)? Love tiny GPIO screens like this 3.5 Inch from Waveshare but want one that is a little bigger and higher resolution so that it is easier to read? Or want a really premi...

Plant_io Sensors Guide | Connect Sensors and Log Data
In the Plant_io Basic Setup Guide we assembled the Plant_io platform to automatically irrigate plants, and sprouted some seeds. As the project runs, a log file is updated with data captured at each interval. This simple log allows us ...

PiicoDev Precision Temperature Sensor TMP117 - Micro:bit Guide
Introduction This guide will help you read temperature data from your PiicoDev Precision Temperature Sensor and a Micro:bit. To follow along, it's best to have: A Micro:bit A PiicoDev Precision Temperature Sensor TMP117 A PiicoDev a...

PiicoDev Precision Temperature Sensor TMP117 - Raspberry Pi Pico Guide
Introduction This guide will help you read temperature data from your PiicoDev® Precision Temperature Sensor and a Raspberry Pi Pico To follow along, it's best to have: A Raspberry Pi Pico with pins sol...

PiicoDev Atmospheric Sensor BME280 - Micro:bit Guide
Introduction This guide will help you read weather data (Temperature, Air Pressure and Humidity) from your PiicoDev Atmospheric Sensor and a Micro:bit. To follow along, it's best to have: A Micro:bit v2 (v1 does not...

PiicoDev Buzzer Module - Raspberry Pi Guide
Introduction Let's play tones and melodies on a PiicoDev® Buzzer Module with a Raspberry Pi. This guide will cover connecting the hardware, running an example to make sure everything works, and playing simple melodies. To follow along...

3D Printed Case For Raspberry Pi Pico and PiicoDev Boards
Let me introduce a new 3D printable case for the Raspberry Pi Pico and the PiicoDev ecosystem. There are variants of the case, one which allows you to wall-mount the system and another variation that makes it possible to charge the dev...

PiicoDev Motion Sensor MPU-6050 - Raspberry Pi Guide
Introduction This guide will help you read motion data from your PiicoDev® Motion Sensor with a Raspberry Pi single-board computer. To follow along, it's best to have: A Raspberry Pi (model 3, 4, Zero or Zero W) This tutorial ...

How to Flash the Old 'Buster' Raspberry Pi OS to a Micro-SD
This will be a quick article showing the process to flash the legacy Raspberry Pi OS 'Buster' Debian 10 (or any previous OS iteration) to a Micro-SD card. With any exciting new Operating System (OS) release, there are always small ...

GlowBit Matrix 4x4 - Python and MicroPython Guide
Introduction This guide will cover the basic functionality of the GlowBit Python library when driving a GlowBit Matrix 4x4 module. To follow along, it's best to have: A GlowBit Matrix 4x4 A Raspberry Pi Pico ...

GlowBit Stick 1x8 - Python and MicroPython Guide
Introduction This guide will cover the basic functionality of the GlowBit Python library when driving a GlowBit Stick 1x8 module. To follow along, it's best to have: A GlowBit Stick 1x8 A Raspberry Pi Pico or...

How to Choose a Bluetooth Module For Your Project
Alright, so we know that Bluetooth is awesome, and if you don’t, take a read of our Introduction to Bluetooth tutorial. But how exactly do we go about implementing Bluetooth communication in our projects? Well, fortunately for us, th...
What Are NeoPixel LEDs?
So in case you haven’t heard yet, digital LEDs are the go-to solution for any project that uses RGB LEDs and you want to avoid the rat's nest that ensures when using multiple RGB LEDs, each colour requiring its own connectio...

How GPS Receivers work
GPS is accurate and handy to use, so much so that we rely on it more and more every day. It's not often we take the time to learn how it works. The idea of GPS refers to a Global Positioning System; a collection of satellites in orbit above...

PiicoDev Atmospheric Sensor BME280 - Raspberry Pi Guide
Introduction This guide will help you read weather data from your PiicoDev® Atmospheric Sensor and a Raspberry Pi single-board computer To follow along, it's best to have: A Raspberry Pi (model 3, 4, Zero ...

PiicoDev Atmospheric Sensor BME280 - Raspberry Pi Pico Guide
Introduction This guide will help you read atmospheric data from your PiicoDev® Atmospheric Sensor and a Raspberry Pi Pico To follow along, it's best to have: A Raspberry Pi Pico with pins soldered (pointing do...

PiicoDev Precision Temperature Sensor TMP117 - Raspberry Pi Guide
Introduction This guide will help you read temperature data from your PiicoDev® Precision Temperature Sensor and a Raspberry Pi single-board computer To follow along, it's best to have: A Raspberry Pi (model 3, 4, Zero or Zer...

PiicoDev RGB LED Module - Raspberry Pi Guide
Let's get started with the PiicoDev® 3x RGB LED Module. In this guide, we'll connect the LED Module to our Raspberry Pi Pico and get it working with some example code to display colourful patterns. To follow along, it's best to ...

Face and Movement Tracking Pan-Tilt System with Raspberry Pi and OpenCV
[Update – Until there is correct compatibility of OPEN-CV with the new Raspberry Pi ‘Bullseye’ OS I highly recommend at this stage flashing and using the previous Raspberry Pi ‘Buster’ OS ...

Capacitive Touch with Makey Makey
The Makey Makey introduces the concept of using everday objects like fruit, lead pencil drawings, play dough etc. to interact with your computer via USB. The Makey Makey acts like a HID device over USB, which means that it behaves just like...

Universal 2 Factor Authentication with Key-ID's USB Key
Before we dive into the FIDO Certified Key-ID Security Key and how it's used, let's get a handle on what authentication online means at the moment. Authentication is simply the process of identifying a user based on a set of unique factors...

How to Build an Arduino Library
Have you ever wanted to simplify or automate a task using an Arduino? Yes? Well, have you ever wanted to simplify the code required for that task into a neat collection of easy-to-use functions? Also yes? Then this tutorial is for you! In t...

Control Structures with Python
Welcome to the next step of comprehension for the fireball programming language of Python. This guide will provide you with tools to help aid conceptualisation of the control flow within your programming scripts. The control flow is th...

3D Printing Onto Fabrics
One of the swell things about 3D printers is being able to lay fabric onto a build plate and create components directly on top of or embedded with fabric material through them. This lets you easily sew designs onto clothes or create interes...

PiicoDev Capacitive Touch Sensor CAP1203 - Raspberry Pi Guide
Let's get started with the PiicoDev® Capacitive Touch Sensor. In this guide, we'll connect the PiicoDev Capacitive Touch Sensor to our Raspberry Pi and get it working with some example code to detect touch events. We'll also remix the c...

DIY Magnetic Encoder
The PiicoDev Magnetometer unlocks a lot of sensing abilities for your project. In this guide we'll walk through how to sense an angle with a small magnet and print the angle on a PiicoDev OLED. This guide covers what the sensor is r...

WiFi GlowBit Matrix Control with WLED and ESP32/ESP8266 Dev Boards – Make Pixel Art with No Code!
Nothing beats bright shiny colourful lights and adding an extra dimension only makes them better. This guide demonstrates the fastest and most customizable way to have WS2812B grids of fully addressable LED Nodes come alive. Exactly ...

Programming with USB-Serial Converters
Thanks to huge advancements in technology over the last decade, the maker community that we know and love has thrived. It’s now easier than ever before to get started with programming and tinkering due to the innovation from brands su...

Your First LoRaWAN Node on The Things Network
Note: With the rollout of TTNv3, the "Setup" section of this guide no longer works - but we're keeping it here for posterity. Let us know on our forums if you need help getting started with the new method. In the lasts article we looked at...

Hello World! First Python Script
Python is a powerhouse programming language capable of supporting you throughout all your programming adventures. Making exciting and unique code is just flashes of comprehension away. For those just starting, looking at the Python Pr...

Video Looper with Raspberry Pi 4 Model B
[Update: The OMXPlayer system, needed for the video looper, has been dropped with the recent 'Bullseye' Raspberry Pi OS. Updates are coming out fast and all the teething troubles from this new OS will be ironed out. For now, download and f...

GlowBit Matrix 8x8 - Python and MicroPython Guide
Introduction This guide will cover the basic functionality of the GlowBit Python library when driving a GlowBit Matrix 8x8 module. To follow along, it's best to have: A GlowBit Matrix 8x8 A Raspberry Pi Pico ...
Building a LoRaWAN Nano Gateway to The Things Network
Note: With the rollout of TTNv3, the "Setup" section of this guide no longer works - but we're keeping it here for posterity. Let us know on our forums if you need help getting started with the new method. warning: this is a "nano" gateway...

Python Rundown and Main Windows
This guide will be a rundown on Python, the open-source programming language built by the hugely intelligent Guido van Rossum. This guide will also contain external links to Python resources and download links. Programming is...

Raspberry Pi High Quality Camera – First Pictures and Videos
[Note - Terminal Commands talked about here have been superseded with the new 'Bullseye' Raspberry Pi OS. Link here for new 'Bullseye' camera commands. If you want to use the commands found on this page download and flash the old 'Bu...

PiicoDev Colour Sensor VEML6040 - Raspberry Pi Guide
Introduction Let's read colour data from a PiicoDev® Colour Sensor with a Raspberry Pi and create a colour sorting machine. This guide will cover connecting the hardware, downloading some example code and remixing it. To follow along,...

Makerverse Real Time Clock with Supercapacitor Backup - Raspberry Pi Pico Guide
Introduction This guide covers the basic use of the Makerverse Supercap Real Time clock on the Raspberry Pi Pico using our RV3028 MicroPython module. The MicroPython module implements some commonly used features of the RV3028 RTC but is no...

Dual-Coloured 3D Printing
The eternal question of ‘does it print in more colours?’ is often one of the most common community desires. And yes you can! One of the best ways that this need is delivered is through dual-extrusion printing. Dual-extrusion pri...

Setting Up Hyperbian – Ambient Lighting with your Screen
Break your television and monitors free from the confines of their edges with Hyperbian! This is an open-source ambient light software that will improve the way you enjoy your favourite media. Hyperion for the Raspberry Pi ∴ Hy...

4G and GPS HAT For Raspberry Pi - Waveshare SIM7600X
Love your Raspberry Pi but wish it had even more connectivity akin to your mobile phone. Then the Waveshare 4G HAT is the solution for you! HAT simply means Hardware attached On Top. With this installed on your Raspberry Pi Single Board Co...

Setting up and Using the Adafruit 16-Channel Servo HAT for Raspberry Pi
This guide will teach you how to control up to 992 5V Servos through the GPIO pins on your Raspberry Pi! But more practically, without stacking multiple HATS (Hardware Attached on Top), this guide will teach exactly how to control sixt...
")
DIY 10W Bluetooth Speaker - No Code Needed – How to use a Bluetooth 4.2 Audio Receiver Board with Onboard Amplifier (MH-M38)
Let's turn it up to 11! Today we are getting right into Bluetooth Audio Receivers in particular the MH-M38. The MH-M38 is a stereo audio receiver with loudspeaker outputs (and an inbuilt amplifier) that can play music from a smartphone/com...

Our Arduino SPI Tutorial
SPI stands for Serial Peripheral Interface and it is a way to send data between microcontrollers and other small devices. It is a synchronous data bus, meaning it uses a clock to regulate the data transfer. SPI is also Full-Duplex com...

Improving Results with Transparent Filament
Fused filament fabrication and transparent prints! No, surely you mean SLA prints. And true you can get excellent transparent prints effectively using SLA however consumer-grade fused filament fabrication can be mistaken for glass when corr...

Pycom GPy Getting Started
warning: Pycom has updated their libraries and the code listed below may not work. If you discover this and find a fix, please post it on our forum and we'll send you a $25 store credit along with a huge thank you. Go to Forum Thread. ...

Face Recognition With Raspberry Pi and OpenCV
[Update – Until there is correct compatibility of OPEN-CV with the new Raspberry Pi ‘Bullseye’ OS I highly recommend at this stage flashing and using the previous Raspberry Pi ‘Buster’ OS onto your Mi...

Object and Animal Recognition With Raspberry Pi and OpenCV
[Update – Until there is correct compatibility of OPEN-CV with the new Raspberry Pi ‘Bullseye’ OS I highly recommend at this stage flashing and using the previous Raspberry Pi ‘Buster’ OS onto yo...

Pose Estimation and Face Landmark Tracking with Raspberry Pi and OpenCV
[Update – Until there is correct compatibility of OPEN-CV with the new Raspberry Pi ‘Bullseye’ OS I highly recommend at this stage flashing and using the previous Raspberry Pi ‘Buster’ OS onto yo...

Optimal Layer Exposure Time for Perfect Resin Prints
Layer Exposure Time is the crucial parameter that when dialed in will change average 3D resin printed components into awesome, crispy, final results that capture every single detail of the CAD model. As a general rule for Normal Layer ...

Real Time Scanning and Storing QR Codes With Raspberry Pi and OpenCV
[Update – Until there is correct compatibility of OPEN-CV with the new Raspberry Pi ‘Bullseye’ OS I highly recommend at this stage flashing and using the previous Raspberry Pi ‘Buster’ OS ...

Makerverse Motor Driver, 2 Channel - Application Guide
Introduction The Makerverse Motor Driver has been updated to a v20 design which now features a 5V output pin instead of the VM pin. Some images and in-video descriptions in this guide may be outdated This guide covers the use of the Maker...

PiicoDev OLED Module SSD1306 - Raspberry Pi Guide
Let's get started with the PiicoDev® OLED Module SSD1306. In this guide, we'll connect the PiicoDev OLED to our Raspberry Pi and get it working with some example code to display text, shapes, and animations. To follo...

Hand Recognition and Finger Identification with Raspberry Pi and OpenCV
[Update – Until there is correct compatibility of OPEN-CV with the new Raspberry Pi ‘Bullseye’ OS I highly recommend at this stage flashing and using the previous Raspberry Pi ‘Buster’ OS onto y...

Assemble a goBILDA Outlaw Chassis Kit - Plus Raspberry Pi and 8BitDo Control!
If you want a high-end robotics platform that is easy to expand with it does not get better than goBILDA! GoBILDA is a complete build system designed for makers, students, and educators. From curated kits, to many structural alum...

Lightning Sensor with a Raspberry Pi Single Board Computer - 40 KM RADIUS RANGE!
What if I told you that you could have the power to detect a lightning strike from 40km away? You'd probably think I've gone mad watching too many Marvel movies. But it is true! All thanks to the DFRobot Gravity: Lightning Sensor. Accessib...

Infinity Mirror Kit V2 - Assembly and Tutorials
The Infinity Mirror Kit V2 is a desktop display that creates a dazzling optical illusion - a tunnel of light that tears through space! The Infinity Mirror Kit V2 entered production in October 2018, and now ships with an Adaf...

MicroPython Board Comparison
Welcome to the benchmarking arena! We are going to put eleven microcontrollers to the test and see how they hold up against a set of fiendish tasks that we devised to push them beyond their limits. We chose most of our candidates based on t...

Makerverse Load Cell Kit Guide | Measure Weights and Forces
Introduction Welcome to the guide for the Makerverse Load Cell kit. With this hardware you will be able to make a set of scales capable of measuring weights up to 3kg with a precision as low as 0.1g! To follow along you will need: ...

How to use Force Sensitive Resistors with a Raspberry Pi and a ADS1015 ADC
Force-sensitive resistors (FSR) are remarkable electrical components and are proper unsung heroes in the Makers World. Name me a better variable touch input device which has basically no moving parts, all whilst being available in such a t...

Raspberry Pi Workshop for Beginners
Welcome to the Raspberry Pi Workshop for Beginners! Here you'll be able to follow along with our series of bite-sized videos that cover everything you'll need to know to get started with your Raspberry Pi, and start making awesome project...

Python Workshop for Beginners
Welcome to the Python Workshop, where you will learn everything you need to hit the ground running with the worlds most popular programming language Python. My name is Tim and am a passionate maker and cherish free exchange of knowledge. I ...

How to Build Internet-Connected Electronics Projects
What do we mean when we talk about the "Internet of Things"? Mostly we're talking about tiny computers that have access to the internet and do some useful work. Unlike the computers we're used to holding in our hands, they don't have a touc...
")
Set Up a Geophone with a Raspberry Pi and an ADC (ADS1115)
Geophones are devices that generate electric signals proportional to the particle velocity in a sound/compression wave. More simply a Geophone is a super low frequency microphone for the ground. Geophones are used around the world to measu...

How to use Stepper Motors and DC Motors with a Raspberry Pi - Adafruit DC & Stepper Motor HAT
This guide will demonstrate exactly how to control Standard Stepper Motors and DC Motors with a Raspberry Pi Single-Board Computer. To do this as seamlessly as possible we will utilise a HAT. HAT stands for Hardware Attached on Top. HAT bo...
")
How to use a RTC With an Arduino UNO R3 to Create an Accurate Clock (LCD Screen and Nixie Tubes)
Today we're pulling out the breadboard, getting up and running with an RTC module then finishing up by making ourselves a clock that will keep the correct time even when we pull the plug. To achieve this we will be combining three main com...

Control Multiple Fully-Addressable WS2812B RGB LED Strips with a Raspberry Pi Single Board Computer
This is an update to an older guide done so that we can provide you with the fastest, most modern, and best way to set up your system. Nothing beats bright shiny colourful lights and this guide demonstrates the fastest and most customizab...

How to use a PiRelay HAT for Raspberry Pi - Multiple Relay Control with Voice or GUI
This guide will teach you exactly how to use a Raspberry Pi Single Board Computer to independently control 4 relays. A Relay is an electrically operated switch. This is all possible thanks to the PiRelay V2 HAT from SB Components. These re...

Control Large GoBILDA DC Motors With a Raspberry Pi - Pololu Motoron HAT
This guide will demonstrate exactly how to control any large DC Motors that we stock with a Raspberry Pi Single Board Computer, through code or through a Bluetooth Controller. To clarify (in my mind) a large DC Motors runs at 12+ Volt...

How to make a Raspberry Pi NAS - A NAS-Berry that Runs Open Media Vault
Welcome to the best article on setting up an OpenMediaVault-based NAS on a Raspberry Pi Single Board Computer! This guide is the fastest and best way to go about it. Raspberry Pi single-board computers are purpose-built to run 24/7, with a...
")
Zero To Maker Workshop | Fab Academy (Our Experience)
Welcome to 'Zero to Maker,' a workshop that will walk through and introduce a ton of tools and skills to help Makers of all skill levels! In this series, Jaryd and Liam will be completing projects as a part of the 2024 Fab Academy and...

C Programming for Makers
Welcome to the C Programming Workshop for Makers! Here you'll be able to follow along with our series of easily digestible videos that cover everything you'll need to know to on your way with C programming and start making awesome projects....

433mHz Radio connected pool thermometer
I was wanting to know what the water temperature was without having to physically go and check and I was curious about how warm the water would get during a sunny day and how much heat was lost overnight. I am interested in the idea of home...

Raspberry Pi Steam Link
Turn Your Raspberry Pi into a Steam Link Sometimes Retropie just isn’t enough to get the best possible gaming experience with the Raspberry Pi. I originally purchased the Raspberry Pi 3B+ so that I could install Retropie and Kodi to ...

The Great Doorbell Hack
Do you want a quick, easy, cheap RF remote control for your Raspberry Pi projects? Well, look no further than the front door! As you've probably got a half-duplex RF setup you've never considered using in a project before. Try this simple h...

House Power and Solar Monitor
I’ve had a Current Cost Power Monitor for a number of years which worked well until we put solar on the roof. The Current Cost can’t determine which direction the power is flowing and so power generation and con...
I’ve had a Current Cost Power Monitor for a number of years which worked well until we put solar on the roof. The Current Cost can’t determine which direction the power is flowing and so power generation and con...

p0wer - Control mains outlets over wifi.
As part of a larger home automation project, I wanted the ability to control some mains power outlets remotely. To achieve this, I interfaced the transmitter from an inexpensive 433MHz mains remote control kit with a raspberry pi zero w (vi...

Smart Watering System
Introduction This began as an idea after building a very basic single-channel unit. Commercial smart watering systems use a Wifi connection to the internet and get weather reports to determine the level of watering required. These systems...

littleBits Death Eater Skull!
Remote Controls are magical enough to recreate this awesome Death Eater Skull. You can switch it on from across the room and make it glow an evil green! Jake and Nathan built this invention at a littleBits Workshop down at the Core Electron...

Quadbeest - A Flying Strandbeest
Introducing to you today, the Quadbeest, the next evolutionary step in the Strandbeest genealogy. It seemed to be about time for Strandbeests to evolve to take over the air, so I made it happen. Able to be controlled over a kilometre in the...

PiicoDev Schematic System
Introduction: Hi everybody. Over the past few weeks, I have been working on an intuitive system that makes working and tinkering with the Piicodev ecosystem even easier! Everybody interested in electronics knows about the universal circui...

IR Break-Beam Stopwatch
This project is a simple stopwatch with a little bit of a twist! It operates like a conventional stopwatch… you can start and stop it, you can record lap times and you can review the lap times once you hit stop. The twist is th...

Mini NES Style Game Console with Raspberry Pi
My son really wanted one of the mini NES when they were released, however he missed out. I already knew that you could use a raspberry pi as an arcade emulator, so I thought why not build him one.
I grew up playing old arcade machi...
I grew up playing old arcade machi...

Concrete Lamp
The concrete body of the lamp (which, to my eye look a bit like a leek) is made is two halves. The 1st and 2nd halves are cast in 2 steps using the same mould twice. I had a few failed attempts at making the mould entirely from sta...
The concrete body of the lamp (which, to my eye look a bit like a leek) is made is two halves. The 1st and 2nd halves are cast in 2 steps using the same mould twice. I had a few failed attempts at making the mould entirely from sta...

YouTube Desktop Notifier
Do you get nightmares of losing your YouTube Subscribers? If you do, you are not the only one. Luckily I have made this "YouTube Desktop Notifier" to keep me up-to-date with my channels Subscriber and View Counts. This very simple DIY ...

DHT 22 Thermometer
This thermometer idea came to me when my little sister asked me “Vince, what’s the temperature?” Answering I said, “Well, I’ll look it up.” So I looked it up but that wasn’t enough for her, This con...

Retro Gaming Station
Hey, My son is turning 1 and I wanted to setup a retro gaming station for him to learn to game through the ages. I went with RetroPie as it is well documented and supports a range of emulators - and it's easy to setup.My RetroPie Gaming Ki...

My ghostbusters proton pack
Hi all. Thought I'd share with you my modded Spirit Halloween proton pack. It's about 80% scale, which is plenty big enough for my 7-year-old son, and still looks decently sized on adults. As soon as I learned of this pack, 5-year-old me ju...

Raspberry Pi Rain Radar and Weather Display
[Update – Until there is correct compatibility of NPM with the new Raspberry Pi ‘Bullseye’ OS I highly recommend at this stage flashing and using the previous Raspberry Pi ‘Buster’ OS onto your Micro-...

Roverling
Introduction
My first 3D printer was a CTC generation 2 clone of MakerBot ‘The Replicator Dual’, circa 2012. It died a little while back and has since been replaced ...

Meet 'Holman' the Ultimate Bluetooth Speaker
Who says you can't have it all? Good looks and a great sound! My name is 'Holman" and I'm a Bluetooth speaker in the form of mans best friend - a dog of course! Why is my name Holman? Well, that's the name of the manufacturer of the PVC pi...

The Euclidean
I'm an amateur musician but a pretty serious classical & jazz pianist, and this project arose out of my interest in exploring the difference between writing music for synthesisers and music for piano. I work as a mathematician, so...

Racing Simulator Motion Platform
Hi. My son and I have made our first Racing Simulator Motion Platform. It has been a challenge but we now have a playable situtationIt has been a long journey, starting off with info from the great people at www.xsimulator.net and a lot of ...

Water Tank Level Sensor
Update: Community member Chris has had a go at remaking this project after the original project contributor Denver made the original code repository private. GitHub links below will not work but the original project has been kept here for...

Wefted Waveforms
This project aims to fuse neopixel strips with papier mache and origami into a free-standing electro-sculpture. The freestanding structure is formed from wire mesh and papier mache. It is then painted and wired up with strips of LEDs conne...

Rain Gauge Data Logger
Summary A Raspberry Pi 3B is used to collect digital counts from an electronic rain gauge (1mm of rain per reed switch closure by magnetic see-saw). It has been running without issues for over 12 months. A UPS powers the Pi so it is immune...
 Weather and Air Quality Station - Full Dashboard (DataCake + TTN), Rain-Proof and Long Range")
Raspberry Pi Pico Long Range Radio (LoRa) Weather and Air Quality Station - Full Dashboard (DataCake + TTN), Rain-Proof and Long Range
Have you ever wanted to make a Weatherproof Weather and Air Quality System that transmits its edge-collected data long-range through LoRa (up to a 10Km range) and then have that data automatically uploaded to the Internet to be gorgeously ...

mmPi-Pico HAT
I use a Raspberry Pi running EmonCms for collecting sensor data and controlling devices around the home but several things have been on my To-Do list to enhance its functionality. A Shutdown/Power Down/Startup circuit. Proportional fan...

Micro:bit based GlowBit Car
I made this car because at school there was a Lego We-Do tug-of-war competition but the cars only drove backward and I wanted to make a car that can turn and drive forwards. If you make this car don't throw away the chassis box because I ...

Environment Monitor - V2
This project started due to the smoke haze that enveloped our area during the 2019 and 2020 bushfires. I wanted something to check the air quality of my home and maybe find areas where it needed better sealing. In addition, the BMP280 senso...

Robot Arm Upgrade Project
This project has been a long and tricky one for me, I purchased my robot arm kit from Jaycar many years ago with the intention of controlling it from the start. I used to work with industrial robots, so when I saw this robot kit for sale I...

Hydra Bluetooth Speaker
Wow - this is one monstrous sounding and great looking speaker - even if I do say so myself! This is basically a 2.1 (stereo + subwoofer) system made with 3D plastic parts. Both the full range and subwoofer speakers are based on closed (se...

Kid’s Music Box
I want to make a portable music box that my 2 year old kid can operate intuitively on her own. So, Spotify or any other on-demand music platform with tablets and Bluetooth speakers are out of the question. Remember the good old days of putt...

Mini Desk Vacuum
Chances are if you are anything like me, being a maker is often an excuse to create as big of a mess as possible during the duration of a project. And after the project is finished? You are left with an enormous mess to clean up, taking awa...

WhyzaGC - Feather ESP32 addon to the MightyOhm Gieger Counter
This project is about adding a wireless Adafruit Feather HUZZAH ESP8266 or ESP32 v2 with Adafruit Featherwing 128x64 OLED to interface with the self-assembled MightyOhm Geiger Kit.
Introduction
I am always on ...Introduction
I am always on ...")
Time lapsing in OctoPrint (Properly!)
Now that we have decked out our Lulzbot Taz 6 3D Printer with a really nice looking acrylic enclosure, I'm just about ready to turn on some serious 3D printing work. But before I dive into that endless pool of fun, it's a good time to take ...

Circadian Lighting
After experimenting with automatic blue light filters on my electronic devices I wanted to replicate the idea with the lighting around the house so that it would gradually transition to warmer colours as the night progresses. I believe this...

Roverling Mk.ⅠⅠ
Introduction
A few months back I created a basic mobile platform using parts from an old 3D printer. It was fun but not very practical. I designed Roverling Mark II so I could experi...
Borg Cube for Scouts STEM Camp
Introduction
What does one make for a Startrek-themed STEM camp for Scouts? Especially when given the Search and Rescue (SAR) activity base to run. Why this base you ask? Usually I run a radio d...Introduction
What does one make for a Startrek-themed STEM camp for Scouts? Especially when given the Search and Rescue (SAR) activity base to run. Why this base you ask? Usually I run a radio d...
PowerPlay SSR Control
Introduction
The aim of PowerPlay is to provide an Arduino platform for managing downstream Solid State Relays (SSR) simply and safely. PowerPlay consists of a custom Arduino Shield, ...
LoRa P2P Wireless Gate Alarm
Introduction
My front gate is a long way from the house at around 300m. I don’t want people wandering around my property without knowing about it. This project uses two Raspberry Pi P...

3D-Printed GPS Speedometer
Introduction
I wanted a GPS speedometer that is portable, robust, and looks okay. I had been messing around with 3D printing and exploring GPS modules for a few years and wanted...

IoT Soundscape
I had been captivated by the sound levels of trains I could hear passing by Metford throughout the day/night. I wondered if a sound level sensor reporting data back over LoRa would help me understand when a train was noisy. I also like the ...


Makers love reviews as much as you do, please follow this link to review the products you have purchased.