This guide will help you get started with a PiicoDev 3-Axis Accelerometer. We'll walk through some examples to read acceleration, infer tilt angle (from gravity), and detect tapping and shaking.
An accelerometer is a device that measures acceleration. They're used in Engineering - to measure vibration in cars, buildings, machines. Really high-end accelerometers are used in navigation, and most smartphones contain an accelerometer to keep the display upright when the screen is rotated. Now the effects of gravity on an object are indistinguishable from acceleration, which means an accelerometer at rest on the surface of the Earth will measure a total acceleration of about 9.8 m/s² (1 g) upwards, while an accelerometer in freefall will measure zero.
The PiicoDev accelerometer is a 3-axis device that measures acceleration separately in three orthogonal axes. This is useful because we can analyse these three acceleration components to determine the direction of acceleration; or tilt-angle for a stationary accelerometer.
Hardware and Connections
To follow along you'll need:
- A Raspberry Pi Pico (with Soldered Headers)
- A PiicoDev 3-Axis Accelerometer LIS3DH
- A PiicoDev Expansion Board for Raspberry Pi Pico
- A PiicoDev Cable
- (Optional) A PiicoDev Platform will keep everything mounted securely.
Plug your Pico into the expansion board. Make sure it is plugged in the correct orientation - Pin 0 on the expansion board should be to the left of the Pico's USB connector.
Connect your Accelerometer to the expansion board with a PiicoDev Cable.


To follow along you'll need:
- A Raspberry Pi single board computer (Pictured: Raspberry Pi 4 Model B)
- A PiicoDev 3-Axis Accelerometer LIS3DH
- A PiicoDev Adapter for Raspberry Pi
- A PiicoDev Cable (100mm or longer is best for Raspberry Pi)
- (Optional) A PiicoDev Platform will keep everything mounted securely.
Mount the Adapter onto your Pi's GPIO. Make sure it is plugged in the correct orientation - An arrow on the Adapter will point to the Pi's Ethernet connector (on a Pi 3 the Ethernet connector and USB ports are swapped.)
Connect your Accelerometer to the Adapter with a PiicoDev Cable.


To follow along you'll need:
- A micro:bit v2
- A PiicoDev 3-Axis Accelerometer LIS3DH
- A PiicoDev Adapter for micro:bit
- A PiicoDev Cable
- (Optional) A PiicoDev Platform will keep everything mounted securely.
Plug your micro:bit into the Adapter, making sure the buttons on the micro:bit are facing up.
Connect your Accelerometer to the Adapter with a PiicoDev Cable.


Setup Thonny
Download / Install PiicoDev Modules
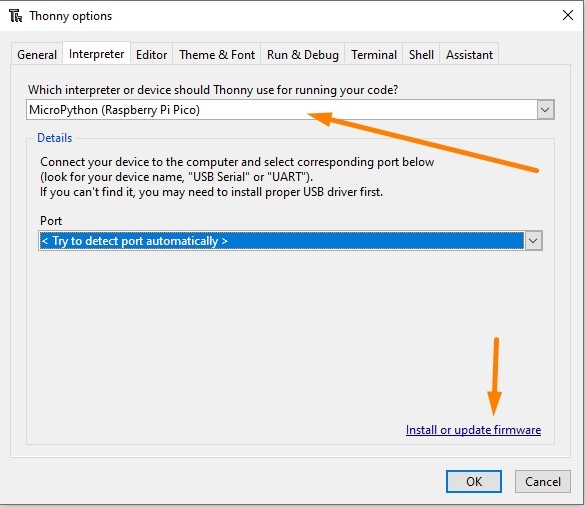
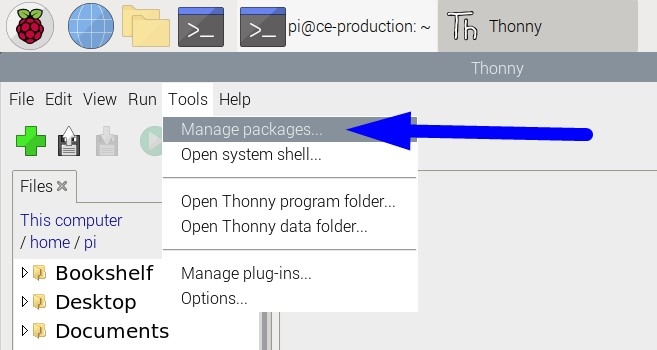
To work with PiicoDev hardware, we need to download some drivers. The drivers provide all the functions to easily connect and communicate with PiicoDev hardware. Select your dev board from the options above.
We will need these files to easily drive the PiicoDev 3-Axis Accelerometer:
- Save the following files to your preferred coding directory - In this tutorial, we save to My Documents > PiicoDev.
- Download the PiicoDev Unified Library: PiicoDev_Unified.py (right-click, "save link as").
- Download the device module: PiicoDev_LIS3DH.py (right-click, "save link as")
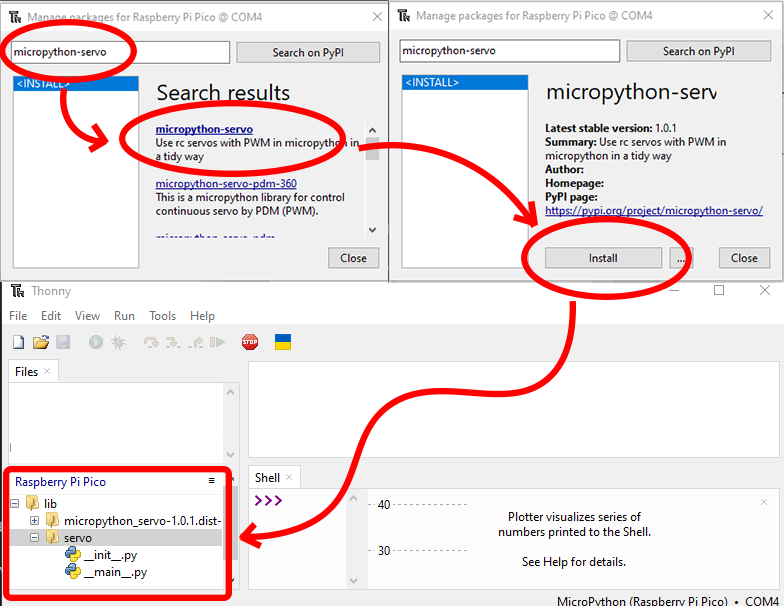
- Upload the files to your Pico. This process was covered in the Setup Thonny section.
The PiicoDev Unified Library is responsible for communicating with PiicoDev hardware, and the device module contains functions for driving specific PiicoDev devices.
We will need these files to easily drive the PiicoDev 3-Axis Accelerometer:
- Save the following files to your preferred coding directory - In this tutorial, we save to My Documents > PiicoDev.
- Download the PiicoDev Unified Library: PiicoDev_Unified.py (right-click, "save link as").
- Download the device module: PiicoDev_LIS3DH.py (right-click, "save link as")
- Upload the files to your micro:bit. This process was covered in the Setup Thonny section.
The PiicoDev Unified Library is responsible for communicating with PiicoDev hardware, and the device module contains functions for driving specific PiicoDev devices.
Example - Read Acceleration
We're ready to begin reading data! The following example reads acceleration data and prints it to the shell. Acceleration is read from each axis and displayed in m/s².
"""
PiicoDev Accelerometer LIS3DH
Simple example to read acceleration data
"""

from PiicoDev_LIS3DH import PiicoDev_LIS3DH
from PiicoDev_Unified import sleep_ms # cross-platform compatible sleep function

motion = PiicoDev_LIS3DH() # Initialise the accelerometer
motion.range = 2 # Set the range to +-2g

while True:
    x, y, z = motion.acceleration
    x = round(x,2) # round data for a nicer-looking print()
    y = round(y,2)
    z = round(z,2)
    myString = "X: " + str(x) + ", Y: " + str(y) + ", Z: " + str(z) # build a string of data
    print(myString)

    sleep_ms(100)
Experiment with tilting the accelerometer and observe how the readings from each axis change: Laying the accelerometer flat on a level surface will point the z-axis directly up. Data on this axis ought to be pretty close to 9.8 m/s². Since the x- and y-axes are parallel to the floor, they are experiencing no inertial forces and ought to read pretty close to zero. Rotate the accelerometer so the y-axis points up and observe how the data/plot changes. This is the first transition labelled in the plot below.
What happens when you shake the accelerometer? Can you excite a single axis at a time?
Example - Read Angle
In the last example we read raw accelerometer data from each axis. Did you know it's possible to infer a tilt-angle from the data? There's a bit of math happening behind the scenes, but briefly, you can combine data from two axes (eg. x and z) to read the tilt around the third (in this case, y). For this, we'll use the .angle property. The following example reads three axes of tilt and prints the rotation of the y axis (as per the Right-Hand Rule).
"""
PiicoDev Accelerometer LIS3DH
Simple example to infer tilt-angle from acceleration data
"""

from PiicoDev_LIS3DH import PiicoDev_LIS3DH
from PiicoDev_Unified import sleep_ms # cross-platform compatible sleep function

motion = PiicoDev_LIS3DH()

while True:
    x, y, z = motion.angle # Tilt could be measured with respect to three different axes
    print("Angle: {:.0f}°".format(y)) # Print the angle of rotation around the y-axis
    sleep_ms(50)
Imagine you had the accelerometer sitting flat on a desk, with the z-axis facing up. There is no way to accurately measure rotation about the z-axis, since the x- and y-axes are parallel to the floor and both are measuring about 0m/s². It only really makes sense to use the .angle property for an axis that is perpendicular to the direction of inertial forces (gravity).
Example - Detect Tapping
The .tapped property will allow you to detect single or double-taps.
To tap detection is configured with the .set_tap() function. The following example configures single-tap detection with a threshold of 40. The first argument is the tap-number (1 for single; 2 for double). Depending on your application, you may want to tune this threshold to be more sensitive (tapping far away from the sensor) or less sensitive (reject spurious tap events).
"""
PiicoDev Accelerometer LIS3DH
Simple example to configure single-tap detection.
"""
from PiicoDev_LIS3DH import PiicoDev_LIS3DH
from PiicoDev_Unified import sleep_ms # cross-platform compatible sleep function

motion = PiicoDev_LIS3DH()
motion.set_tap(1, threshold=40) # set up single-tap detection with a tap threshold of 40

while True:
    if motion.tapped:
        print(1)
    else:
        print(0)

    sleep_ms(200)
Double taps can be a little trickier to configure - we've tried to pre-tune double-tap detection to work well by default, so you should just be able to call .set_tap(2) to detect tapping directly onto the accelerometer. If you wish to delve deeper, other parameters you can modify when calling .set_tap() are:
- threshold=40 (default). How strong a tap needs to be.
- time_limit=10 (default). The maximum time a tap may be above the threshold.
- latency=80 (default). The 'dead-time' between the taps.
- window=255 (default). The maximum time window for a double-tap.
For more information, refer to the LIS3DH Application Note.
Example - Detect Shaking
While a tap is a short, sharp acceleration - a shake is a more sustained action. Detect shakes by calling the .shake() function.
"""
Shake-detection example
shake() can be called without any arguments, but has the following parameters should you need them:
    shake_threshold = 15 (default. Should not be less than 10)
    avg_count = 40 (default)
    total_delay = 100 (default)

"""
from PiicoDev_LIS3DH import PiicoDev_LIS3DH
from PiicoDev_Unified import sleep_ms

motion = PiicoDev_LIS3DH() # Initialise the accelerometer

while True:
    if motion.shake(threshold=15):
        print("shaken!")
    else:
        print("")
    # shake() is blocking, so can be used instead of sleep_ms() to delay a loop.
The .shake() function is tunable with the following parameters:
- threshold=15 (default). How strong the shaking needs to be
- avg_count=40 (default). How many samples to average
- total_delay=100 (default). The total time during which to sample for shaking.
Configure Range and Data-Rate
It is possible to modify the measurement range and data rate of the PiicoDev 3-Axis Accelerometer. You may need to do this if your project is measuring large shocks or bumps.
Range: Defaults to ±2 g. Use the range argument to select ±4, ±8 or ±16 during initialisation.
Rate: Defaults to 400 Hz. Use the rate argument to select from 1, 10, 25, 50, 100, 200, or 400 Hz during initialisation. (rate=0 will shut down the accelerometer)
For example:
motion = PiicoDev_LIS3DH(range=4, rate=100) # set the range to 4g and rate to 100Hz during initialisation
You can also update these parameters at any time, as follows:
motion = PiicoDev_LIS3DH() # Initialise with defaults

motion.range = 8 # set the range to +-8g

motion.rate = 200 # set the data rate to 200Hz
Connecting Multiple Devices
The PiicoDev 3-Axis Accelerometer has two possible addresses - set by the Address SWitch labelled ASW. That means up to two Accelerometers can share a PiicoDev I2C bus, each with address;
- 0x19 (ASW Off, default)
- 0x18 (ASW On)
You don't have to remember these numbers though - Just initialise each device separately as follows using the asw argument to encode the state of the switch (0:Off, 1:On). If you prefer to be explicit, you can use the address argument instead which accepts the exact I2C address.
# Initialise two devices, A and B
accelerometer_A = PiicoDev_LIS3DH(asw=0) # initialise the first device with ASW: OFF
accelerometer_B = PiicoDev_LIS3DH(asw=1) # initialise the first device with ASW: ON

# Or be explicit about the I2C address, if you prefer
# accelerometer_A = PiicoDev_LIS3DH(address=0x19) # initialise the first device with ASW: OFF
# accelerometer_B = PiicoDev_LIS3DH(address=0x18) # initialise the first device with ASW: ON

# Now each device can be read independently
xA, yA, zA = accelerometer_A.acceleration
xB, yB, zB = accelerometer_B.acceleration
Conclusion
We can see that simple acceleration measurements can be expanded to provide great utility in a project. From measuring angles to detecting tapping or shaking, accelerometers are pretty versatile instruments.
From here you can make all sorts of useful projects, like a digital spirit level that can indicate whether a surface is level or not. Perhaps a tilt-controlled game, or a locked box that only opens when knocked on in the right pattern.
If you have some questions, or would like to share anything you create then open the discussion below!
Happy Making!


