Introduction
Welcome to the guide for the Makerverse Audio Kit. This kit will allow you to build a music player, a musical keyboard, and a sound effect soundboard!
To follow along you will need:
- The Makerverse Audio Kit
- The Makerverse Essentials Kit
- A soldering iron
- A computer capable of running Thonny (a desktop, laptop, or Raspberry Pi)
- A USB SD card adapter
Kit Contents
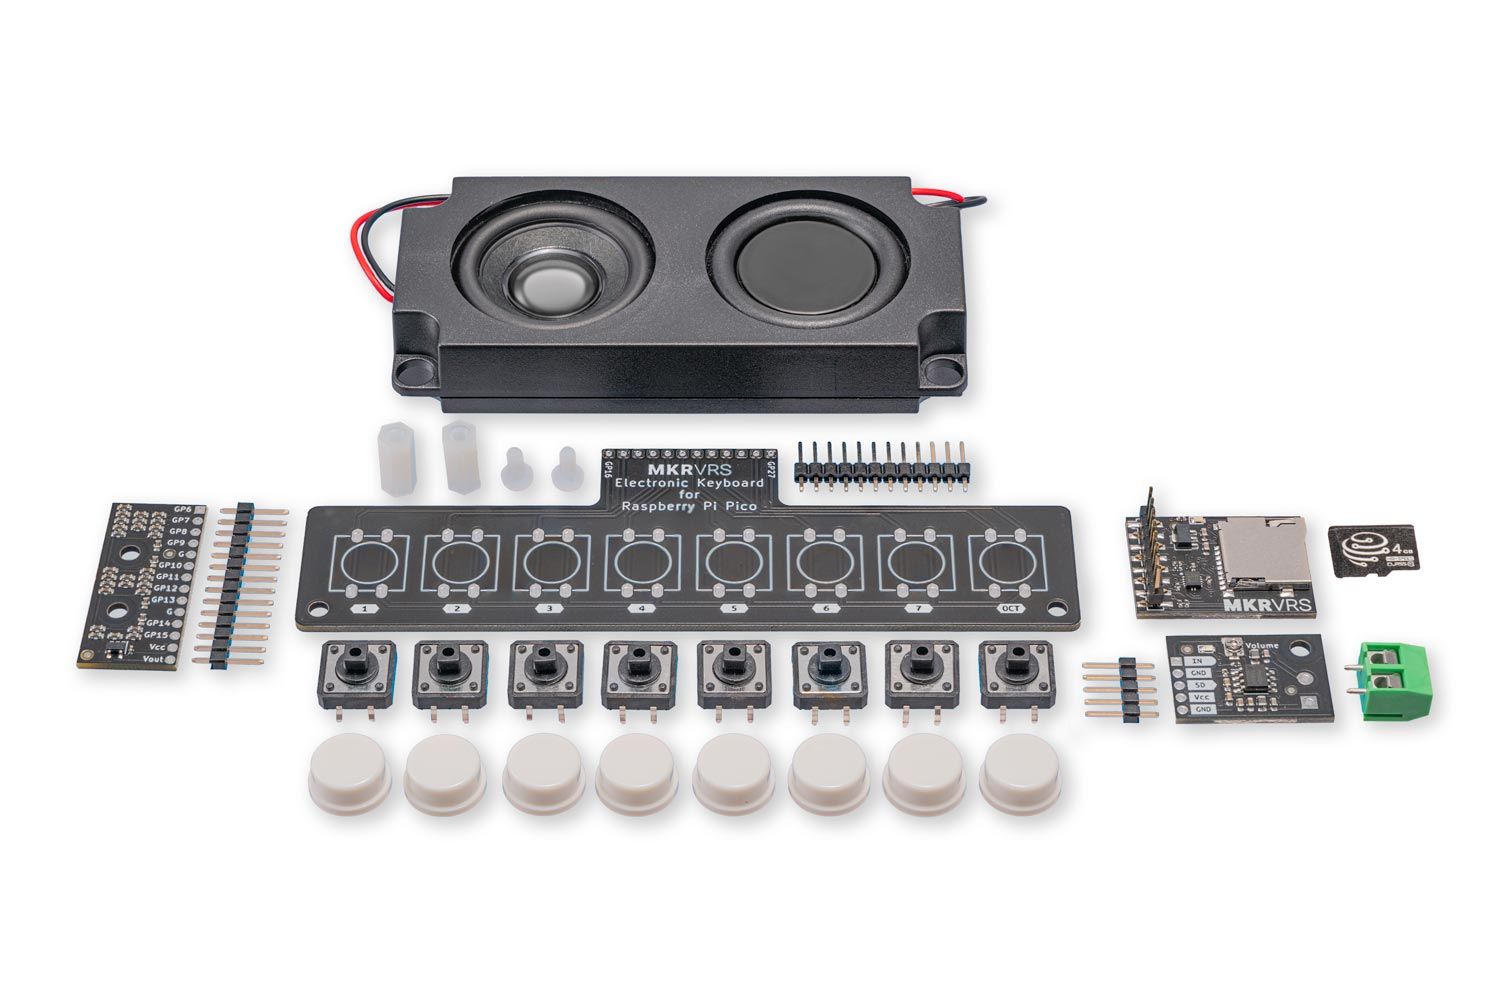
Inside the Makerverse Audio Kit you will find:
- A Makerverse R2R DAC
- The module that converts a digital signal to an analog voltage
- A Makerverse Electronic Keyboard for Raspberry Pi Pico
- An array of eight tactile switches
- A Makerverse PAM8302A Class D Audio Amplifier
- The module that drives power into the speaker
- A Makerverse MicroSD Card Module
- Allows for connection of a micro SD card to a microcontroller
- A length of lead-free solder
- For making permanent electrical connections with a soldering iron
- An Enclosed speaker - 45 x 100mm
- A 4GB MicroSD Card with a full-sized SD card adapter
From the Makerverse Essentials Kit you will need:
- The breadboard
- The Raspberry Pi Pico
- Several male-male jumper wires
- The screwdriver
Assembling Modules
Of the included modules the following soldering assembly is required:
Makerverse R2R DAC
The 14-pin header inserts from the bottom side of the circuit board and is soldered on the top side. The pins on the pin header are held together with a black plastic spacer, be sure to have this on the bottom side of the board, with the shorter pins inserted in the holes.
To aid in soldering a small ball of office putty can be used to hold the module still on your work surface and keep the header aligned square to the PCB while soldering the first joint.

Makerverse Electronics Keyboard for Raspberry Pi Pico
The following order is suggested for assembly of the keyboard module:
- Gently tighten the nylon screws and standoffs into the two mounting holes. Each screw can be inserted from the top side and held in place with a finger while the standoff is screwed on. Be careful not to over-tighten, as this will damage the screw threads.
- Insert the 12-pin header from the bottom side and solder it in place. When placed on your workbench the standoffs are approximately the right height to let the header sit square to the PCB, making soldering easier. Again, a lump of office putty can be used to hold the header still during soldering.
- Insert the eight tactile switches from the top side. These snap into place and sit flush with the circuit board surface. Sometimes the pins are slightly bent and require bending back before they will insert smoothly. Solder all 32 pins.
- Click on the 8 white button caps for a clean finish and comfortable button feel.

Makerverse PAM8302A Class D Audio Amplifier
Finishing off the assembly list is the audio amplifier module. Start by soldering the 5-pin header, inserting it from the bottom side, then insert the screw terminal from the top side and solder in place.

All of the required parts (including solder!) are included in the kit box while a soldering iron can be purchased separately.
Once the screw terminal is soldered to the amplifier module the speaker can be connected. It is recommended that the stripped wire end is folded over the insulation and the screw terminal clamped down so that the insulation acts as strain relief, reducing the chances that the wire snaps off.
Module Details
The Makerverse R2R DAC module is a 10-bit digital to analog converter made from high accuracy 0.1% resistors and an op-amp voltage buffer.
It has a THD+N (total harmonic distortion plus noise) specification of approximately 60dB - very close to the theoretical limit for a 10-bit converter and capable of reproducing clear audio signals.
The DAC module is designed to plug directly into the Raspberry Pi Pico between pins GP6 (pin 9) and GP15 (pin 20). The Vcc and Vout pins plug into free terminal strips for power input and signal output, respectively.
The onboard voltage buffer op-amp is a "rail-to-rail" type, allowing for the DAC module to operate from either 3.3V or 5.0V with only 25mV of clipping when the output approaches the supply rails. The true operating voltage range is 1.8V to 6.0V so the DAC module itself is compatible with other microcontrollers.
The digital inputs labeled GP6 (LSB) to GP15 (MSB) form the binary input with the 0 to 1023 input range mapping linearly from 0V to 3.3V with a step size of approximately 3.2mV.
If you are applying this module to a different microcontroller, and don't need the full 10-bit resolution, only the highest numbered inputs need to be connected and unused inputs connected to ground. For example, a 5-bit DAC can be built by driving GP15 to GP11 with digital signals and grounding GP6 to GP10.
The PAM8302A is a class D amplifier module rated to 2.5W (Vcc = 5.5V driving a 4 Ohm speaker). It is designed for operation between 1.8V and 5.5V and can drive 4 Ohm or 8 Ohm speakers.
The Makerverse module contains a volume control potentiometer and screw terminal for easy speaker connection. At maximum volume, the module has a fixed voltage gain of 23.5 dB (15 times).
An output filter is included to allow for use with long (>20cm) speaker wires without causing excessive radio interference.
The pin description is as follows:
| Pin | Description |
| IN | Audio signal in |
| GND | Signal ground |
| SD | Shutdown, active low with onboard pull-up |
| Vcc | 1.8V to 5.5V power in, 350mA max |
| GND | Power ground |
The Electronic Keyboard is an array of eight buttons, each connected to a different digital input pin on the Raspberry Pi Pico. The buttons are labeled 1 to 7, then "oct" (octave) as its primary purpose is to cover one octave of a musical keyboard.
To make electrical connections easy the 12-pin header connects directly to the Raspberry Pi Pico, covering pins GP16 (pin 21) to GP27 (pin 32). The RUN pin (pin 30) is not connected, so a reset button can still be used.
For usage in this kit, the provided MicroPython module takes care of reading the button status. If, however, you are using this module for another application please be aware that each button connects its relevant digital input to GP27. As such, the keyboard module can be used in either an "active high" or "active low" mode as follows:
- Active HIGH: GP27 configured as logic HIGH output and all other digital inputs with pull-downs - Buttons produce a logic HIGH when pressed
- Active LOW: GP27 configured as logic LOW output and all other digital inputs with pull-ups - Buttons produce a logic LOW when pressed
The buttons are connected to the Pico as follows:
| Button | Pico Pin |
| 1 | GP16 |
| 2 | GP17 |
| 3 | GP18 |
| 4 | GP19 |
| 5 | GP20 |
| 6 | GP21 |
| 7 | GP22 |
| OCT | GP26 |
The Makerverse Micro SD Adapter module is included so that large wav files can be played with this kit. This module breaks out a micro SD card's SPI interface with all input signals routed through a 5.0V tolerant buffer for compatibility with 3.3V and 5.0V microcontrollers. A 3.3V regulator is included so a 3.3V power supply is not required.
You can find full details about the micro SD card adapter in the guide Makerverse Micro SD Adapter - MicroPython Guide and Data Logging.
Download MicroPython Modules
Download the Makerverse R2R DAC MicroPython module: Makerverse_R2R_DAC.py (right-click, "Save Link As...")
Download the SD card driver: sdcard.py (right-click, "Save Link As...")
Once downloaded, insert the Raspberry Pi Pico into the breadboard, connect the Micro USB cable, and copy both MicroPython modules to it with Thonny.
A full description of all methods provided by this library can be found in the GitHub repository.
Breadboard Power Setup
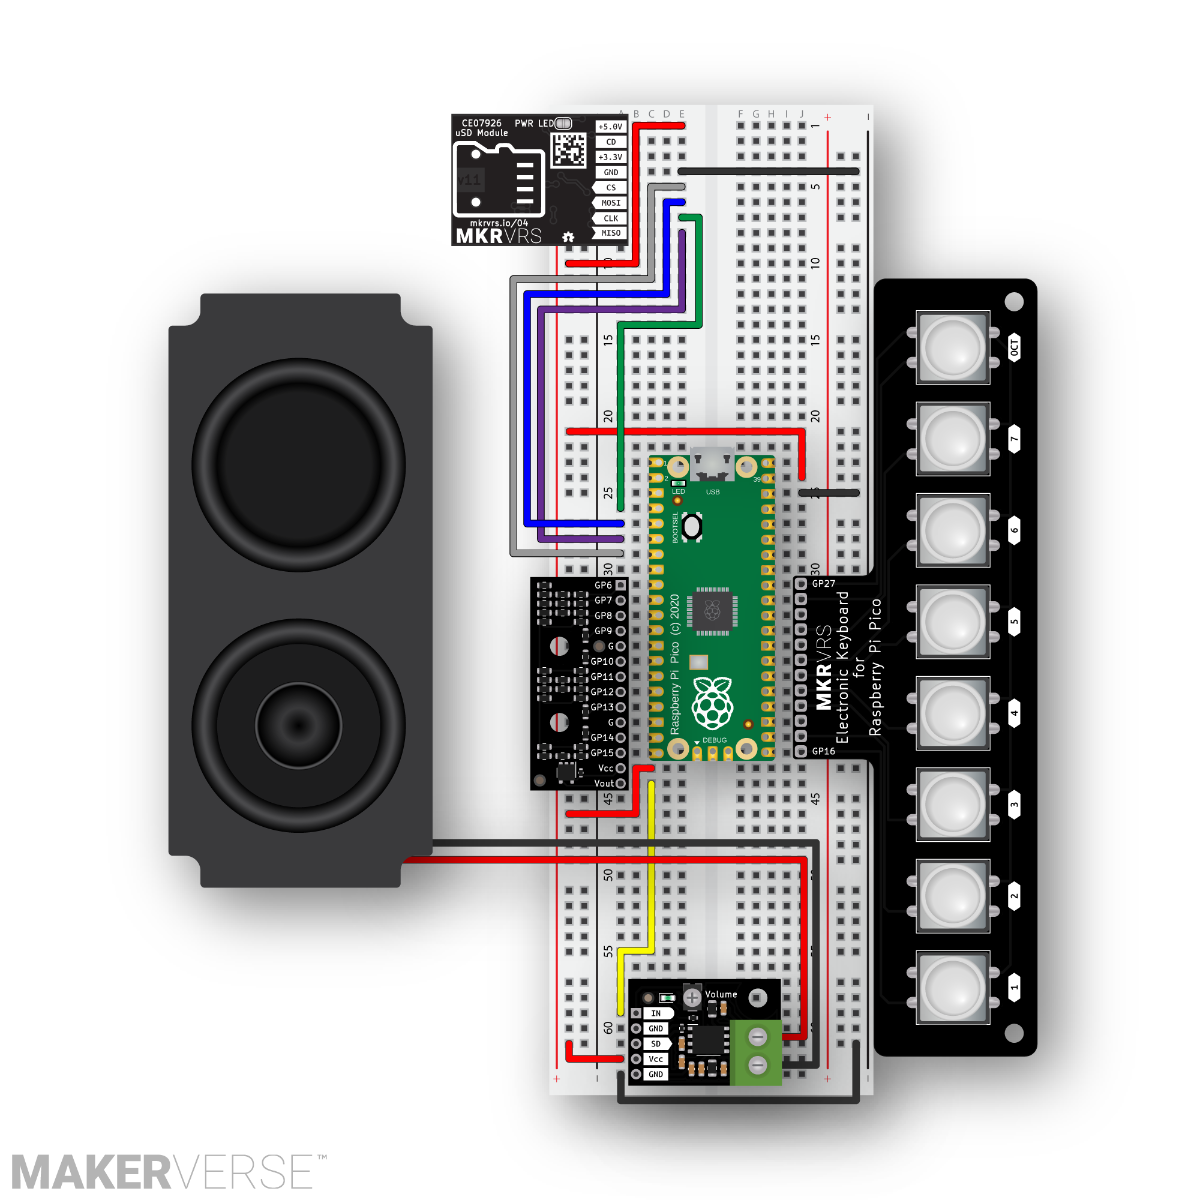
Because there are three modules that require +5.0V the breadboard bus strips will be used to distribute power.
To provide power to the breadboard bus rails, connect a jumper from the Pico's VBUS pin to the positive supply rail and from a GND pin to the negative supply rail. The adjacent image shows the GND pin near VBUS being used for this purpose.
Although the four bus strips are electrically identical it is strongly recommended that we follow the "red is positive - black is negative" convention.

Playing WAV Files from the Raspberry Pi Pico's Memory
The Raspberry Pi Pico has a small memory chip on board that is able to store about 5 to 10 seconds of wav file audio, depending on sample rate.
For this example, download pluck.wav (right-click, "Save Link As...") and upload it to the Raspberry Pi Pico with Thonny.
Insert the R2R DAC and PAM8302A amplifier as shown, then run the example code below. You should hear the sound played on the speaker and the code will exit when the whole wav file has finished playing.
The following connections are required for this example:
| From | To | Suggested Colour |
| R2R DAC Vcc pin | +5.0V power rail | Red |
| R2R DAC Vout pin | IN pin of the amplifier | Yellow |
| Vcc pin of the amplifier | +5.0 power rail | Red |
| GND pin of the amplifier | GND power rail | Black |
The code creates a wavPlayer object with a given buffer size. This object will occupy at least this many bytes of RAM. If your project requires a lot of RAM the buffer size can be decreased, but be aware that audio stuttering can occur.
from Makerverse_R2R_DAC import WAV_player # Import the wav file player library
from machine import Pin

# The module will automatically configure a sample rate for each file but keeping the rate constant reduces artifacts.
# buffer can be reduced if your project needs more RAM but audio stuttering may occur.
player = WAV_player(rate=44100, buffer=8192) # Create a wav file player object

player.play("pluck.wav") # Play "pluck.wav". This file path is relative to the Pico's 'root'.

Playing WAV Files From an SD Card
To play long audio files the Pico is going to need some external memory - For that, this kit includes a micro SD card and adapter.
Insert the micro SD card module into the breadboard as shown. To connect it to the Pico the following jumper wire connections need to be made:
| MicroSD Adapter Pin | To | Suggested Colour |
| +5.0V | The +5.0V rail | Red |
| GND | The GND rail | Black |
| CS | Pico pin GP5 | Grey |
| MOSI | Pico pin GP3 | Blue |
| CLK | Pico pin GP2 | Green |
| MISO | Pico pin GP4 | Purple |
Properly converted wav files can then be loaded onto the included micro SD card. The example below assumes that the file sneaky-snitch-by-kevin-macleod-from-filmmusic-io.wav has been saved to the SD card.
If you have converted your own file then the filename will need to be edited in the script on the last line.
from Makerverse_R2R_DAC import WAV_player

player = WAV_player()

player.mountSD(path = '/sd', spi = 0, sck_pin=2, mosi_pin=3, miso_pin=4, cs_pin = 5)

player.play("/sd/sneaky-snitch-by-kevin-macleod-from-filmmusic-io.wav")

Building an Electronic Keyboard
Plugging the keyboard into the breadboard as shown and running the code below turns the Audio Kit into a simple musical instrument.
The Makerverse_Keyboard() library is tuned to a C-Major scale, with the "1" key corresponding to a note 1 octave above middle C.
Note that the micro SD card is not used in this example. There is no harm in leaving it connected but it doesn't need to be to make the keyboard work.
from Makerverse_R2R_DAC import keyboard

keyboard = keyboard()

keyboard.play()

Creating a Sound Effects Soundboard
A soundboard is an array of buttons that each play a different sound. This example uses the keyboard hardware as the array of buttons and can play up to 8 wav files stored either on the Raspberry Pi Pico or the SD card.
The code below shows the general usage. A list of filenames is passed to the soundboard() method where the first list entry is played when button 1 is pushed, the second when button 2 is pushed, etc.
Five sample sound files are provided in the GitHub repository. These can be downloaded and copied to the Pico directly:
from Makerverse_R2R_DAC import WAV_player

player = WAV_player(buffer=8192)

sounds = ["chirp.wav", "drum.wav", "dtmf.wav", "noise.wav", "pluck.wav"]

while True:
    player.soundboard(sounds)
If the wav files are too large to fit on the Pico's internal memory the micro SD card can be used by first mounting it and appending "/sd/" to the filenames:
from Makerverse_R2R_DAC import WAV_player

player = WAV_player(buffer=8192)

player.mountSD(path = '/sd', spi = 0, sck_pin=2, mosi_pin=3, miso_pin=4, cs_pin = 5)

sounds = ["/sd/chirp.wav", "/sd/drum.wav", "/sd/dtmf.wav", "/sd/noise.wav", "/sd/pluck.wav"]

while True:
    player.soundboard(sounds)
Preparing WAV Files
The Makerverse Audio Kit is capable of playing wav files in the following format:
- 1 channel (mono)
- Data format of 16-bit PCM (signed integer)
- Sample rates of 44.1kHz or slower
When using the provided micro SD card the maximum file size is 4GB (limited by the FAT32 filesystem) which, at 44.1kHz, is about 13 hours of audio.
The wav files can be created either by recording material from scratch or by converting existing audio files. The recommended software for performing either of these tasks is Audacity. Recording is beyond the scope of this article, but the conversion of an existing audio file can be done as follows:
- Open the chosen file in Audacity. The input can be any common audio format.
- Convert the track to mono by clicking Tracks > Mix > Mix Stereo Down to Mono

- Convert the data format to 16-bit PCM by clicking the drop-down menu again and selecting Format > 16-bit PCM
- Ensure that the "Project Rate (Hz)" is set to 44100 or lower. The highest rate supported by the Audio Kit is 44100.
- Export the converted audio by clicking File > Export > Export as WAV. Note that you will need to both choose a filename and confirm the wav metadata before the file is written to disk.
- The .wav file can now be copied to the included micro SD card or uploaded with Thonny.


Conclusion
We hope you've enjoyed building this kit and that it has inspired many ideas for your own projects. These audio components can be built into, say, a custom doorbell, electronic games, etc.
If you make something cool from this kit guide we'd love for you to share it on our forums! And if you'd like some help with this guide, start the conversation below - We're full-time makers and here to help!
