This is an update to an older guide done so that we can provide you with the fastest, most modern, and best way to set up your system.
Nothing beats bright shiny colourful lights and this guide demonstrates the fastest and most customizable way to have Fully Addressable WS2812B LED (Light Emitting Diode) strips running on any Raspberry Pi Single Board Computer. That way you can enjoy lighting up your home exactly the way you want.
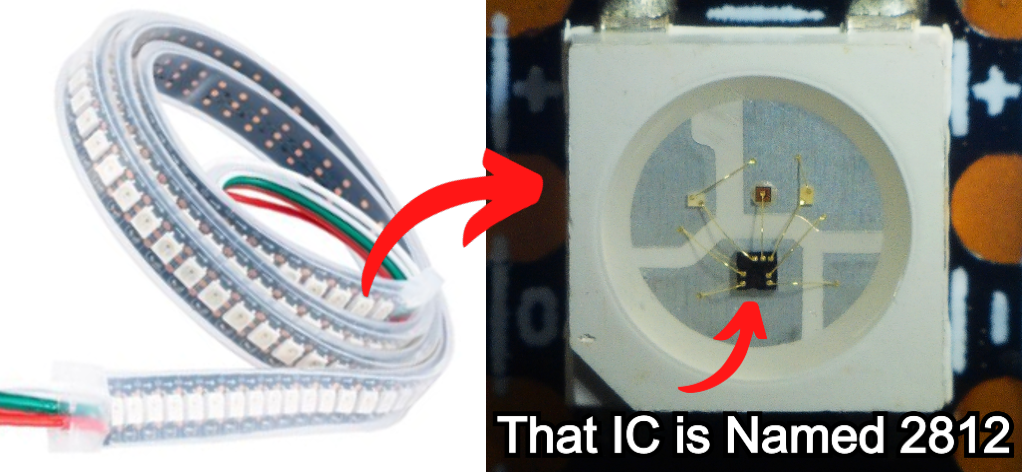
The name WS2812B Strip usually refers to a long length of flexible PCB with many specific RGB LED Nodes evenly spaced and dotted along the top side of the PCB. Furthermore, WS2812B strips are fully addressable. This means each RGB LED node can display a different colour and intensity than its neighbours. WS2812B strips will do everything that non-addressable RGB strips do. In almost all regards WS2812B Strips are better as they allow for more creative LED light shows. Fancier animation/striping/chasing effects become possible when you can decide exactly what each LED Node will do. WS2812B can be referred to as NeoPixels or GlowBit LEDs.
WS2812B stands for | World Semi | which is the name of the OEM (Original Equipment Manufacturer), followed by the name of the IC chip | 2812 |, followed by | B | indicating it is the 2nd big revision of this design. The IC Chips are built into each LED Node, for a close-up microscope view of a single WS2812B LED Node and a strip of WS2812B LEDs, check the image below.
Now there are different types of Fully Addressable Strip LEDs. The main difference to keep on top of is whether the LED strip runs on 5V or 12V. As our Raspberry Pi Single Board Computer runs at 5V we want to use the 5V WS2812B Strip. Otherwise, we will need to use extra hardware, like a DC-DC Step-Down Module, to accommodate the 12 Volt power requirements. WS2812B LED strips also differ in LED Node densities. Currently, there are 30 Nodes Per Metre, 60 Nodes Per Metre, and 144 Nodes Per Metre variants. You can also get flexible WS2812B strips with and without waterproofing. Our GlowBit LED Products will also work with the Python Script provided in this tutorial, they are essentially WS2812B Nodes attached to Rigid PCBs.
For the above reasons, WS2812B Strips are the best LEDs to choose in this form factor. The contents of this guide can be seen below.
- What You Need
- Hardware Assembly (For Small and Long WS2812B Strips)
- Software Set Up
- Flashy Demonstration
- Simple WS2812B LED Strip Script
- Control Multiple WS2812B LED Strips Simultaneously
- Where to Now, More Stock Patterns, GUI Controlled and Sound Reactive
- Downloads
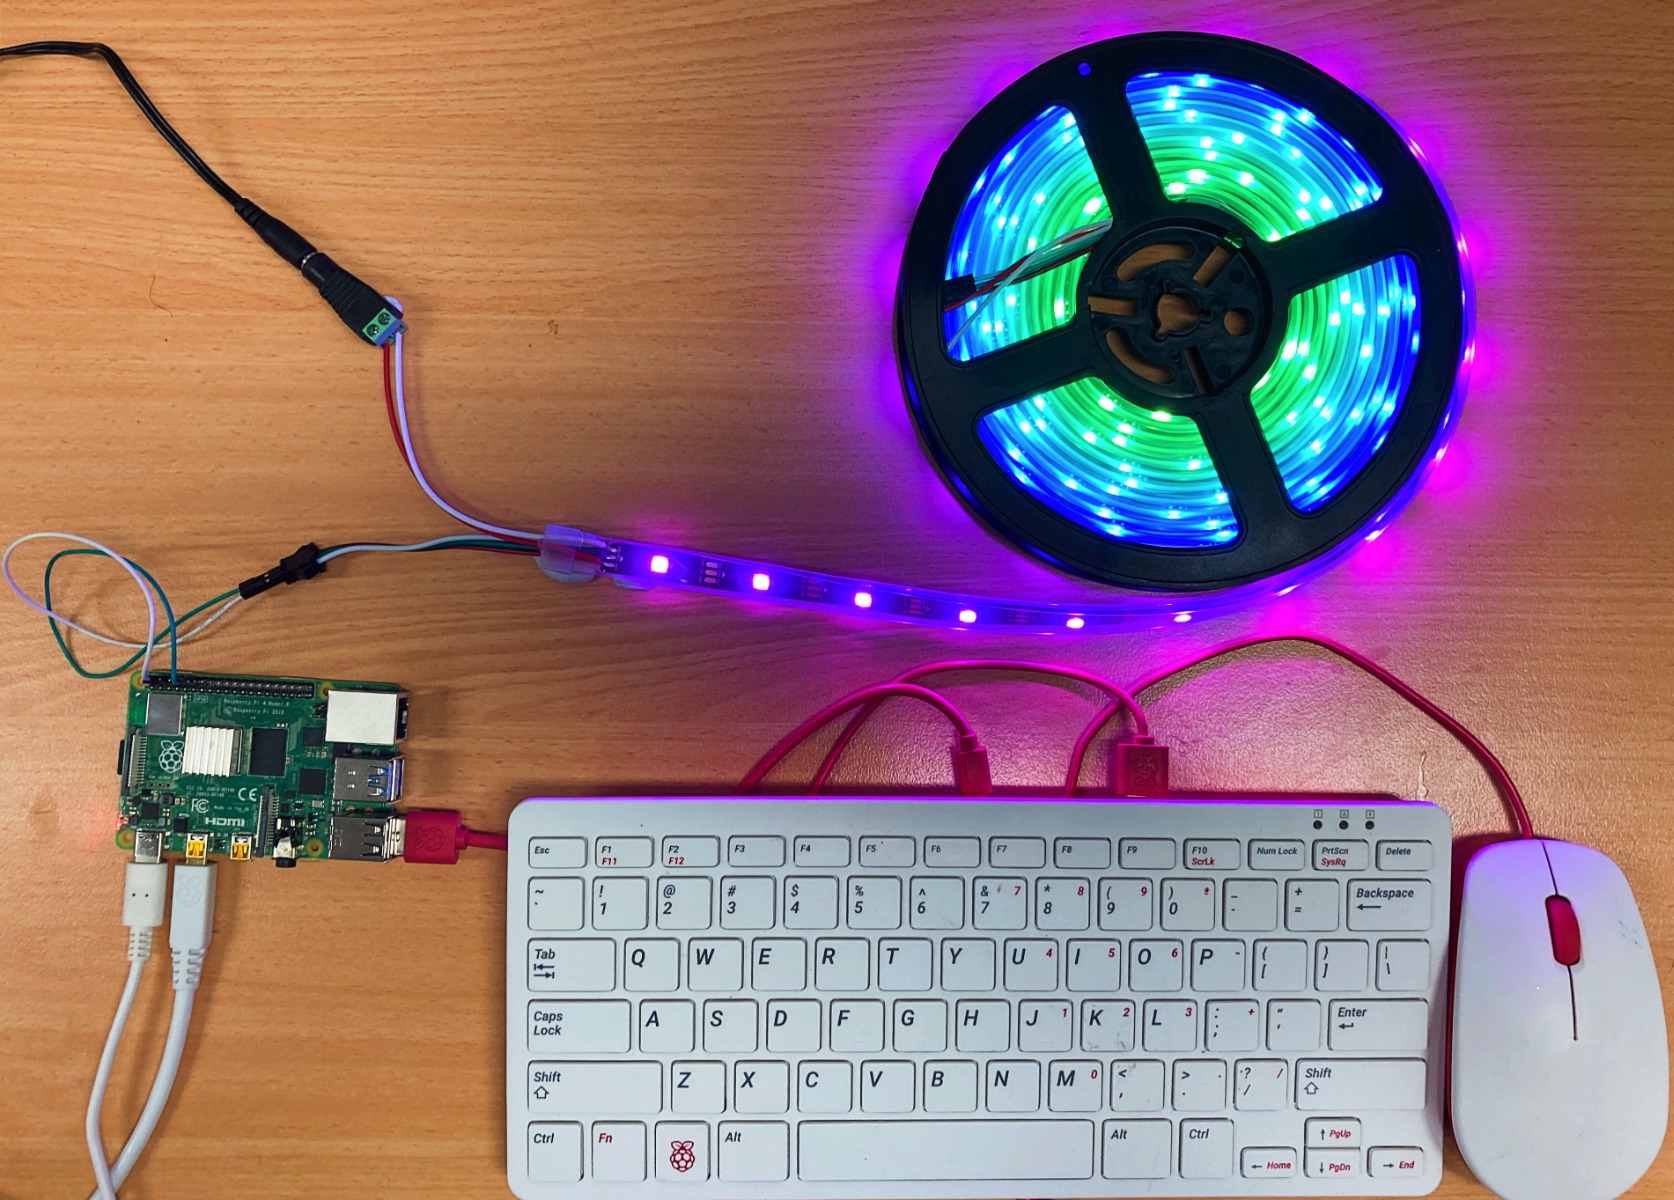
Whether your WS2812B LED Nodes are connected on a rigid PCB or a flexible long strip the control system built in this guide can accommodate both. If you have never used a Raspberry Pi before, we have got you covered with our free, online Raspberry Pi for Beginners Workshop. If you've covered at least Chapter 1 then you have all the knowledge to easily follow these instructions! See the LEDs happy blinking brightly along in the image below.

If you happen to be holding a Raspberry Pi Single Board Computer and are not quite sure exactly what model it is? Then check out this guide Raspberry Pi Generations to identify it. As always if you have any questions, queries, thoughts, or comments please let me know!
What You Need
Below is everything you need to set up your Raspberry Pi single board to control a whole bunch of fully addressable LEDs.
- A Raspberry Pi Single Board Computer (for this tutorial I used a Raspberry Pi 4 Model B 2GB)
- 5V WS2812 LED Strip (for this guide I have three strips of different densities and lengths)
- A 5V 4A Power Supply (Optional, see Note 1 below)
- A DC Barrel Jack to 2-Pin Terminal Block Adapter (Optional, see Note 1 below)
Note 1. You will need to use an external power source if you are powering more than 30 WS2812B LED Nodes. Producing bright light, even with very efficient LEDs, takes a lot of power. Each pixel will draw about 20mA on average, and 60mA when displaying white light at max brightness. Knowing this 30 Pixels can draw 600mA on average and up to 1.8A when maxed out. A note here, full white light at max brightness is so unbelievably bright it causes my eyes to have blind spots if I stare at them directly. I usually run WS2812B at 20% brightness because of this. Take the time to ensure your power supply is large enough to drive your WS2812B strip at the desired brightness. When your driving huge amounts of LEDs the Power Supply will usually start to look like this.
Note 2. Most Modern WS2812B LED Nodes will run on 3.3V Data Logic. This is great for us as the operating voltage range of a Raspberry Pi's GPIO Pins is 0 to 3.3V. Since its initial creation, there have been five small revisions of this particular surface-mounted WS2812B LED Node component (as of 2022). So, if you are having weird or intermitted problems I recommend utilising a logic level shifter as you may have an older WS2812B strip that only runs 5V Data Logic.
Hardware Assembly (For Small and Long WS2812B Strips)
We will set up our Raspberry PI as a desktop computer as the desktop UI is a much more familiar experience for the everyday maker. This guide assumes you know how to flash Raspberry Pi OS onto a new Micro-SD Card, check this guide if you need this knowledge. With the intention of setting up our Raspberry Pi as a desktop computer, insert a micro-SD card flashed with Raspberry Pi OS. Then add a mouse, keyboard, and HDMI out to a monitor. This is also a great time to add a little heatsink to the main CPU Integrated Circuit of your Raspberry Pi Board. See the setup in the image below next to a small length of a WS2812B LED strip which has three wires coming out of it. Note the three wires coming off the WS2812B which we have yet to connect to our Raspberry Pi Single Board Computer. Also, note the Arrows drawn onto the WS2812B LED Strip PCB, this is the direction of the Data flow. Not adhering to this is a common troubleshooting issue.

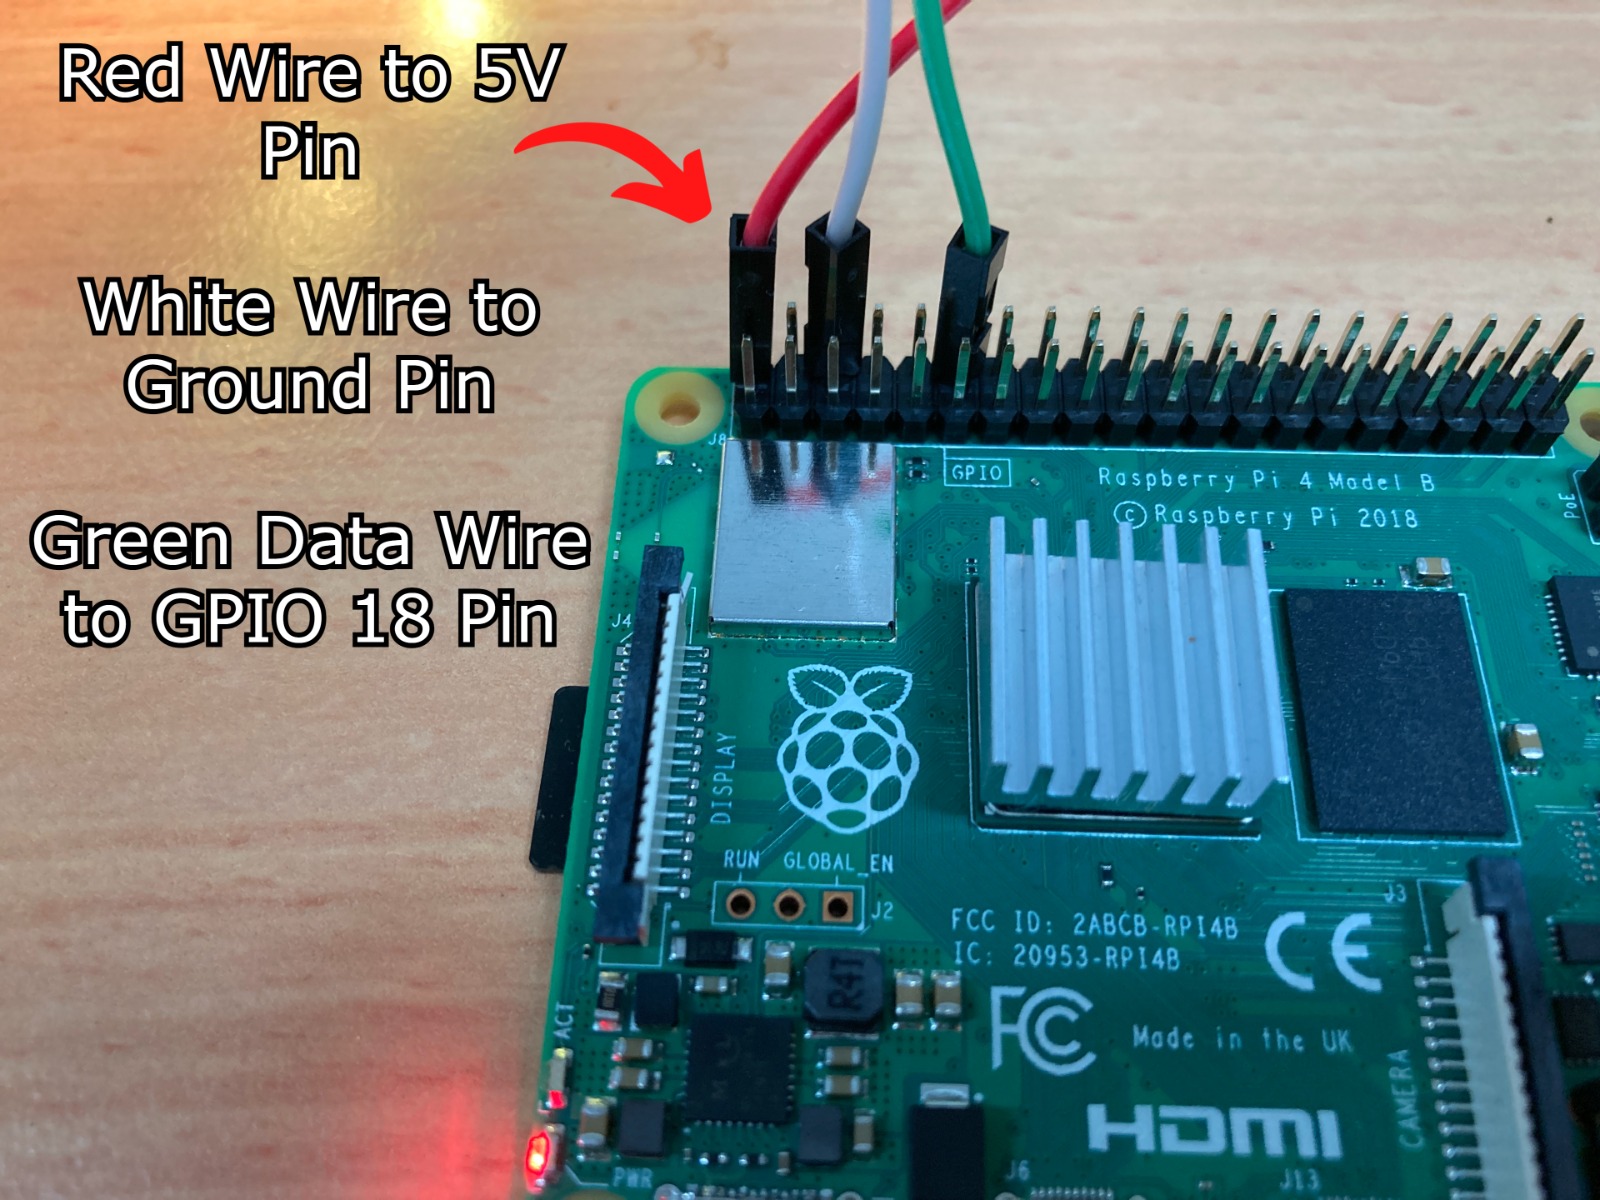
Hardware Setup for Small (<30 Nodes) Lengths of WS2812B. Before powering up our Raspberry Pi let's connect up those three wires coming out of the 5V WS2812B Strip. Connect the Red Power Wire to the 5V Pin of the Raspberry Pi. Connect the White Ground Wire to a Ground Pin on Raspberry Pi. Connect the Green Data Pin to GPIO 18 of the Raspberry Pi. Note here that other GPIO pins could be used for the Green Data Pin, so long as it is written into your Python Scripts. All scripts in this guide are going to use GPIO 18 as the Data Line. See these three wires connected up in the image below. This simple setup is sufficient for powering and communicating to a small number of LEDs.
Hardware Setup for a Long Length of a WS2812B Strip (>30 Nodes). If you want to power an entire strip you will need to supply more power to the LED strip than the Raspberry Pi Power Pin Out will be able to do. Fully Addressable WS2812B LEDs can draw a lot of electrical current, especially in long strips. As a general rule of thumb, a good quality 5V 4A Power Supply can comfortably handle 150 RGBW LEDs at full brightness.
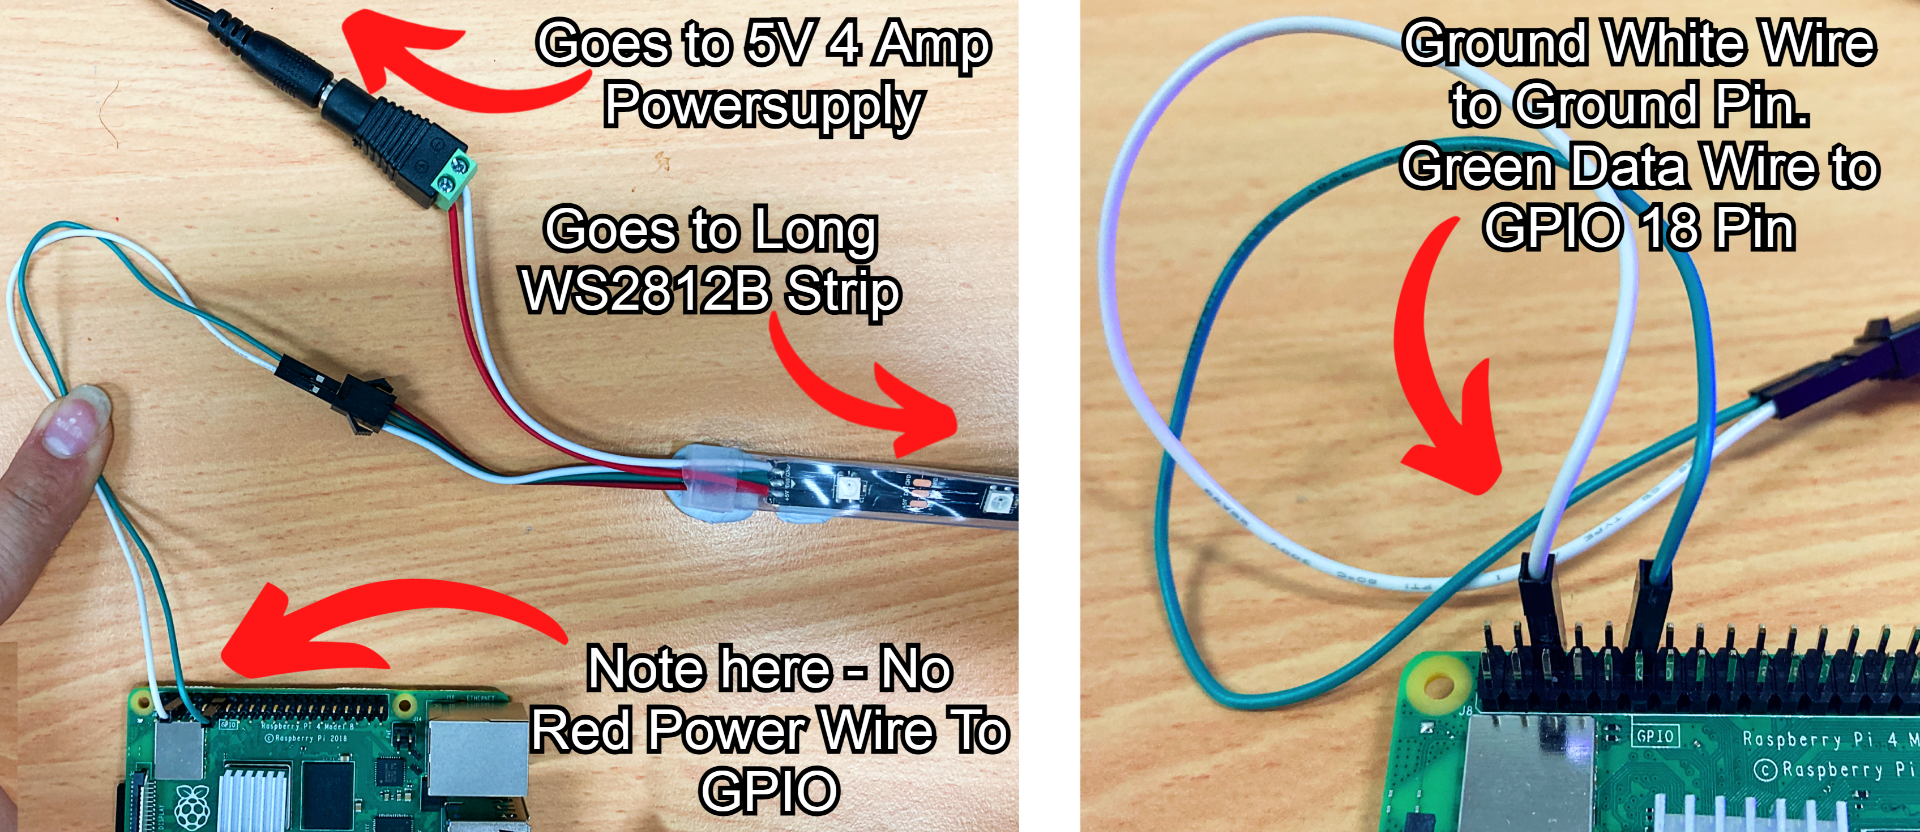
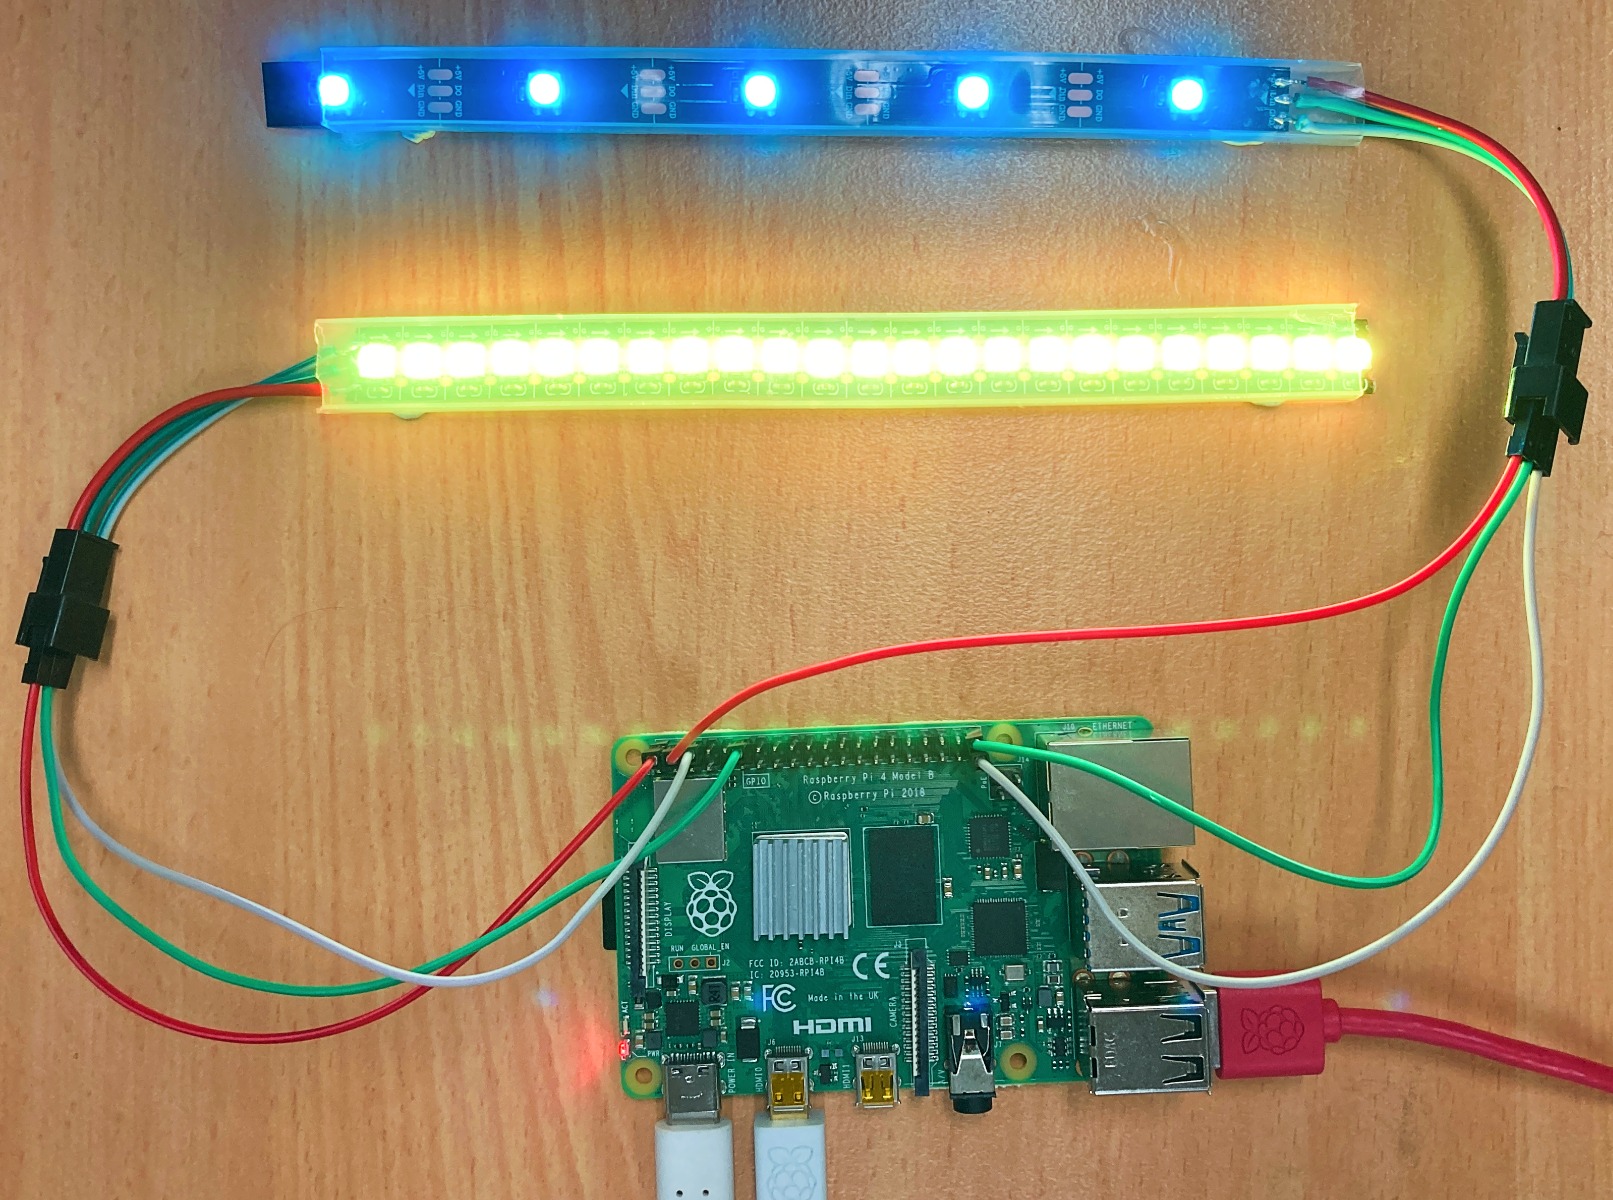
Thus, we will hook up a 5V 4A Power supply with a DC Barrel Jack into our system just like the image below. All WS2812B LEDs sold by us will have Two White Wire Ground connections, Two Red Wire Power connections, and One Green Data Wire already soldered onto the LED Strip. Connect the White Wire to the Negative Screw Down Terminal of the DC Barrel Jack. Connect the Red Wire to the Positive Screw Down Terminal. Note that both the Raspberry Pi Single Board Computer and the Power supply share a Common Ground as the White Wires all connect to each other. Without a common ground, connections between the two devices will not have a static reference and result in floating voltages and errors in sent data.
There is also no longer a Red Power Wire from the Raspberry Pi Computer going into the WS2812B LED Strip. This is because we no longer require the Raspberry Pi to Power our System. See the image below for exactly how to wire in long lengths of WS2812B LED Strips that will be controlled by a Raspberry Pi Single Board Computer.
If you are interested in powering a huge amount of LED Strips please note that there are some great standard practices (when powering hundreds or thousands of WS2812B LEDs). Refer to this fantastic Adafruit guide on the topic if you are planning on powering significantly more LEDs than a single 5 Metre roll. Thermal and electrical considerations need to be taken.
With everything connected how you desire power up the Raspberry Pi System by plugging in a USB-C connector.
Software Set Up
Some packages will need to be installed on your fresh version of Raspberry Pi OS. This will allow the correct operation of WS2812B LEDs. With the power into the system and the (new) first boot-up wizard complete, you will be welcomed by the Raspberry Pi Desktop.
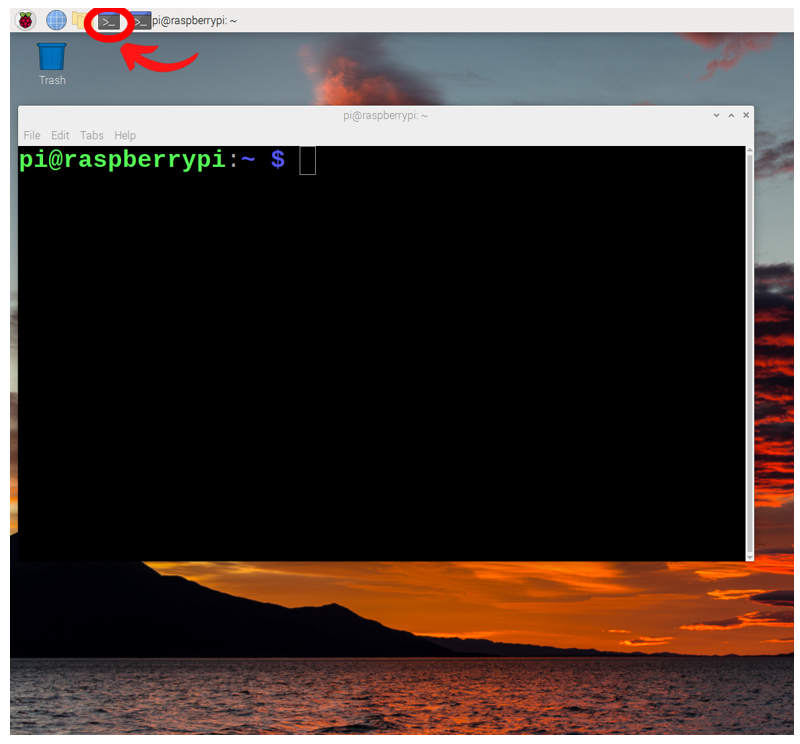
Open a new terminal window by pressing the black button on the top left of the screen. This will open up a terminal window. See the image below of this happening and a big red arrow pointing toward the terminal button that was pressed.
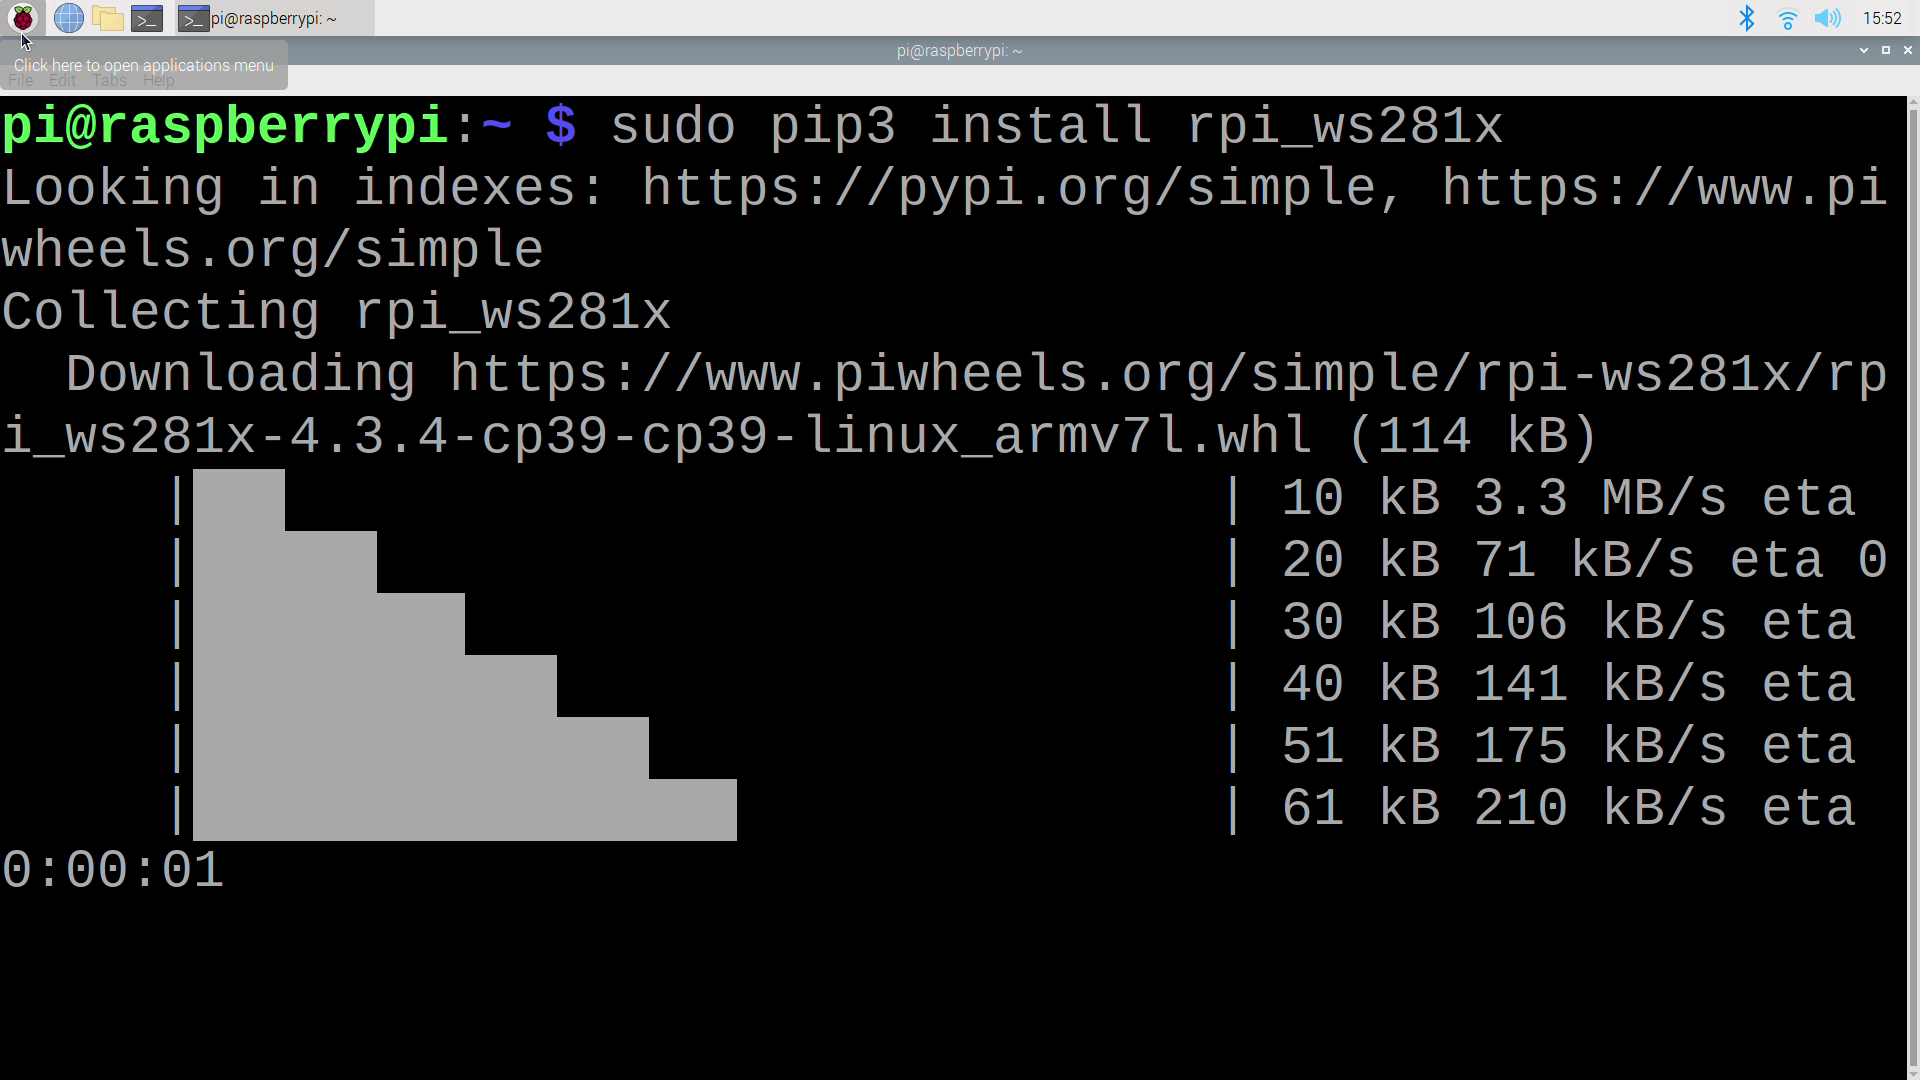
This terminal window will enable us to download from the internet the exact packages we require. So now type and enter the following lines into the terminal to get all the packages that you will need. If prompted, type and enter | Y | to continue/confirm installations. See further below an image of one of these commands being downloaded and requesting this confirmation.
sudo pip3 install rpi_ws281x
sudo pip3 install adafruit-circuitpython-neopixel
sudo python3 -m pip install --force-reinstall adafruit-blinka
The Programming Packages and software to correctly power and drive WS2812B will now be on your hardware.
Flashy Demonstration
There are a lot of ways you can get the Raspberry Pi to activate the connected WS2812B LED strips. I will start by doing the most intuitive and fastest method by connecting this Raspberry Pi up to a monitor with a mouse and keyboard and directly running Python scripts to control them. The best and most exciting Python Script to start with can be seen below named | strandtest.py |. You can download all scripts talked about in this guide in the download section which is found at the bottom of this page. This Python script is significantly more complex than the next scripts in this guide but it offers such a great overview of some of the potential patterns and light styles it needed to be included first.
#!/usr/bin/env python3
# NeoPixel library strandtest example
# Author: Tony DiCola ([email protected])
#
# Direct port of the Arduino NeoPixel library strandtest example.  Showcases
# various animations on a strip of NeoPixels.

import time
from rpi_ws281x import *
import argparse

# LED strip configuration:
LED_COUNT      = 30     # Number of LED pixels.
LED_PIN        = 18      # GPIO pin connected to the pixels (18 uses PWM!).
#LED_PIN        = 10      # GPIO pin connected to the pixels (10 uses SPI /dev/spidev0.0).
LED_FREQ_HZ    = 800000  # LED signal frequency in hertz (usually 800khz)
LED_DMA        = 10      # DMA channel to use for generating a signal (try 10)
LED_BRIGHTNESS = 65      # Set to 0 for darkest and 255 for brightest
LED_INVERT     = False   # True to invert the signal (when using NPN transistor level shift)
LED_CHANNEL    = 0       # set to '1' for GPIOs 13, 19, 41, 45 or 53


# Define functions which animate LEDs in various ways.
def colorWipe(strip, color, wait_ms=50):
    """Wipe color across display a pixel at a time."""
    for i in range(strip.numPixels()):
        strip.setPixelColor(i, color)
        strip.show()
        time.sleep(wait_ms/1000.0)

def theaterChase(strip, color, wait_ms=50, iterations=10):
    """Movie theater light style chaser animation."""
    for j in range(iterations):
        for q in range(3):
            for i in range(0, strip.numPixels(), 3):
                strip.setPixelColor(i+q, color)
            strip.show()
            time.sleep(wait_ms/1000.0)
            for i in range(0, strip.numPixels(), 3):
                strip.setPixelColor(i+q, 0)

def wheel(pos):
    """Generate rainbow colors across 0-255 positions."""
    if pos < 85:
        return Color(pos * 3, 255 - pos * 3, 0)
    elif pos < 170:
        pos -= 85
        return Color(255 - pos * 3, 0, pos * 3)
    else:
        pos -= 170
        return Color(0, pos * 3, 255 - pos * 3)

def rainbow(strip, wait_ms=20, iterations=1):
    """Draw rainbow that fades across all pixels at once."""
    for j in range(256*iterations):
        for i in range(strip.numPixels()):
            strip.setPixelColor(i, wheel((i+j) & 255))
        strip.show()
        time.sleep(wait_ms/1000.0)

def rainbowCycle(strip, wait_ms=20, iterations=5):
    """Draw rainbow that uniformly distributes itself across all pixels."""
    for j in range(256*iterations):
        for i in range(strip.numPixels()):
            strip.setPixelColor(i, wheel((int(i * 256 / strip.numPixels()) + j) & 255))
        strip.show()
        time.sleep(wait_ms/1000.0)

def theaterChaseRainbow(strip, wait_ms=50):
    """Rainbow movie theater light style chaser animation."""
    for j in range(256):
        for q in range(3):
            for i in range(0, strip.numPixels(), 3):
                strip.setPixelColor(i+q, wheel((i+j) % 255))
            strip.show()
            time.sleep(wait_ms/1000.0)
            for i in range(0, strip.numPixels(), 3):
                strip.setPixelColor(i+q, 0)

# Main program logic follows:
if __name__ == '__main__':
    # Process arguments
    parser = argparse.ArgumentParser()
    parser.add_argument('-c', '--clear', action='store_true', help='clear the display on exit')
    args = parser.parse_args()

    # Create NeoPixel object with appropriate configuration.
    strip = Adafruit_NeoPixel(LED_COUNT, LED_PIN, LED_FREQ_HZ, LED_DMA, LED_INVERT, LED_BRIGHTNESS, LED_CHANNEL)
    # Intialize the library (must be called once before other functions).
    strip.begin()

    print ('Press Ctrl-C to quit.')
    if not args.clear:
        print('Use "-c" argument to clear LEDs on exit')

    try:

        while True:
            print ('Color wipe animations.')
            colorWipe(strip, Color(255, 0, 0))  # Red wipe
            colorWipe(strip, Color(0, 255, 0))  # Blue wipe
            colorWipe(strip, Color(0, 0, 255))  # Green wipe
            print ('Theater chase animations.')
            theaterChase(strip, Color(127, 127, 127))  # White theater chase
            theaterChase(strip, Color(127,   0,   0))  # Red theater chase
            theaterChase(strip, Color(  0,   0, 127))  # Blue theater chase
            print ('Rainbow animations.')
            rainbow(strip)
            rainbowCycle(strip)
            theaterChaseRainbow(strip)

    except KeyboardInterrupt:
        if args.clear:
            colorWipe(strip, Color(0,0,0), 10)
From here open up a Python interface like Thonny IDE. Thonny IDE is just a Python Interpreter software and you can use whichever is your preference. For this script we will want to open a Thonny IDE version with Sudo Privileges. Click on the black symbol on the top left of the screen. This will open the terminal command window like before. Type and enter into it the following | sudo thonny |. This will open up Thonny IDE with sudo privileges. Then Copy and Paste the above script into Thonny IDE and save it to the desktop (or wherever you deem appropriate) as | strandtest.py |. Now run it by pressing the big green | Run | button. See the image below of what you will see when you do this.

Just like that, your LED strip should now be producing beautiful colours. If your entire WS2812B LED Strip is not lighting up jump into the Python Script, find the variable named | LED_COUNT |, and increase that value to match the number of LED Nodes on your particular strip. Save and then Re-Run the Script by pressing the big green | Run | button again. For the large roll of WS2812B LED Strip I made this variable value equal to | 150 |. Check below for the Long Length of WS2812B Strip connected up with the external power supply and utilising this altered Python Script.
Troubleshooting Section!
If your lights are not turning on first check that the Thonny Version you are running the script in has root/sudo privileges. Type and enter | sudo thonny | into the terminal to open the Thonny instance with sudo privileges. The error it will spit out if you are not doing this is as follows | NameError: name ‘Adafruit_NeoPixel’ is not defined |.
If you are using an earlier Raspberry Pi single board computer (a Raspberry Pi 3 Model B, 3B+ this has been identified for) and only one or two LEDs turn on when you run this script (and they flicker or show odd colours) do the following to fix it. Type and enter | sudo nano /boot/config.txt |. This will open up inside the terminal command a text editor. Using the arrow keys navigate to the section that states | dtparam=audio=on | and change it to | dtparam=audio=off |. With that completed press | Ctrl + X | and then | Y | to save the changes and exit.
Simple WS2812B LED Strip Script
Now the above | strandtest.py | script is a great test to see if your Hardware is all assembled and performing correctly. It also makes for a spectacular light show. However, it can leave the Maker wanting more. Particularly in regard to ease of code understanding so that it can be more readily altered for a particular project. This section will thus demonstrate simple Python scripts to control WS2812B LEDs that can be easily customised to do exactly what you want.
The first down to the basics WS2812B Control Script worth checking out can be seen below and is called | OneStripNeopixels.py |.
#include all necessary packages to get LEDs to work with Raspberry Pi
import time
import board
import neopixel

#Initialise a strips variable, provide the GPIO Data Pin
#utilised and the amount of LED Nodes on strip and brightness (0 to 1 value)
pixels1 = neopixel.NeoPixel(board.D18, 55, brightness=1)

#Also create an arbitrary count variable
x=0

#Focusing on a particular strip, use the command Fill to make it all a single colour
#based on decimal code R, G, B. Number can be anything from 255 - 0. Use an RGB Colour
#Code Chart Website to quickly identify the desired fill colour.
pixels1.fill((0, 220, 0))

#Below demonstrates how to individual address a colour to a LED Node, in this case
#LED Node 10 and colour Blue was selected
pixels1[10] = (0, 20, 255)

#Sleep for three seconds, You should now have all LEDs showing light with the first node
#Showing a different colour
time.sleep(4)

#Little Light slider script, will produce a nice loading bar effect that goes all the way up a small Strip
#and then all the way back
#This was created using a While Loop taking advantage of that arbitrary variable to determine
#which LED Node we will target/index with a different colour

#Below will loop until variable x has a value of 35
while x<35:

    pixels1[x] = (255, 0, 0)
    pixels1[x-5] = (255, 0, 100)
    pixels1[x-10] = (0, 0, 255)
    #Add 1 to the counter
    x=x+1
    #Add a small time pause which will translate to 'smoothly' changing colour
    time.sleep(0.05)

#Below section is the same process as the above loop just in reverse
while x>-15:
    pixels1[x] = (255, 0, 0)
    pixels1[x+5] = (255, 0, 100)
    pixels1[x+10] = (0, 255, 0)
    x=x-1
    time.sleep(0.05)

#Add a brief time delay to appreciate what has happened
time.sleep(4)

#Complete the script by returning all the LED to off
pixels1.fill((0, 0, 0))
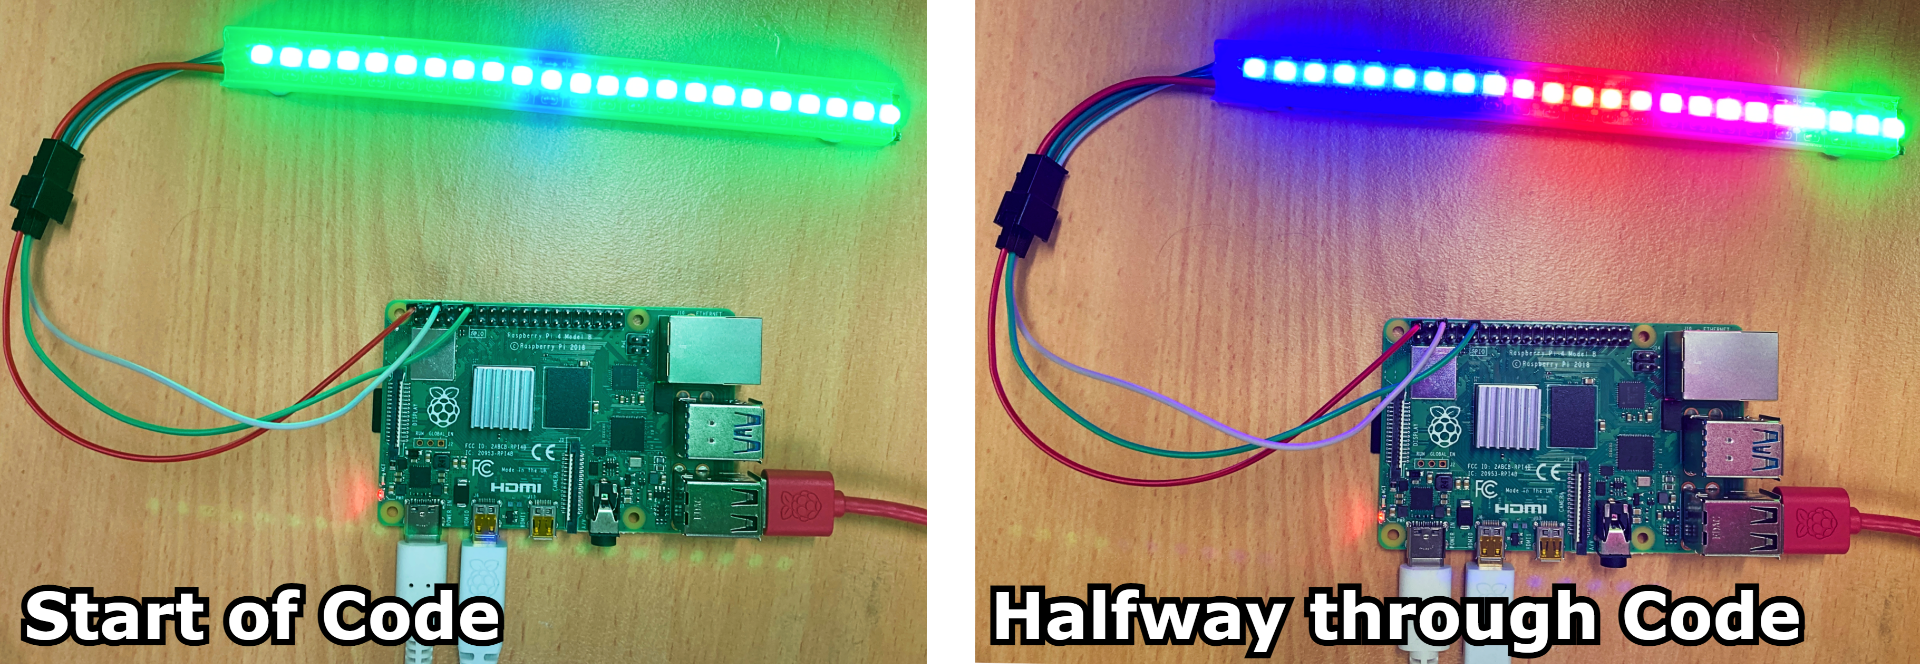
The Python Script is fully annotated so you should be able to follow along at every step. The script above provides simple to identify levers and toggles. For example setting the LED Node amount, the brightness level for the LED strips, how to fill the whole board with a single colour, how to fill particular LEDs with a single colour, and the basics of creating a fun LED Pattern. When customising the script you will note that each colour on a Node is represented by a Red, Blue, and Green number value. Each number value ranges from 0 to 255. This is often referred to as an RGB Colour Code. Trial and error is a fun way to create new colours however a more effective way of getting exactly the colour you want can be achieved using an RGB Colour Code Chart Website like the one linked here. This website will let you pick any colour and provide the three numbers that make up the RGB Colour Code. Once the desired colour code is identified you can simply add the three numbers to the Python Script.
Open it up in Thonny IDE either by copying and pasting the script into it or by downloading it from the zip file at the bottom of this tutorial. With it saved run the script by pressing the big green button. See the results of this Python Script running in the images below.
Troubleshooting Section!
If your lights are not turning on first check that the Thonny you are running the script in has root/sudo privileges. Type and enter | sudo thonny| into the terminal to open the Thonny instance with sudo privileges. The error it will spit out if you are not doing this is as follows | NameError: name ‘Adafruit_NeoPixel’ is not defined |.
If you are using an earlier Raspberry Pi single board computer (a Raspberry Pi 3 Model B, 3B+ this has been identified for) and only one or two LEDs turn on when you run this script (and they flicker or show odd colours) do the following to fix it. Type and enter | sudo nano /boot/config.txt |. This will open up inside the terminal command a text editor. Using the arrow keys navigate to the section that states | dtparam=audio=on | and change it to | dtparam=audio=off |. With that completed press | Ctrl + X | and then | Y | to save and exit.
To be able to use GPIO18, sound must be disabled. The above steps for disabling for audio need to be performed otherwise a segmentation fault may occur.
Due to changes in GPIO controls, Neopixels are not currently working with the Raspberry Pi5.
Control Multiple LED Strips Simultaneously
The next step is to have multiple LED Strips attached to the Raspberry Pi Single Board Computer and control both using a simple Python Script. I have set up the hardware in the exact same way as | Hardware Setup for Small (<30 Nodes) Lengths of WS2812B | (check the Hardware Assembly section above if you need) except this time I have also added another small length of WS2812B LED Strip.
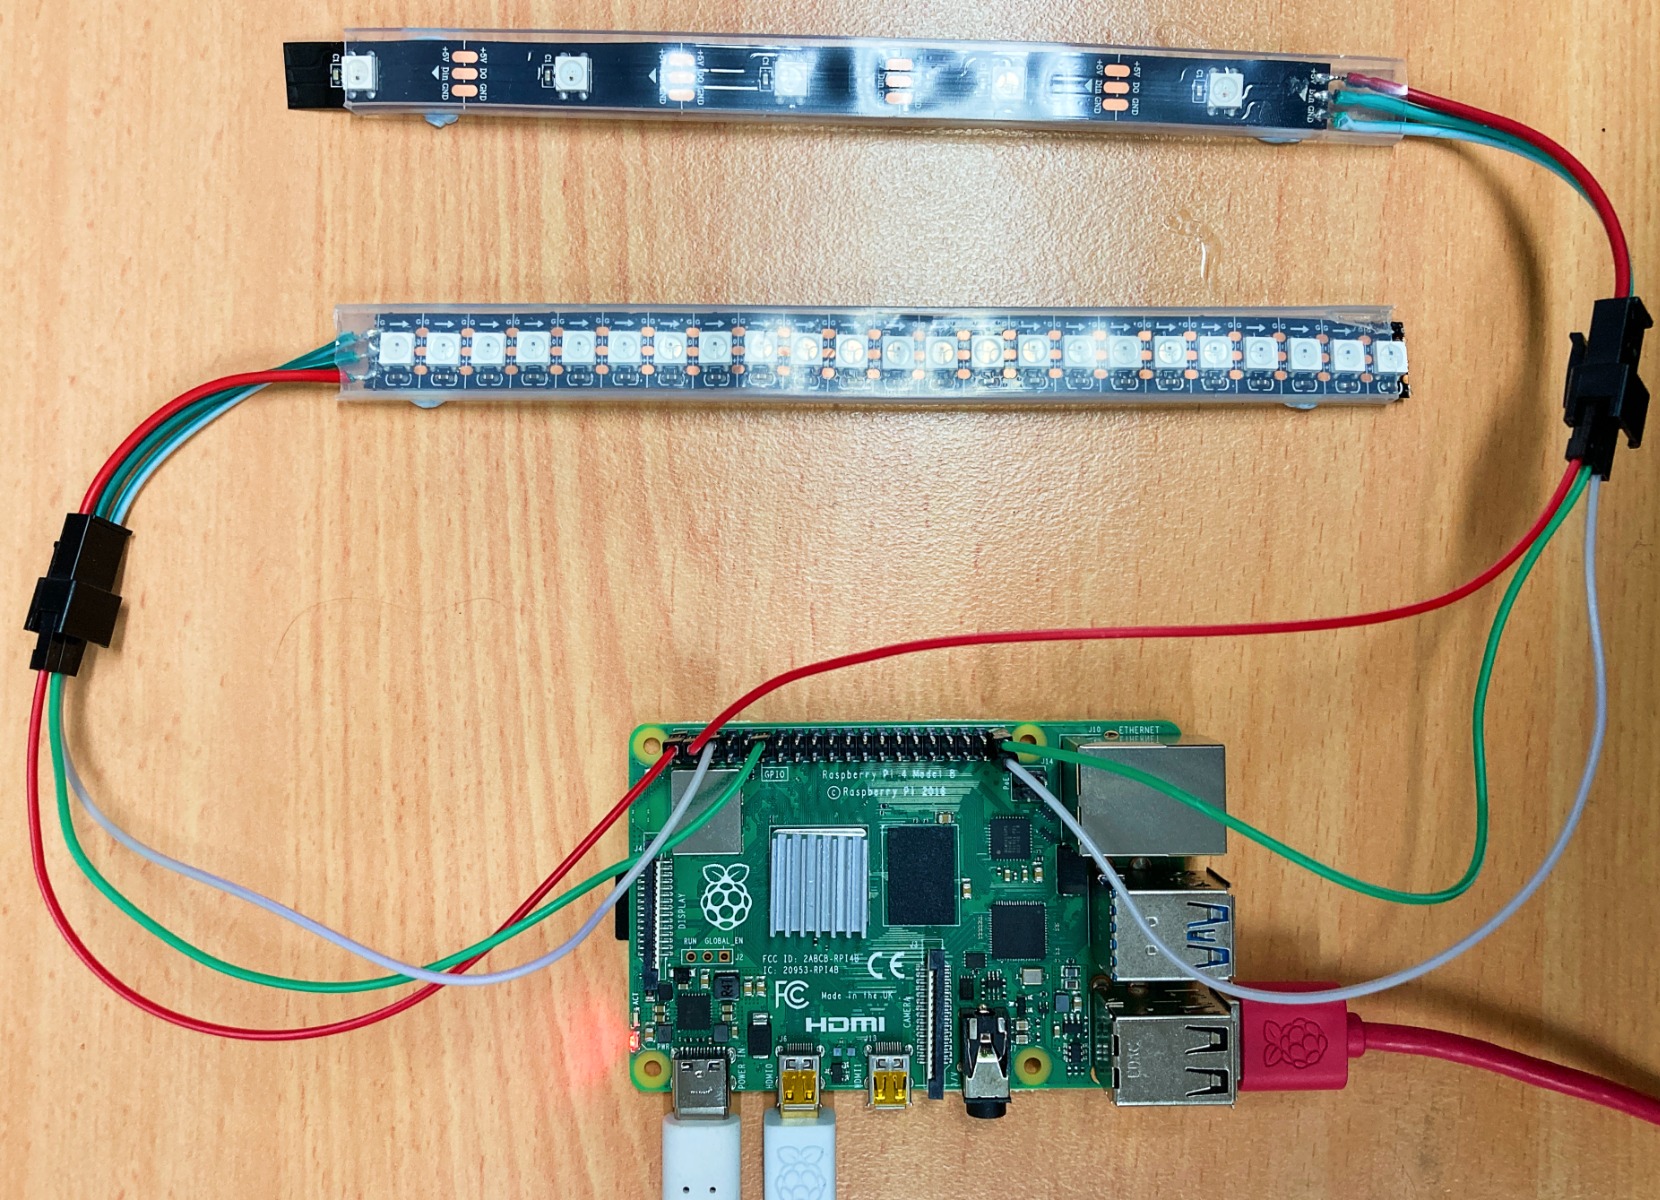
This secondary strip of WS2812B LEDs I connected to the GPIO as follows. The RED Power wire went to the other 5V Pin on the Raspberry Pi. The White Ground Wire went to another Ground Pin on the Raspberry Pi. The Green Data Wire went to GPIO 21. See the image below of the connected hardware, note that is perfectly okay to use two different densities of WS2812B LED strips.
Now to drive these two WS2812B LED Strips in a down-to-basic manner open up the python script named | TwoStripsNeopixels.py | using Thonny IDE as before. See this fully annotated Python script below.
#include all necessary packages to get LEDs to work with Raspberry Pi
import time
import board
import neopixel

#Initialise two strips variables, provide the GPIO Data Pin
#utilised and the amount of LED Nodes and brightness (0 to 1 value)
pixels1 = neopixel.NeoPixel(board.D18, 30, brightness=1)
pixels2 = neopixel.NeoPixel(board.D21, 6, brightness=1)

#Focusing on a particular strip, use the command Fill to make it all a single colour
#based on decimal code R, G, B. Number can be anything from 255 - 0. Use a RGB Colour
#Code Chart Website to quickly identify a desired fill colour.
pixels1.fill((0, 255, 0))
pixels2.fill((0, 0, 255))

#Sleep for one second, and then code repeats for different colour combinations. Light changes
#Could happen instead in response to certain buttons being pressed or due to threshold values
time.sleep(1.5)

pixels1.fill((200, 200, 0))
pixels2.fill((0, 200, 200))

time.sleep(1.5)

pixels1.fill((50, 70, 215))
pixels2.fill((215, 50, 70))

time.sleep(1.5)

pixels1.fill((0, 0, 0))
pixels2.fill((0, 0, 0))
Of note here, so long as you update the Python script correctly there are four available Data Wire locations on a Raspberry Pi Single Board Computer that can each control a separate WS2812B LED Strip. The Pin locations are GPIO 18, GPIO 21, GPIO12, and GPIO10. That means using this method and expanding on it you can easily control four fully addressable WS2812B strips independently with a single Raspberry Pi Single Board Computer.
Double-check before running the script that your amount of LED Nodes has been set up correctly for both LED WS2812B Strips. Then run the script by pressing the big green | Run | button in Thonny IDE. The two strands will spring to life, displaying multiple and different fill colours. See this in the image below.
Where to Now, More Stock Patterns, GUI Controlled LED Lights and Sound Reactivity.
Naturally, there are heaps of different and already crafted Python Scripts for controlling WS2812B LED Strips with a Raspberry Pi Single Board Computer. Some of the best Open-Source options found on GitHub can be seen listed below.
- For a LED GUI Control + Pattern Creator for WS2812B, LED-Control, check this out here (Advanced).
- For simply the best in Sound Reactivate WS2812B LEDs, Dancy-Pi, check this here.
Downloads
Below is a download link for all the scripts utilised in this guide. For ideas on where to go next with Raspberry Pi and LED Strips just check out my sound-reactive WS2812B LED Strip and Raspberry Pi LuMa project!

