Welcome to the Raspberry Pi Workshop for Beginners! Here you'll be able to follow along with our series of bite-sized videos that cover everything you'll need to know to get started with your Raspberry Pi, and start making awesome projects. My name is Michael and I'm an electronics enthusiast with particular interest in embedded electronics. As we progress through the workshops, you'll find helpful material next to each video - these could be code snippets, commands to issue, circuits to build, or links to other resources.
To follow along with the workshop you'll of course need a Raspberry Pi and a few other bits and pieces. These are:
- A Raspberry Pi (I'm using a Raspberry Pi 3 Model B+)
- A micro SD card (8GB or larger, class 10 preferred)
- A power supply to safely power your Pi
- A USB keyboard and mouse
- A monitor with HDMI input, and an HDMI lead. (A modern television works in a pinch!)
A few components that you'll need are:
- A breadboard
- Some Male-Female jumper leads
- Some solid-core wire suitable for breadboards.
- LEDs
- Momentary push-buttons
- Resistors (470 Ohm can be used for all circuits in the workshop)
Most of what is required is available in our Starter Kit.
Course Outline:
- Chapter 1 - First Steps
- Understand what a Raspberry Pi is
- Setting up your Raspberry Pi
- Become confident using your Raspberry Pi as a desktop-style computer
- Chapter 2 - Programming With Python
- Begin Programming in Python
- Write your own functions
- Use the GPIO to drive outputs and read inputs
- Chapter 3 - Shell Scripting
- Begin shell scripting
- Learn about file permissions
- Getting programs to run automatically
- Chapter 4 - Making a Desktop Application
- Learn about event-driven programming
- Make a simple Graphical User Interface (GUI)
- Chapter 5 - The Internet of Things
- What is the IoT and what can you do with it?
- Setup Particle Pi
- Get started with IFTTT
- Control GPIO over the internet
If you run into any issues throughout this workshop, then please reach out to us on our forum. We're full-time makers and are here to help.
Let's get started!
Chapter 1: First Steps
1.0 Chapter Overview
In Chapter 1 we are going to discuss what a Raspberry Pi actually is and why it's taken the maker community by storm. We'll walk through going from a fresh-out-of-the-box Raspberry Pi, to installing an OS, booting it up and having a bit of a play around.
By the end of this chapter you will be able to use your Raspberry Pi as a desktop computer. We will have covered:
- What a Raspberry Pi is,
- How to download and install an operating system,
- How to configure a Pi so your keyboard works correctly,
- Navigating with the desktop environment (the Graphical User Interface),
- Connecting to WiFi
- Keeping your operating system up to date.
1.1 What is a Raspberry Pi?
In this section we're going to discuss what a Raspberry Pi is, the different models that are available and their qualities.
There have been several generations of Raspberry Pi since they were first released in 2012. We recommend the most recent "large-footprint" model, the Raspberry Pi 3 Model B+ because we think it's the best learning platform; It runs fast and has plenty of connectivity options.
1.2 Downloading and Installing NOOBS
If you've purchased an SD card that already comes with NOOBS preinstalled, like the one that is supplied in our starter kit, it's still worth watching this section so you'll know how to re-flash a clean installation of NOOBS or another operating system.
NOOBS stands for New Out Of the Box Software. NOOBS is an operating system installer package put together by the Raspberry Pi Foundation. It comes with one OS already installed and gives the option of downloading several operating systems - convenient for first-time users who want to test-drive their Pi.
You can download NOOBS from the Raspberry Pi Foundation.
1.3 First Power-Up & Having a Look-Around
We're powering up our Pi for the first time. Let's have a look around and set a few things up. This includes setting up the keyboard and WiFi, exploring the Pi's menus and capabilities, and having a look at some tools we'll use for programming.
If you want to install an OS other than Raspbian using NOOBS you will need to have your Raspberry Pi connected to the internet via its Ethernet port. With this connection, you will see other options available for download and install.
To power-off your Pi, you can either find the shutdown option in the Pi menu, or issue this command in the terminal:
sudo shutdown -h now
The power light will remain on, to indicate power is connected, but the activity light will remain off.
Try to never remove power from your Pi without doing either of these things first; An unexpected loss of power may corrupt your SD card.
1.4 Introduction to the Shell
The shell is a program which processes our commands and returns outputs. We interact with the shell through a terminal. This could be an emulated terminal on the Pi's graphical desktop, or via remote connection for more advanced users. Getting comfortable with the shell is an important step, because it provides us with powerful tools to control how our Pi functions.
| Basic Commands cheat-sheet | |
|---|---|
| Command | Description |
| ls | List contents of directory |
| cd <dir> | Change to directory: <dir> |
| mkdir <dir> | Make a new directory called <dir> |
| rmdir <dir> | Delete the empty directory, <dir> |
| rm <file> | Delete the file, <file> |
| nano | Run the nano text editor program |
1.5 Staying Updated
Day-to-day Upgrades
Executing these commands will keep your programs and packages up to date. Update downloads the package lists for repositories. This is how your Pi knows where to install software from. Upgrade actually downloads the up-to-date packages.
sudo apt-get update
sudo apt-get upgrade
Distribution Upgrades
These commands perform larger, distribution upgrades. They might be useful in the future when newer distributions are released, or if you're updating a NOOBS SD card that was flashed more than a few months ago.
The Distro Upgrade Commands
sudo apt-get update
sudo apt-get dist-upgrade
Instructions specific to upgrading from Jessie to Jessie + PIXEL
If you purchased an SD card preloaded with NOOBS, chances are it was flashed some time ago and contains Raspbian Jessie without the PIXEL upgrade. PIXEL is a mostly cosmetic upgrade but still comes with some nice features. You won't need to follow this step if you've setup your own SD card, (Section 1.2) because you'll already be up to date. The Raspberry Pi Foundation has made a post about what PIXEL is, and how to upgrade.

How Raspbian Jessie looks without PIXEL
Chapter 2: Programming with Python.
2.0 Chapter Overview
In this chapter you'll learn about:
- How to write a simple program in Python
- Using variables
- Declaring functions to organise our code
- Using Python to connect to the real world via GPIO
Chapter Resources:
The Python Standard Library - Useful for a syntax reference and just to explore what pre-built functions are available to you.
Raspberry Pi GPIO Library - This is what we'll use to interact with the world outside. There are handy examples.
2.1 Introduction to Python
The IDLE is Python's shell. It's useful for trying out commands real-time. We can write a Python script, which is just a sequence of Python commands.
I've tried to squeeze in as many Python features as I could into this short script. Compare the script to what you see output when it is run; There's definitely a few tricks worth knowing!
Code for this section:
# A first Python Script, playing around with strings, loops and conditions.

print('This is my first script') # and this is a comment
string1 = 'hello'
string2 = 'world'

# strings can be concatenated with + and repeated with *
print(string1 + ' ' + string2 + '!'*3 )

twoOnThree = 2/3
print('2 divided by 3 is about {}' .format(twoOnThree)) # you can print variables
print('or with fewer decimal points: {: f}' .format(twoOnThree)) # you can explicitly format the output


import math #Usually we put imports at the start. I put it here for context.
string3 = 'more'
print('you can print {0} than one variable, here\'s Pi: {1}. That makes {2} variables!' .format(string3,math.pi,3))

print('\nCounting in Twos:') # a blank line before the text
for num in range(2,10,2):
    print(num)

print('\n') # a blank line

a = [1, 2, 3, 4, 5, 6, 7, 6, 5, 4, 3, 2, 1] # This is an array

# Here's a FOR loop with an IF statement inside!
for element in a: # For every element in a, do something
    if element == max(a): # looks for the largest number in a
        print(element*'=')
        print('We reached the largest')
    print(element*'=')
Challenge: change the for loop that counts in twos to count from -5 to 25 in steps of 5. Remember that you have the Standard Python Library Documentation available, try searching for range.
2.2 Connecting to the Outside World with GPIO
GPIO or General Purpose Input and Output is the interface that allows your Raspberry Pi to connect to the world. The pins can drive a voltage, sink current, and read voltage levels. Complex digital communications can also take place on the GPIO.
Before we begin, a word about connecting to the GPIO: The pins in the GPIO header are connected directly to the Broadcom processor that is the heart of a Raspberry Pi. You should never prototype circuits while your Raspberry Pi is powered because a short circuit - no matter how brief - might immediately fry your Pi.
Safely shutdown your Pi as described in Section 1.3 before removing power - then you're ready to prototype some circuits!
We've put together a great refresher on How to Use a Breadboard, if you haven't used one before.
Sparkfun have a comprehensive tutorial on how pull-up resistors work, if you're interested in further reading.
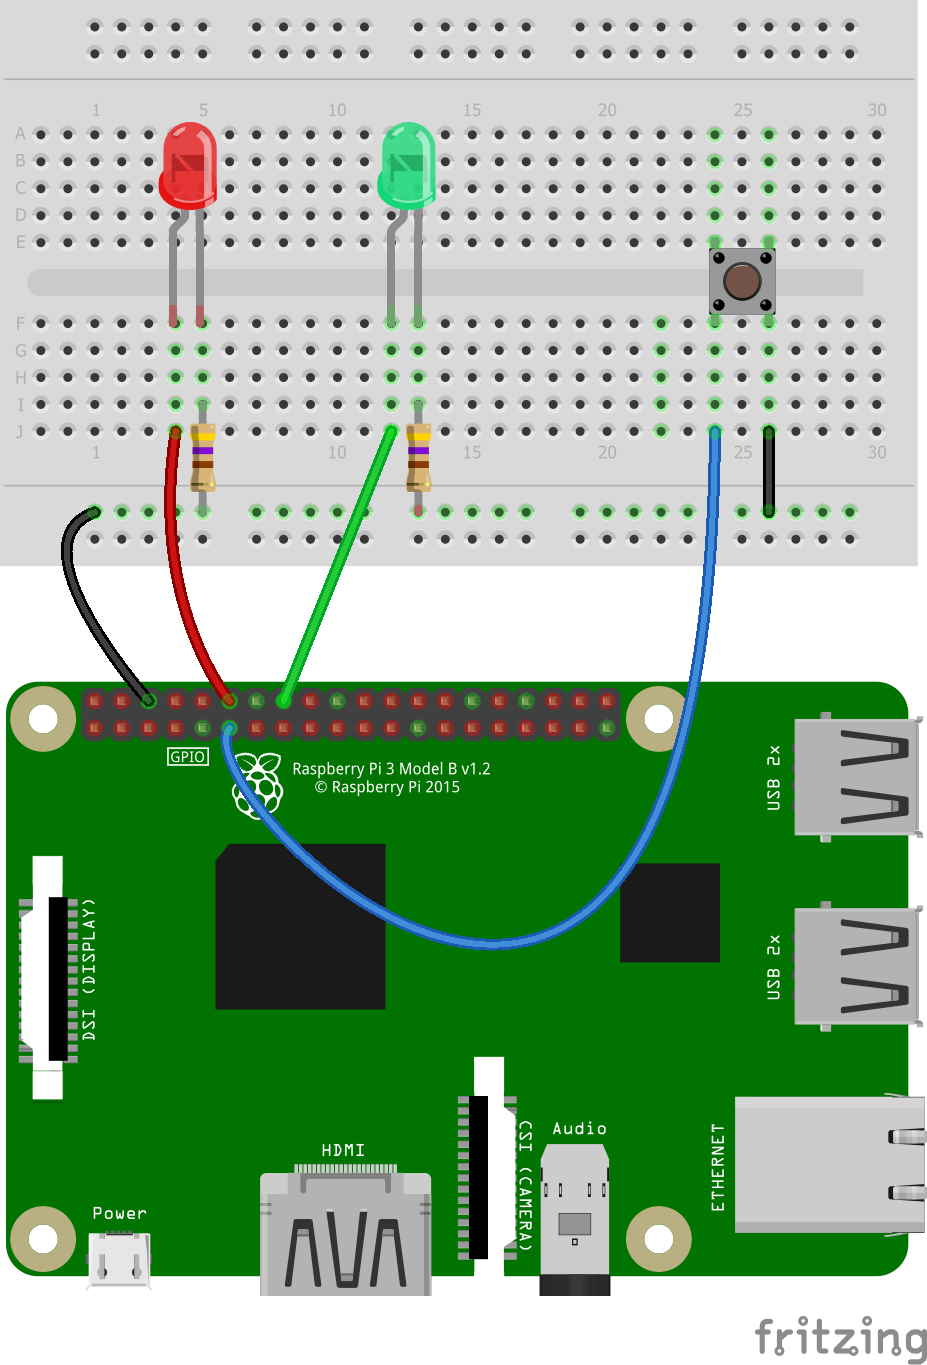
You'll need:
- A breadboard
- 2x LEDs
- 2x 470 Ohm Resistors
- a momentary button
- hookup wire / Male-Female jumper wires
Code for this section:
# First GPIO example
#   * Read button input
#   * Drive LEDs (Blink & PWM)

import RPi.GPIO as GPIO
import time

# Pin Definitions
pwmPin = 18
ledPin = 23
butPin = 17

duty = 75

# Setup GPIO
GPIO.setmode(GPIO.BCM)
GPIO.setup(ledPin,GPIO.OUT)
GPIO.setup(pwmPin,GPIO.OUT)
GPIO.setup(butPin,GPIO.IN, pull_up_down=GPIO.PUD_UP)

pwm = GPIO.PWM(pwmPin, 200) # Set PWM freq = 200Hz
GPIO.output(ledPin, GPIO.LOW)
pwm.start(duty)

# Infinite Loop
try:
    while 1:
        if  GPIO.input(butPin):             # Not Pressed ========
            pwm.ChangeDutyCycle(duty)
            GPIO.output(ledPin, GPIO.LOW)

        else:                               # Pressed ============
            GPIO.output(ledPin, GPIO.HIGH)
            pwm.ChangeDutyCycle(duty)
            time.sleep(0.5)
            GPIO.output(ledPin, GPIO.LOW)
            pwm.ChangeDutyCycle(100-duty)
            time.sleep(0.5)

except KeyboardInterrupt:
    pwm.stop()
    GPIO.cleanup()
2.3 Pretty Demo: Using math and functions
We're going to animate a nice sine wave in our shell. To do this we'll write a simple function.
Code for this section:
# Display a pretty sine wave in the Python Shell

import math # For the Sine function
import time # For sleep() delay

numCycle = 5 # Number of times we want our sinewave to cycle
pi = math.pi # Less typing required later = more readable code

# Function to simplify calling the sine function
def sin(x):
    return math.sin(x)

x = 0
while x < (2 * pi * numCycle):
    bar = int(20*sin(x))    # An integer number for the length of our bargraph
    x += 0.3                # the same as saying x = x+0.3
    print ((21+bar)*"=")    # Print the bargraph
    time.sleep(0.03)
2.4 Breathing LED effect
We'll be reusing the LED-button setup from Section 2.2 for this section.
Code for this section:
# 'Breathe' an LED, change speed with button-press

import RPi.GPIO as GPIO
import math # For the Sine function
import time # For sleep() delay

# Pin Number Definitions
pwmPin = 18
ledPin = 23
butPin = 17

# Function to simplify calling the sine function
def sin(x):
    return math.sin(x)

# Linearly map an input scale to an output scale. This can be used
# to map the sin function (-1 to 1) into a duty cycle (0 to 100)%
def mapFun(x, inLo, inHi, outLo, outHi):
    inRange = inHi - inLo
    outRange = outHi - outLo
    inScale = (x - inLo) / inRange  # normalised input (0 to 1)
    return outLo + (inScale * outRange) # map normalised input to output


GPIO.setmode(GPIO.BCM)          # Use Broadcom pin-numbering
GPIO.setup(ledPin,GPIO.OUT)     # Setup an ouptut pins
GPIO.setup(pwmPin,GPIO.OUT)
# Setup input pin for button: use internal pull-up resistor
GPIO.setup(butPin,GPIO.IN, pull_up_down=GPIO.PUD_UP)

pwm = GPIO.PWM(pwmPin, 200)     # Initialise PWM channel at 200Hz

GPIO.output(ledPin, GPIO.LOW)   # LED off
pwm.start(0)                    # Initialise PWM with 0 duty


#### Main Loop ####

x = 0
try:
    while 1:
        # Decide how fast to breathe the LED
        if GPIO.input(butPin):               # Not Pressed, breathe slow
            step = 0.03
        else:                                # Pressed, breathe fast
            step = 0.1

        duty = mapFun(sin(x),-1,1,0,100) # Call our special map function
        x += step                        # Equivalent to: x = x + step
        pwm.ChangeDutyCycle(duty)
        print(duty)
        # If you want to remove the print, make sure you have a time.sleep
        # Otherwise the program will run too fast and spoil the effect.
        #time.sleep(0.01)
        if x >= 2*math.pi:               # Keep x bounded (0 to 2Pi)
            x = 0


except KeyboardInterrupt:
    pwm.stop()
    GPIO.cleanup()
    print('Halted Cleanly')
The RPi.GPIO documentation also has an example which brightens/dims an LED. To acheive that end the example uses some for loops. We encourage you to check that out to see how they did it. Make sure you remember to change the GPIO pin number in the code to whichever one you're using!
2.5 Using HATs and the Sense HAT Emulator
All the examples for this section came straight out of the Sense Hat Emulator. You can access them yourself by selecting File > Open Example.
Note that when you open an example from this menu, a copy of the example gets saved in your home directory ( /home/pi ).
This is how I accessed the Rainbow Demo (rainbow.py):

Chapter 3 - Shell Scripting with BASH
In this chapter you'll learn about:
- How to write a simple BASH script
- Using variables and arguments
- Scheduling tasks
- How to use the command manual so you can use new commands correctly.
3.1 File Permissions, Arguments and Your First Script
Arguments are pieces of information that we pass in to a program or function. When you issue a command like cd /home/pi, here the command is cd and there is one argument, /home/pi.
In BASH, arguments are accessed in the order they were passed in with $x, where x is the argument number. This means that $1 refers to the first argument, and $4 refers to the 4th argument (if there is one). The name of the command issued is $0.
Code for this section:
#!/bin/bash

# an example of using arguments

echo The command issued was: $0
echo My name is $1
echo -e "\tI am $2 years old!\n\t$# arguments were passed in"
# -e option enables echo's interpretation of formatting
# characters, like \t for tab, and \n for a new line.
List files and their permissions with
ls -l
Permissions determine who is allowed to read, write (modify or delete,) and execute (run) a file. Since there is probably only one user on a Raspberry Pi, we'll be modifying permissions only for the file owner (which is you).
Add execute permissions to a file that you own with
chmod u+x <file>

Of course, you could always edit file permissions from the graphical desktop by right clicking a file, selecting Properties > Permissions > Access Control
3.2 Variables and Decision-Making
To create a variable, all you need to do is assign it, for example a=5. Don't use any spaces! To do some arithmetic with the variable a you need to wrap the expression in some double brackets and add the $ symbol. Eg. to make b equal to 5 times a you would write b=$(($a*5))
Code for this section:
#!/bin/bash

a=5
b=2
c=$(($a*$b)) # Multiply a and b and store result in c
let c=a*b # Equivalent, nicer looking statement!
echo "$a times $b is $c"

if [ $a -gt $b ] # If a is greater than b (YES)
then
  echo "a greater than b"
  let c=1
else
  echo "a less than or equal to b"
  let c=5
fi

# Loop ten times (c less-than-or-equal-to)
while [ $c -le 10 ]; do
  echo Number $c
  let c++ #equivalent to let c=c+1
done
Here's a few example expressions you can use in IF statements:
| Numeric Comparison | File Comparison | |||
|---|---|---|---|---|
| Expression | Meaning | Expression | Meaning | |
| [ $a -gt 10 ] | True if variable a is greater than 10 | [ -a FILE ] | True if FILE exists | |
| [ $a -lt $b ] | True if variable a is less than variable b | [ -w FILE ] | True if FILE is writable | |
| [ 5 -ge $c ] | True if 5 is greater than or equal to variable c | [ FILE1 -nt FILE2] | True if FILE1 was changed more recently than FILE2 | |
| [ $c -le -200 ] | True if variable c is less than or equal to -200 | Logic | ||
| [ $c -eq 1 ] | True if variable c is equal to 1 | [ ! EXPRESSION ] | True if EXPRESSION is NOT true | |
| [ $c -ne 1 ] | True if variable c is not equal to 1 | [EXPR1 -a EXPR2] | True if both EXPR1 and EXPR2 are true | |
| [EXPR1 -o EXPR2] | True if either EXPR1 or EXPR2 are true | |||
3.3 Writing a Useful Backup-Script
We're going to write a useful archiving script now. This script will take whatever directory or file we give it, and copy it to a predetermined archive-directory.
Code for this section:
#!/bin/bash

# Archive the input file to a predetermined location

# Check we have exactly 1 argument
if [ $# -ne 1 ]
then
  echo "Usage: $0 FILE"
  exit 1 # Quit the script, indicate an error to the shell
fi

# The archive location
archive=/home/pi/archives

# Make the destination if it does not already exist
mkdir -p $archive

# Copy the input file
cp -r $1 $archive
3.4 Improving the Backup-Script (Using the Manual)
We're going to improve our archive script to include copying input-files into a date-stamped directory. To achieve this end, we'll have to brush up on with using the date command by reading it's manual page; This will be a useful skill for researching commands to use in future scripts.
Code for this section:
#!/bin/bash

# Archive the input file to a predetermined location

# Check we have exactly 1 argument
if [ $# -ne 1 ]
then
  echo "Usage: $0 FILE"
  exit 1 # Quit the script, indicate an error to the shell
fi

# The archive location
DATE=`date +%Y-%m-%d`
archive=/home/pi/archives/$DATE

# Make the destination if it does not already exist
mkdir -p $archive

# Copy the input file/directory
rsync -avr $1 $archive

exit 0 # Quit the script, indicate no error
3.5 Scheduling Tasks and Running at Startup
Always use absolute file paths when working with these tools. This means most of the directories you specify will start with /home/pi. Don't just use ~ or ./
Run commands/programs at startup:
Entries in /etc/rc.local are run at startup.
You must edit this file with root permissions, eg:
sudo nano /etc/rc.local
You can add commands below the commented section, but make sure that the last line is left as exit 0
Warning!
If a command runs continuously, like a python script with an infinite loop (while 1:) or something that never exits, you must end the entry with an ampersand ( & ) character, eg:
python3 /home/pi/script.py &
If you don't do this, your Pi will fail to boot because it is stuck in your infinite-loop script!
All shell scripts entered into rc.local need to end with an exit 0 to indicate they were completed successfully.
An alternative to using rc.local is to use the crontab, covered next. The crontab is perhaps a bit safer to use than edits to rc.local.
Scheduling commands/programs to run periodically:
Tasks can be scheduled by entering them into the crontab. Edit the crontab with
crontab -e
Here are a few examples of how to format your cron jobs:
| Crontab Examples | ||||||
|---|---|---|---|---|---|---|
| Description | m | h | dom | mon | dow | command |
| Reboot every day at midnight | 0 | 0 | * | * | * | sudo reboot |
| Run a backup script every Monday at 5:00 AM |
0 | 5 | * | * | mon | /home/pi/backup_script |
| Execute some Python3 script at 9 AM and 5 PM every weekday |
0 | 9,17 | * | * | 1,2,3,4,5 | python3 /home/pi/my_script.py |
You can use the crontab to run your programs at startup too. Run a script at startup by creating an entry like:
@reboot python3 /home/pi/my_script.py
Chapter 4 - Desktop Applications
In this chapter you'll learn about:
- How to create graphical user interfaces (GUI)
- Event-driven programming
We'll begin with making a very simple interface, and gradually expand its functionality. By the end of the chapter we'll have a neat GUI that can control the GPIO - useful if you want to try some DIY home automation or make a dedicated interface for a project.
Chapter Resources:
4.1 Introducing Tkinter
4.2 Your First GUI
We're going to whip-up a very simple GUI to toggle a GPIO pin with. This will familiarise us with the Tkinter workflow:
- Create the main GUI window
- Create widget, required variable(s)
- Position the widget
- Create and attach an event-function
- Program the function to do what you want
- Repeat steps 2-6 as required
Here's the gpiozero documentation if you think you'll prefer using it instead of RPi.GPIO.
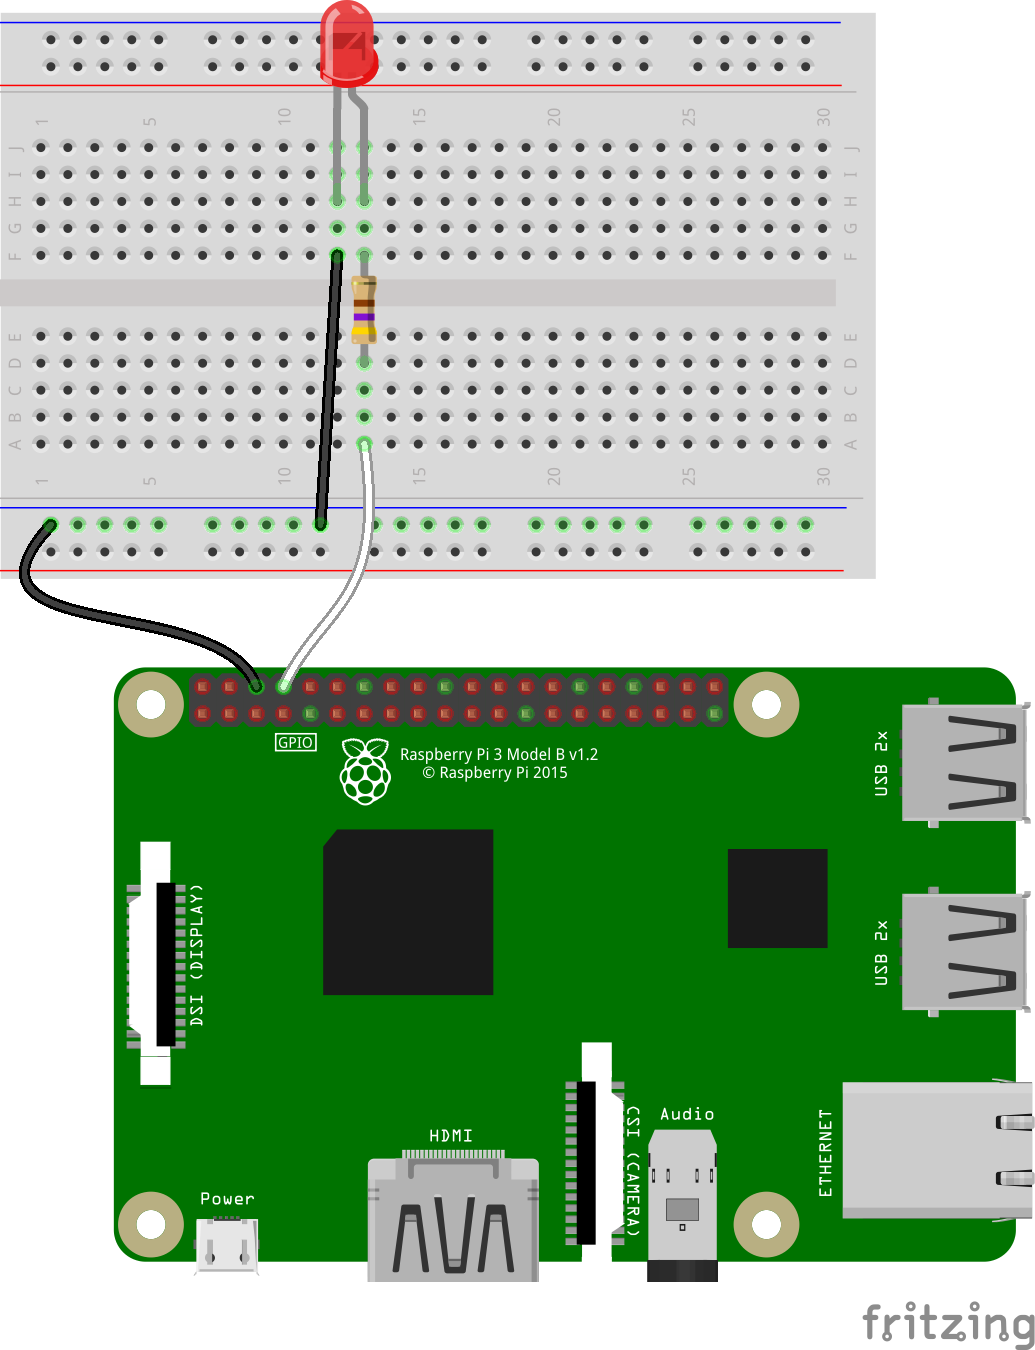
We'll be using this simple LED circuit, I'm using a 470 Ohm resistor:
## Toggle an LED when the GUI button is pressed ##

from tkinter import *
import tkinter.font
from gpiozero import LED
import RPi.GPIO
RPi.GPIO.setmode(RPi.GPIO.BCM)

### HARDWARE DEFINITIONS ###
led=LED(14)

### GUI DEFINITIONS ###
win = Tk()
win.title("LED Toggler")
myFont = tkinter.font.Font(family = 'Helvetica', size = 12, weight = "bold")


### Event Functions ###
def ledToggle():
    if led.is_lit:
        led.off()
        ledButton["text"]="Turn LED on" # Change only the button text property
    else:
        led.on()
        ledButton["text"]="Turn LED off"

def close():
    RPi.GPIO.cleanup()
    win.destroy()


### WIDGETS ###

# Button, triggers the connected command when it is pressed
ledButton = Button(win, text='Turn LED on', font=myFont, command=ledToggle, bg='bisque2', height=1, width=24)
ledButton.grid(row=0,column=1)

exitButton = Button(win, text='Exit', font=myFont, command=close, bg='red', height=1, width=6)
exitButton.grid(row=2, column=1)

win.protocol("WM_DELETE_WINDOW", close) # cleanup GPIO when user closes window

win.mainloop() # Loops forever
4.3 A Walkthrough of Other Widgets
GUI programming is quite repetitive, so you can think of this section as a handy reference to copy code from and quickly deploy a widget.
## A demonstration of some Tkinter widgets ##

from tkinter import *
import tkinter.font

### GUI DEFINITIONS ###
win = Tk()
win.title("My Simple GUI")
myFont = tkinter.font.Font(family = 'Helvetica', size = 12, weight = "bold")

leftFrame = Frame(win)
leftFrame.pack(side = LEFT)
rightFrame = Frame(win)
rightFrame.pack(side = RIGHT)
midFrame = Frame(win)
midFrame.pack(side = RIGHT)

### Variable Definitions for widgets ###
checkVal1 = IntVar()
checkVal2 = IntVar()
sliderval = DoubleVar()
rad = IntVar()

### Event Functions ###
def buttonPress():
    print('Slider value is {}' .format(sliderval.get()))

def checkToggle():
    print('\nCheckbox #1  #2\n          {}   {}' .format(checkVal1.get(), checkVal2.get()))

def checkRadio():
    select = "Radio button " + str(rad.get()) + " selected"
    label.config(text = select)

def close():
    win.destroy()   # Close GUI

### WIDGETS ###

# Button, triggers the connected command when it is pressed
myButton = Button(midFrame, text='Load', font=myFont, command=buttonPress, bg='bisque2', height=1)
myButton.pack(side = BOTTOM)

# Two checkboxes, update attached variables and call command when toggled
check1 = Checkbutton(leftFrame, text='Lights   ', variable=checkVal1, command=checkToggle)
check1.pack()
check2 = Checkbutton(leftFrame, text='Sprinkler', variable=checkVal2, command=checkToggle)
check2.pack()

# Radio Buttons - good for mutually exclusive options
label = Label(leftFrame)
label.pack()
label.config(text="No option selected")
R1 = Radiobutton(leftFrame, text="Option 1",variable=rad,value=1, command = checkRadio)
R1.pack()
R2 = Radiobutton(leftFrame, text="Option 2",variable=rad,value=2, command = checkRadio)
R2.pack()

# Slider bar - Good for more continuous parameter adjustment
slider = Scale(midFrame, variable = sliderval, from_=100.0, to=0.0)
slider.pack()

# Spinbox - select from a range of predetermined values
numOption = Spinbox(rightFrame, from_=1, to = 11, width=5)
numOption.pack(side = TOP )


# Exit Button - closed the GUI
exitButton = Button(rightFrame, text='Exit', font=myFont, command=close, bg='red', height=1, width=6)
exitButton.pack(side = BOTTOM )

win.mainloop() # Loops forever
4.4 LED Command-Centre with Text-Entry box

from tkinter import *
import tkinter.font
from gpiozero import LED
import RPi.GPIO
RPi.GPIO.setmode(RPi.GPIO.BCM)

### HARDWARE DEFINITIONS ###
# LED pin definitions
led0 = LED(7)
led1 = LED(8)
led2 = LED(25)
led3 = LED(23)
led4 = LED(24)
led5 = LED(18)
led6 = LED(15)
led7 = LED(14)
# Arrange LEDs into a list
leds = [led7,led6,led5,led4,led3,led2,led1,led0]

### GUI DEFINITIONS ###
win=Tk()
win.title("LED Controller")
myFont=tkinter.font.Font(family = 'Helvetica', size = 12, weight = "bold")
ledCode = StringVar()


### Event Functions ###
def ledShow():
    ledCode = code.get()
    print("LED code: ", ledCode) #Debug

    i=0 #loop-counter
    # For each character in the ledCode string, check if = 1 and if so,
    # turn on the corresponding LED
    for c in ledCode:
        if c == "1":
            leds[i].on()
        else:
            leds[i].off()
        i+=1

def close(): # Cleanly close the GUI and cleanup the GPIO
    RPi.GPIO.cleanup()
    win.destroy()


### WIDGETS ###

ledButton = Button(win, text='Load LED code', font=myFont, command=ledShow, bg='bisque2', height=1)
ledButton.grid(row=0,column=1)

code = Entry(win, font=myFont, width=10)
code.grid(row=0,column=0)

exitButton = Button(win, text='Exit', font=myFont, command=close, bg='red', height=1, width=6)
exitButton.grid(row=3,column=1, sticky=E)

win.protocol("WM_DELETE_WINDOW", close) # cleanup GPIO when user closes window

win.mainloop() # Loops forever
4.5 Menu Bars and Extra Windows
from tkinter import *

win = Tk()
win.title("Menu bar demo")


def placeholder():
    popup = Toplevel()
    popup.title("placeholder")
    # Fill the popup window with the Canvas() example image
    C = Canvas(popup, bg="blue", height=250, width=300)
    coord = 10, 50, 240, 210
    arc = C.create_arc(coord, start=0, extent=150, fill="red")
    C.pack()
    popup.mainloop()


menubar = Menu(win)

# Create menu entry and sub-options
filemenu = Menu(menubar, tearoff=0)
filemenu.add_command(label="Open", command=placeholder)
filemenu.add_command(label="Save", command=placeholder)
filemenu.add_command(label="Save as...", command=placeholder)
filemenu.add_separator()
filemenu.add_command(label="Quit", command=win.quit)
menubar.add_cascade(label="File", menu=filemenu)

# Create more menus
commandmenu = Menu(menubar, tearoff=0)
commandmenu.add_command(label="Irrigation Manager", command=placeholder)
commandmenu.add_command(label="Dog Walker", command=placeholder)
commandmenu.add_command(label="Calculator", command=placeholder)
menubar.add_cascade(label="Command", menu=commandmenu)

helpmenu = Menu(menubar, tearoff=0)
helpmenu.add_command(label="How-To", command=placeholder)
helpmenu.add_separator()
helpmenu.add_command(label="About", command=placeholder)
menubar.add_cascade(label="Help", menu=helpmenu)

# Display the menu
win.config(menu=menubar)
4.6 Events & Bindings
In examples that use GPIO we've been capturing the WM_DELETE_WINDOW event which occurs if the user clicks the close-window button ( x ). Here, we'll demonstrate how to capture a double-click event, and work that into a cool menu interface. There are lots of other events which you can make use of.
## Demonstrate a small list-style menu with mouse-click events
from tkinter import *
import tkinter.font

### GUI DEFINITIONS ###
win = Tk()
win.title("List menu demo")
myFont = tkinter.font.Font(family = 'Helvetica', size = 12, weight = "bold")

menuFrame = Frame(win)
menuFrame.pack(side = LEFT)
irrFrame = Frame(win)
dogFrame = Frame(win)
calcFrame = Frame(win)

### EVENT FUNCTIONS ###
def buttonPress(): # Placeholder button event
    print("Button Pressed")


def callback(event):
    print("clicked at", event.x, event.y)


def menuManage(dummy): # Manage what options are visible
    # Start by hiding all buttons
    sel = Lb.curselection()
    irrFrame.pack_forget()
    dogFrame.pack_forget()
    calcFrame.pack_forget()

    # Show the relevant buttons depending on list selection
    if sel[0] == 0:
        irrFrame.pack(side=RIGHT)
    elif sel[0] == 1:
        dogFrame.pack(side=RIGHT)
    elif sel[0] == 2:
        calcFrame.pack(side=RIGHT)


### WIDGETS ###

# Listbox for text-item selection
Lb = Listbox(menuFrame)
Lb.insert(1,"Irrigation Controller")
Lb.insert(2,"Dog Walker")
Lb.insert(3,"Calculator")
Lb.bind("<Double-Button-1>", menuManage) # Attach double-click event
##Lb.bind("<Double-Button-1>", callback) # Try running this line instead of the above
Lb.pack()

# Placeholder buttons for functionality
irrOn = Button(irrFrame, text='On', font=myFont, command=buttonPress, bg='bisque2', height=1)
irrOff = Button(irrFrame, text='Off', font=myFont, command=buttonPress, bg='bisque2', height=1)
irrOn.pack(side = TOP)
irrOff.pack(side = BOTTOM)

dogOn = Button(dogFrame, text='Walk', font=myFont, command=buttonPress, bg='bisque2', height=1)
dogOff = Button(dogFrame, text='No-Walk', font=myFont, command=buttonPress, bg='bisque2', height=1)
dogOn.pack(side = TOP)
dogOff.pack(side = BOTTOM)

calcPlus = Button(calcFrame, text='+', font=myFont, command=buttonPress, bg='bisque2', height=1)
calcMinus = Button(calcFrame, text='-', font=myFont, command=buttonPress, bg='bisque2', height=1)
calcPlus.pack(side = TOP)
calcMinus.pack(side = BOTTOM)

win.mainloop()
Chapter 5: The Internet of Things
5.0 Chapter Overview
In Chapter 5 we are going to discuss what the Internet of Things (IoT) is, and what you can do with it.
We'll explore some easy-to-use IoT services that will help you get off the ground with minimal fuss.
By the end of this chapter you will be able to use your Raspberry Pi as a web-connected 'thing' that you can control from anywhere on the planet with an internet connection.
5.1 Introduction to IoT Services
IFTTT: If This, Then That is built around applets and services. Services are things you use every day like email, twitter, dropbox, spotify, instagram... the list goes on. Applets are how IFTTT connects your services to do your bidding. The structure of an IFTTT app is simple: If a certain condition is detected in one service, perform an action that affects another service. If it sounds abstract, don't worry. We'll soon be going through a juicy example.
Particle is an IoT company that produce internet-connected microcontroller boards. They also maintain the Particle Cloud, a service that makes it super easy to connect Particle devices over the internet. Recently, Particle added Raspberry Pi support to their cloud service, meaning you can put your Pi on the Particle Cloud for free!
For the remainder of this chapter we're going to use IFTTT and Particle, so register for an account with both of these services. We'll also need a Gmail account. I'm going to make a special Gmail account just for this chapter. If you want to keep your personal email separate from your IoT experiments, it won't hurt to do the same.
At the time of writing, Particle Pi is in Beta so you may need to follow this link after setting up your Particle account.
MQTT is a lightweight messaging protocol for IoT devices. It works as a publish -> subscribe interface. Simply, IoT devices subscribe to a topic they are interested in. A publisher publishes data to a topic, and that data is sent to all subscribers of that topic. If you'd like to learn more, we've put together a tutorial on how to get started with MQTT on a Raspberry Pi. Adafruit also host a free MQTT server called Adafruit IO.
Sparkfun have put together their own free-to-use data server over at data.sparkfun.com. Here you can create data streams, store data and even download the underlying engine onto your own machine if you want to create a private data server.
5.2 Particle Pi and IFTTT
At the end of this video we'll be able to control a GPIO by email. Let that sink in.
1. Construct the following circuit

2. Setup the particle-agent on your Pi
You can find the full setup documentation for particle-agent here.
Install particle agent by executing:
bash <( curl -sL https://particle.io/install-pi )
Once the agent has installed, you'll be prompted to enter your Particle username and password to link your Pi to the Particle Cloud - You'll also have the opportunity to give your Pi a name that it will appear as in the Particle Cloud. With that complete you'll be able to log in to build.particle.io and see your Pi listed and displayed as "online."
3. Create a Particle App
Over at build.particle.io, select "Create New App" and copy the following code into your app. You need to change the string "unique_event_name" to a unique string of your own choosing - don't make it short and simple. Now for something truly amazing. Click the "lightning bolt" icon to flash the App onto your Pi. That's right - we're developing code for our Pi from an internet browser, and we'll be able to upload our code over the internet. We could be doing this from anywhere in the world. Take a moment to recover, maybe it's time for a cup of tea.
// -----------------------------------------
// Demonstrate Particle and IFTTT
/* -----------------------------------------
This program subscribes to a a particle event.
An IFTTT app monitors inbox activity of a Gmail account and publishes events to the Particle Cloud.
------------------------------------------*/

int led = D1;
int boardLed = D7;

// setup() is run only once, it's where we set up GPIO and initialise peripherals
void setup() {

  // Setup GPIO
  pinMode(led,OUTPUT); // Our LED pin is output (lighting up the LED)
  pinMode(boardLed,OUTPUT); // Our on-board LED is output as well
  digitalWrite(led,LOW);
  digitalWrite(boardLed,LOW);

  // Subscribe to an event published by IFTTT using Particle.subscribe
  Particle.subscribe("unique_event_name", myHandler);
  // TODO:
  // Subscribe will listen for the event unique_event_name and, when it finds it, will run the function myHandler()
  // (Remember to replace unique_event_name with an event name of your own choosing. Make it somewhat complicated to make sure it's unique.)
  // myHandler() is declared later in this app.
}

// loop() runs continuously, it's our infinite loop. In this program we only want to repsond to events, so loop can be empty.
void loop() {

}

// Now for the myHandler function, which is called when the Particle cloud tells us that our email event is published.
void myHandler(const char *event, const char *data)
{
  /* Particle.subscribe handlers are void functions, which means they don't return anything.
  They take two variables-- the name of your event, and any data that goes along with your event.
  In this case, the event will be "buddy_unique_event_name" and the data will be "on" or "off"
  */

  if (strcmp(data,"led-off")==0) {
    // if subject line of email is "off"
    digitalWrite(led,LOW);
    digitalWrite(boardLed,LOW);
  }
  else if (strcmp(data,"led-on")==0) {
    // if subject line of email is "on"
    digitalWrite(led,HIGH);
    digitalWrite(boardLed,HIGH);
  }

}
4. Construct a new IFTTT Applet
Our Pi is sitting patiently, waiting for some trigger event. Let's give it one.
Log into IFTTT and create a new applet (My Applets > New Applet)
Click the this and select or search for 'Gmail'; You'll be prompted to authorise IFTTT to access your Gmail account. Next, select New email in inbox from search. This is a general purpose trigger which we can refine in the next step.
Now we have to enter our search condition. We want to check the subject field of an incoming email for the subjects led-on and led-off. You can click through to see other useful search operators, but for this example we're going to enter {subject:led-on subject:led-off} which checks for either subject.
Back at the applet menu, you'll see that gmail has been dropped into the if condition. Now select the "that". This is where we link our email service to the Particle Cloud. Select or search for 'Particle', and select the Publish an event option. In the Event name box, enter the unique event name you chose before. Leave the data field as Subject - this is how we're going to pass information into our Pi.
5. Email yourself
Send an email with the subject led-on from any address to the one that you've set up as the IFTTT trigger. In my case I'm just going to email myself.
You can manually have IFTTT check it's trigger by opening the applet and clicking check now. This is useful for when we're debugging, because the response time for IFTTT can vary wildly - from seconds to minutes.
Your LED should turn on! And when you send an email with the subject as led-off the led should turn off. How cool is that!?
Particle Pinout Reference
Paricle make their own hardware, so they've maintained their own GPIO nomenclature in their Particle Pi service. This is pretty neat, because it means you can easily swap what kind of device ( Pi <==> Particle ) your code is running on if you choose. Here's a handy table to keep track of the GPIO, as defined by Particle.

image source: docs.particle.io
5.3 Pi to Pi communications with Particle Pi
Last section we got up to speed with IFTTT - a super versatile service. IFTTT is flexible, but sometimes doesn't trigger instantaneously. If our project is timing-sensitive, we'll communicate direct through the Particle Cloud. Here, we'll publish and subscribe to Particle events on two Raspberry Pis.
Publisher
Circuit
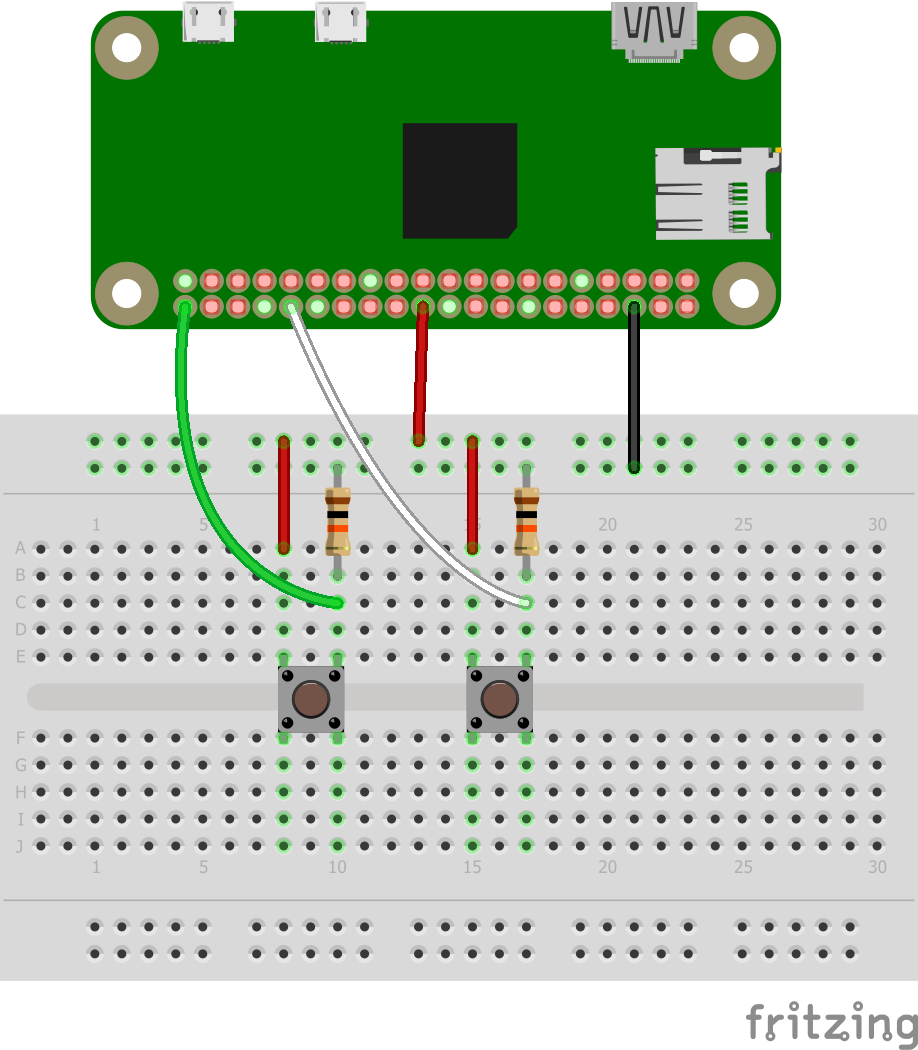
Particle App
// -----------------------------------------
// Publisher Code Demo
/* -----------------------------------------
    Each time a button is pressed, publish
    the total number of button-presses to
    an event.
------------------------------------------*/

// GPIO Definitions
int pwr3_3 = D12; // 3.3V supply for button
int flashButton = D13;
int resetButton = D16;
int boardLed = D7;
int pressCount = 0; // Stores the number of times the flash-button is pressed

// Setup GPIO
void setup() {
    pinMode(flashButton, INPUT);
    pinMode(resetButton, INPUT);
    pinMode(boardLed, OUTPUT);
    pinMode(pwr3_3, OUTPUT);

    digitalWrite(boardLed, HIGH); // Start the onboard LED as OFF (boardLed is inverted)
    digitalWrite(pwr3_3, HIGH);
}

// Poll the button status, increment or reset the counter, publish the count.
void loop() {
    if (digitalRead(flashButton) == HIGH) {// HIGH when pressed

        pressCount++;
        String dataString = String(pressCount);

        Particle.publish("buttonPressed",dataString,60,PRIVATE);
        // And flash the on-board LED on and off.
        digitalWrite(boardLed,LOW); // On
        delay(500);
        digitalWrite(boardLed,HIGH); // Off

    }

    if (digitalRead(resetButton) == HIGH) pressCount = 0; // Reset the press-counter

}
Subscriber
Circuit
Particle App
// -----------------------------------------
// Subscriber Code Demo
/* -----------------------------------------
    Subscribe to an event and assume all
    data that comes in is numeric.
    Convert the string data to an integer
    and flash an LED that number of times.
------------------------------------------*/

int led = D1;
volatile int blinkCount = 0;
volatile bool trigger = 0;

void setup() {

  // Setup GPIO
  pinMode(led,OUTPUT); // Our LED pin is output (lighting up the LED)
  digitalWrite(led,LOW);

  // Subscribe to an event published by our second Raspberry Pi (or other device!)
  Particle.subscribe("buttonPressed", myHandler, MY_DEVICES);
  // The MY_DEVICES argument means that only events published by devices registered to this Particle Cloud account will be accepted.
}


void loop() {
    if (trigger) { // trigger is set TRUE in the event handler
        for(int i = 0; i < blinkCount; i++){
            digitalWrite(led, HIGH);
            delay(350);
            digitalWrite(led, LOW);
            delay(350);
        }
        trigger = 0; // Need to reset the trigger
    }

}

void myHandler(const char *event, const char *data)
{
    String dataVar = data;       // Load data, which is a constant into a string variable
    blinkCount = dataVar.toInt(); // Now we can call a special function which converts the numberic data in the string, to an integer
    trigger = 1; // Trigger the blink loop

}
5.4 Workshop Closeout - Where to from here?
We've covered several topics throughout this workshop series, and we've really only scratched the surface of each. By now we've assembled a toolbox of useful skills and are aware of the kinds of tasks our Pi can handle.
Where to find inspiration:
A good place to start with a new piece of hardware is to find a well-documented project and copy it. There are loads of cool projects on instructables.com or hackaday.io, and on our own projects page.
Where to get help:
The Raspberry Pi Stack Exchange is the place to go with questions specific to Raspberry Pi.
The Unix and Linux Stack Exchange is where to take your Linux questions like command use, shell scripting and other OS tasks.
To receive quality answers on Stack Exchange, make sure you ask quality questions. Provide succinct information in your questions, and it always helps to have done a bit of googling first.
Of course, there's always our own forums.

