Similar to how bats echo-locate and how submarines use sonar, the PiicoDev® Ultrasonic Rangefinder uses sound waves to measure the distance to an object. It sends out a high-pitched sound wave, which bounces off of the object and comes back to the sensor. The time it takes for the sound wave to go out and come back is used to calculate the distance to the object. Think of it like shouting and listening for an echo! By knowing how long it takes for the echo to come back, we can calculate how far away the object is.
Distance data can be used in all kinds of creative ways! Plenty of consumer devices use distance data to determine the presence of humans or obstacles - things like non-contact faucets which can control the flow of water if hands are present in a wash sink; or vehicle detectors in parking garages that indicate if a parking space is vacant.
This guide will walk through connecting a PiicoDev Ultrasonic Rangefinder to a dev. board and provide some example code to get started taking distance measurements. There's even some project inspiration further down. Let's jump in!
Contents
- Hardware and Connections
- Setup Thonny
- Download / Install PiicoDev Modules
- Measure Distance
- Code Remix - Proximity Alert
- Multiple Rangefinders on the same PiicoDev Bus
- Conclusion
- Resources
- Project Ideas
Hardware and Connections
To follow along you'll need:
- A Raspberry Pi Pico (with Soldered Headers) or Pico W (with Soldered Headers)
- A PiicoDev Ultrasonic Rangefinder
- A PiicoDev Expansion Board for Raspberry Pi Pico
- A PiicoDev Cable
First, make sure your PiicoDev Ultrasonic Rangefinder is assembled correctly. Plug the ultrasonic ranger into the 4-pin female header on the PiicoDev module such that it points outwards. Be careful here - If you connect the ranger incorrectly both it and the PiicoDev module may become damaged.
Make sure all the ID switches are OFF before proceeding.
Plug your Pico into the Expansion Board. Make sure it is installed in the correct orientation - Pin 0 on the expansion board should be adjacent to the Pico's USB connector.
Connect your PiicoDev Ultrasonic Rangefinder to the expansion board with a PiicoDev Cable.

To follow along you'll need:
- A Raspberry Pi single board computer (Pictured: Raspberry Pi 4 Model B)
- A PiicoDev Ultrasonic Rangefinder
- A PiicoDev Adapter for Raspberry Pi
- A PiicoDev Cable (100mm or longer is best for Raspberry Pi)
- (Optional) A PiicoDev Platform will keep everything mounted securely.
First, make sure your PiicoDev Ultrasonic Rangefinder is assembled correctly. Plug the ultrasonic ranger into the 4-pin female header on the PiicoDev module such that it points outwards. Be careful here - If you connect the ranger incorrectly both it and the PiicoDev module may become damaged.
Make sure all the ID switches are OFF before proceeding.
Mount the Adapter onto your Pi's GPIO. Make sure it is plugged in the correct orientation - An arrow on the Adapter will point to the Pi's Ethernet connector (on a Pi 3 the Ethernet connector and USB ports are swapped.)
Connect your PiicoDev Ultrasonic Rangefinder to the Adapter with a PiicoDev Cable.

To follow along you'll need:
- A micro:bit v2
- APiicoDev Ultrasonic Rangefinder
- A PiicoDev Adapter for micro:bit
- A PiicoDev Cable
- (Optional) A PiicoDev Platform will keep everything mounted securely.
First, make sure your PiicoDev Ultrasonic Rangefinder is assembled correctly. Plug the ultrasonic ranger into the 4-pin female header on the PiicoDev module such that it points outwards. Be careful here - If you connect the ranger incorrectly both it and the PiicoDev module may become damaged.
Make sure all the ID switches are OFF before proceeding.
Plug your micro:bit into the Adapter, making sure the buttons on the micro:bit are facing up.
Connect your PiicoDev Ultrasonic Rangefinder to the Adapter with a PiicoDev Cable.

Setup Thonny
Select your dev board from the tabs above to get ready for programming with Thonny for the first time.
If you have already programmed with PiicoDev modules before, there's probably no need to follow these steps again.
Let's get set up with scripting in Thonny for the Raspberry Pi Pico.
We'll install Thonny, configure for Pico and write our first script. To follow along you'll need:
Install Thonny
If you're working on a Raspberry Pi 4, you're in luck - Thonny comes pre-installed. For those on another operating system, download Thonny here and run the installer.
Once the installer finishes, run Thonny.
Set up Thonny
Hold the BOOTSEL button on your Pico, and connect your Pico to your computer via USB.
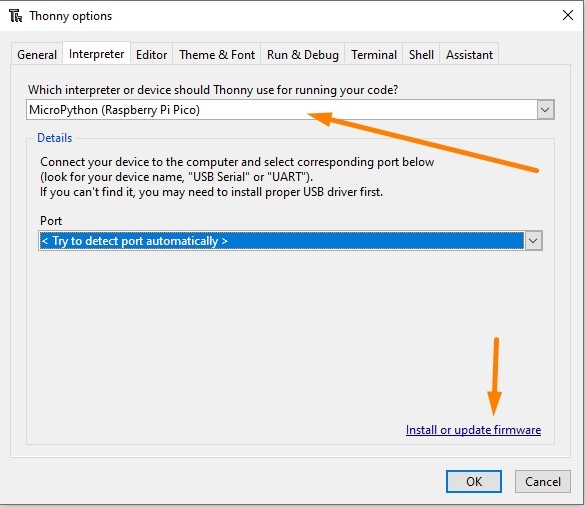
Go to Run > Select interpreter and choose MicroPython (Raspberry Pi Pico).
It's also a good idea to install or update firmware. This will update your Pico with the latest version of MicroPython, or install MicroPython if it wasn't already.
REPL interface (Shell)
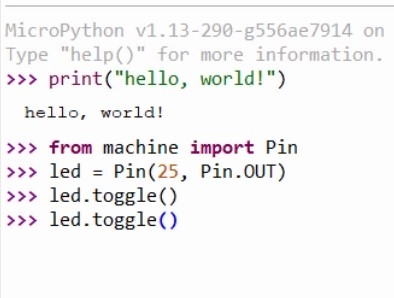
We can immediately start executing code in the REPL - Enter this code in the shell tab: print("Hello, World!")
The command will be sent to your Pico, which will execute the command and display back the message.
We can also take control of the on-board LED by executing the following code:
from machine import Pin
led = Pin(25, Pin.OUT)
led.toggle()
This code will toggle the LED. If you keep executing led.toggle() the LED will keep changing state.

Writing a Script
Create a new script with File > New and paste in the following code:
from machine import Pin
from time import sleep
led = Pin(25, Pin.OUT)
n = 0;
while True:
    led.toggle()
    print("13 x {} = {}".format(n, 13*n)) # print the thirteen-times table
    n = n + 1
    sleep(0.5)
Save the script - you will be prompted to save to your computer OR the pico. Select save to Pico and name the file main.py
Return to the REPL and press Ctrl+D (or use the Stop/Restart button) to restart your Pico. The LED should flash at a steady rate and the shell should begin printing multiples of thirteen.

Installing a Package
Packages are reusable pieces of code that another programmer has written for a common task, such as interfacing with a specific piece of hardware. Thonny has support for installing micropython packages from the Python Package Index - aka 'PyPI' directly onto the Raspberry Pi Pico.
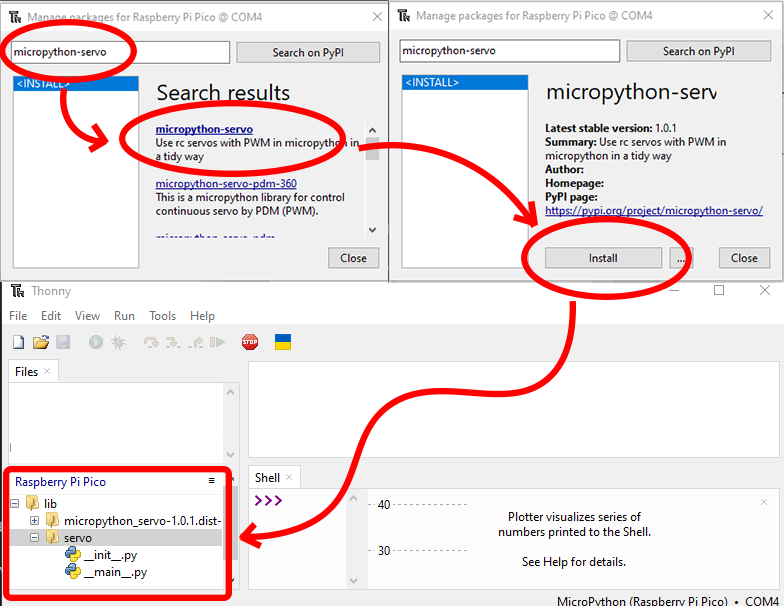
To install a package, ensure the Pico is plugged in and go to Tools > Manage Packages, which will show the Manage Packages dialog.
Enter the name of the package you would like to install into the search bar and click 'Search on PyPI'.
In the search results list, click the title of the package you would like to install. A title that's in bold simply indicates a direct search match on the text you entered in the search bar.
The Manage Packages dialog will show an overview of the package you have clicked. Click Install to install the package on your Pico.
You can confirm the package has been installed by checking the 'Raspberry Pi Pico' section of the File View in Thonny. The view should show a new folder named 'lib', and inside this folder will be one or more folders containing the metadata and source code of the library you just installed.
Conclusion
We've installed Thonny and uploaded scripts to our Raspberry Pi Pico - if you have any questions feel free to start the conversation below, or open a topic in our forums - we're full time makers and happy to help!
Good news! Thonny comes pre-installed with Raspberry Pi OS. However, to work with PiicoDev we need to enable I2C communications as follows:
- Power on your Raspberry Pi.
- Open the Preferences > Raspberry Pi Configuration, select the Interfaces tab
- Ensure I2C is Enabled
You only need to do this step for your first PiicoDev project - from here on you probably won't have to repeat this step when using PiicoDev hardware.

Let's get set up with scripting in Thonny for the Micro:bit. We'll install Thonny, configure for Micro:bit, and write our first script.
All you'll need to follow along is a Micro:bit v2 GO kit
Contents
- Install Thonny
- Set up Thonny
- REPL interface
- Writing a Script
- Useful Tips
- Uploading and Downloading Files
Install Thonny
Download Thonny here and run the installer.
Once the installer finishes, run Thonny.
Set up Thonny
Connect your Micro:bit V2 to your computer with the USB cable.

Open Thonny, and in the menu bar find Run > Select interpreter and choose MicroPython (BBC micro:bit)
It's also a good idea to install or update firmware. This will update your micro:bit with the latest version of MicroPython, or install MicroPython if it wasn't already.

Make sure the Files pane and Plotter are visible by selecting them in View > Files, and View > Plotter.
REPL interface (Shell)
Click the red STOP button to restart the MicroPython on your micro:bit if necessary. The Shell tab should display a block of text that indicates MicroPython is running:

We can immediately start executing code in the REPL - Enter this code in the shell tab: print("Hello, World!")
The command will be sent to your micro:bit, which will execute the command and display back the message - nice!
Next, we can also take control of the on-board speaker by executing the following code:
from microbit import *
import audio
audio.play(Sound.HAPPY)
This code will play a happy tone from the micro:bit's speaker! If you the LED. If you keep executing audio.play(Sound.HAPPY), the tone will repeat.

Writing a Script
The REPL is great for test-driving some new commands and performing short experiments - the real power is in scripting though.
Create a new script with File > New and paste in the following code:
from microbit import *
import audio

print("Hello!")

multiple = 1 # initialise the counter

while True:
    if button_a.was_pressed(): # get the next multiple of the thirteen
        result = multiple * 13 # Calculate the result
        print("13 times " + str(multiple) + " is " + str(result)) # print the multiplication
        multiple = multiple + 1 # increment the multiple

    if button_b.was_pressed(): # Say Hello
        display.show(Image.HAPPY)
        audio.play(Sound.HAPPY)
        display.clear()

    sleep(10) # a 10 millisecond delay
Save the script - you will be prompted to save to your computer OR the micro:bit. Select save to micro:bit and name the file main.py
Return to the REPL and press Ctrl+D to restart your micro:bit. If something went wrong, use the Stop/Restart button, then Ctrl+D.
Now, when we press the A button, the Shell will print the next multiple of 13, or if we press the B-button, our micro:bit gives us a smile and a hello sound.

Notice the plot is also showing some lines, and they're colour-coded to numbers in the print statement! In my case:
- The Blue line is the constant 13,
- The Orange Line is the multiple variable that increases slowly, and
- The Red line is the result variable, which increases really quickly.
Useful Tips
- You can stop a running script by selecting the Shell window and pressing Ctrl+C. This is useful if we want to make changes to the file(s) stored on the micro:bit.
- Reboot your micro:bit (or other MicroPython device) by selecting the Shell window and pressing Ctrl+D
- If something goes wrong, you can always click the red STOP button in the menu bar
Uploading and Downloading Files
We've been working with a file stored directly on the micro:bit - if you'd like to keep a copy on your computer, right-click the main.py file and select the 'download' option. Similarly, you can always upload code to your micro:bit by right-clicking files on your computer and selecting the upload button.

Conclusion
We've installed Thonny and uploaded our first script to our micro:bit. The script includes branches depending on which button is pressed and can generate audio tones and perform basic arithmetic. Now we can write scripts, move them between micro:bit and computer, or test code interactively using the REPL.
If you have any questions feel free to start the conversation below or open a topic in our forums - we're full-time makers and happy to help!
Let's get set up with scripting in Thonny for the Micro:bit. We'll install Thonny, configure for Micro:bit, and write our first script.
All you'll need to follow along is a Micro:bit v2 GO kit
Contents
- Install Thonny
- Set up Thonny
- REPL interface
- Writing a Script
- Useful Tips
- Uploading and Downloading Files
Install Thonny
Download Thonny here and run the installer.
Once the installer finishes, run Thonny.
Set up Thonny
Connect your Micro:bit V2 to your computer with the USB cable.
Open Thonny, and in the menu bar find Run > Select interpreter and choose MicroPython (BBC micro:bit)
It's also a good idea to install or update firmware. This will update your micro:bit with the latest version of MicroPython, or install MicroPython if it wasn't already.
Make sure the Files pane and Plotter are visible by selecting them in View > Files, and View > Plotter.
REPL interface (Shell)
Click the red STOP button to restart the MicroPython on your micro:bit if necessary. The Shell tab should display a block of text that indicates MicroPython is running:
We can immediately start executing code in the REPL - Enter this code in the shell tab: print("Hello, World!")
The command will be sent to your micro:bit, which will execute the command and display back the message - nice!
Next, we can also take control of the on-board speaker by executing the following code:
from microbit import *
import audio
audio.play(Sound.HAPPY)
This code will play a happy tone from the micro:bit's speaker! If you the LED. If you keep executing audio.play(Sound.HAPPY), the tone will repeat.
Writing a Script
The REPL is great for test-driving some new commands and performing short experiments - the real power is in scripting though.
Create a new script with File > New and paste in the following code:
from microbit import *
import audio

print("Hello!")

multiple = 1 # initialise the counter

while True:
    if button_a.was_pressed(): # get the next multiple of the thirteen
        result = multiple * 13 # Calculate the result
        print("13 times " + str(multiple) + " is " + str(result)) # print the multiplication
        multiple = multiple + 1 # increment the multiple

    if button_b.was_pressed(): # Say Hello
        display.show(Image.HAPPY)
        audio.play(Sound.HAPPY)
        display.clear()

    sleep(10) # a 10 millisecond delay
Save the script - you will be prompted to save to your computer OR the micro:bit. Select save to micro:bit and name the file main.py
Return to the REPL and press Ctrl+D to restart your micro:bit. If something went wrong, use the Stop/Restart button, then Ctrl+D.
Now, when we press the A button, the Shell will print the next multiple of 13, or if we press the B-button, our micro:bit gives us a smile and a hello sound.
Notice the plot is also showing some lines, and they're colour-coded to numbers in the print statement! In my case:
- The Blue line is the constant 13,
- The Orange Line is the multiple variable that increases slowly, and
- The Red line is the result variable, which increases really quickly.
Useful Tips
- You can stop a running script by selecting the Shell window and pressing Ctrl+C. This is useful if we want to make changes to the file(s) stored on the micro:bit.
- Reboot your micro:bit (or other MicroPython device) by selecting the Shell window and pressing Ctrl+D
- If something goes wrong, you can always click the red STOP button in the menu bar
Uploading and Downloading Files
We've been working with a file stored directly on the micro:bit - if you'd like to keep a copy on your computer, right-click the main.py file and select the 'download' option. Similarly, you can always upload code to your micro:bit by right-clicking files on your computer and selecting the upload button.
Conclusion
We've installed Thonny and uploaded our first script to our micro:bit. The script includes branches depending on which button is pressed and can generate audio tones and perform basic arithmetic. Now we can write scripts, move them between micro:bit and computer, or test code interactively using the REPL.
If you have any questions feel free to start the conversation below or open a topic in our forums - we're full-time makers and happy to help!
Download / Install PiicoDev Modules
To work with PiicoDev hardware, we need to download some drivers. The drivers provide all the functions to easily connect and communicate with PiicoDev hardware. Select your dev board from the options above.
We need these files to easily drive the PiicoDev Ultrasonic Rangefinder:
- Save the following files to your preferred coding directory - In this tutorial, we save to My Documents > PiicoDev.
- Download the PiicoDev Unified Library: PiicoDev_Unified.py (right-click, "save link as").
- Download the device module: PiicoDev_Ultrasonic.py (right-click, "save link as").
- Upload the files to your Pico. This process was covered in the Setup Thonny section.
The PiicoDev Unified Library is responsible for communicating with PiicoDev hardware, and the device module contains functions for driving specific PiicoDev devices.
We will now install/upgrade the PiicoDev python module for Thonny. This module contains all the drivers to work with all current PiicoDev hardware. Even if you have already installed the PiicoDev modules before, it's still worth upgrading to the latest version if one is available.
First, run Thonny by clicking the:
- Pi Start Menu
- Programming
- Thonny IDE

We need to set up a virtual environment to install the PiicoDev module into. This only needs to be done once as Thonny will remember an environment you have already made. If you are unsure if you have already set one up, you can always create a new one by following these steps.
To set up a virtual environment, click on run > configure interpreter, to open up the interpreter tab.

In this window, we can create a new virtual environment in the bottom right. A notification window will first pop up, just click OK.

In this window, we are going to create a new empty folder in our Home Directory which will be the location of our virtual environment. To do so follow these steps:
- Select the Home tab on the left-hand side of the window.
- Click the Create Folder button in the top right.
- Enter the name of the new folder. You can call it what you want, but we will call ours "myenv". Once you have written the name, click Create next to it.
- Click OK in the bottom left.

Thonny will then set up your virtual environment and when it has finished, it will return to the Interpreter tab. Click OK, and you will have successfully set up the environment.
Note: the Python Executable path now points to the environment we just created.
Remember, you only need to do this once as the next time you open Thonny it will use this environment.

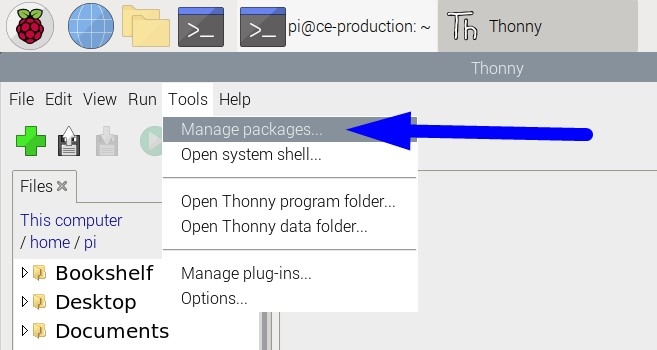
Next, open the package manager. From within Thonny click Tools > Manage Packages
Enter "piicodev" and click "Search on PyPI"

Finally, Install PiicoDev. If you already have PiicoDev installed, there may be an Upgrade button instead, to upgrade to a newer version.
With the PiicoDev module installed we are now ready to begin programming with PiicoDev hardware.

We need these files to easily drive the PiicoDev Ultrasonic Rangefinder:
- Save the following files to your preferred coding directory - In this tutorial, we save to My Documents > PiicoDev.
- Download the PiicoDev Unified Library: PiicoDev_Unified.py (right-click, "save link as").
- Download the device module: PiicoDev_Ultrasonic.py (right-click, "save link as").
- Upload the files to your micro:bit. This process was covered in the Setup Thonny section.
The PiicoDev Unified Library is responsible for communicating with PiicoDev hardware, and the device module contains functions for driving specific PiicoDev devices.
Measure Distance
The PiicoDev Ultrasonic Rangefinder samples distance continuously at a constant rate. You can read the latest sample from the .distance_mm attribute (or .distance_inch if you prefer imperial).
The following code is a minimal example for reading data from the Rangefinder, and controlling its onboard LED.
# Read distance from the PiicoDev Ultrasonic Rangefinder

from PiicoDev_Ultrasonic import PiicoDev_Ultrasonic
from PiicoDev_Unified import sleep_ms

ranger = PiicoDev_Ultrasonic() # Initialise the rangefinder

while True:

    print(ranger.distance_mm)

    ranger.led = not ranger.led # blink the LED every loop
    sleep_ms(100)

Code Remix - Proximity Alert
Let's do a quick code remix - we can modify the above example so that the Rangefinder's LED is only illuminated when the measured range is less than 100mm.
The .led attribute can be set to either True or False. Rather than toggle the LED every loop like the previous example, we can set .led to the result of an expression:
(ranger.distance_mm < 100) will evaluate as True whenever the measured distance is less than 100mm, else it will evaluate as False. This is a pretty compact way of including the functionality we desire without having to create a new variable or using an if statement.
# Turn on the LED when range is less than 100mm

from PiicoDev_Ultrasonic import PiicoDev_Ultrasonic
from PiicoDev_Unified import sleep_ms

ranger = PiicoDev_Ultrasonic() # Initialise the rangefinder

while True:

    print(ranger.distance_mm)

    ranger.led = (ranger.distance_mm < 100)
    sleep_ms(100)
Let's do a quick code remix - we can modify the above example to create an audible alert whenever the range is less than 100mm.
To do this we can import the music package and use the .pitch method to play a tone.
# Make an audible proximity alert
import music
from PiicoDev_Ultrasonic import PiicoDev_Ultrasonic
from PiicoDev_Unified import sleep_ms

ranger = PiicoDev_Ultrasonic() # Initialise the rangefinder

while True:

    print(ranger.distance_mm)

    if ranger.distance_mm < 100:
        music.pitch(880, 100) # play a 880Hz tone for 100ms

    sleep_ms(100)
Multiple Rangefinders on the same PiicoDev Bus
It's possible to connect multiple PiicoDev Ultrasonic Rangefinders on the same PiicoDev bus, though beware! These sensors are quite capable of interfering with each other if pointed together, or at the same object - so consider the path reflected sound may take.
Begin by setting a unique ID for each module. The ID switches are located in the centre of the module. Use a fine pen or similar instrument to set the ID switches as shown in the image below.
In the initialisation code, we will use the id argument to differentiate the Rangefinders. id is a list that encodes the ID switch positions; 1=ON and 0=OFF.
- The first rangefinder (range_a) will have all its ID switches off, and will be initialised with the argument
id=[0,0,0,0] - The second rangefinder (range_b) will have ID 1,3 ON and the rest off, and will be initialised with the argument
id=[1,0,1,0]

The following example shows how to sample two ranges independently.
# Read distance from two PiicoDev Ultrasonic Rangefinders independently

from PiicoDev_Ultrasonic import PiicoDev_Ultrasonic
from PiicoDev_Unified import sleep_ms

range_a = PiicoDev_Ultrasonic(id=[0,0,0,0])
range_b = PiicoDev_Ultrasonic(id=[1,0,1,0]) # id argument must match ID switch positions

while True:
    print(range_a.distance_mm, range_b.distance_mm)
    sleep_ms(100)
Note: ID switches are how PiicoDev abstracts away I2C Addressing - you don't have to remember the address if you can just read the switch positions.
If you prefer to work with actual addresses instead, the following table shows the relationship between ID Switches and I2C Addresses.

Sample Period
The sample period (milliseconds) can be updated by setting the .period_ms attribute which accepts integers between 0 (disabled) and 65335. The default value is 20.
Most users won't need to change the default sample period, but the option is available and useful if you also wish to enable/disable the sensor.
ranger.period_ms = 1000 # sample once per second
ranger.period_ms = 0    # disable the sensor entirely

print(ranger.period_ms) # query and display the sample period
For longer sample periods, you may want to poll the Rangefinder status and only read new ranges when they become available (instead of reading out the same data multiple times). For this, you can check the .new_sample_available attribute. The following example sets the sample period to 1000ms, and checks for a new sample every 100ms. Each sample is printed exactly once.
# Only read the Rangefinder when a new sample is available

from PiicoDev_Ultrasonic import PiicoDev_Ultrasonic
from PiicoDev_Unified import sleep_ms

ranger = PiicoDev_Ultrasonic() # Initialise the rangefinder
ranger.period_ms = 1000 # set a slow sample period

while True:
    if ranger.new_sample_available:
        print(ranger.distance_mm)

    sleep_ms(100)
Conclusion
It's pretty amazing to be able to measure distance so easily! Check out the project ideas featured below if you'd like some inspiration of what useful and creative projects you can complete with an Ultrasonic Rangefinder. If you have any questions or need some help, start the conversation below. We're full-time makers and happy to help.
Happy making!
Resources
This guide has taken every care to document the PiicoDev Ultrasonic Rangefinder to be useful for most makers. If you really want to look under the hood and explore the hardware and software, we've provided these additional resources.
- Hardware Repo for the PiicoDev Ultrasonic Rangefinder PCB
- Schematic
- MicroPython/Python Library and API documentation
Project Ideas
This invisible tripwire project is a flexible starter project with loads of applications. You could set it up to range across a doorway - when somebody passes through the door a message is displayed. This is a useful starter project for other range-alert style projects - for example, you could create an invisible limbo-bar that tells you when somebody didn't limbo low enough!
The project is self-calibrating, meaning you don't have to manually set any range thresholds. The tripwire will adapt to a steady-state range, and if it detects any sudden, large errors in the range measurement a trip event is reported. This is handled by continuously updating an average range (using exponential smoothing). A trip event occurs when any one range sample deviates too far from the average.
# A self-calibrating tripwire that looks for gross changes in distance
# Slowly calibrates for new distances - no manual tuning required.

from PiicoDev_Ultrasonic import PiicoDev_Ultrasonic
from PiicoDev_Unified import sleep_ms

ranger = PiicoDev_Ultrasonic() # Initialise the rangefinder

tuning = 0.1                   # a tuning parameter that affects how quickly new distances are calibrated
sensitivity = 50               # [mm] any change greater than this amount will count as a trip
average = ranger.distance_mm   # Initialise the moving average with a range sample

sleep_ms(1000)

while True:

    distance = ranger.distance_mm
    print(distance, average)

    # check if the wire has been tripped
    if abs(average - distance) > sensitivity:
        print("Trip!")
        ranger.led = True # Indicate a trip
    else:
        ranger.led = False

    # update the moving average https://en.wikipedia.org/wiki/Exponential_smoothing
    average = tuning * distance + (1 - tuning) * average

    sleep_ms(100)
A theremin is a musical instrument controlled without physical contact. Real theremins use changing electric fields to control the sound output - here we can use the hands proximity to the Ultrasonic Rangefinder. Hold your hand closer to produce lower notes, and farther away to produce higher notes.
This project requires a PiicoDev Buzzer, and the PiicoDev_Buzzer.py module.
# A non-contact musical instrument. Hold your hand near the rangefinder and move
# closer or farther to play different notes.

from PiicoDev_Ultrasonic import PiicoDev_Ultrasonic
from PiicoDev_Buzzer import PiicoDev_Buzzer
from PiicoDev_Unified import sleep_ms

ranger = PiicoDev_Ultrasonic() # Initialise the rangefinder
buzzer = PiicoDev_Buzzer()

def get_note_from_distance(distance):
    """Converts a distance [mm] to a note [Hz] from a supplied scale"""
    scale_Hz = [523, 587, 659, 698, 784, 880, 988, 1047] # Cmajor scale
    note_number = round( (distance - 100) / 50 ) # spaces notes 50mm apart, starting 100mm away from the rangefinder

    # make sure the note stays within bounds
    if 0 <= note_number < len(scale_Hz):
        return scale_Hz[note_number]
    else:
        return 0 # silence if not being actively played

note_duration = 250 # [ms]
while True:
    distance = ranger.distance_mm
    note = get_note_from_distance(distance)
    buzzer.tone(note, note_duration)

    print(distance, note)

    sleep_ms(note_duration)
This project uses the plotter in Thonny to draw a simple obstacle-avoiding, 2D-scrolling game - similar to Flappy Bird or the timeless classic Helicopter Game. The player flies through a winding cave and must avoid crashing into the walls. The player position is controlled by the Ultrasonic Rangefinder. The cave is procedurally generated - the frame counter drives a generate_cave() function which uses simple trig functions (sin, cos) to create an infinite cave.

This project requires a PiicoDev Buzzer, and the PiicoDev_Buzzer.py module.
# Cave explorer game. Use the ultrasonic rangefinder to control the position of the player as you
# fly through a narrow, winding cave. Don't crash into the walls!

import math
from PiicoDev_Ultrasonic import PiicoDev_Ultrasonic
from PiicoDev_Buzzer import PiicoDev_Buzzer
from PiicoDev_Unified import sleep_ms

ranger = PiicoDev_Ultrasonic() # Initialise the rangefinder
buzzer = PiicoDev_Buzzer() # Initialise the buzzer


def generate_cave():
    """generate a new cave floor and ceiling based of the frame number. Changing these constants will affect game difficulty"""
    floor = range + \
                 range/2 * math.sin(2*math.pi * frame/200) + \
                 range/4 * math.cos(2*math.pi * frame/88)  + \
                 range/4 * math.sin(2*math.pi * frame/33)

    ceiling = floor + cave_size
    return floor, ceiling

def player_in_bounds():
    return player > cave_floor and player < cave_ceiling

def play_start_sound():
    buzzer.tone(1200,300)

def play_crash_sound():
    buzzer.tone(1200,300)
    sleep_ms(300)
    buzzer.tone(600,300)

#################
# Game Variables
#################

cave_size = 150   # height of the cave
cave_floor = 150  # starting floor height
range = 150       # how much room the player needs to move around
frame = 0         # frame counter is used to generate the cave, and keep score

bound_counter = 0 # how many frames the player was out of bounds. glitches happen, so we look for consecutive out-of-bounds to trigger a crash

state = 'prestart'
print("Game starts when player is in bounds")
sleep_ms(1000)

while True:

    # Update the game
    cave_floor, cave_ceiling = generate_cave()
    player = ranger.distance_mm

    # Check for out-of-bounds
    if player_in_bounds():
        bound_counter = 0
        if state == 'prestart':
            state = 'play'
            play_start_sound()
    else:
        bound_counter += 1


    # Plot the game state
    print(f"{player} {cave_ceiling} {cave_floor} 0 {2*range + cave_size}")

    # Crash when out of bounds for consecutive frames
    if bound_counter > 2 and state == 'play':
        print(f"You crashed! Score: {frame}")
        play_crash_sound()
        break;

    frame += 1
    sleep_ms(100)

