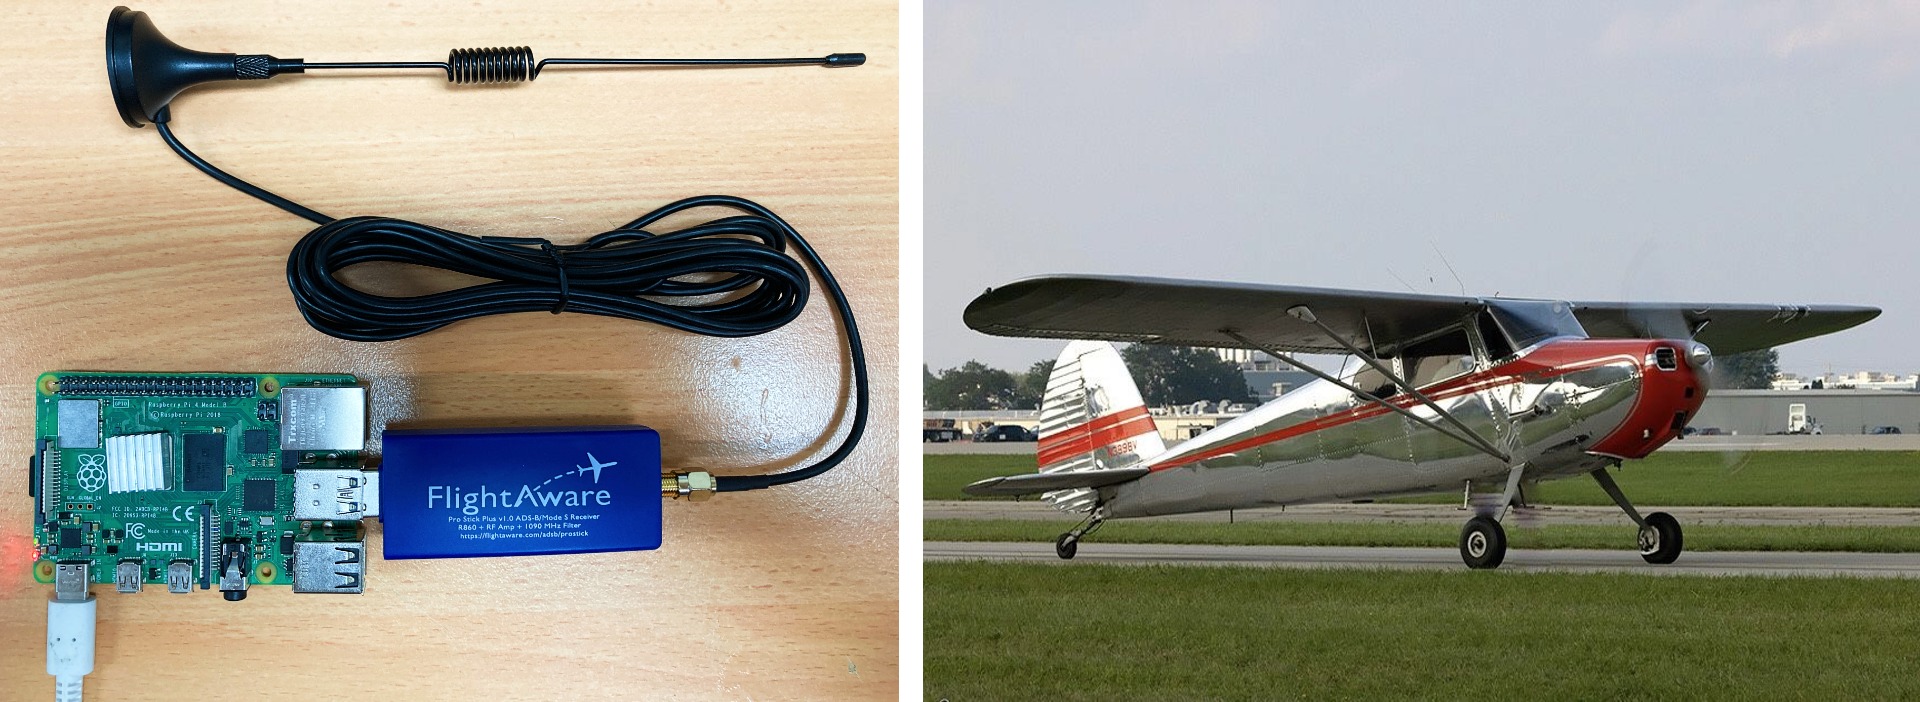
It is time for an Airplane Tracking Raspberry Pi! The final setup here will let you personally collect data on the exact whereabouts of airplanes over 400km away. It will update one to four times each minute. Be passenger planes, cargo aircraft, single prop Cessnas, helicopters, and even on occasion military planes. You will know the exact details about them and even where they have been before. All thanks to Raspberry Pi and the FlightAware Pro Stick. Put them together and you create a PiAware! Check out the completed system and a Shiny Cessna 140 Airplane in the image below.
With a PiAware we can tap into the information transmitted by the ADS-B transponders installed on almost all aircraft as they fly overhead. This ADS-B (Automatic Dependent Surveillance-Broadcast) is a technology that enables aircraft to determine their position via satellite and then broadcast it. Effectively all aircraft are legally required to do this. This information, which is shouted out into the electromagnetic spectrum, can be received by Airport Ground Stations. This is how Airports keep track of aircraft around them.
With FlightAware, you build and run your own ADS-B Ground Station. Tapping into those ADS-B Signals. Our PiAware can be installed anywhere, runs at low power, and receives real-time, minute-to-minute, data directly from Airplanes high up in the sky! The following are the contents of this guide.
- A Dive Into ADS-B and How FlightAware Works
- What You Need
- Hardware Set Up
- FlightAware Set Up
- Demonstration
- Where to Now
Knowing what's happening with air traffic at any point in time can be hugely valuable and this system provides you with the best insight as to what's actually happening. You can even figure out if your future flight will be turbulent from the safety of your home! FlightAware provides accurate weather overlays to all their maps. Traveling through the airport can be fun for some but if you are stuck in huge lines and broken airplanes then you be kicking yourself for not getting a PiAware.
Furthermore, by the end of this guide, you will be able to know exactly where every single Passenger, Cargo, or Single Pilot Airplane is in the sky. At any point in this globe! You will even be able to have historical data on what all the planes have done. It is incredible! Huge thanks to the clever clogs up at Huston Texas who make this all possible. See below what can be achieved with a single node and what can be achieved by hooking into the Larger Flight Aware Network. You will have full access to this and, even better, a whole bunch more features for free (an enterprise-level account) in return for contributing to the larger picture.

Daniel Baker, the founder of this FlightAware system is just about to be inducted into the Texas Aviation Hall of Fame this year (2023), alongside Lance C. “Wildcat” Wade and Chester W. Nimitz, and for good reason. His system has over ten million monthly users and is the largest aggregator of live flight tracking data. Hear him chatting about the FlightAware system here. Growing up I had mates who could tell me exactly what the plane was in the sky just by the noise. I’m happy to say I can now tell them exactly what airplanes exist over the horizon.
As always if you have any questions, queries, or things you'd like me to do with this system, please let us know your thoughts!
A Dive Into ADS-B and How FlightAware Works
FlightAware operates a network of ADS-B Receivers (many of them PiAware) for tracking ADS-B Equipped Aircraft. So let's break this down. See an ADS-B Transponder that gets mounted into airplanes (like the Gulfstream G700 on the right) in the image below.

What is ADS-B? Well, ADS-B is a system in which electronic equipment onboard an aircraft automatically broadcasts the precise location of the aircraft via a digital data link. This data is broadcast every half-second at 1090MHz. Furthermore, this data link can be used by other aircraft and air traffic control to show the aircraft's position and altitude on display screens without the need for any radar. It is primarily for safety and is basically a legal requirement in most countries. In Australia, any airplane operating under instrument flight rules needs one. In the USA any plane that goes above 18,000 feet must have one. U.S. Military and Government aircraft routinely transmit via ADS-B but the Pentagon has provided them leeway to turn them off. However if you are lucky, and in America, you may just spot an E-4 Nightwatch before it gets filtered away when displayed on the larger map. Non-military planes do not have this leeway and there are substantial fines if a pilot neglects to do so. This has resulted in an enormous amount of ADS-B signals, constantly beaming out data that we, as makers, can freely glean from. To be clear ADS-B stands for the following.
Automatic --> Requires no pilot input, it just happens.
Dependant --> Data depends on accurate position and velocity data from the aircraft's navigation system. This is usually GPS location obtained via multiple Satellites as they yell the time into the electromagnetic spectrum.
Surveillance --> Provides aircraft position, altitude, velocity, and other surveillance data to meet the requirements.
Broadcast --> Information is continually broadcast for monitoring by appropriately equipped ground stations, other aircraft, or PiAware systems.
Broadcasts from these systems may include the following. Flight Identification (flight number callsign or call sign), ICAO 24-bit Aircraft Address (globally unique airframe code), Position (in latitude and longitude), Position integrity/accuracy (GPS horizontal protection limit), Barometric and Geometric Altitudes, Vertical Rate (rate of climb/descent), Track Angle and Ground Speed (velocity), Emergency indication (when emergency code selected) or Special position identification.
Now, if any of the data that these Airplanes yell out is within the range of a PiAware Node then the FlightAware system will pick it up. The ability of a ground station to receive a signal depends on altitude, distance from the site, and obstructing terrain. The maximum range of each ground station can exceed 250 nautical miles. This data will update one to four times each minute in the PiAware Aircraft Map. In airspace immediately surrounding each ground station, surveillance coverage extends to near the surface. Furthermore, when globally tracking, it'll even tell you when planes are on the runway. The Canadian Aviation and Space Museum has a great video demonstrating how it works with both ground stations and satellites linked to it here. See the image below for a simplified understanding and an Air France Airbus A320-200 passenger plane.

So to be ultra clear, FlightAware and PiAware systems function correctly solely because all these airplanes are constantly broadcasting their location signals. PiAware can send its Airplane Location Data to FlightAware (I recommend doing this) over the Internet. This makes your accurate Airplane data available worldwide to be seen by anyone. With enough stations (FlightAware as of 2023 has over 35000 unique nodes) it has been possible to stitch all this data together and create a very complete map of all the airplanes, helicopters, and even gliders in the air at any given time! Just check out the formidable worldwide FlightAware Node coverage (192 unique countries) in the image below. Know that FlightAware provides FlightFeeder units free of charge to individuals in areas where FlightAware's ADS-B network does not have sufficient coverage. They really want nodes everywhere on this globe. Each yellow dot in the image below is a unique FlightAware Node contributing to the greater mesh network of FlightAware.

So this FlightAware system picks up the collected data resulting in a phenomenally accurate map of where all the airplanes are at any given time. You can see this public map by clicking this webpage link here. Know that anyone can access this map but a lot of extra features will be unlocked for us for free (Enterprise Level) if we are actively contributing to the Data. One cool feature of Enterprise Level is it allows you to track planes from Commercial Airlines to Private Business Jets. We can also create a system that doesn't send data to FlightAware and retains the data only locally (but that's less fun). Be a positive citizen of the globe and contribute. Airplanes still go missing in this modern age and this system actively prevents that from ever occurring again. See an image of the FlightAware map below.

Note that the default setting is to NOT show planes that don't have a schedule. This is the main reason helicopters and smaller GA planes do not show up on the | FlightAware.com/live | map automatically. You just need to turn on | Position Only | to see these aircraft.
What You Need
Below is everything you need to set up your Raspberry Pi to become a fully functional Plane Tracking Extraordinaire.
- FlightAware Pro Stick Plus (USB SDR ADS-B Receiver) (It only weighs 17 Grams!)
- 3dBi ADS-B 1090Mhz SMA Antenna with Magnetic Base
- A Raspberry Pi Single-Board Computer (in my case I have used a Raspberry Pi 4 Model B 2GB but this can be done perfectly with an earlier lower-spec Pi like the Raspberry Pi 3 Model B+)
- Micro-SD Card 16GB
- Micro-HDMI to HDMI Cord to connect the system to a Monitor
- Power Supply
- A Desktop Computer with a Mouse and Keyboard
Hardware Set Up
Start by jumping onto your desktop computer and inserting that micro-SD card into it. You may need to use a Micro-SD to USB Adapter to do so. With that inserted make sure you have the program Raspberry Pi Flasher open (install it from this location linked here). Hit up this guide if you need a hand doing any of this. Now flash your system with the most recent PiAware Image for Raspbian Linux which you can download using this link here. Unzip that file and select it as the | Operating System | inside Raspberry Pi OS. Then select your micro-SD as the | Storage | and click | Write |. See this process occurring in the image below. Right-click the image and open it in a new tab to see it in full size if you need.

With that flash completed insert that flashed micro-SD card into the Raspberry Pi. Now twist the FlightAware Stick Pro onto the antenna connector. This is a simple SMA Connector that screws into place, once seated properly it will not screw in any further. Check out my picture-rich guide Identify Electrical Connectors if you ever have a connector that you want to know what it is. See this happening in the image below.

With that complete insert the FlightAware Dongle into a USB Port of the Raspberry Pi. Then add HDMI out to a monitor. This is also a great time to add a little heatsink to the main CPU Integrated Circuit of your Raspberry Pi Board. Also, connect an Ethernet Cord from your Raspberry Pi directly to your Router. If you want to create a WiFi-only system check this official guide here. With that completed, power up the Raspberry Pi System by plugging in a USB-C connector. See the completed PiAware setup below.

As soon as you do you will be welcomed by a quick PiAware flash screen on your Monitor and then display a very similar page to the one in the image below. From this page, the most important piece to write down is the IP Address that your Router has provided your Raspberry Pi with. For me, this number was | 192.168.1.146 |.

For those curious, you can find all the open-source scripts that will be running on our system can be seen at the GitHub page linked here. See the top of this page in the image below.

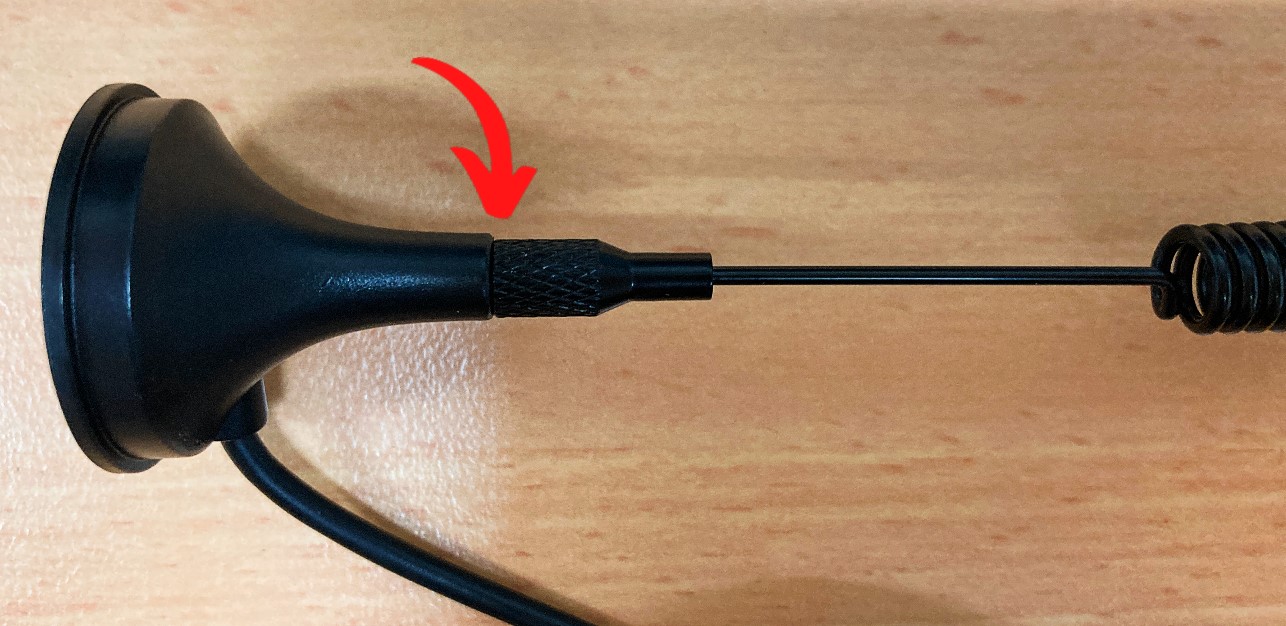
Continuing on, having pulled this information out of the system you no longer need the Monitor or HDMI cord to be connected to the system. Quick addition as well, twist in the top of the Antenna a touch at the joint to be sure that it is seated correctly. If you do not do this you won't get a good connection. You can see this happening in the image below.
Note that the most optimal antenna installations are installed outdoors and on a roof which will then provide an effective range of over 400km! Heaps of antenna mounts and cases can be found online at Thingiverse perfectly ready to be 3D printed. See a perfect installation in the image below.

Software Set Up /// NOT NEEDED
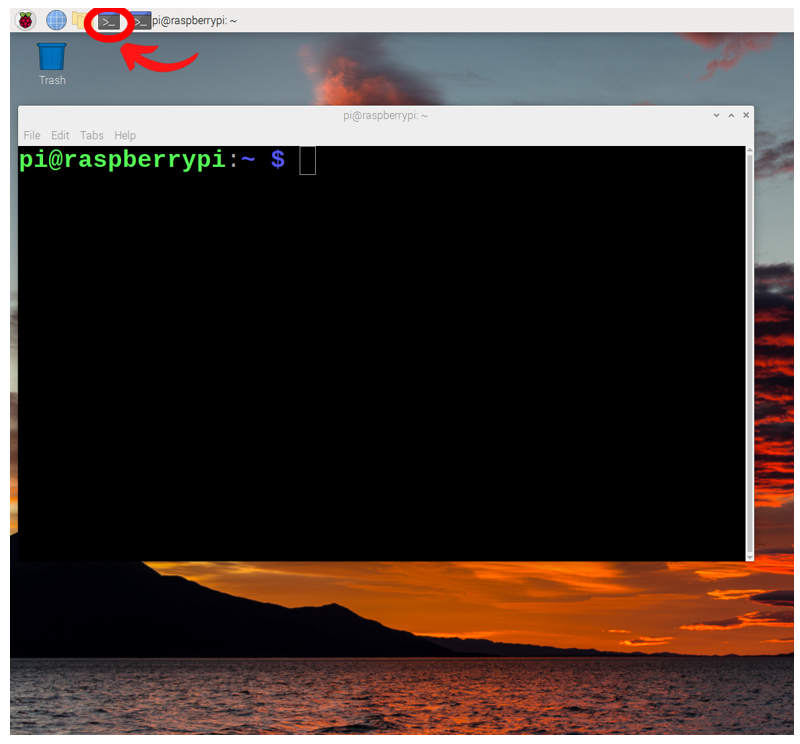
Some packages will need to be installed on your fresh version of Raspberry Pi OS. This will allow the correct operation of our Pi-Hole System. With the power into the system and the (new) first boot-up wizard complete, you will be welcomed by the Raspberry Pi Desktop. Open a new terminal window by pressing the black button on the top left of the screen. This will open up a terminal window. See the image below of this happening and a big red arrow pointing toward the terminal button that was pressed.
This terminal window will enable us to download from the internet the exact packages we require. So now type and enter the following lines into the terminal to get all the packages that you will need. If prompted, type and enter | Y | to continue/confirm installations. See further below an image of one of these commands being downloaded and requesting this confirmation.
wget https://flightaware.com/adsb/piaware/files/packages/pool/piaware/f/flightaware-apt-repository/flightaware-apt-repository_1.1_all.deb
sudo dpkg -i flightaware-apt-repository_1.1_all.deb
sudo apt-get update
sudo apt-get install piaware
sudo piaware-config allow-auto-updates yes
sudo piaware-config allow-manual-updates yes
sudo apt-get install dump1090-fa
sudo apt-get install dump978-fa
sudo reboot

FlightAware Set Up
Jump to the FlightAware Account Making Website by clicking on this link right here. Fill out the form and create an account. You will need to confirm it by verifying your email too. Make sure to save your Username somewhere as we will utilise it in the following steps. See this happening in the image below.

Now Type and Enter the IP Address of your PiAware Station (in my case | 192.168.1.146 |) directly into the URL of your Browser. See what that looks like in the image below. The goal here is to turn the four coloured columns in the middle of the screen green. The | 1090 Radio | column will turn green automatically once it received data from an Airplane. That took less than 1 minute for me. The next step is to click on the button that states | Claim this feeder to associate it with your FlightAware account |.

You can also access this page by clicking this link here PiAware - Claim and Link a Brand New PiAware Ground Station page linked here. See it in the image below when it has not found your PiAware system. Click the | Check Again for my PiAware | until the page changes.

The success page looks like the image below. Once you see this you are very close to completing all the setup! You will even be able to access your personal website that FlightAware creates especially for you. There you can check out all your personally gathered data.

Now click on the link inside the | View your ADS-B Statistics | Section. This will take you straight to your personal data website. There's even a ranking system to see how many airplanes you have seen compared to other people around the globe! Note how you are now an Enterprise User which is very rad. The next step is to fix the MLAT setting so it turns green as well. MLAT stands for multilateration. The multilateration (MLAT) system calculates the position of the aircraft. For our system here to work well for MLAT we need to provide it with an accurate GPS location. Press the | Cog | symbol to start this process.

As soon as you press the | Cog | symbol a setting menu will pop up. See the steps to take to provide accurate GPS details to the PiAware system. Make sure to click | Save |.

With that complete, your PiAware Status webpage will look like the image below. After 5 Minutes the MLAT will turn green as well! With that, all software settings for your PiAware are sorted!

Know that you can use any locally connected device to connect to this webpage. Check below to see my phone opening the webpage and seeing that all the columns are now green. Beauty!

Demonstration
So let's check what we can identify using our system here. The very first plane my system Identified was a Piper PA-31 Navajo with Tail Markings VH-XGW and on Flight AE866. The average price for a pre-owned PIPER Navajo Chieftain is USD$250,321. This particular plane is going from Tamworth to Newcastle. And just check out this and all the other information (historical and trip) I can glean using FlightAware in the images below. I even have a photograph of that exact plane!


Then if we expand our view to include everyone else data, using the FlightAware Map, we can see that there is a huge amount of airplanes flying around our world at any instant.

You can also hit up your Personal SkyAware Map. This is a web portal for viewing flights and displaying them on a map that only your receiver is picking up. See this in the image below.

Where to Now
You can see some proper amazing things with FlightAware. For instance, the next time you are on a commercial airplane, and you notice some weird flight paths being taken, check the airplane's history in FlightAware. You may just be a part of some sky art without even knowing it. Check out some fantastic examples below.

So if it is that time of year, keep an eye out for a red suit-wearing fella, he will be up there somewhere nearby if you are doing a good job. FlightAware even has an API service named AeroAPI. It is a simple, query-based API that gives software developers access to a variety of FlightAware's flight data. Users can obtain current or historical data. Furthermore, if you are in a situation where you own an Airplane FlightAware can help you immensely. From tax management purposes, replacing/supporting your flight logs, providing history flight activities, and supplementing pre-buy inspections. FlightAware is also a really great place to check out very cool pictures of Airplanes just check out their photo gallery linked here. See some highlights below.


