In the Plant_io Basic Setup Guide we assembled the Plant_io platform to automatically irrigate plants, and sprouted some seeds. As the project runs, a log file is updated with data captured at each interval. This simple log allows us to peer back in time and see how things progressed - it's a wonderful start, but only captures soil-moisture and pump-duration. Perhaps you wish to observe how ambient light levels affect your plant - or track the air temperature and humidity to see how these things impact growth.
This guide is all about connecting additional sensors to observe even more about our plant and its environment, in turn, allowing us to conduct meaningful experiments. This guide assumes you've followed the Basic Setup Guide and are familiar with working programming a Raspberry Pi Pico in Thonny.
Before you Begin
- Follow the Plant_io Basic Setup Guide.
- Download the code and resources (if you haven't already)
- It's helpful if you've already programmed a Raspberry Pi Pico using Thonny. If you need help getting started with this, check the tutorial.
PiicoDev Sensors
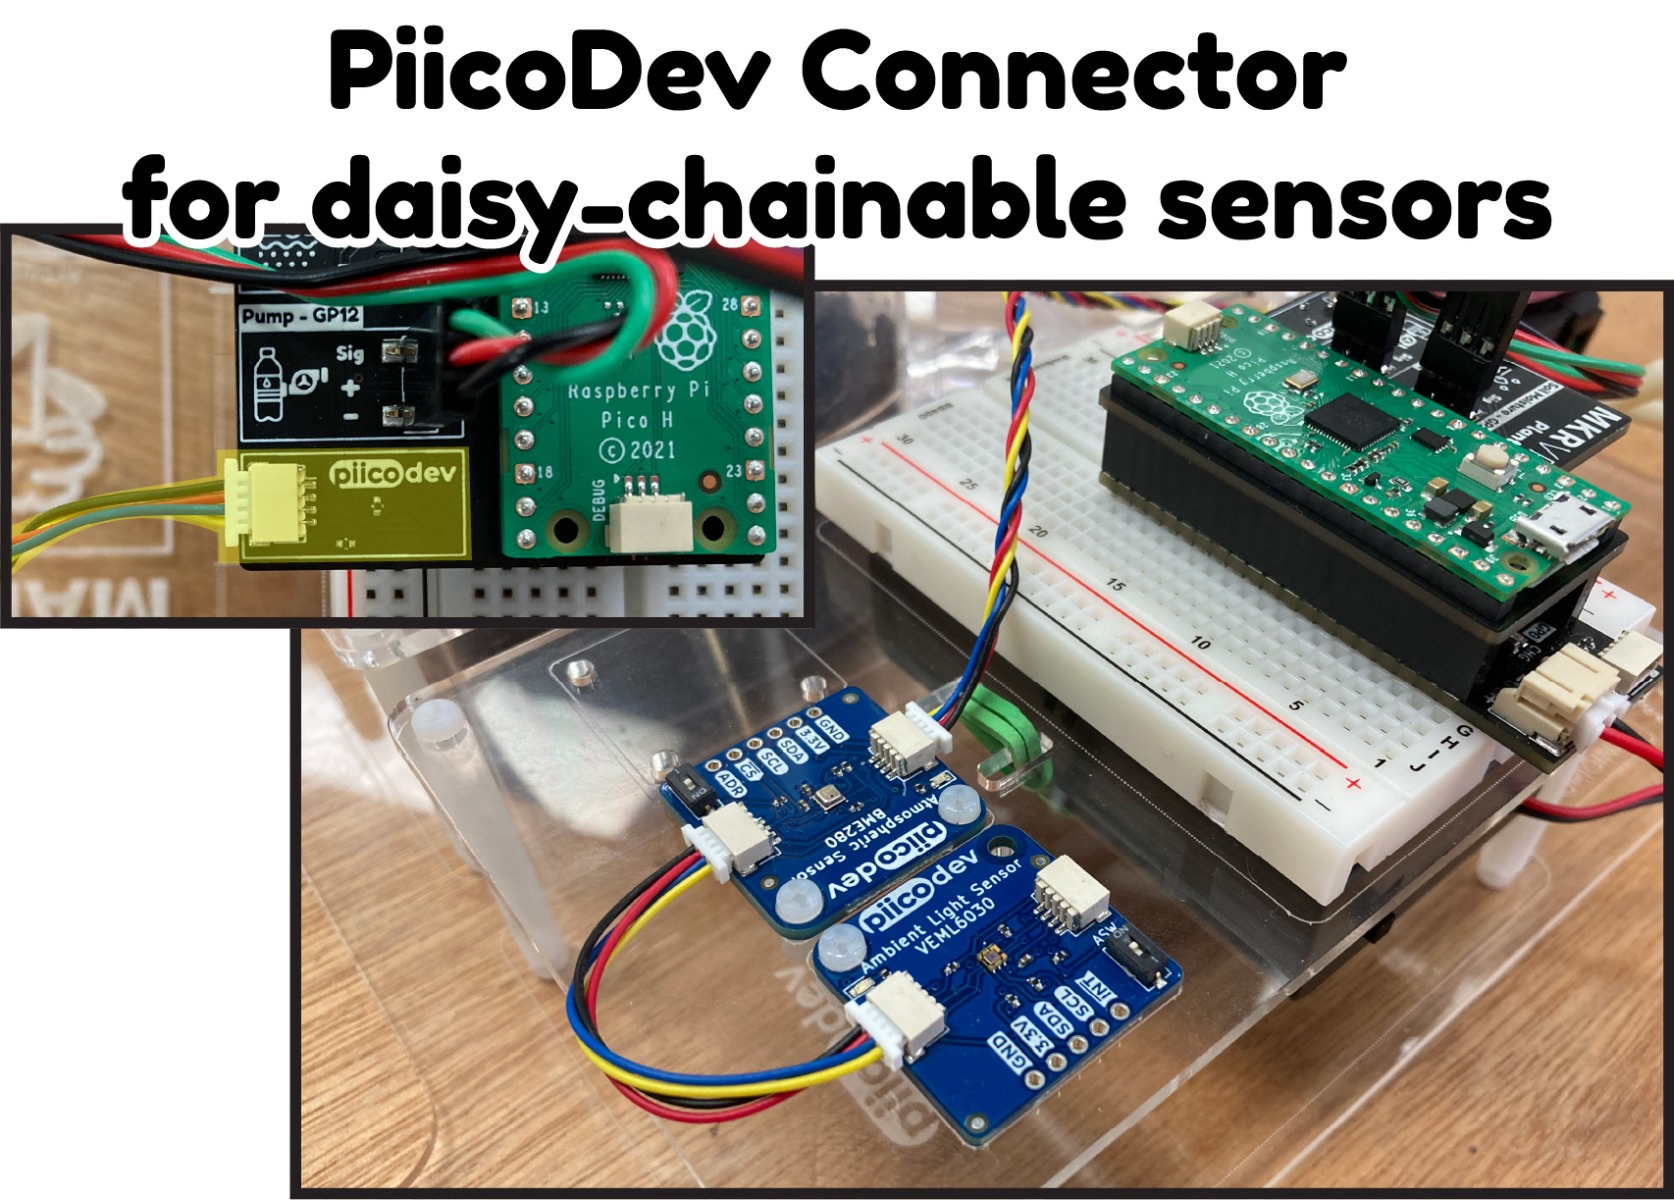
You may have noticed the Plant_io SHIM features an additional PiicoDev connector - this allows connecting and daisy-chaining multiple PiicoDev sensors and actuators without soldering.
Supported Sensors
Plant_io supports a limited line of PiicoDev hardware that we think are most relevant to plant experiments.
The PiicoDev® Atmospheric Sensor lets you easily measure barometric pressure, humidity, and temperature.
See the Atmospheric Sensor Guide for more information and code examples.
Experiment Ideas
- Observe the effects of temperature on plant development.
- Observe the effects of humidity on plant development. Do seedlings prefer high or low humidity? Does it make any difference?
- (Requires advanced equipment) Simulate a high-altitude environment using a Bell Jar and vacuum pump. Does this impact plant development? Does changing air pressure at different stages of development have an impact?

The PiicoDev® Air-Quality Sensor ENS160 is great for measuring indoor air-quality. It is sensitive to volatile organic compounds like impurities in the air. The sensor provides measurements for Air Quality Index (AQI 1-5), Equivalent CO2 (eCO2) and Total Volatile Organic Compounds (TVOC).
See the Air-Quality Sensor Guide for more information and code examples.
Experiment Ideas
- Observe the effects of volatile organic compounds on plant cultivation. How sturdy is your selected plant?

The PiicoDev® Ambient Light Sensor measures light intensity in Lux with 16-bit precision.
See the Ambient Light Sensor Guide for more information and code examples.
Experiment Ideas
- Observe the effects of ambient light on plant cultivation
- Is there a minimum-viable light level?

The PiicoDev® Laser Distance Sensor VL53L1X is an infrared laser that measures distances with millimetre repeatability. It may be useful for measuring the height of plants automatically.
See the Laser Distance Sensor Guide for more information and code examples.

The PiicoDev® Colour Sensor can tell you the hue of measured light, or return a raw RGB value.
See the Colour Sensor Guide for more information and code examples.
Experiment Ideas
- Observe the effects of different light colour on plant cultivation.
- Couple the sensor to the plant specimen and track its colour as it develops.

The PiicoDev® 3-Axis Accelerometer LIS3DH measures inertial forces and can tell you acceleration and tilt information.
See the Accelerometer Guide for more information and code examples.
Experiment Ideas
- Observe the effects of tilt on plant cultivation.
- Is there some way to simulate and record long-term acceleration as in eg. an accelerating space ship?

The PiicoDev® Magnetometer QMC6310 measures the intensity of magnetic fields in 3-axes. It can also be used as a compass (no tilt compensation).
See the Magnetometer Guide for more information and code examples.
Experiment Ideas
- Observe the effects of magnetic fields on plant cultivation.
- Does the direction of a magnetic field impact the direction a plant grows?

This guide is all about connecting PiicoDev sensors to your Plant_io project - but you're not restricted to just this family of sensors. You can still bring your own sensor to the party - you will need to wire it up (probably by using the breadboard) and have driver code at hand. You can follow the steps in the Logging Data section below to help add this sensor's data to the log file.
Happy Making!
Connecting and Mounting Sensors
PiicoDev hardware requires no soldering to connect. Use PiicoDev Cables to daisy chain between multiple modules. For extra routing flexibility you can even use a PiicoDev Splitter.
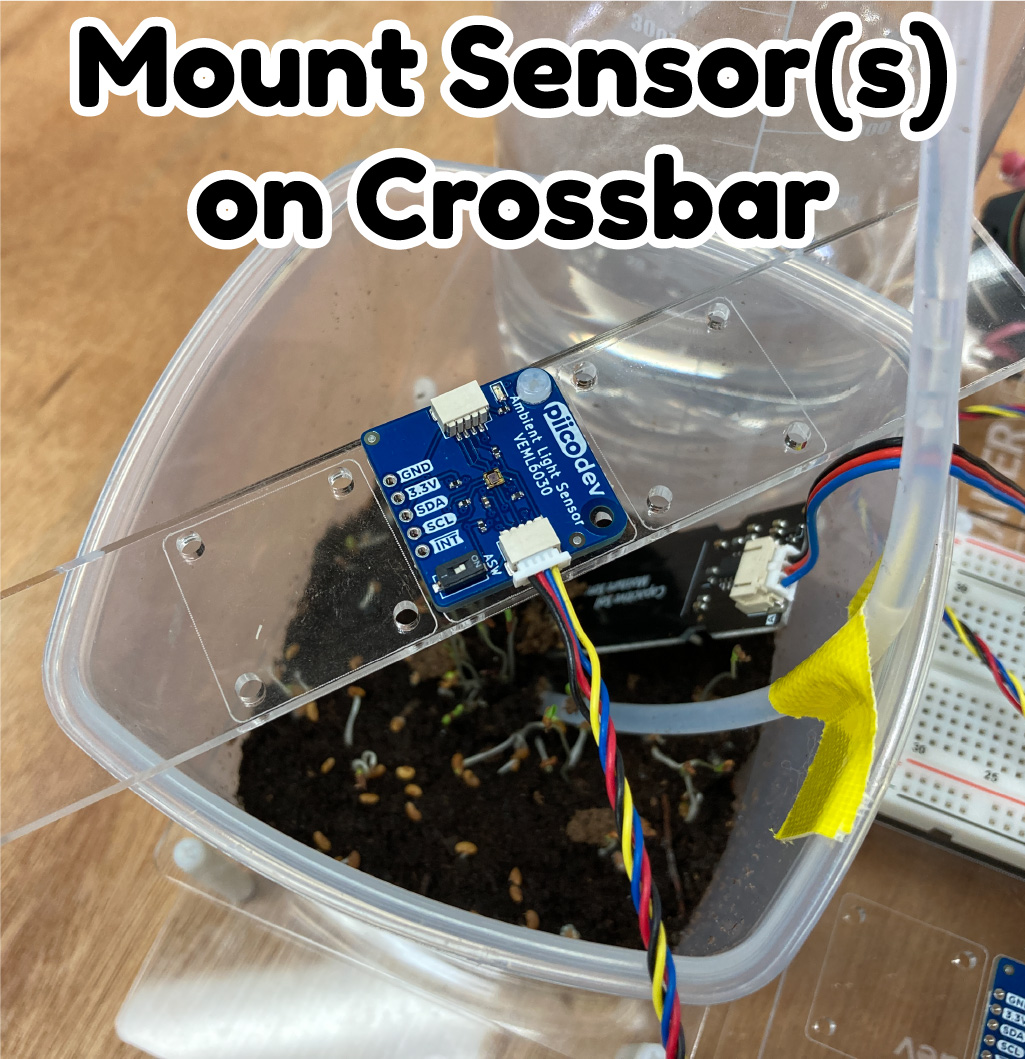
The Plant_io platform comes with some flexible mounting hardware to help position your sensors exactly where you need them.
For environmental sensing, there are three convenient mounting locations next to the breadboard. These are most useful for sampling ambient environmental conditions eg. ambient light, temperature, humidity.
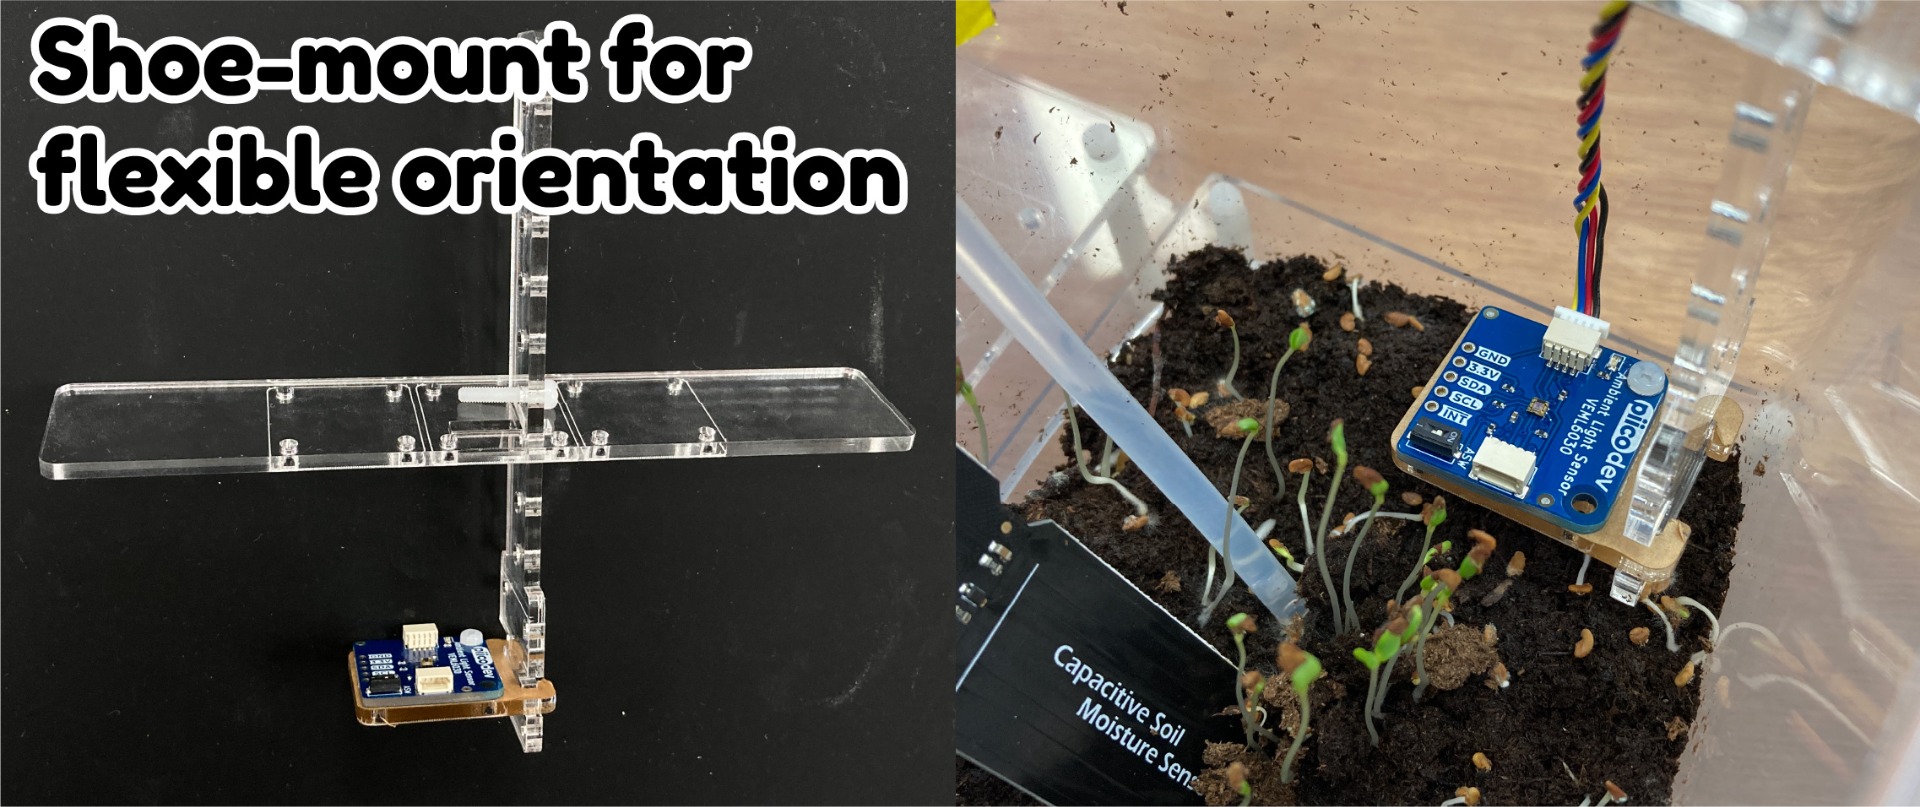
To get sensors as close as possible to the plant specimen there are some additional mounting solutions - shown here with the protective paper still applied for clarity.
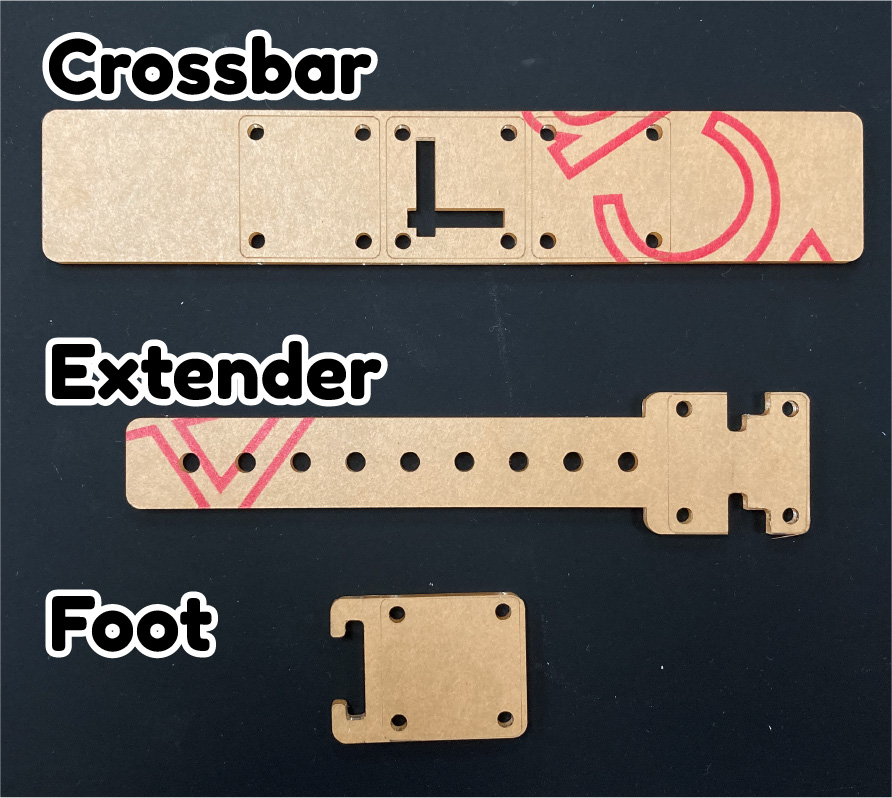
The Crossbar spans the top of the Plant Container and can point sensors directly up or down. It features central slots for the Extender.
The Extender can be suspended from the crossbar to hold a sensor at varying depths within the plant container. Vary the height by inserting a screw in the appropriate hole. The Extender features a stepped feature that accepts the Foot.
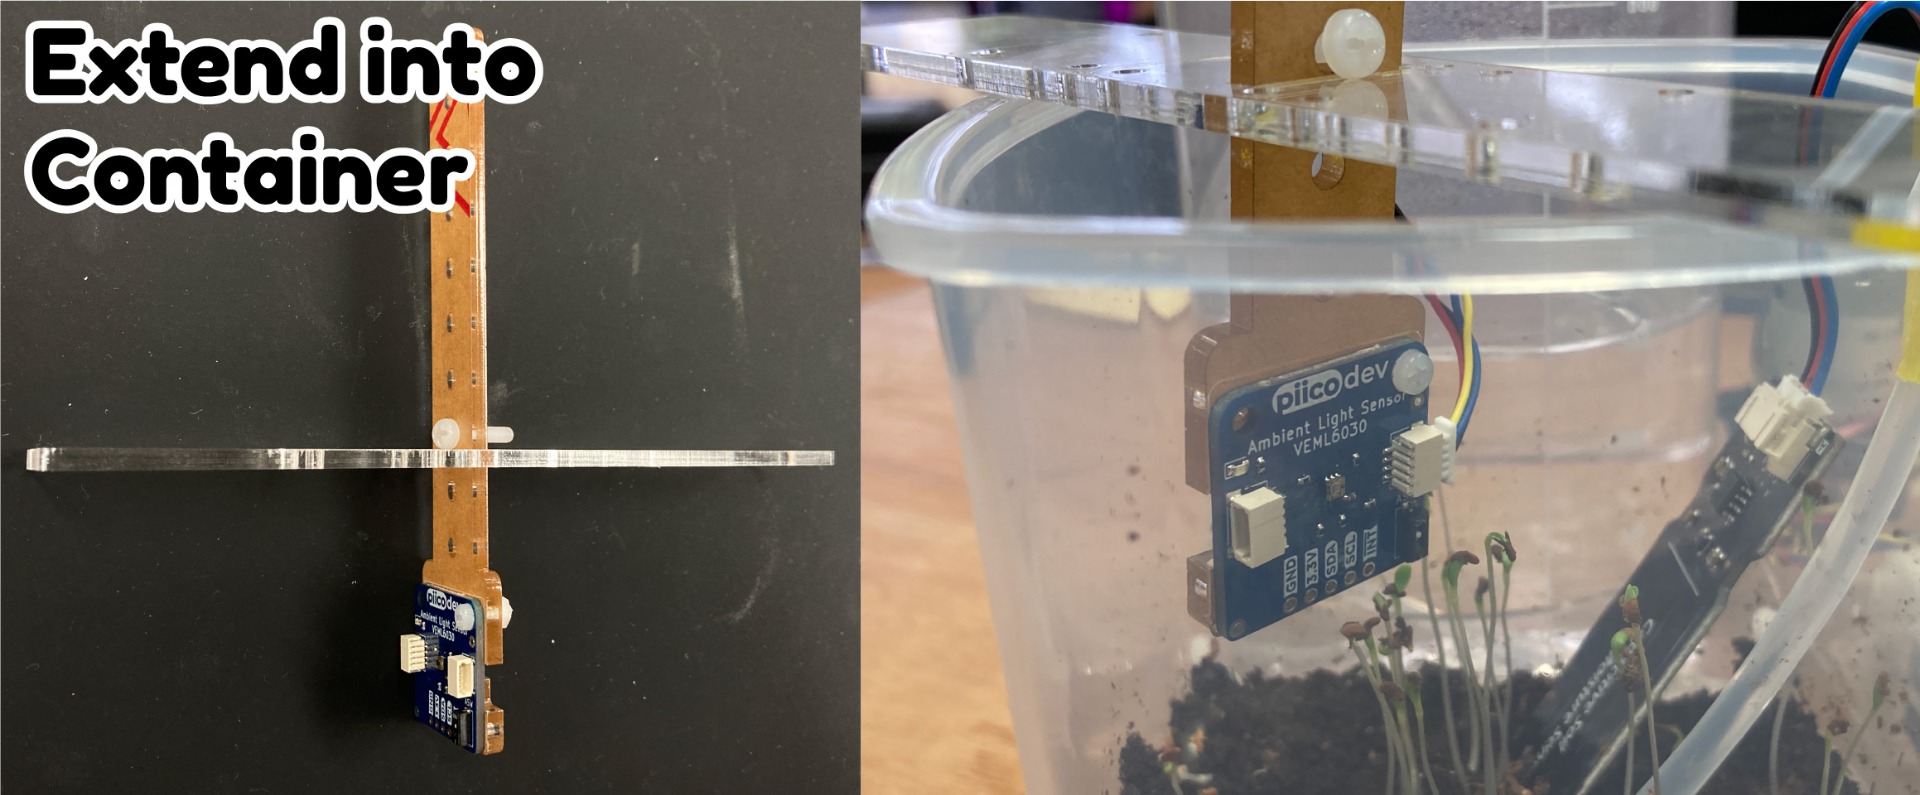
The Foot couples to the stepped feature at the bottom of the extender and allows mounting a sensor to point vertically up or down within the Plant Container.
Upload Python Modules
We need to upload some files to our Pico before using PiicoDev modules.
First, upload the PiicoDev_Unified.py file, which is required by all Piicodev Modules. Right-click and select "save link as"
Second, upload any of the following device module files that match your connected sensors:
| Device | Python Module (right-click, "save link as") |
| All Devices | PiicoDev_Unified.py |
| Atmospheric Sensor BME280 | PiicoDev_BME280.py |
| Air-Quality Sensor ENS160 | PiicoDev_ENS160.py |
| Ambient Light Sensor VEML6030 | PiicoDev_VEML6030.py |
| Laser Distance Sensor VL53L1X | PiicoDev_VL53L1X.py |
| Colour Sensor VEML6040 | PiicoDev_VEML6040.py |
| 3-Axis Accelerometer LIS3DH | PiicoDev_LIS3DH.py |
| 3-Axis Magnetometer QMC6310 | PiicoDev_QMC6310.py |
Logging Data
The plant_experiment.py script has been prepared to log sensor data. It is an extension of the controller code found in the Plant_io Basic Setup Guide.
To get started, uncomment the lines relevant to sensors you have connected. Each sensor has an attach() line and some code to perform the measurement.
For example, to log Temperature, Pressure and Humidity using an Atmospheric Sensor BME280, uncomment the appropriate attach() function:
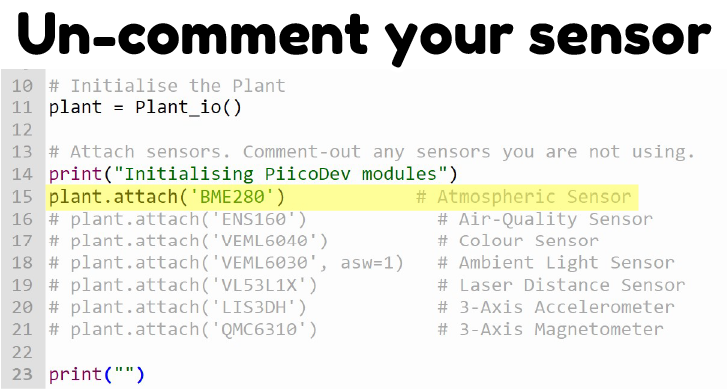
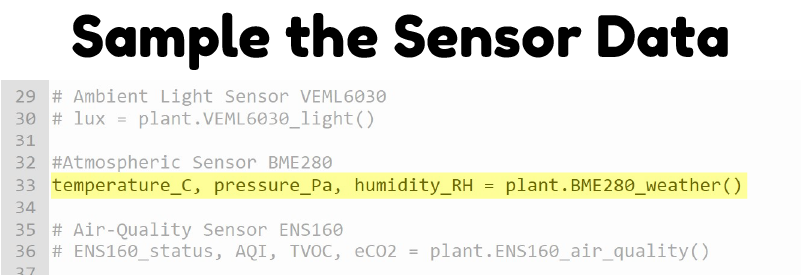
Then un-comment the appropriate line where the sensor data is sampled. In this case, the BME280 provides separate variables for Temperature, Pressure and Humidity.
Datalogging is handled in the same way as the Plant_io Basic Setup Guide - we just include additional entries in the data heading and data dictionary.
Include entries for the data headings. Recall, this is the text shown at the top of each column in the data file.

Finally, we need to associate each type of data with the correct column ie. we make sure the temperature data is put into the temperature column etc.

Run your Experiment
Once you have planned your experiment and set up the plant_experiment.py file to record your desired data, it's time to save the file to your Pico as main.py
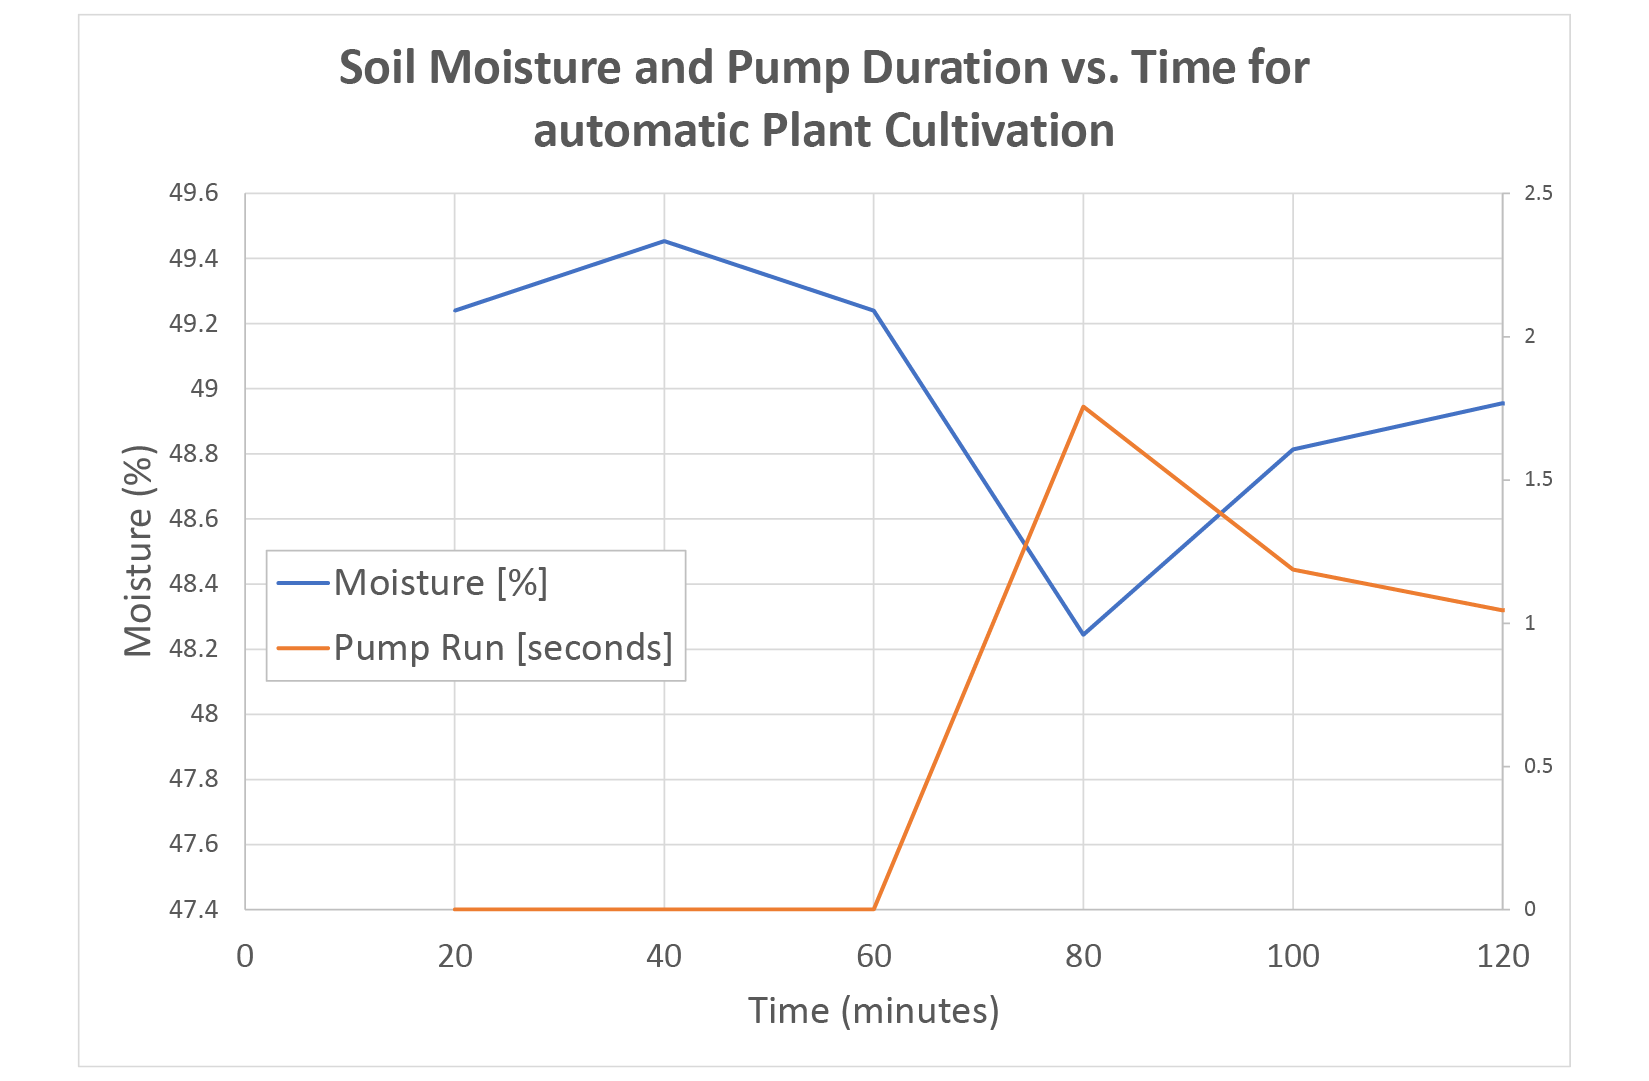
You may want to check in on your experiment and preview the log file to make sure everything is working as intended. The following example shows some sample data of a Plant_io experiment that was left for a little while on a windowsill in an office. The data appears to be logging correctly so we're ready to run an experiment!
These figures were created by importing the log.txt file into Excel and creating graphs from the resulting tables. This is outlined briefly in the Plant_io Basic Setup Guide
 |
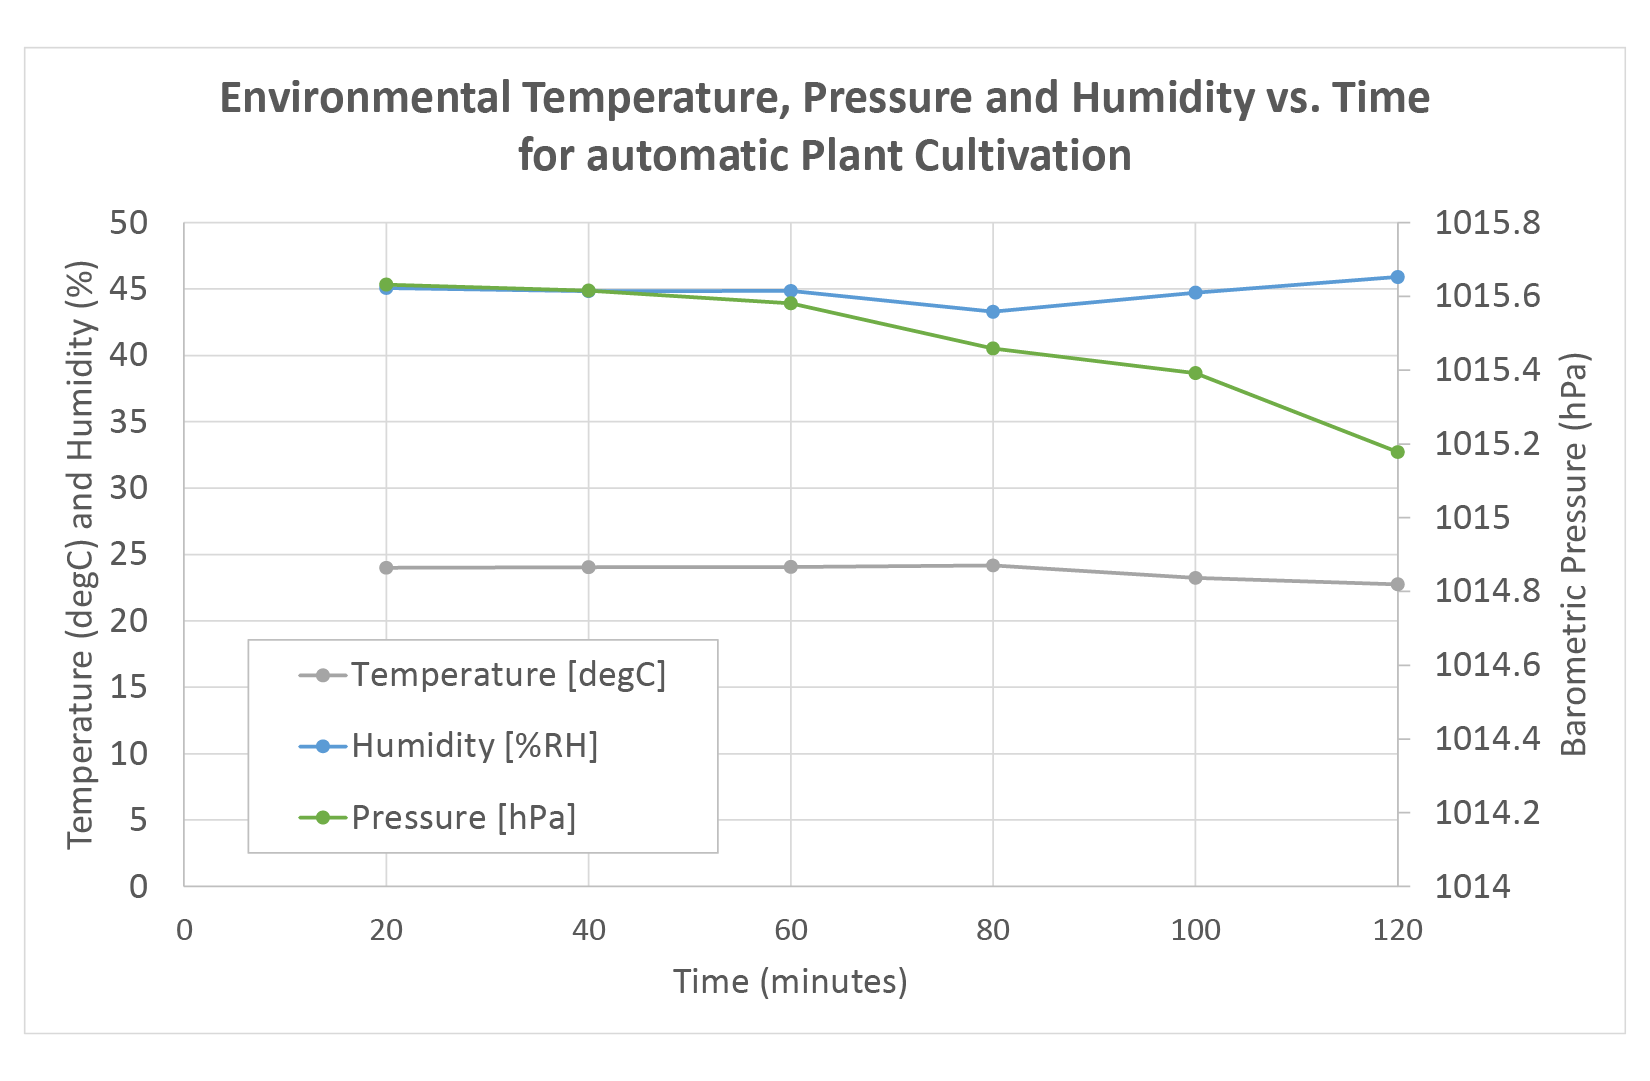 |
| Moisture and Pump preview after 2 hours | Ambient conditions preview after 2 hours |
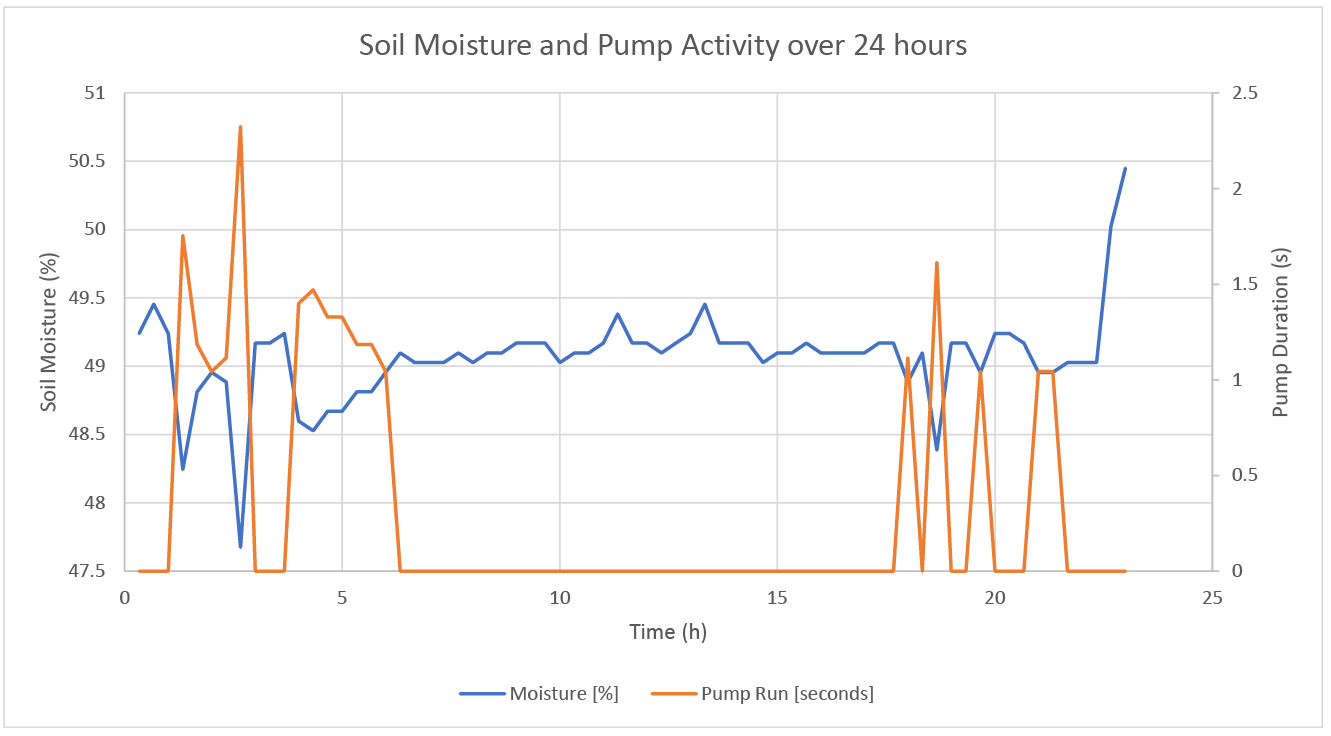
Satisfied that everything seems to be working correctly, I allowed the project to run for about 24 hours and plotted the log again.
Referring to the Soil Moisture and Pump Activity plot, it's great to see the pump kicking in when moisture begins to fall. The Ambient Condition plot is also interesting - revealing a downward trend in barometric pressure and a steady rise in humidity overnight. Temperature is pretty stable which makes sense because the experiment was set up in a pretty temperature-stable office. Overnight the temperature bottoms out at about 21 degC.
 |
 |
Conclusion
In the Plant_io Basic Setup Guide we set up Plant_io for automatic plant cultivation. In this guide we augmented our set up with some additional sensing to log environmental conditions (or other data depending on the sensor you chose).
We now have a system useful for conducting experiments and collecting data automatically. Where you take it from here is up to you! Refer to each sensor listing for inspiration on what experiments you might like to run, or come up with your own idea and test it out!
Happy Making!

