The PiicoDev® Air Quality Sensor is based on an ENS160 multi-gas sensor that detects Volatile Organic Compounds (VOCs). These measurements are run through some algorithms to produce standardised outputs like Air Quality Index (AQI), Equivalent CO2 (eCO2), and Total Volatile Organic Compounds (TVOC). These readings are useful for logging indoor air quality, or controlling ventilation and alarms.
Hardware Connections
To follow along you'll need:
- A Raspberry Pi Pico (with Soldered Headers)
- A PiicoDev Air Quality Sensor ENS160
- A PiicoDev Expansion Board for Raspberry Pi Pico
- A PiicoDev Cable
- (Optional) A PiicoDev Platform will keep everything mounted securely.
Plug your Pico into the expansion board. Make sure it is plugged in the correct orientation - Pin 0 on the expansion board should be to the left of the Pico's USB connector.
Connect your Air Quality Sensor to the expansion board with a PiicoDev Cable.
The PiicoDev Air Quality Sensor features an address switch labelled ASW. Ensure this switch is OFF before proceeding. This will use the default device address. For advanced users, this corresponds to OFF:0x53 and ON:0x52.
To follow along you'll need:
- A Raspberry Pi single board computer (Pictured: Raspberry Pi 4 Model B)
- A PiicoDev Air Quality Sensor ENS160
- A PiicoDev Adapter for Raspberry Pi
- A PiicoDev Cable (100mm or longer is best for Raspberry Pi)
- (Optional) A PiicoDev Platform will keep everything mounted securely.
Mount the Adapter onto your Pi's GPIO. Make sure it is plugged in the correct orientation - An arrow on the Adapter will point to the Pi's Ethernet connector (on a Pi 3 the Ethernet connector and USB ports are swapped.)
Connect your Air Quality Sensor to the Adapter with a PiicoDev Cable.
To follow along you'll need:
- A micro:bit v2
- APiicoDev Air Quality Sensor ENS160
- A PiicoDev Adapter for micro:bit
- A PiicoDev Cable
- (Optional) A PiicoDev Platform will keep everything mounted securely.
Plug your micro:bit into the Adapter, making sure the buttons on the micro:bit are facing up.
Connect your Air Quality Sensor to the Adapter with a PiicoDev Cable.
Setup Thonny
Download / Install PiicoDev Modules
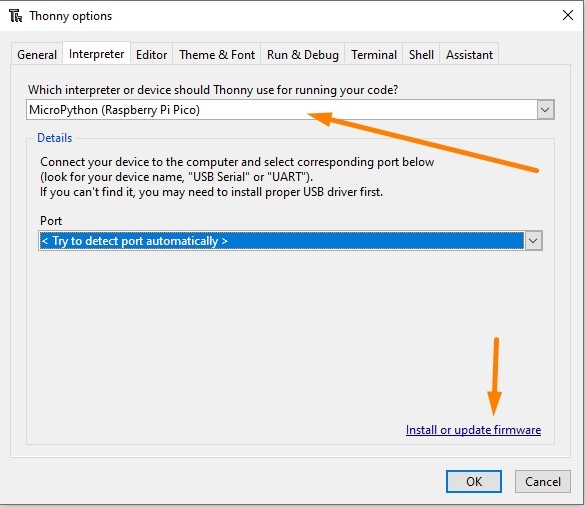
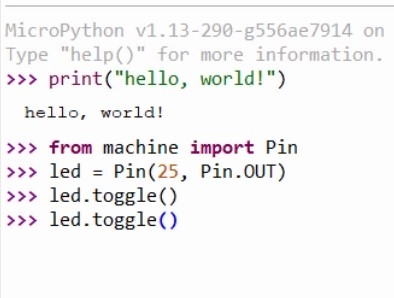
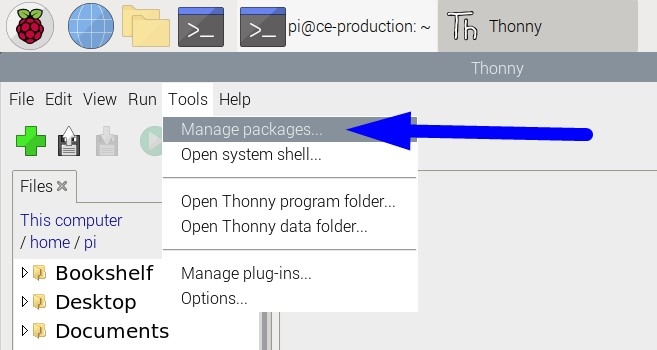
To work with PiicoDev hardware, we need to download some drivers. The drivers provide all the functions to easily connect and communicate with PiicoDev hardware. Select your dev board from the options above.
We will need these files to easily drive the PiicoDev Air Quality Sensor:
- Save the following files to your preferred coding directory - In this tutorial, we save to My Documents > PiicoDev.
- Download the PiicoDev Unified Library: PiicoDev_Unified.py (right-click, "save link as").
- Download the device module: PiicoDev_ENS160.py (right-click, "save link as")
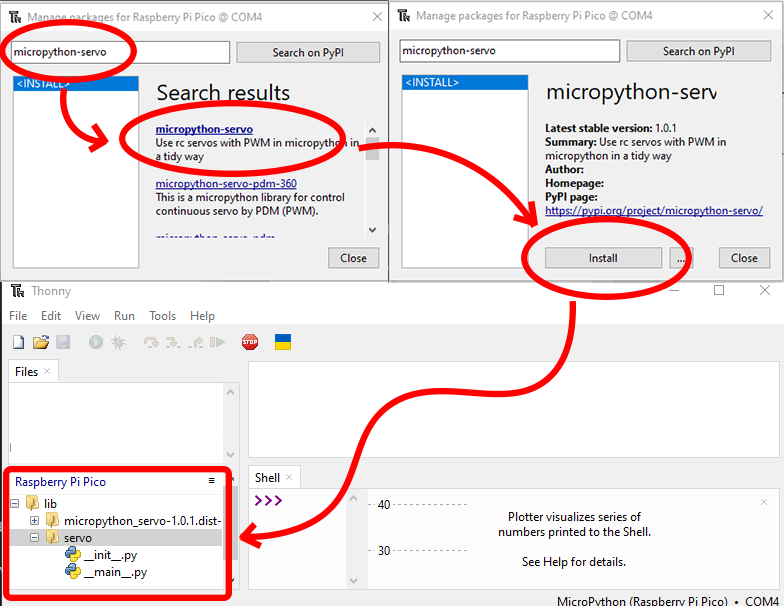
- Upload the files to your Pico. This process was covered in the Setup Thonny section.
The PiicoDev Unified Library is responsible for communicating with PiicoDev hardware, and the device module contains functions for driving specific PiicoDev devices.
We will need these files to easily drive the PiicoDev Air Quality Sensor:
- Save the following files to your preferred coding directory - In this tutorial, we save to My Documents > PiicoDev.
- Download the PiicoDev Unified Library: PiicoDev_Unified.py (right-click, "save link as").
- Download the device module: PiicoDev_ENS160.py (right-click, "save link as")
- Upload the files to your micro:bit. This process was covered in the Setup Thonny section.
The PiicoDev Unified Library is responsible for communicating with PiicoDev hardware, and the device module contains functions for driving specific PiicoDev devices.
Reading Air Quality Metrics
This example samples the Air Quality sensor for three air quality metrics: AQI, TVOC and eCO2. Run the following code to begin taking measurements.
# Read air quality metrics from the PiicoDev Air Quality Sensor ENS160
# Shows three metrics: AQI, TVOC and eCO2

from PiicoDev_ENS160 import PiicoDev_ENS160 # import the device driver
from PiicoDev_Unified import sleep_ms       # a cross-platform sleep function

sensor = PiicoDev_ENS160()   # Initialise the ENS160 module

while True:
    # Read from the sensor
    aqi = sensor.aqi
    tvoc = sensor.tvoc
    eco2 = sensor.eco2

    # Print air quality metrics
    print('    AQI: ' + str(aqi.value) + ' [' + str(aqi.rating) +']')
    print('   TVOC: ' + str(tvoc) + ' ppb')
    print('   eCO2: ' + str(eco2.value) + ' ppm [' + str(eco2.rating) +']')
    print(' Status: ' + sensor.operation)
    print('--------------------------------')

    sleep_ms(1000)
All going well, you ought to see some data formatted as follows: Three metrics for air quality and the operation status.
Referring to the example code, we can see that the aqi property has both a value (a number, in this case 2) and a corresponding rating (a description, in this case, "good"). Each can be accessed individually with .aqi.value and .aqi.rating respectively. Similarly, the .eco2 property has a value and rating that can be accessed with .eco2.value and .eco2.rating respectively. The .tvoc property returns a value only.
You may notice that the data drifts a fair bit during the first few minutes of operation - this is normal and expected. The ENS160 sensor requires an initial start-up and warm-up phase. The current phase is indicated by the .operation property. Read more about this in the Initial Start-Up and Warm-Up section.
Air Quality Index - AQI
The Air Quality Index (AQI) provided by the sensor is derived from a guideline by the German Federal Environmental Agency and is often referred to more formally as AQI-UBA. The index is based on a TVOC sum signal. Although local to Germany, this guideline is referenced and adopted by many countries and organisations. The index ranges from 1 (Excellent) to 5 (Unhealthy) and each index is accompanied by recommendations and exposure limits. The following figure is reproduced from the ENS160 datasheet.
Equivalent CO2 - eCO2
Equivalent CO2 has historically served as an air quality indicator since there is a well established proportionality between VOCs and CO2 generated by humans. This inference is historically motivated by the unavailability of VOC measurement technology in the 19th Century - and so an equivalent CO2 measurement was adopted as a surrogate for inhabitant-generated air-pollution. Many HVAC industry standards still refer to eCO2 for demand-controlled ventilation. An example ventilation application might select "Low", "Medium", and "High" fan speeds for "Fair", "Poor" and "Bad" ratings, respectively. These ratings are shown in the table below, reproduced from the ENS160 datasheet.
Remix ideas: Human Byproducts and Cooking Odours
In general, VOCs are more abundant indoors and come from a few main sources: humans (respiration, transpiration, and metabolism), and furniture or household supplies). All else being equal, we ought to be able to infer the presence of a human (or other large animals!) from the change in data. Give it a try! Here's a few experiments you might like to try:
Kitchens are an abundant source of air contamination. Without adequate ventilation, smoke from oils and food can readily degrade the air quality. What's more, TVOCs are often odourous, and so you may even be able to track the concentration of 'cooking smells' by observing sensor data during cooking.
Bedrooms and bathrooms are great candidates for observing byproducts of human metabolism - they're generally contained volumes with people in them. Provided you're not violating anybody else's privacy, try tracking data over a day in these spaces.
The ENS160 datasheet supplies a fascinating figure (below) showing eCO2 values logged in a bedroom when windows are opened and closed, "cooking smells" in a kitchen, and body odours / bio-effluents in a bathroom.
Initial Start-Up and Warm-Up
The first ever time the PiicoDev Air Quality Sensor is powered on it will need some time before it can be expected to deliver good air quality readings. This is called the Initial Start-Up and lasts for 1 hour at most. If power is removed within 24 hours, the sensor will proceed with the Initial Start-Up again the next time it is powered up. Once the Initial Start-Up is complete and the sensor has run for at least 24 hours, the PiicoDev Air Quality Sensor needs only 3 minutes each time it is powered on to Warm-Up.
You can still read data from the sensor during the Initial Start-Up and Warm-Up times, though the output may not be as reliable.
You can check the current state of the sensor by reading the .operation property which will return one of the following descriptions:
- operating ok
- warm-up
- initial start-up
- no valid output
An example of showing the .operation property is below:
from PiicoDev_ENS160 import PiicoDev_ENS160
from PiicoDev_Unified import sleep_ms

sensor = PiicoDev_ENS160()   # Initialise the ENS160 module

while True:
    print('Operational Mode: ' + str(sensor.operation))
    sleep_ms(1000)
Connecting to multiple sensors
The following example reads data from two PiicoDev Air Quality Sensors independently. To do this, they each require a unique Address Switch (ASW) setting. Leave one with ASW:OFF and set the second sensor ASW:ON. Referring to the example code, we can see two instances of PiicoDev_ENS160(). Each sensor's instance is initialised with an asw argument which encodes the positions of the ASW switch (1=ON, 0=OFF).
# Read from two sensors independently
from PiicoDev_ENS160 import PiicoDev_ENS160
from PiicoDev_Unified import sleep_ms

sensor_A = PiicoDev_ENS160(asw=0)  # Initialise the first sensor with ASW:OFF
sensor_B = PiicoDev_ENS160(asw=1)  # Initialise the second sensor with ASW:ON

while True:
    # Read the sensors
    tvoc_A = sensor_A.tvoc
    tvoc_B = sensor_B.tvoc

    # print total organic volatile compounds
    print('A: ' + str(tvoc_A) + '    B: ' + str(tvoc_B))

    sleep_ms(1000)
Advanced Usage - Setting Temperature and Humidity parameters
The algorithms implemented by the ENS160 include terms for air temperature and humidity, which are used for compensating output data. In general, these can be left as defaults. If you have access to temperature and humidity data, you can provide this information to the ENS160 by setting the .temperature and .humidity properties. The following example sets the temperature to 25 degrees Celsius and humidity to 50%. We use constant values in the example, but this data could be provided by temperature and humidity sensors.
#Set the temperature and humidity properties for compensated data.
from PiicoDev_ENS160 import PiicoDev_ENS160
from PiicoDev_Unified import sleep_ms

sensor = PiicoDev_ENS160() # Initialise the ENS160 module
sensor.temperature = 25.0  # [degC]
sensor.humidity = 50.0     # [%RH]
Conclusion
We're now well equipped to measure Indoor Air Quality (IAQ) with the PiicoDev Air Quality Sensor. We've performed basic readings of IAQ, and remixed code to perform some action depending on Air Quality Index. We're capable of running two sensors simultaneously and have observed how fumes may be detected.
If you build on this starter-project - or just have some quesitons - continue the discussion below! We're full-time makers and happy to help.
Happy Making!
Resources
Documentation and Repos
Air Quality signal characteristics
- TVOC: 0 - 65,000 ppb
- eCO2: 400 - 65,000 ppm CO2 equiv.
- AQI-UBA: 1 to 5


