Nothing beats bright shiny colourful lights and adding an extra dimension only makes them better. This guide demonstrates the fastest and most customizable way to have WS2812B grids of fully addressable LED Nodes come alive. Exactly how you want. Even better, because we are using WLED, there will be absolutely No Code Required. GlowBit Matrix 8x8 are fully addressable LED grids literally purpose-built for this task, built in-house, Australian-made, and this guide will use them extensively. See a GlowBit Matrix 8x8 component below in front of a matrix that was made by combining 9 of them together.
To be clear, this guide will be all about controlling any Fully Addressable LED Grid or Matrix, in any size or shape, using any Espressif ESP32 or ESP8266 Development Board. These developer boards are the best way to get WiFi connectivity into any project. Your mobile phone or computer will then be able to tell the LED Nodes exactly what to do wirelessly. All through the local WIFI! This is all possible by WLED, one of the best open-source projects ever conceived.

This guide will make it clear how to inject extra power into a LED Light system, that way you can feel confident in lightning more than 30 LED Nodes. This guide will demonstrate how to set up WLED on a Single GlowBit Matrix 8X8 (that's 64 unique LED nodes) and provide all the tools to take it to the next level with a 3X3 GlowBit Matrix 8x8 Grid (that's 9 GlowBit Matrix components put together, totalling 576 LED Nodes)! There are even tips to make your system portable and sound reactive too. See the contents of the guide below.
- What You Need
- Hardware Assembly (Crucially Power Injection)
- WLED Software Setup for Grid Control
- Demonstration
- Where To Now (3X3 Grid)
- Custom Pixel Art
- How to Battery Power into the WLED System (Portable)
- Sound Reactive WLED System
- Downloads
Check just a small sample of what you can do in the image below. No Code, No Worries! Truly WS2812B grids made easy. Know that the images below are being projected to the 3X3 Grid of 8x8 GlowBit Matrices. More LED Nodes result in clearer images.
![]()
Know that if you built a grid shape from any WS2812B Strips or a grid of Any Other Fully Addressable LED Nodes then the WLED Grid system will work for you as well. As always if you have any questions, queries, or things you'd like me to do with this system, please let me know your thoughts!
What You Need
Below is a list of all components needed to make this guide a reality in your Makerverse. All the electronics here operate at 5V.
- ESP32 or ESP8266 Board. There are many types, for this guide I have used an Adafruit HUZZAH ESP8266. You could use an Adafruit Feather HUZZAH32 Microcontroller (perfect for a Portable Set Up) or any ESP32 or ESP8266 board that you wanted.
- GlowBit Matrix 8X8. Worth noting there are many types, of WS2812B RGB (Neopixel) Grids that will work using this guide. You could even create a huge grid by lining up sections of a 1M RGB LED Strip into a square or rectangular shape.
- A 5V 4A Power Supply (suitable for most art - but not running LEDs at full brightness @ white across a 9x9 grid. Will need to inject more power depending on your intended usage)
- A DC Barrel Jack to 2-Pin Terminal Block Adapter
- DuPont Jumper Cables
- MicroUSB to USB Cable (Must be able to transfer Data!)
- Optional 3.7V LiPo Battery (only needed if you want to create a portable system)
Hardware Assembly (Crucially Power Injection)
For this, we will need to inject extra power and connect the GlowBit Matrix 8x8 to the ESP8266 Development Board. Know that this method of injecting extra power is appropriate for any setup which has more than 30 nodes. Doing so means will let your LED Nodes reach their maximum brightness. This setup can work with very long single lines of WS2812B very happily, just replace the GlowBit matrix with a line of addressable LEDs.
To proceed add wires to the GlowBit Matrix so we can connect the ESP32 Module. Do this by soldering on connectors to the GlowBit Matrix 8x8 like the image below. I cut the Dupont Wires in half, strip them slightly, twist and wrap them, and finally, solder them directly on. The image below shows the front and back of the GlowBit Matrix 8x8 with wires soldered on.

Having done so and your LEDs are all wired up like the image below you are good to progress. Note that I have connected the | Din | pin to the | GPIO 2 | pin and that fact that I will set in the WLED Software in the | LED Configuration | Menu. Also, connect Edge Pin | Ground | to | Ground | on the Dev Board. Finally, attach the DC Barrel Jack to the Middle Positive and Negative wires. Make sure to connect this correctly, noting the symbols on the Jack. Connect this up backwards and you will break your GlowBit Matrix.
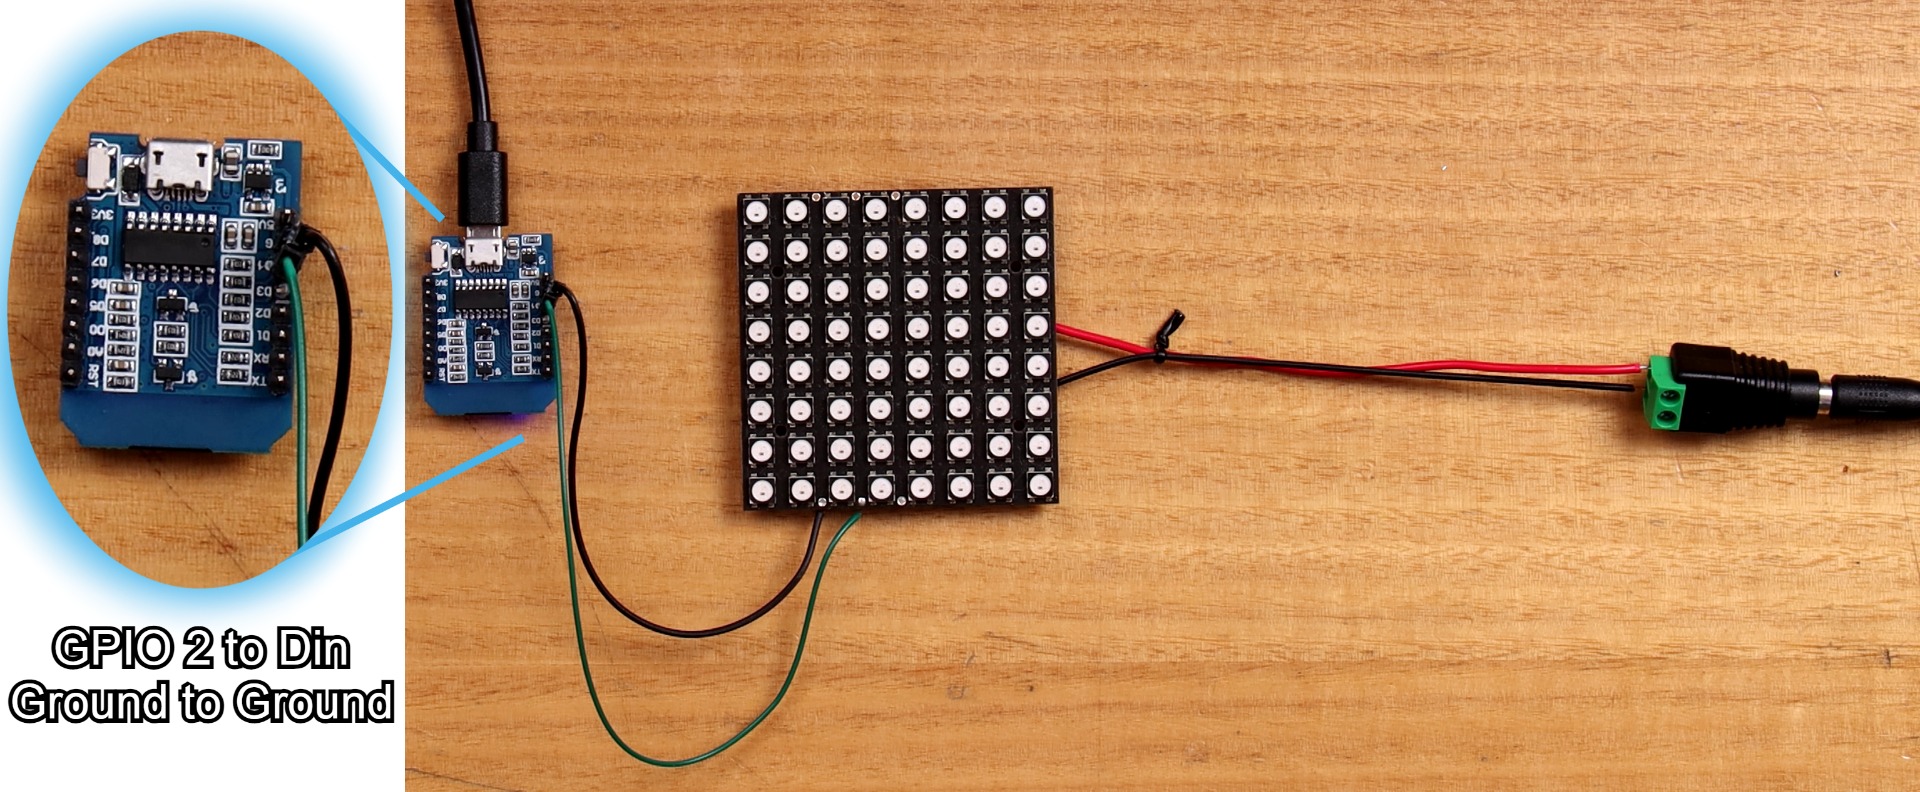
With all wires connected up plug in your power supply to the DC Barrel Jack. Then connect the Micro-USB to USB cord into your computer and the ESP8266 board.
WLED Software Setup for Grid Control
WLED is the ticket to doing this all without code. I have a guide all about doing this hit it up exactly by clicking this location - WLED Phone App | Control Addressable LEDs with an ESP32 or ESP8266. Lots of great troubleshooting tips can be found there too. Make sure to install the version of WLED which is | 0.14.0-b1 | or better to your ESP32/ESP8266 Board. See this in the image below.

Once you can get LED lights to turn on and respond to you via the Phone App you are good to continue. From here everything can now be done via the WLED App, make sure you have it installed on your phone if you haven’t already (you can also find it for free in the Google Play Store or in the IOS App Store). You can learn exactly how to set up the LEDs Correctly (selecting the right GPIO Pin and amounts of LEDs) from this guide right here. Now it is time to set up our parameters for 2D Grid control inside the WLED Phone App. Access the WLED system and click on the settings menu. Click on | 2D Configuration |. See that menu in the image below.

From here if you are running a single 8x8 GlowBit Module Fill out the form exactly like the image below. Then press | Save |.

If you are running instead 9 total 8x8 GlowBit Matrix, soldered together in a square shape, fill out the form exactly like the image below. Then press | Save |.

Nice, we can now select any of the options in the Effects section and your Grid will Light up appropriately! All options that work really well with grids will have a little |#| symbol next to their name. Options without that grid symbol will also work really well. Most options will have sliders that will change the speed, size, or intensity of the effect. See the Effects menu in the image below.

See my fingers selecting options with the WLED Phone App in the image below. All these options are just one click away. Also, note those customising sliders that I have annotated with arrows. So much freedom to be had.

And check below to see some of the effects occurring on our single Glowbit Matrix in the image below! So much choice!

Demonstration
Look at all these beautiful effects when we use our larger 3X3 Matrix in the images below! I dive into the build of this larger display in the next chapter. It is much better to see them dancing around in the video (check the top of this guide) but I will do my best here with the still images below. See a whole bunch of grid examples below, for an exhaustive list of all of the patterns check out this link right here.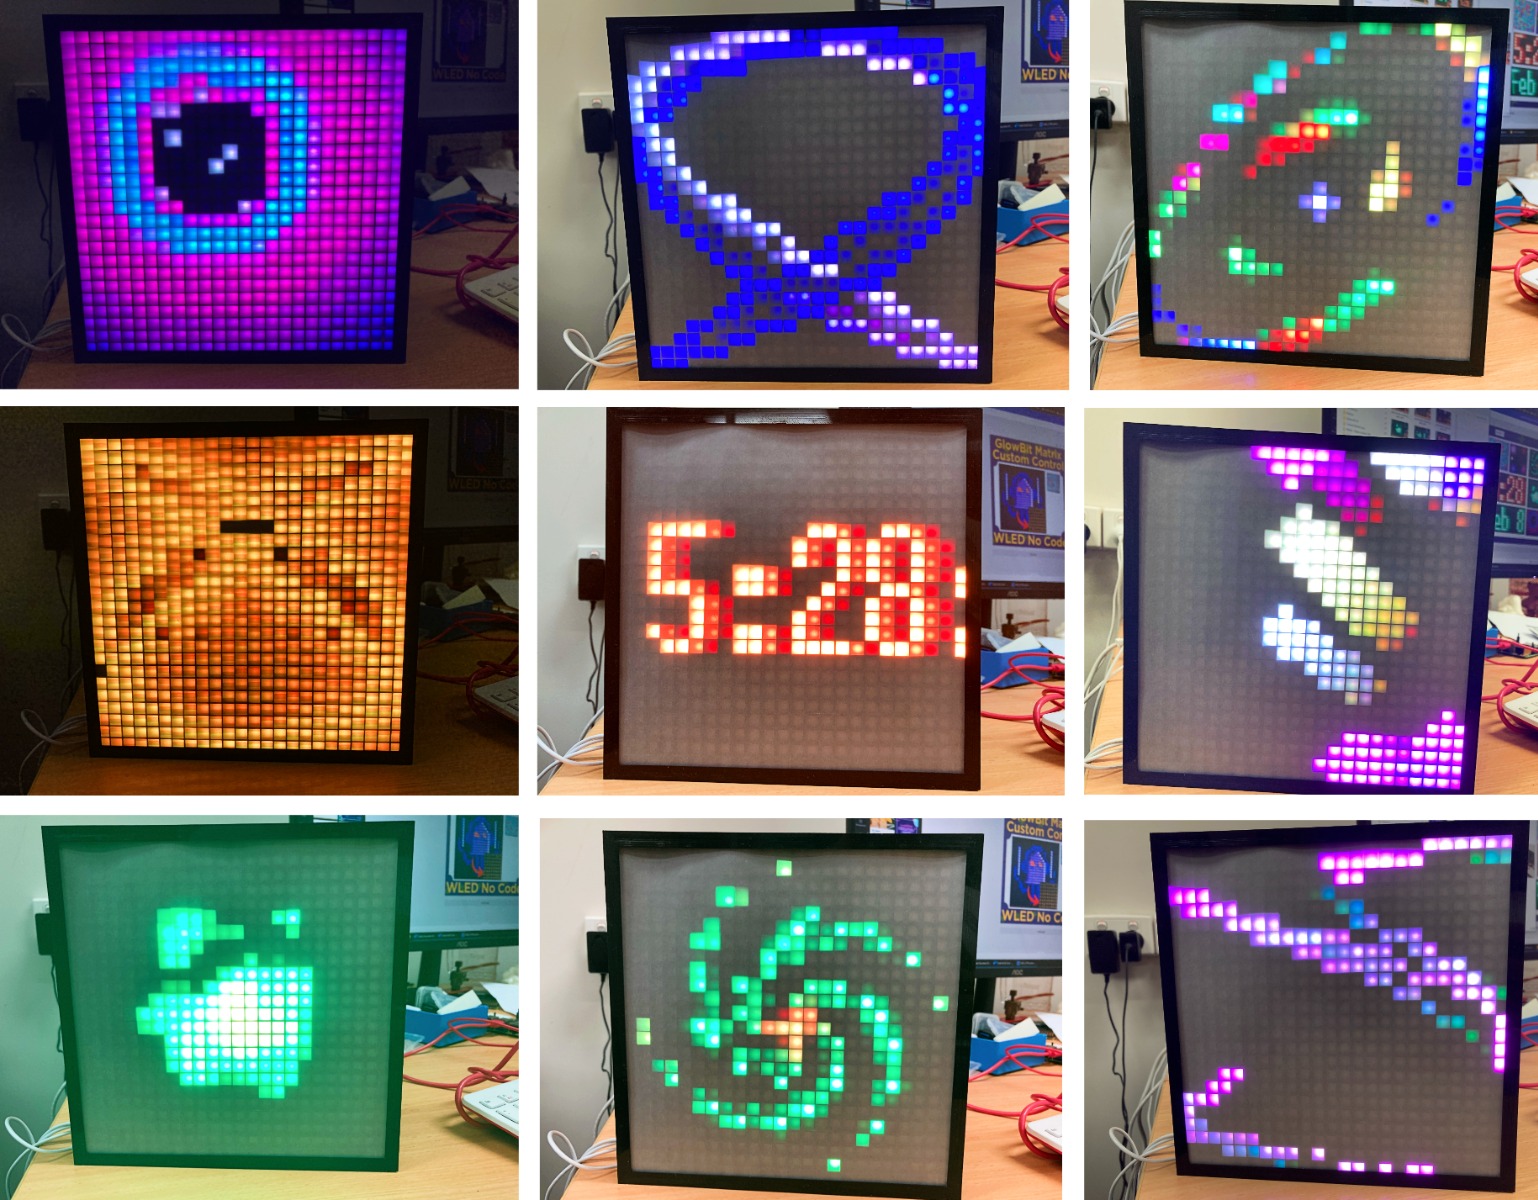
The prebuild settings are just so much fun, easy, and dynamic to use! It literally took me weeks to explore and exhaust all the options. The one below, Plasma, is a particular favourite of mine.

Where to Now (3X3 Grid)
One of the greatest things about GlowBit Matrix Modules is how easy they are to Tile. Check out this video here explaining exactly how we did this. Also, check out this guide to see exactly how to do so. Simply for this guide, I will show you the solder connections to GlowBit Matrix components. See a 2x2 tile system of GlowBit Matrix 8x8 in the image below. Note how the | Vcc | and | Ground | Pins are all connected and take care to see how the | Din | to | Dout | Pins are connected. There are even extra solder points so you only need to rely on the solder as a mechanical connection between grids.

With my 3x3 grid all soldered I connected it up just like before except now I changed the settings inside WLED to accommodate for 3X3 8X8 Tiling. You can see the exact settings I used in the | WLED Setup for Grid | Chapter higher up in this article. We had 64 LEDs before, now we have 576 unique LEDs! That is pretty phenomenal. They all light up very brightly using that single 5V 2A Power Supply from before. See the board exposed in this video playing Conway's Game of Life below.

Even simply placing white printing paper on top of the LED matrix creates some great diffuse light that amplifies the effect. See that in the image below

Now LEDs always look better with a diffuser and square boxes around each of them. It means it can turn the round emitters into square boxes that fill up the space completely. Like having big pixels on a television screen. Doing this really amplifies the effect. See below some of the 3D-printed components to make this happen.

All parts were printed on an Ultimaker 2+, so if you have a smaller build platform fear not, you can print this too. See the outside case part printed on the build platform in the image below. All STL files can be found at the bottom of this guide.

Once Assembled the end result looks like the above. Know that I utilised Vellum Paper as the diffuser screen. However, cutting down an A4 Piece of paper to shape will work perfectly fine too. Just be aware LEDs can get hot so do not leave our little system unattended when it is running. See the completed light box in the image below.

Custom Pixel Art
There are heaps of pre-set inside WLED. It took me weeks to explore it all. But, truthfully, we all want to see our favourite retro game characters lighting up our display and we can't do that using just WLED. Pixel art is much better the more pixels you have so this guide will demonstrate it with the 3X3 GlowBit Matrix display. Below is the kind of effects you will be able to get.
Now the Plug-In to add this functionality comes from Werkstrom and his project WLED Pixel Art Converter. The link to his Project's Github is right here. This software will run in your browser and let you drag and drop almost any image (tested with at least PNG, JPG, WEBP, and GIF) into it. You can then upload the generated results directly to your WLED device, with a single click of a button. Keep in mind these images will all be static. However, you can upload multiple slides from a GIF and then run them sequentially after each other. Zero Code Required and Zero Excel Sheets Required!
See the process to set this up start by navigating to the GitHub Page and downloading the packages as you can see happening below.

Unzip (extract) the downloaded file, the desktop is a perfectly fine place to do so, and open the extracted files with a file explorer. See that having occurred in the image below. Now Navigate into the | html | Folder and double-click on the file that says | pixartmin.html |. This will open a web interface that we can use to directly communicate with our WLED system.

Now that that web interface is open fill it out like below. Be sure to use your IP address for the WLED instead of my one.

Having done that drop in the image that you would like to have displayed. I liked this kitten one (Pusheen!) so that's the very first one I used.

With that Pulled in select the next option | Convert to WLED JSON |. See the result of pressing that button in the image below, it creates a long text string (that will get parcelled to WLED) and a preview of what each LED on your grid will display.

Once at this point simply press the | Send to Device | button. Then you will have your new, custom Pixel Art display gorgeously on your WLED Grid. Yay! See my kitty below.

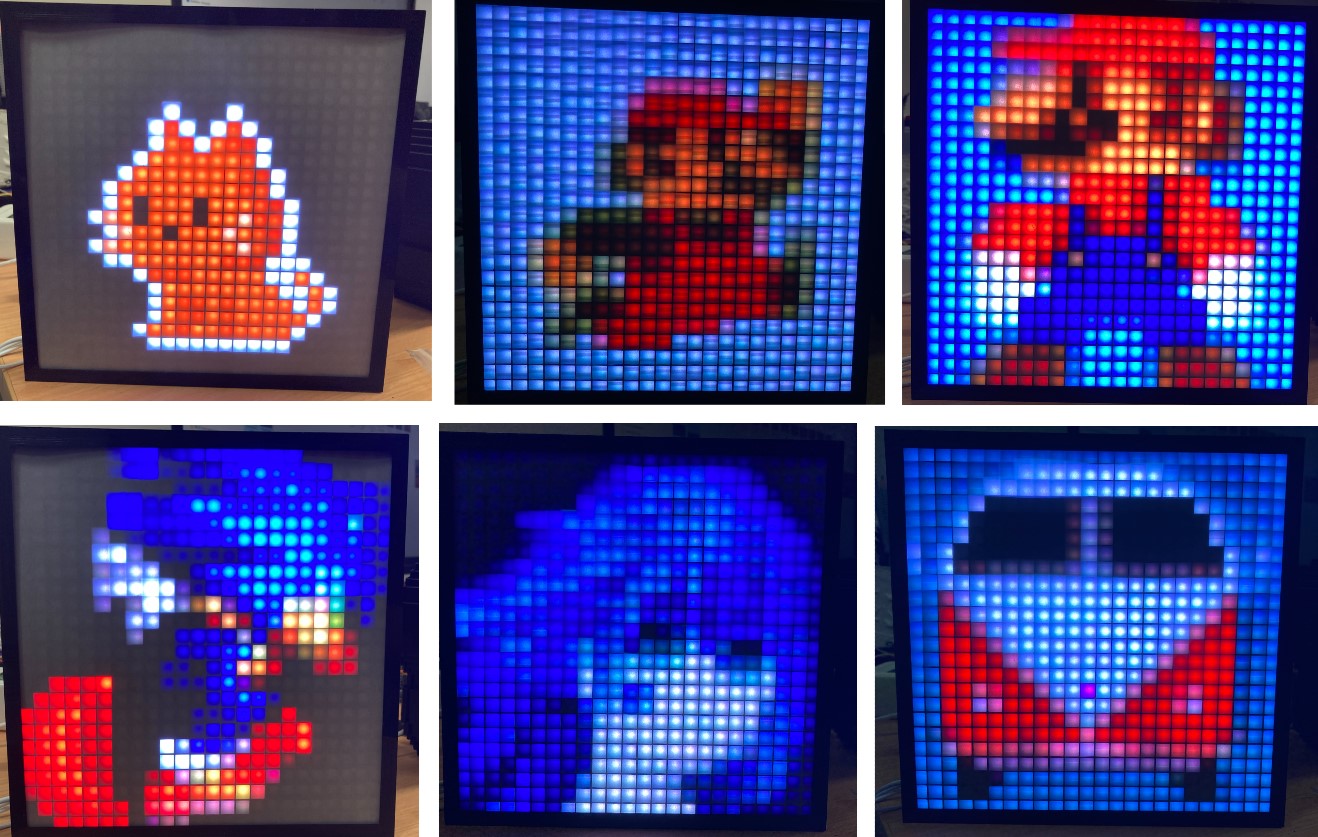
This is a very recent development, and I expect it to get better and better (likely to become fully integrated with WLED) but if you do the following you can use any image and have it displayed on your setup using WLED. It is bloody amazing! See some more results below (some fine art as well, write down in the comments below if you can identify them).
![]()


I've gone ahead and added some more art too. It was just too much fun I couldn't resist.

How to Battery Power a WLED System (Portable)
A common question I see asked is how to battery power/make a portable WLED system. That means you will have Blinky Fully Addressable LEDs on the go. If you utilise an Adafruit HUZZAH32 Feather Board and Any 3.7V LiPo Battery this can be done very easily. See how to do it in the best and safest way in the image below.

The Adafruit Feather Boards all come with voltage and current regulation (a Power Management System, PMS) already on board. They also have an easy-to-connect port to plug in LiPo Batteries (Standard 2-pin JST-PH connector). The PMS circuitry (which on these boards also acts as a battery management system, BMS) means your system will automatically turn off once your LiPo Battery has drained to a safe point. This means your battery will have a long life span. This board will also charge the LiPo battery when you plug the whole system into a powered USB port. This board is a perfect solution for a portable ESP32 running WLED.
Worth noting, I am using less than 30 LED Nodes here as I directly power them from the Adafruit HUZZAH32 Feather Board. This has the exact same wiring as my original WLED Guide. The only difference is I am just replacing the powered USB connection with a connected 3.7V LiPo Battery.
Also note, for this system you will need to set up your desired effects before wandering outside of WiFi range as you won't be able to change it outside of WiFi. If you do not connect your ESP32 to a WiFi then it will produce a Hotspot that you can access and change things that way if you want to control it portably.
The final jewel in the crown of WLED would be Bluetooth control, however, as of 10-02-2023, that hasn't happened yet. WLED is all open-source scripts so perhaps one of you out there will be able to add it. Rest assured as soon as they add the feature, I will be rabbiting on about it.
Sound Reactive WLED System
WLED...it is just so good! We can even have our system listen to the ambient noise around it and respond dynamically through the lights. So many of the presets have this capability and it is properly phenomenal.
You will need to connect up an I2S MEMs Microphone like this one linked to the ESP32 Board, see the Microphone in the image below. Doing so will let you live your wildest audio-reactive dreams. Make sure to adjust the gain settings inside the WLED App and then you will be off to the races. Check this great youtube video here to see how to do it too.

Downloads
If you want even more inspiration come check out the WLED Projects Forum, lots of incredible ideas to check out there.
All STL files used to create the 3D Printed case can be found in this ZIP file here, make sure everything is scaled correctly for your grid before printing them. Check this guide if you need a hand scaling models in Ultimaker Cura.

