What if I told you that you could have the power to detect a lightning strike from 40km away? You'd probably think I've gone mad watching too many Marvel movies. But it is true! All thanks to the DFRobot Gravity: Lightning Sensor. Accessible to the everyday maker, it'll fit in the palm of your hand and even tell you exactly how far away the lightning struck in kilometres.
This is a proper electronic superpower and nobody can tell me otherwise. There are heaps of potential applications with this module, from Consumer Weather Station incorporating thunderstorm measurements, wearable devices for a thunderstorm early warning system (great for outdoor climbers or people who work at heights), hands-free lightning photography, and heaps more.
Lighting is an incredible example of electricity on a grand scale. The average length of a lightning bolt is about 4km. The charge carried down this small channel is so intense that the temperature of the lightning reaches 30,000 °C which is five times hotter than the surface of the Sun. Worldwide there are around 1800 thunderstorms in progress and 44 lightning strikes every second. Research conducted by the National Lightning Safety Institute in 2008 suggests that the cost of damage from lightning may exceed $5B to $6B annually.
The 40-kilometres radius range for lightning detection is amazing! So this guide will instruct exactly how to install, program, and utilise this DFRobot Gravity: Lightning Sensor on a Raspberry Pi Single Board Computer to create an early warning lightning detection system! It will run continuously and whenever lightning hits the ground occurs it will output that fact and the distance of the strike to the shell. The following are the contents of this guide.
- How The DFRobot Gravity: Lightning Sensor Works
- What You Need
- Hardware Set Up
- Software Set Up
- Demonstration
- Where to Now! LCD Output Screen and GPIO Control
- Downloads and Addendum
Lightning is incredibly dangerous, especially to both humans and electronics. This system provides early warning of thunderstorms that people can perceive so that people can take precautions a step ahead. For instance, during my last Australian snow trip, a ski lift was shut down for multiple days after a lightning strike hit it and completely fried up all the electronics. This caused all kinds of chaos, both for the skiers/boarders as they found themselves waiting in huge queues and for the management/lifties of the establishment as they dealt with the fallout. This could have been avoided entirely with an early warning system that disconnects and isolates delicate electronics during a storm. Only if the sky gods are feeling particularly vindictive, and the very first lightning strike goes straight for the electronics, would this not work.
Lots of grief and anxiety can be alleviated with this tiny, beautiful superpower that takes the form of a gorgeous electronic component. If we set it up with an ESP32 (which is totally possible and would drastically minimise the size) we could turn even turn this safety system into a piece of functional jewellery. As always if you have any questions, queries, or things you'd like me to do with this system, please let us know your thoughts!
How This Works
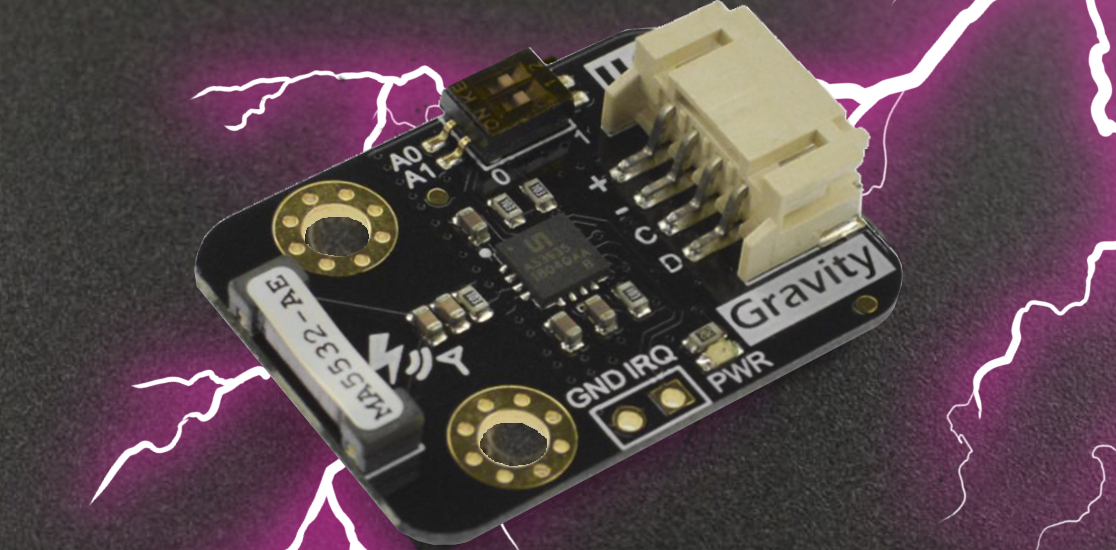
Most people don’t realise (including me until I put together this guide) that there are electronic devices that can pick up on lightning strikes from such a range. The sensor on this module that makes this all possible is the AMS Franklin Lightning Sensor (AS3935) IC and a Coilcraft MA5532-AE dedicated antenna. The AMS innovative AS3935 Franklin lightning sensor IC detects lightning distance, intensity, and frequency within a radius of 40km, in 15 steps, both indoors or outdoors. The sensitive antenna picks up lightning events in the 500kHz band with an accuracy of 1km to the storm front. Furthermore, it auto-rejects disturbances in that band that do not match the characteristic profile of a lightning strike. It has an indoor or outdoor toggle depending on the final setup and a number of methods to tune/filter out false positives. Interestingly the AS3935 won AMS the gold award at the 2012 Sensor Expo. Download the datasheet for this sensor in the zip file found at the bottom of this page.
Lighting has a very distinct signal that it pumps through the electromagnetic spectrum that travels heaps further than the sound of it smashing into the ground or the light emitted from it, see an image of this response below. Lightning strikes are electrostatic discharges, reacting to the high electric potential between a thunderstorm's negatively charged bottom layer and the Earth's positively charged ground. Lightning is detected by sensing electromagnetic radiation. The rapidly changing currents of the strike cause electromagnetic pulses (pulse time 10-150ms) in the VLF (3k-30kHz) and ELF (<3kHz) radio bands. The maximum amplitude lies around 5-10KHz. There are three types of lighting, intercloud, cloud-to-cloud, and cloud-to-the-ground. This module can detect all three.

The embedded man-made disturber rejection algorithm (what a mouthful) that this board has can effectively avoid the electrical interference generated by various household appliances. The lightning algorithm consists of hardwired logic. False events (man-made disturbers) which might trigger the AS3935 are rejected, while lightning events initiate calculations to estimate the distance to the head of the storm. The Lightning algorithm is broken up into three subblocks:
1. Signal Validation: Verification that the incoming signal can be classified as lightning.
2. Energy Calculation: Calculation of the energy of that single event.
3. Statistical Distance Estimation: According to the number of stored events (lightning), a distance estimate is calculated.
In case the incoming signal does not have the shape characteristic of lightning, the signal validation fails, and the event is classified as a disturber. In that case, the energy calculation and statistical distance estimation are not performed, and the sensor automatically goes back to listening mode. The shortest time span between two lightning strikes that the AS3935 can resolve is approximately one second. Once a signal is classified as disturber the sensor is deactivated for a further 1.5s time period. As the duration of disturber signals can vary, this sensor downtime will prevent the sensor from triggering repeatedly due to longer disturber events.
Worth noting, at the moment of lightning, the interrupt pin IRQ generates a pulse. That pulse can be used to trigger a Camera shutter to open, helping photographers to accurately capture the exciting moment of lightning. Or with the sensor embedded inside lightning-sensitive equipment, it can be used to automatically trigger a switch to backup power thus isolating all the systems when lightning strikes.
What You Need
Below is everything you need to set up your Raspberry Pi to work with the DFRobot Gravity: Lightning Sensor.
- A Raspberry Pi Palm-Sized Computer (in my case I have used a Raspberry Pi 4 Model B 2GB but this can be done perfectly with a lower-spec Pi like the Raspberry Pi Zero 2)
- DFRobot Lighting Sensor
- Micro-SD card flashed with Raspberry Pi OS
- Micro-HDMI to HDMI Cord to connect the system to a Monitor
- Power Supply
- Mouse and Keyboard
- DuPont Female to Female Jumper Cables
Hardware Set Up
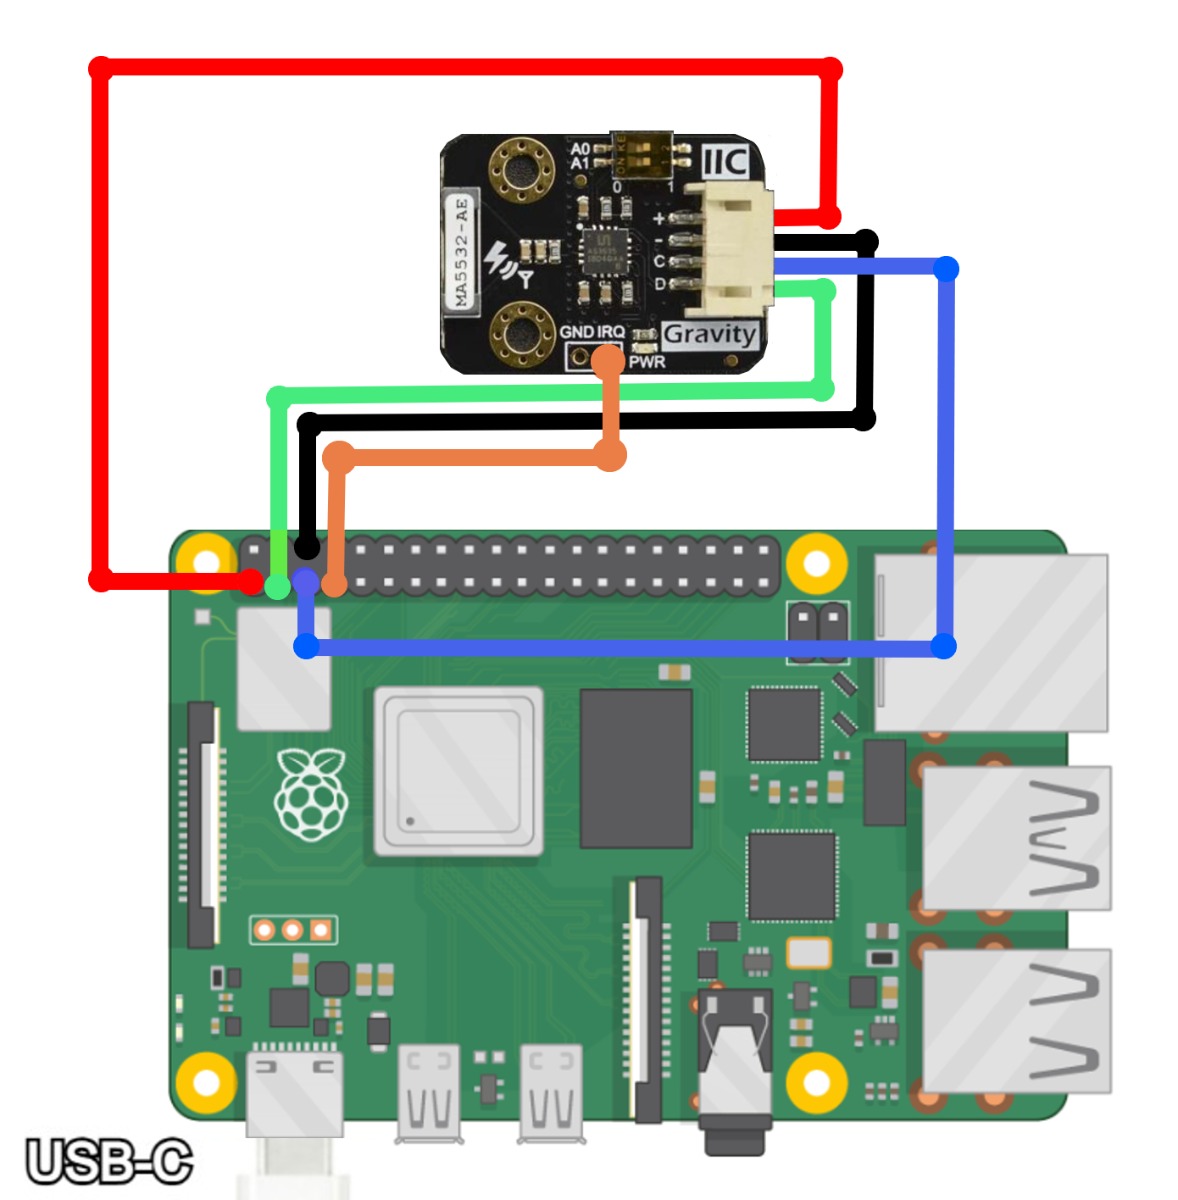
The first step is to connect the DFRobot Gravity: Lightning Sensor to the Raspberry Pi single-board computer. Below is a schematic to do so. Make sure to supply the lightning sensor module only to 3.3V. If you connect it to 5V it will break. All connections can be done with Female to Female Jumper Cables. Connect the 3.3 Volt Pin of the Raspberry Pi to the | + | Connection on the Lightning Module. Connect a Ground Pin of the Raspberry Pi to the | - | Connection on the Lightning Module. This module uses I2C (a two-wire protocol) to communicate with the Raspberry Pi Single Board computer. Connect the SCL (Serial Clock) Pin of the Raspberry Pi to the | C | Connection on the Lightning Module. Connect the SDA (Serial Data) Pin of the Raspberry Pi to the | D | Connection on the Lightning Module. Finally, connect the | IRQ | Pin of the Lightning Module to | GPIO Pin 7 | of the Raspberry Pi using a jumper cable. IRQ stands for Interrupt Request Pin. Use this linked Raspberry Pi Pinout Guide if you need.
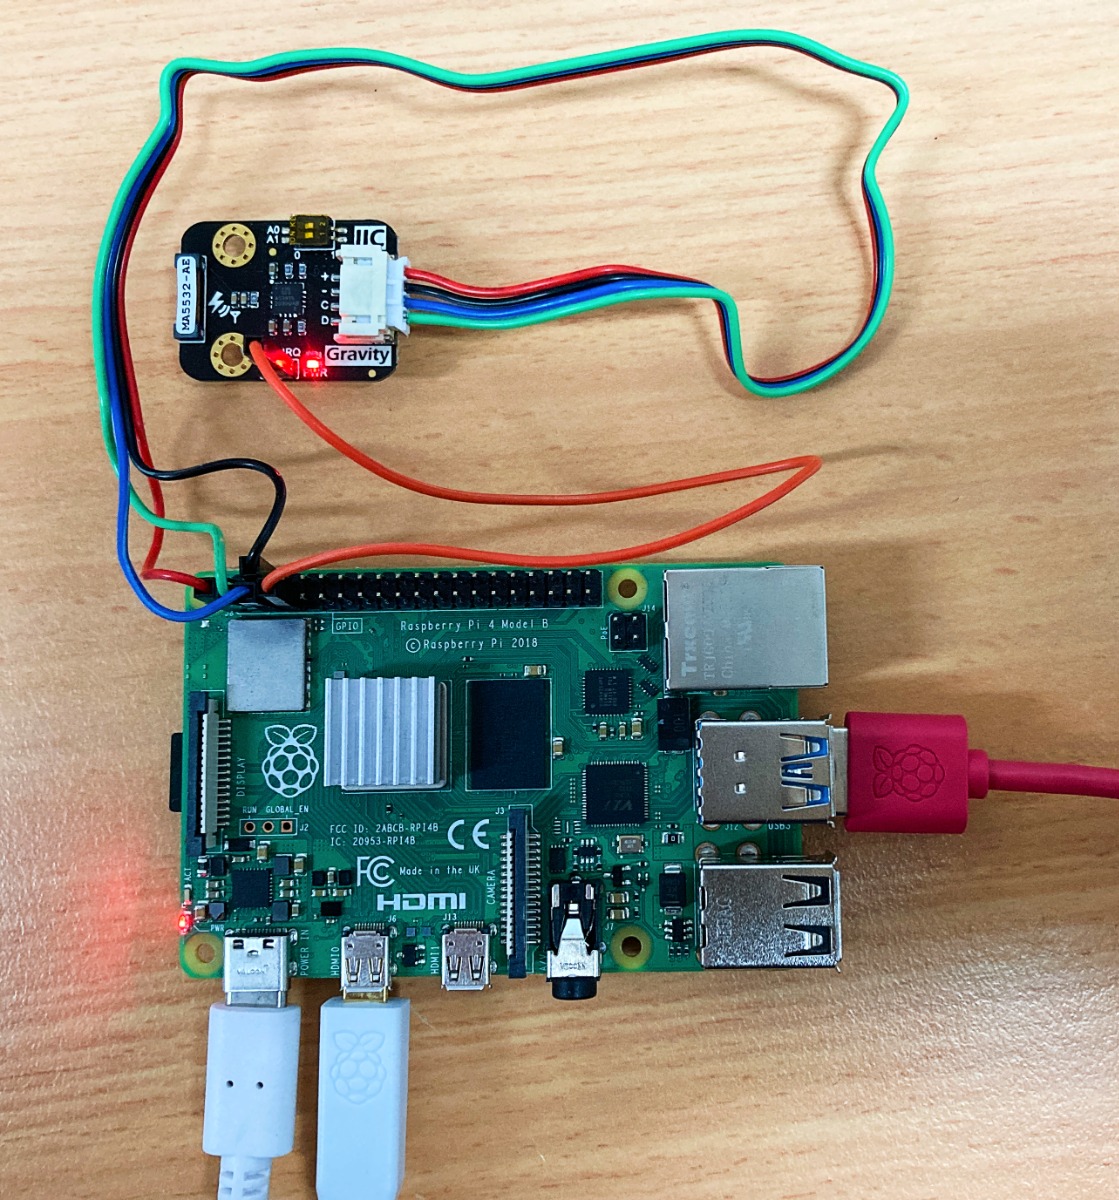
Having done this, set up your Raspberry Pi as a desktop computer. Insert a micro-SD card flashed with Raspberry Pi OS, and add a mouse, keyboard, and HDMI to a monitor. This guide will assume you can do this, if you need an extra hand or more knowledge, come check this linked guide right here. See my completed setup in the image below.
Software Set Up
Some packages will need to be installed and settings altered on your fresh version of Raspberry Pi OS. This will allow correct communication between the DFRobot Gravity: Lightning Sensor and the Raspberry Pi Single Board Computer.
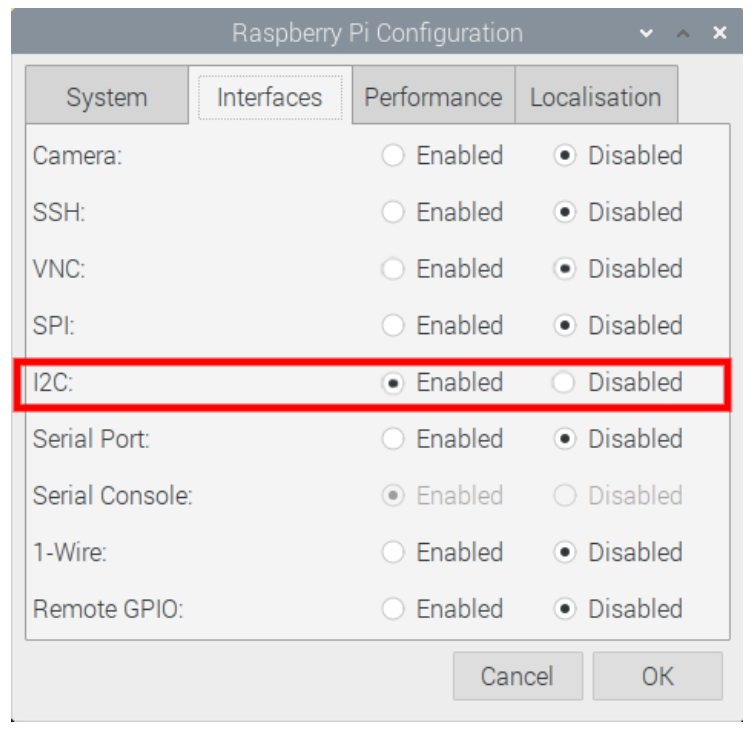
The DFRobot Gravity: Lightning Sensor requires I2C communication to work. By default on Raspberry Pi OS, this communication method is turned off. So the first step is to turn that on. To do this open up the Raspberry Pi Configuration menu (found using the top left menu and scrolling over Preferences) and then enable the I2C Connection found under the Interfaces tab. After enabling, reset the Raspberry Pi to lock in the change. See this setting turned on in the settings window in the image below.
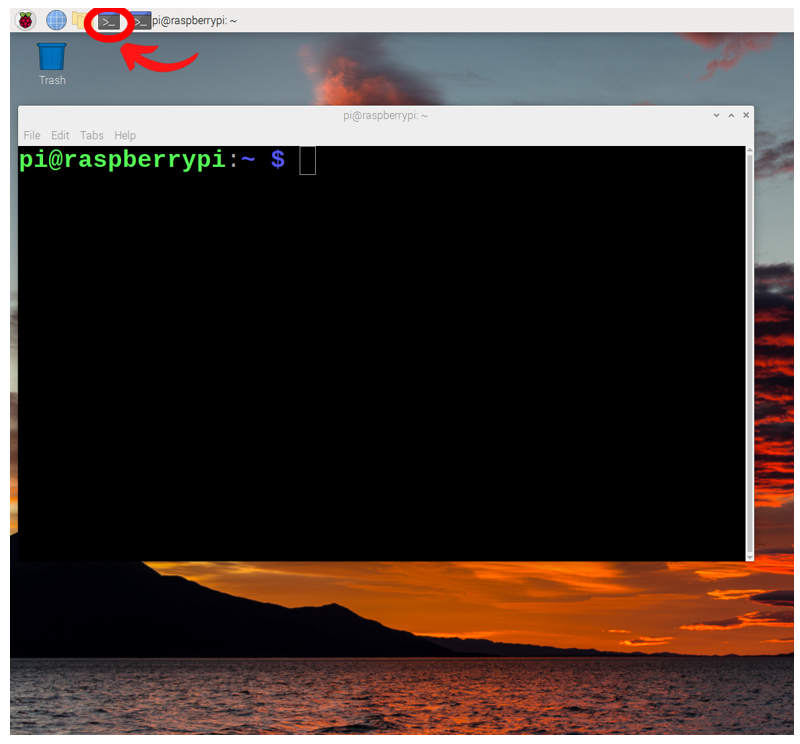
Now with your system rebooted and connected to the internet, open a new terminal window by pressing the black button on the top left of the screen. This will open up a terminal window. See the image below of this happening and a big red arrow pointing toward the terminal button that was pressed.
This terminal window will enable us to download from the internet the exact packages we require. So now type and enter the following lines into the terminal to get all the packages that you will need. If prompted, type and enter | Y | to continue/confirm installations.
sudo apt-get update
sudo apt-get install build-essential python-dev python-smbus git
git clone https://github.com/DFRobot/DFRobot_AS3935.git
There is one further step to do here. You need to be sure that the Python File | DFRobot_AS3935_Lib.py | is in the same folder as | DFRobot_AS3935_detailed.py |. That latter file is the main python script we will run. The previous python file provides it with all the needed variables and features for it to run properly. I do this by jumping into the directory named | home/pi/DFRobot_AS3935/RaspberryPi | which will now be downloaded to your system. From here copy and paste it into this directory here | home/pi/DFRobot_AS3935/RaspberryPi/example/DFRobot_AS3935_detailed|. See this happening in the image below.

With that complete, your Raspberry Pi Single Board computer is fully ready to scan for lightning strikes that hit the ground anywhere within 40km of the system.
Demonstration
From here open up a Python interface like Thonny IDE. Thonny IDE is just a Python Interpreter software and you can use whichever is your preference. In this guide, we will code using the Python Programming Language. Click on the Application Menu (this is the Raspberry Pi Symbol on the top left of the screen) and hover over the Programming Tab to find (and click on) the Thonny IDE Icon. This will open Thonny IDE. Select the Open button found in the top left of the Thonny IDE and open up | DFRobot_AS3935_detailed.py |. You can find this script in the directory | home/pi/DFRobot_AS3935/RaspberryPi/example/DFRobot_AS3935_detailed |. Also, know that all scripts utilised in this guide can be downloaded in the zip file found at the bottom of this article.
Select Run and wait for a response! I waited for a Lightning Storm to be overhead in my location when I ran this script. Every time lightning occurred (which was so close I could hear it) it returned a response similar to | Lightning Occurs! Distance: 1km Intensity: 25 |. See this exact moment lightning struck around me in the image below as well as the weather during the occasion (as seen in the Raspberry Pi Rain Radar and Weather Display). Phenomenal!

Waiting for a thunderstorm did delay the release date of this guide however I do hope the authenticity provides significantly more grounding in reality. Below is the BOM (Bureau of Meteorology (which is an executive agency of the Australian Government responsible for providing weather services to Australia and surrounding areas) Rain Radar of the day.

Be aware when testing your setup at home and you find yourself without a thunderstorm you can use the electronic sparks from Plasma Lighters/Push Button Lighters (for starting a gas stove) to trigger the DFRobot Lightning Module if you are in close proximity to it. Activating a solenoid (12V) within the same room will cause the disturber interrupt message to go off along with other sources of electromagnetic interference (like running electric drills or electric motors, activating the ignition systems of cars, active CRT tv sets, lit fluorescent lights, powering high voltage wires, and switching light switches to name a few sources). All of this is good knowledge for testing and operating your lightning detection hardware.
Tuning System
Now my system has been rugged and accurate from the get-go, hopefully, you will have the same experience as me.
However, if you find the system keeps pumping out the shell message false positives they can be tuned out. The incoming signal of the RLC resonator to the IC needs to be tuned to the resonant frequency of 500.000 Hertz, +-3.5%. This value is tuned by setting the capacitor value (tuning capacitor) of the RLC resonator. You set the capacitor value (16 discrete options) inside the script, then you detect the current antenna frequency by counting the square-wave oscillation on the |IRQ | Pin. Then you adjust if the value is not close to 500.000 Hz. All this can be done inside the Python Script | DFRobot_AS3935_detailed.py | however configurations are for advanced users. You may find yourself chasing your tail. Check here for more tips on tuning and here for even more tips.
Downloads and Addendum
Here is a Download Link for all the Python Scripts utilised in this guide. If you want ideas on what to do next with your lightning sensor come check out this amazing art produced locally in Newcastle. Also, check out this worldwide map of tracked lightning strikes, it'd be very phenomenal to set up our system to feed into that!
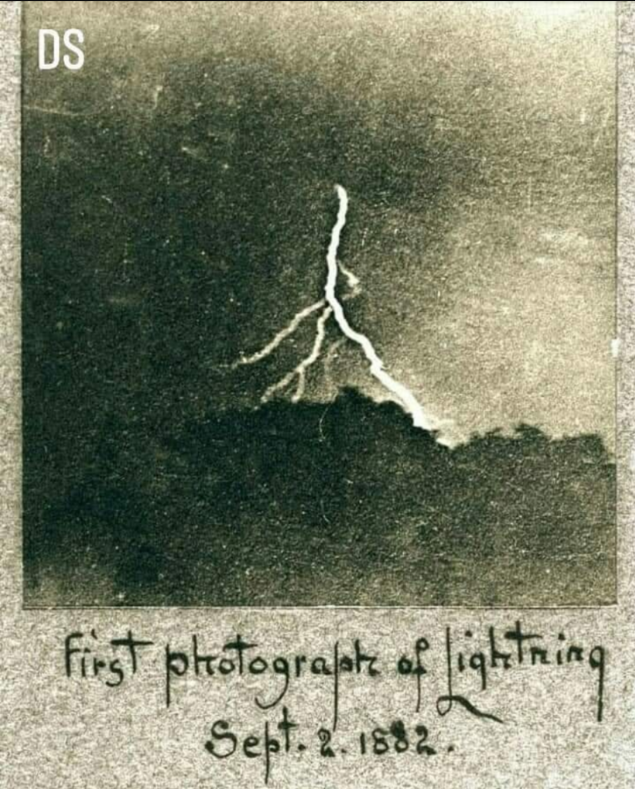
This sensor will definitely save you from spending half your life chasing that perfect lightning shot which is exactly what William Nicholson Jennings did during the 19th and 20th centuries (along with proving that lightning has diversity). His image can be seen below and is the earliest surviving example of lightning photographed.