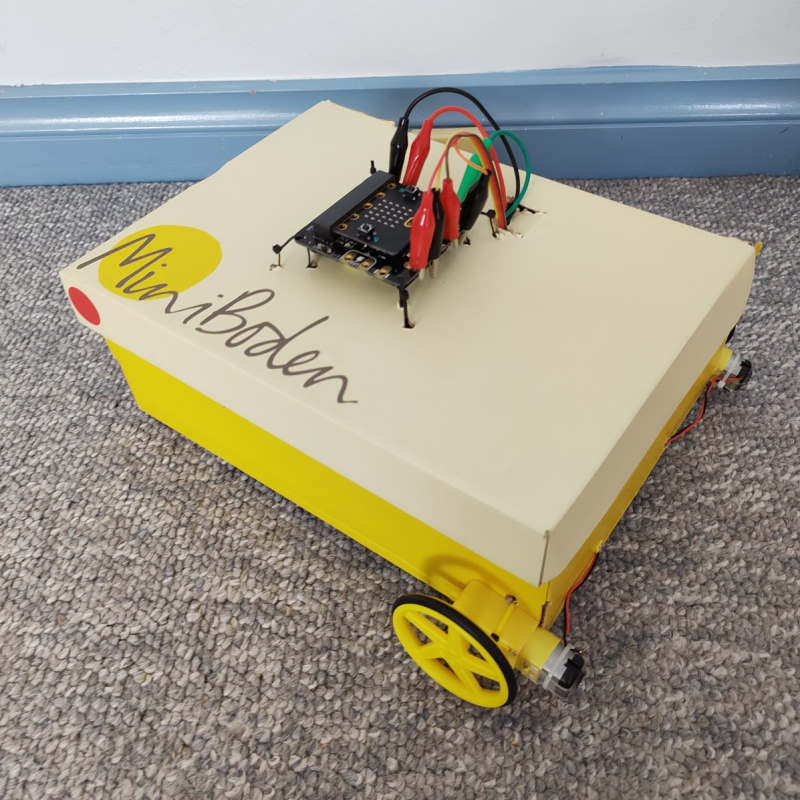
I made this car because at school there was a Lego We-Do tug-of-war competition but the cars only drove backward and I wanted to make a car that can turn and drive forwards.
If you make this car don't throw away the chassis box because I will be using the same holes and base in my future cars.
The box measurements are listed below, but you can use any box that fits the parts, you could even re-use the box that Core sends out!.
When I get more parts I’m going to make a remote, then make it play music.


Parts
- 1x micro:bit
- 1x GlowBit Rainbow
- 1x Motor Driver
- 2x TT Motors
- 2x Wheels
- 1x Ball Caster
- 3x Alligator Wires (red, green and black)
- 4x Female - Alligator Wires
- Assorted Cable ties
- A cardboard box (A Core Electronics order box works well!)
- Small scissors


Step 1: Making the holes to mount everything
You will need to make some holes to mount components to this car.
Motor Mounts
Using the scissors, make 2 holes at the back of the box.
On both sides in the bottom corner on that same edge make 2 holes, you can use the motor as a reference (The bottom hole is for the shaft and top for a cable tie).


The motor’s white part should be able to spin in the big hole and the small hole should be just above the motor. The motor should be sticking out past the car’s back.


Controller board, wire door and micro:bit Mount
For the top holes make the holes circled in red. They should be 6cm apart. Then make the green holes. They should be 1cm away from the red holes.
Cut out a flap-door for all the wires, making sure that you can open and close it.


GlowBit Mount
For the front holes, you will need to hold the Glowbit like in the picture, make the blue holes, and the pink holes for cable ties.
Then make the 6 yellow holes for the alligator clips to connect to, and make sure that there isn't cardboard poking forward that could get in the way.


Final Motor mounts and Caster Wheel
For the bottom holes, make the 2 purple holes in the corners for the motors
To make the orange holes, push on the screws of the caster ball until the screws go through the cardboard.
Then secure the caster from the inside with the included nuts.


Inside Securing Holes
For the inside holes, fold back the 2 front inner flaps and make 2 holes in each one so that the holes are visible on the sides.


Step 2: Attaching the parts
You already have the ball caster attached. Now you need secure the rest of the parts.


Attaching the motor driver
Use the top holes to attach the motor driver to the car with cable ties. Make sure that the M1 and M2 connections face forward, toward the GlowBit.


Attaching the GlowBit
Use the front holes to attach the Glowbit, and try to squeeze the cable tie between the LEDs to make sure it's bright.


Securing the inside flaps
Use the inner flap holes to attach them to the side walls of the box.


Attaching the motors
Attach the motors using 2 cable ties per motor, use the bottom and higher hole to secure it to the cardboard box, and the other to make sure the wire stays close to the box.
Then put the wires through the back hole.
Step 3: The wires
Internal GlowBit and Motor connections
Using the holes you made before, you should be able to connect the Glowbit to alligator wires through the holes.
Green to Data, red to 3V, and black to GND. Put them through the wire door on the top.
Connect the female to alligator wires to the motor pins and put them all through the door.


Connecting to the controller board
Connect the wires as shown in the picture.
The GlowBit wires should connect like:
- Green data connection to 0
- Red 3v power to the 3V OUT
- Black GND to the GND OUT
Motor wires should connect:
- M1 black and red to the M1 connections on the motor driver
- M2 black and red to the M2 connections on the motor driver
If the motors spin the wrong way you can swap red and black.


Step 4: The code
If you want to program this yourself, start by adding Neopixel and Klip motor extensions. Then copy the diagram below.
Alternatively use this link for the code to start playing with the car straight away!
Plug the micro:bit into the motor driver. Press button A to turn right. Press button B to turn left. Press both buttons to go forward. This car works best on a wooden floor.


Showing other students
Alexander brang the GlowBit car to school and reported back:
The students liked the car and played with it a lot. Everyone wanted to see inside it but the wires were too short and they kept slipping so I added four extension wires and the next day I could show the inside to everyone.


