Let's get started with the PiicoDev® Magnetometer. In this guide we'll connect the Magnetometer to our Raspberry Pi, get it working as a compass, and read the magnetic field strength of a nearby magnet. Finally, we'll remix the code to create a graphical compass display.
To follow along, it's best to have:
- A Raspberry Pi (model 3, 4, Zero W) This tutorial will use a Raspberry Pi 4, Model B
- A PiicoDev Adapter for Raspberry Pi
- A PiicoDev Magnetometer QMC6310
- A PiicoDev Cable - longer cables are useful to keep your Magnetometer away from magnetic interference.
- (Optional) A magnetic compass - to compare measured headings.
- (Optional) A PiicoDev platform helps secure everything together.
- (Optional) A magnet
- (Optional) A PiicoDev OLED Module and additional cable for the final project.
If you prefer not to use the PiicoDev Adapter for Raspberry Pi, there are other connection options in our PiicoDev Connection Guide.
If you haven't set up a Raspberry Pi to be used like a desktop computer before, head over to our Raspberry Pi Workshop for Beginners to get started.
Contents
- Introduction
- Connect the Magnetometer to your Pi
- Download MicroPython Modules
- Example 1 - Compass and Calibration
- Example 2 - Detect a Magnet
- Example 3 - Raw Data
- Project - Graphical Compass
- Conclusion
- Resources
Introduction
A magnetometer measures the strength and direction of a magnetic field. They can be used to detect nearby magnets and even measure the Earth's magnetic field. The PiicoDev Magnetometer measures magnetic field strength in three separate axes (labelled on the board: x,y,z). The direction of these axes shows the positive direction - this means that if the arrow is aligned with a magnetic field in the same direction, the value measured on that axis will be positive.
Connect the Magnetometer to your Pi
Mount the PiicoDev® Adapter on your Raspberry Pi and plug connect your Magnetometer to the Adapter via the PiicoDev cable.
The adapter connects to the 40-pin GPIO header on the Raspberry Pi - ensure the header is mounted correctly, with the "Ethernet" label on the same side as the Pi's ethernet adapter (for a Pi 4. On a Pi 3 this will be the USB connector).
Pictured above: A Raspberry Pi 4 Model B with USB Power and HDMI (two white leads). The PiicoDev Adapter is placed on the 40-pin header, and connects to the weather sensor with a PiicoDev Cable.
Enable I2C
Power on your Raspberry Pi. Open the Raspberry Pi Configuration Menu, select the Interfaces tab and ensure I2C is enabled.
You only need to do this step for your first PiicoDev project - from here on you probably won't have to repeat this step when using PiicoDev hardware.
Install PiicoDev
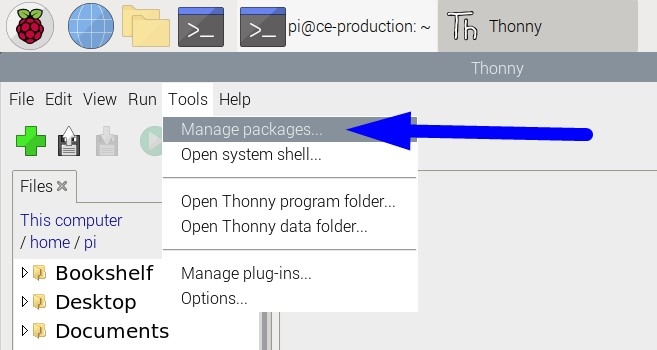
Open Thonny (Pi Start Menu > Programming > Thonny IDE) and open the Manage Packages menu (Tools > Manage Packages)
 |  |
|---|
Search for 'piicodev' and install or upgrade if necessary.
 |  |
|---|
Example 1 - Compass and Calibration
In this first example, we'll calibrate the magnetometer and use it like a magnetic compass.
Download the example script: compass.py (right-click, "save link as"). Save this somewhere you can find it - like a "PiicoDev" directory in your home directory.
Open main.py in Thonny and run the script (click the Green Play Button, or Ctrl+R). You will be prompted to calibrate the magnetometer: Slowly rotate the sensor on a flat surface until calibration is complete. You can see the calibration progress shown by a progress bar in the shell.
Follow along with the video for this part - getting a high-quality calibration is important for reading an accurate heading.
Once calibration is complete, your Pi will begin printing the measured heading into the shell. This is the same heading that you would read off a magnetic compass. The heading is the direction the top edge (with the PiicoDev label) of the module is pointing when placed on a level surface like a table.
If you have a magnetic compass you can compare headings. In the video I scribe a line pointing north - as read from my magnetic compass. I then compare the data gathered by the magnetometer and the results are really close!
You may notice a new file named calibration.cal has appeared on your Pi - this is the calibration data. This calibration data will be automatically loaded every time the script runs, so you can comment-out compass.calibrate() if you don't want to calibrate on every power-up. It's still a good idea to calibrate periodically, or if you notice your heading has drifted.
Remix - True North
So far we have been working with Magnetic North - this is the direction a magnetic compass will point. To find a true heading, we need to input some more information. Magnetic Declination is the difference between Magnetic North and True North (or "Geographic North"). The value for declination changes depending on location. In Newcastle, Australia, the declination is about 12° (as of 2022). There are lots of online tools that will help you find the declination in your area (here's one example). Once you know the declination in your area, you can input that angle into the setDeclination() function. Re-run your script and you should notice the heading data has been offset slightly. Your magnetometer is now indicating its measurement for True North.
Example 2 - Detect a Magnet
In this example, we'll measure magnetic-field strength. This is useful to detect the presence of a nearby magnet.
Download the example script: detectMagnet.py (right-click, "save link as") or copy+paste the following code into Thonny.
# Read the magnetic field strength and determine if a magnet is nearby

from PiicoDev_QMC6310 import PiicoDev_QMC6310
from PiicoDev_Unified import sleep_ms

magSensor = PiicoDev_QMC6310(range=3000) # initialise the magnetometer

threshold = 80 # microTesla or 'uT'.

while True:

    strength = magSensor.readMagnitude()   # Reads the magnetic-field strength in microTesla (uT)
    myString = str(strength) + ' uT'       # create a string with the field-strength and the unit
    print(myString)                        # Print the field strength

    if strength > threshold:               # Check if the magnetic field is strong
        print('Strong Magnet!')

    sleep_ms(1000)
When we run the script, we see the measured field strength being printed to the shell. If the measured strength goes above a set threshold, the program prints a message to the shell. This time around, the magnetometer is initialised with the maximum range (3000 uT), since there could be a strong magnet nearby. When we exceed the range of the magnetometer, the measurement becomes invalid and so the measurement data is returned as a special "Not a Number" type.
A note about calibration: In Example 1 we performed a 2-axis calibration (rotating the magnetometer on a flat surface. For best results in this example a 3-axis calibration is necessary. To calibrate 3-axes, call the calibrate() function, and rotate the device slowly in all axes.
Above: Bring a magnet nearby the Magnetometer and observe how small movements can be easily observed by the magnetic field strength. The above figure is using modified code that removes other print() statements. Refer to tutorial video to reproduce this example.
Example 3 - Raw Data
The read() method allows you to extract the 3-axis magnetometer data (in uT, or just the raw register data) - for when you wish to process the data with your own algorithm.
Download the example script: rawData.py (right-click, "save link as") or copy+paste the following into Thonny
# Prints the raw axis readings in micro-Tesla

from PiicoDev_QMC6310 import PiicoDev_QMC6310
from PiicoDev_Unified import sleep_ms

magSensor = PiicoDev_QMC6310() # Initialise the sensor (defaults to range=3000uT)
magSensor.setRange(1200)

while True:
    raw_data = magSensor.read() # Read the field strength on each axis in uT
    # raw_data = magSensor.read(raw=True) # Read the raw, unscaled data on each axis
    print(raw_data)             # Print the data
    sleep_ms(200)
Project - Graphical Compass
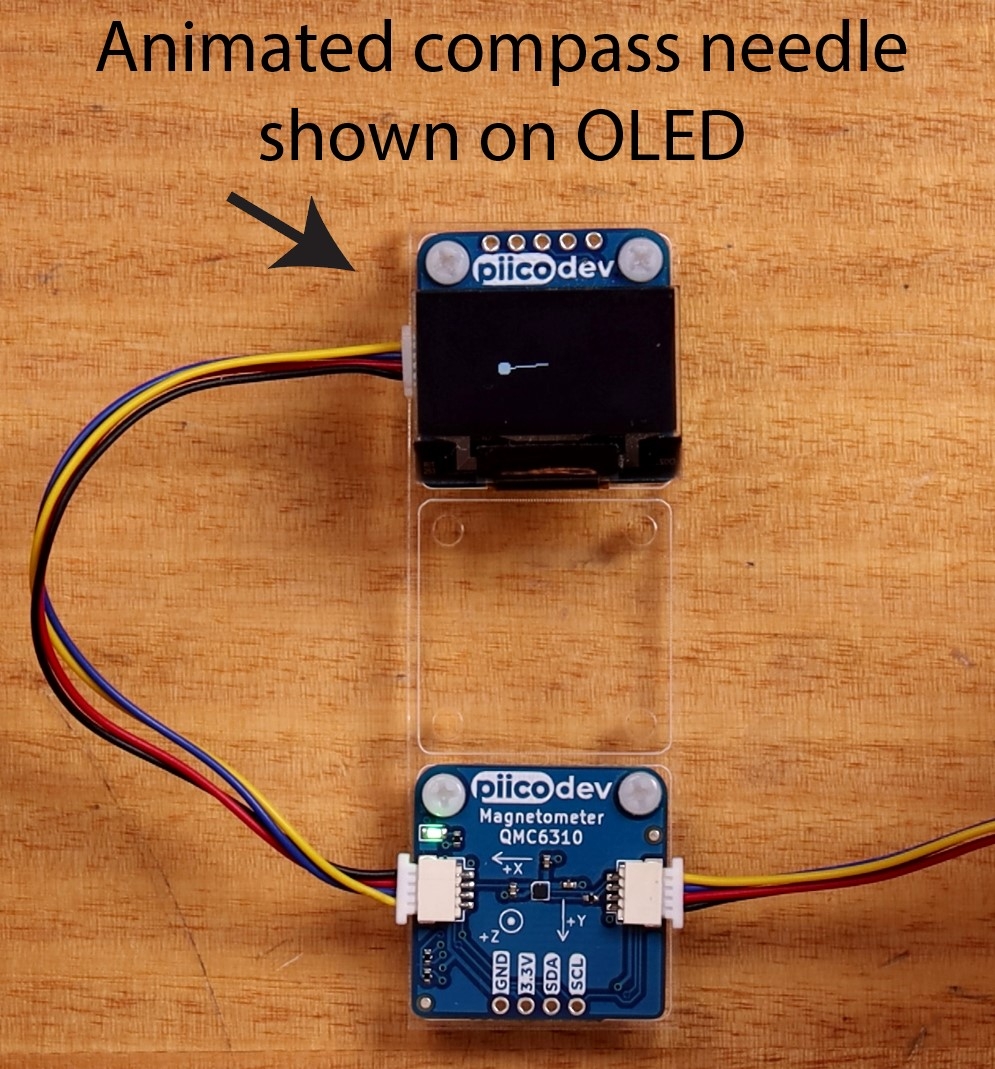
So far we've been using the shell to visualise information collected from the magnetometer. Now for a fun mini-project. We can use a PiicoDev OLED Module to display a digital compass-needle that always points north. The following code is really similar to Example 1, except there's extra code to drive the display, and handle drawing an indicator on the display.
Download the example script: graphicalCompassNoText.py (right-click, "save link as") or copy+paste the following code into Thonny.
# Similar to the compass example, this demo uses a PiicoDev OLED module to show a compass graphic

from PiicoDev_QMC6310 import PiicoDev_QMC6310
from PiicoDev_SSD1306 import create_PiicoDev_SSD1306, WIDTH, HEIGHT
from PiicoDev_Unified import sleep_ms
from math import sin, cos, radians # for calculating the compass-needle co-ordinates

compass = PiicoDev_QMC6310(range=1200) # Initialise the sensor with the most sensitive range. Valid ranges: 200, 800, 1200, 3000 uT
oled = create_PiicoDev_SSD1306()
# compass.calibrate() # only need to calibrate once

# Declination is the difference between magnetic-north and true-north ("heading") and depends on location
compass.setDeclination(12.5) # Found with: https://www.magnetic-declination.com/Australia/Newcastle/122944.html

centreX = int(WIDTH/2)
centreY = int(HEIGHT/2)

# This function draws the artwork onto the OLED display. It takes a heading and draws a line at that angle from the centre of the display - along with some other nice stuff.
def drawCompass(heading):
    rads = radians(heading + 180) # convert heading to radians and offset by 180 degrees (to account for y increasing down the display)
    length = 25 # compass needle length (in pixels) from centre

    # Convert polar coordinates (length, angle) to cartesian coordinates (x,y) for plotting on display. Offset the coordinates by half the screen width/height to draw from the centre - rather than the top-left of the display.
    x = int( length * sin(rads) + WIDTH/2 )
    y = int( length * cos(rads) + HEIGHT/2 )

    # Plot the compass on the display
    oled.fill(0)
    oled.line(centreX, centreY, x, y, 1) # draw the compass needle
    oled.circ(x,y,4)                     # put a north-indicator on the end
    oled.show()

while True:
    heading = compass.readHeading()
    if compass.dataValid(): # only draw for valid data - prevents errors
        heading = round(heading)
        drawCompass(heading)
    print(heading)

    sleep_ms(100)
The drawCompass() method converts the heading into x,y coordinates that draw a line to the centre of the display. A circle is drawn on the end of the line and the heading in degrees is shown in the bottom corner of the display.
Above: a compass needle is animated on the OLED to point North, even if the whole assembly is rotated.
Conclusion
We can measure the properties of magnetic fields using a 3-axis magnetometer. Build-in functions allow us to easily measure the sensor's heading in a magnetic field, and we've even built a cool graphical compass project using an extra display module.
If you make something cool with this starter project we'd love for you to share it on our forums! And if you'd like some help with this guide, start the conversation below - We're full-time makers and here to help!
Resources
Magnetometer Library: PiicoDev Unified MicroPython module for QMC6310
Hardware Repository for the PiicoDev Magnetometer
OLED Library: PiicoDev Unified MicroPython module for SSD1306


