Pimironi Picade Pan-Tilt Hat lets you mount and control a pan-tilt module right on top of your Raspberry Pi palm-sized computer. Setting up a Pan and Tilt system has never been easier with absolutely no soldering required! Perfect for many applications and projects this set of horizontal and vertical motion servos will let you rotate through 180 degrees in both axes. It clips in perfectly with the Raspberry Pi Camera Module V2 and any other module which has a similar form factor, letting you keep the action in frame. The Hat's onboard microcontroller and cleaver packages let you independently drive the two servos (pan and tilt) very simply, as well as powering up to 24 regular LED or NeoPixel RGB LEDs. There's also a handy slot through which you can route the servo, LED, and camera cables elegantly through the PCB. Ideal for a mini-CCTV system, or to mount a set of eyes on it to make a friendly robot out of it, this set of horizontal and vertical motion servos will give you movement with a minimum of fuss.
But wait, what even is a hat in this context? Well here is the guide for you!
We are going to make the pan and tilt to run along a set course and how to control the Pan and Tilt with the arrow keys on your keyboard and take photos with a single button press. Contents are as follows
- What You Need
- Initial Build
- Install Pimoroni Pan-Tilt Package to Raspberry Pi OS
- Example Sweep Code
- Keyboard Controlled Pan-Tilt Code
- Downloads
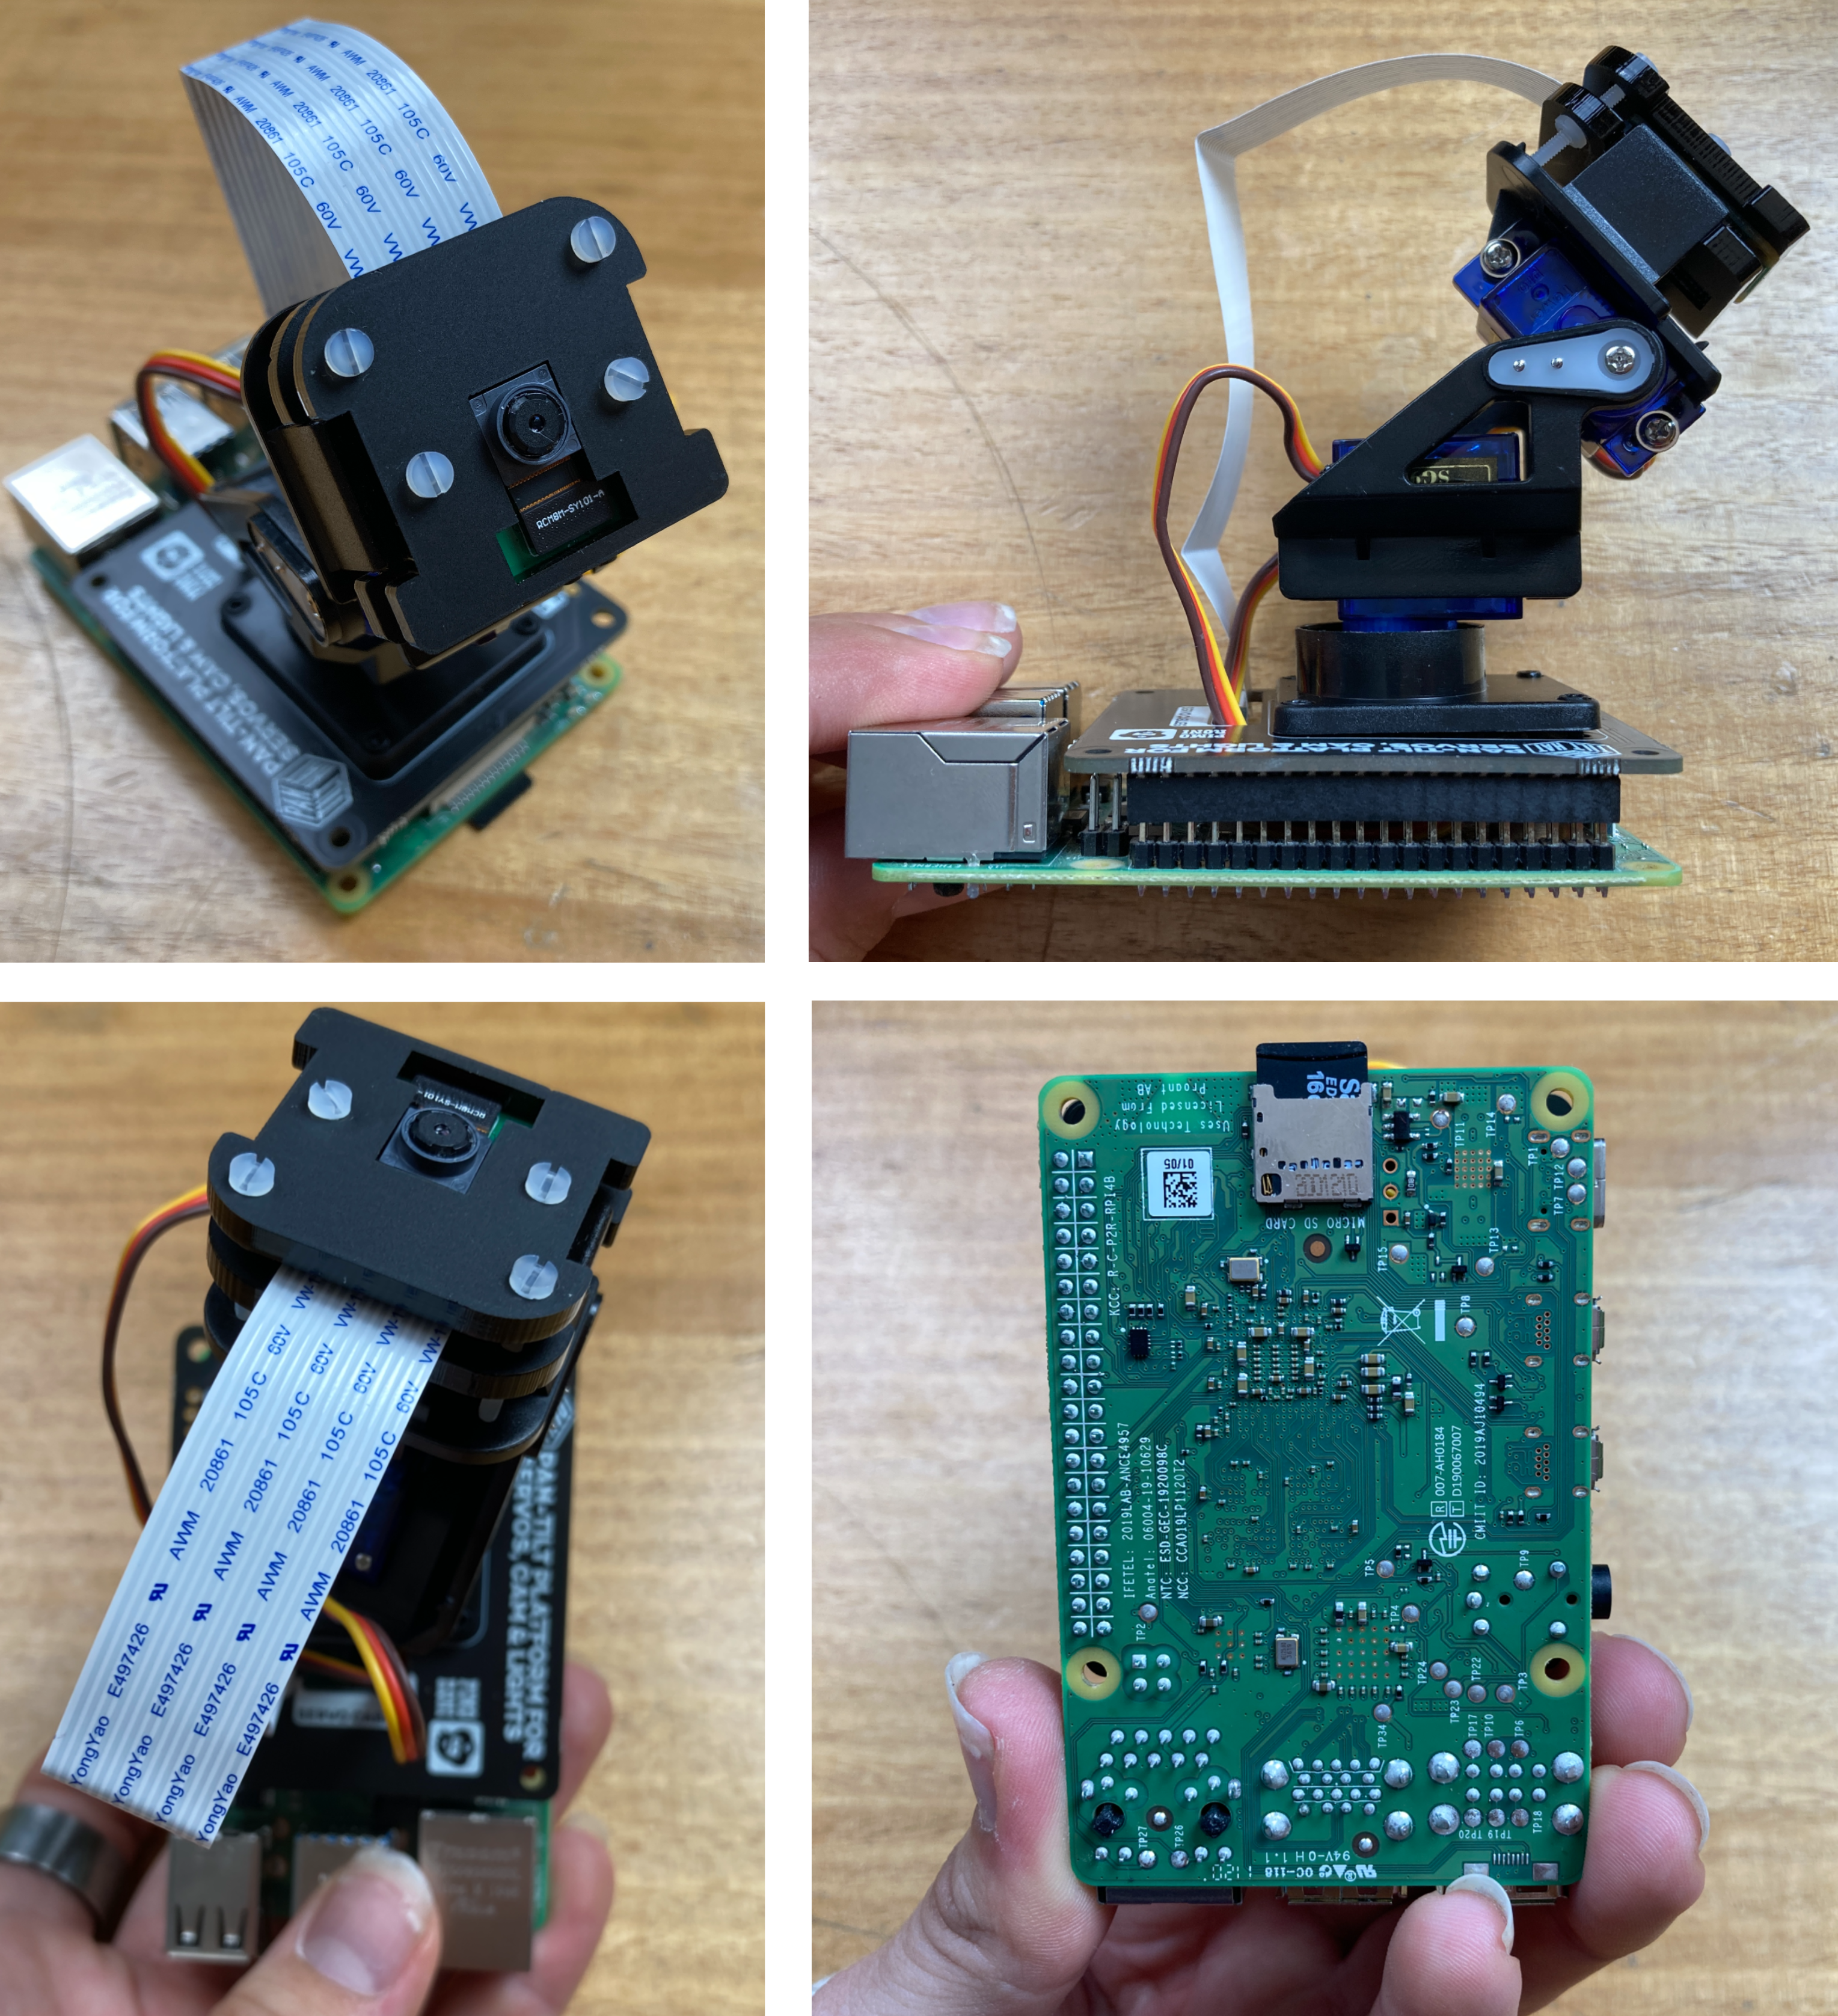
The code for this will be clearly explained so you can jump right in and edit it to your heart's content. See below for what the setup is going to look like from all angles installed on a Raspberry Pi!
The next step for me will be to use the Pan-Tilt Hat with the Pi camera used face-tracking, I just need to figure out how (I did! Link here to that article). As always if you have any questions, queries, or things to add please let us know your thoughts!
What You Need
Below is a list of the components you will need to get this system up and running real fast.
- Raspberry Pi 4 Model B (Having the extra computing power 'oomph' that the Pi provides is super helpful for this task only if you're going to use facial detection or object recognition so for the examples here an earlier version of the Raspberry Pi will work just fine).
- Pimoroni Pan and Tilt HAT
- Raspberry Pi Official Camera Module V2 (fits perfectly on the Pan-Tilt Hat)
- Micro SD Card that has been flashed with Raspberry Pi OS
- Power Supply
- Monitor
- HDMI Cord
- Mouse and Keyboard
Initial Build
The fastest way to get up and running with the Pimoroni Hat is to put all the parts together, then stick it onto a Raspberry Pi with a fresh version of Raspberry Pi OS installed and inserted, connect it to the internet, and using the console, install all the useful packages. Then you will have example code and can create code quickly and easily letting you get right into Panning and Tilting. This section will go through the hardware side of things. Below are the parts that come with the Pimoroni Pan and Tilt Hat. Inside the box it has the pan-tilt PCB, the two servos pre-mounted in a pan-tilt bracket, two black sheet acrylic parts to mount a camera module, a white sheet acrylic part to attach LEDs to, and a selection of nylon screws and bolts.
So let's put these parts together. The first step is to connect the PCB to the bottom of the servo stack and peel off the protective layer on the acrylic camera mount parts. Line up the servo stack on top of the white square on the PCB and use the black nylon fasteners to connect the setup together. All this can be seen in the image below. You want the Servo to lean off the PCB (when viewed from above) so that when you connect the Camera Module to the Raspberry Pi the ribbon cable does not get in the way of the system.
With that firmly attached the next step is to put those camera mounts onto a Camera Module, in my case I use the Camera Module V2. The two black acrylic parts sandwich the camera module together and connect together using the white nylon fasteners. With that section secured together hand tight (not much more because you do not want to put undue stress bending the Camera Module or strip the nylon bolts) you can then clip it onto the pan-tilt bracket. You can see this occurring in the image below. Take note of the orientation of the acrylic pieces and be sure to attach the piece with the larger hole against the camera lens side of your Camera Module.
The final step is attaching all the electrical connections together, both the camera ribbon cable and the wires for each of the servos. The servos go onto their marked spot on the bottom of the PCB. Make sure to attach them correctly. Black or dark brown wires are commonly used on servos to represent the ground wires. Red is usually the voltage line. Orange or white are the usual colours for the data channel wire. This wire to used to tell the servo the direction and angle to turn to. If attached incorrectly it can cause damage to the servo. Then connect the Ribbon Cable to the CSI (Camera Serial Interface) connector on the Raspberry Pi board. Make sure the ribbon cable is facing the right way and that it is clipped correctly. To connect the ribbon cables, lift up the edges of a CSI connector gently, slip the ribbon cable in till it bottoms out, then push down the edges of the CSI connector. Finally, connect the Pan-Tilt HAT directly to the GPIO pins of the Raspberry Pi. Make sure to line all the GPIO Pins up and press the two boards together. You can see these steps happening in the image below (if any of the pictures are too small right-click them and open them up in a new browser for the full resolution).

Once this is done you have succeeded in putting that hardware together for your Pan-Tilt Hat attached to a Raspberry Pi 4 Model B Board. Literally that easy. So plug-in that micro-SD card with Raspberry PI OS (Link here to a tutorial on how to do just this), mouse, keyboard, monitor, and provide the system power through the USB-C port. See the completed hardware setup in the images below.
Install Pimoroni Pan-Tilt Package to Raspberry Pi OS
Once the hardware is installed it will work right away so long as you activate the correct GPIO pins in your code (here is the exact GPIO Pinout) but you are much better off getting all the bells and whistles by installing the Pimoroni Custom-Built Pan-Tilt Package. For this setup, it is absolutely the way to go, it makes controlling the servos much, much easier.
With a monitor connected insert the USB-C plug to start booting the Raspberry Pi. The Hat might move a little bit when you do this but don't be surprised/frightened (like me the first time). Then once the booting sequence is over you will be welcome with the Raspberry Pi OS and the familiar Angkor Wat background. This you can see in the image below as well as an arrow pointing to the internet connection button. Click this button and follow through the prompts to connect to the internet by following through the prompts. Also at this point open up the Raspberry Pi Configuration menu (found using the top left menu and scrolling over preferences) and enable the Camera found under the Interfaces tab. After enabling reset the Raspberry Pi to lock in the changes.

Once you have connected to the internet we will open up the Raspberry Terminal using the black icon in the top left corner of the screen. Below you can see what it looks like when you open this window and there is a big arrow pointing to the icon which was clicked with the mouse.

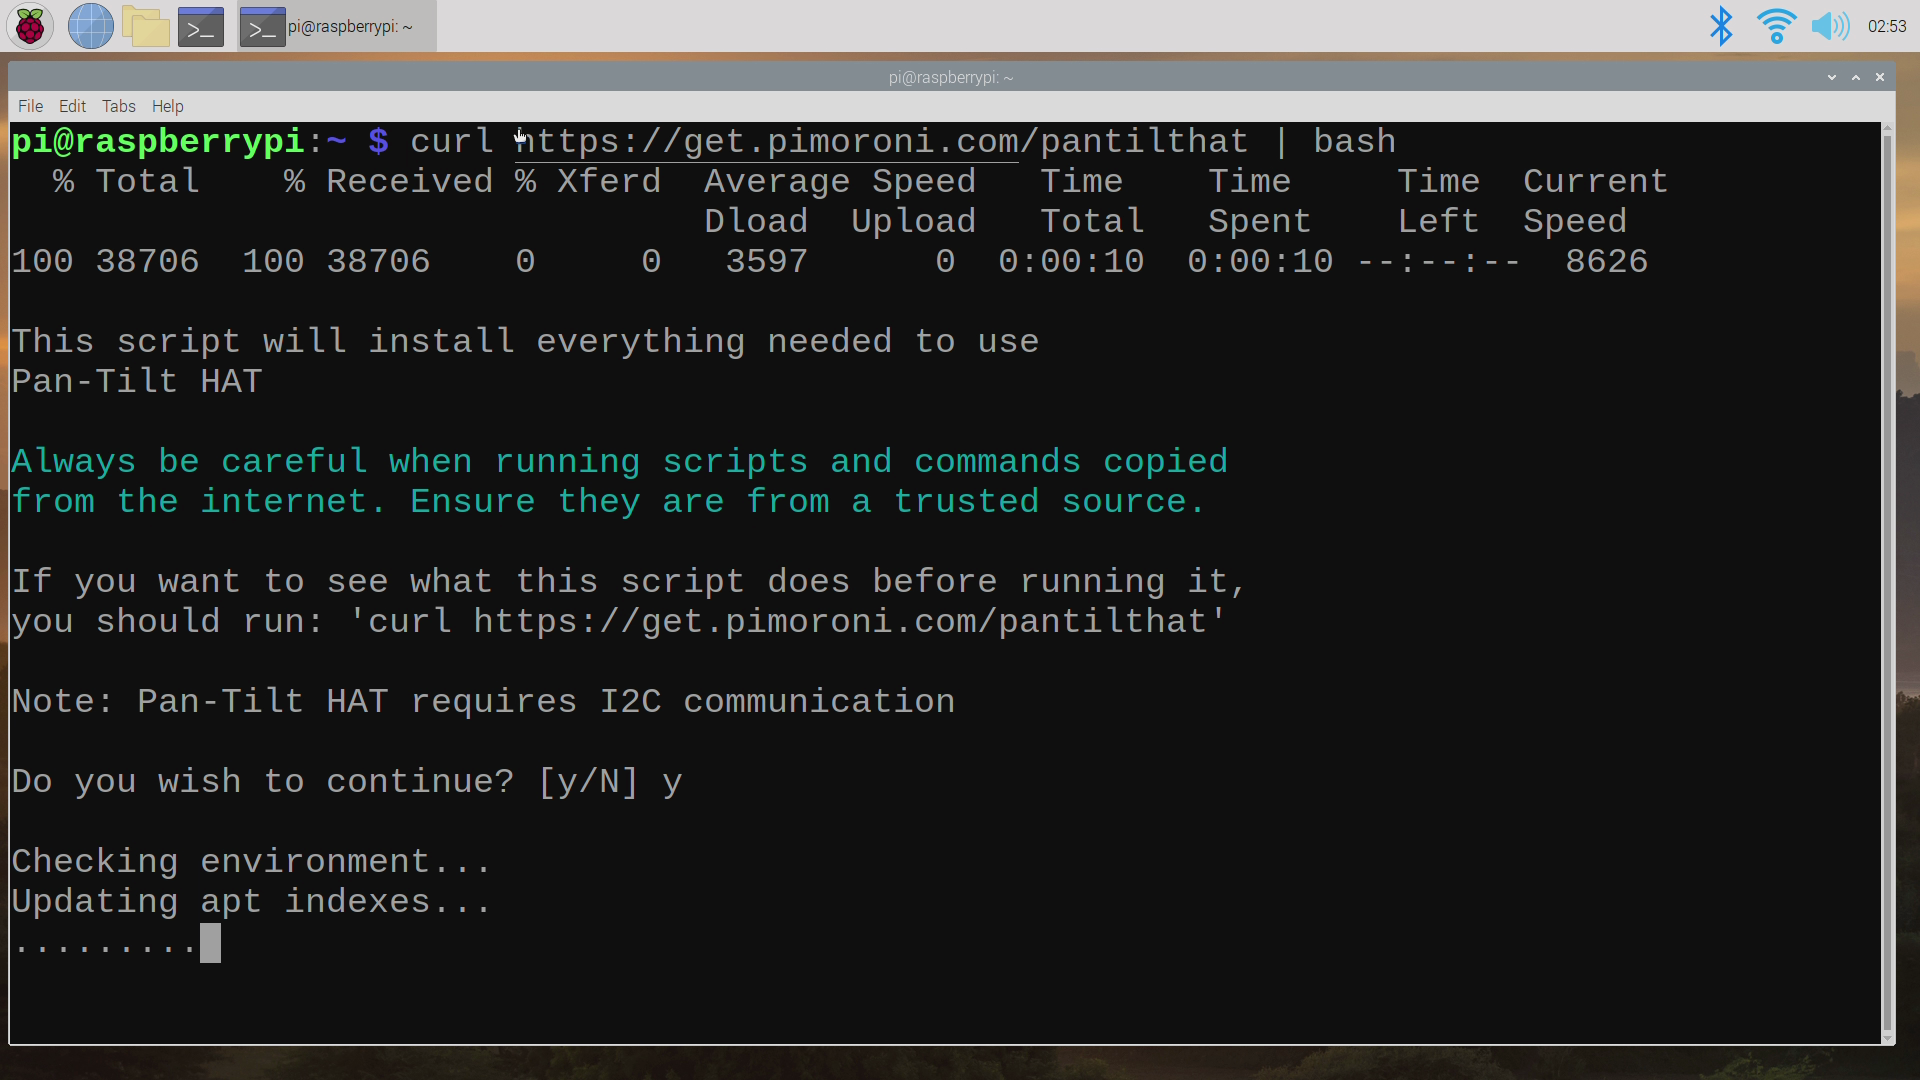
In the terminal, we are going to type and enter the following lines. If prompted type Y and press enter to continue the install process. An image of the specific Pan-Tilt Package being installed can be seen further below. Installing the package should take less than 4 minutes. The first line starts with | sudo | (which means this line will run with admin privileges) and is used to update and install all the current packages on the current setup. The next line is a client URL command line that pulls data from an online server to install the Pan-Tilt Hat Package. Bash when typed like so at the end of the line will automate the installation of all the facets of the installed package to Raspberry Pi OS.
sudo apt-get update && sudo apt-get upgrade
curl https://get.pimoroni.com/pantilthat | bash

And once that is complete you have everything you need to Pan and Tilt with ease! Run a quick reboot to lock in all these changes.
Example Sweep Code
Pimoroni has a very simple code that you can access and use as soon as you downloaded the above Pan-Tilt Package. Installed straight away it is perfect for testing whether your Pan-Tilt Camera is fully operational and has a full range of motion.
You can find this code in the | Pi/home/examples | directory named | smooth.py |. I have copied it below as well. All you need to do is open it up (or copy, paste, and save it) in Thonny IDE (or any Python interpreter that you would like, Geany IDE also comes pre-installed into Raspberry Pi OS, you could use that). Then with it open, run that code pressing the Green Run Button, and watch your Pan-Tilt Hat spring to life. See the | smooth.py | code below.
# Start by importing all the details needed for this
import math
import time
import pantilthat

# This line will create a endless loop
while True:
    # Get the time in seconds
    t = time.time()

    # Generate an angle using a sine wave (-1 to 1) multiplied by 90 (-90 to 90)
    a = math.sin(t * 2) * 90

    # Cast a to int for v0.0.2
    a = int(a)

    # These functions require a number between 90 and -90, then it will snap either the pan or tilt servo to that number in degrees
    pantilthat.pan(a)
    pantilthat.tilt(a)

    # Two decimal places is quite enough!
    print(round(a,2))

    # Sleep for a bit so we're not hammering the HAT with updates
    time.sleep(0.005)
The very clever part of this package is after you | import pantilthat | to your code you can control what angle the pan or tilt is by using a single function | pantilthat.pan(a) | or | pantilthat.tilt(a) | respectively. The value | a | is between 90 degrees and -90 degrees. That is a truly very easy way to control a servo, even simpler than the grassroots process I have outlined in this guide here.
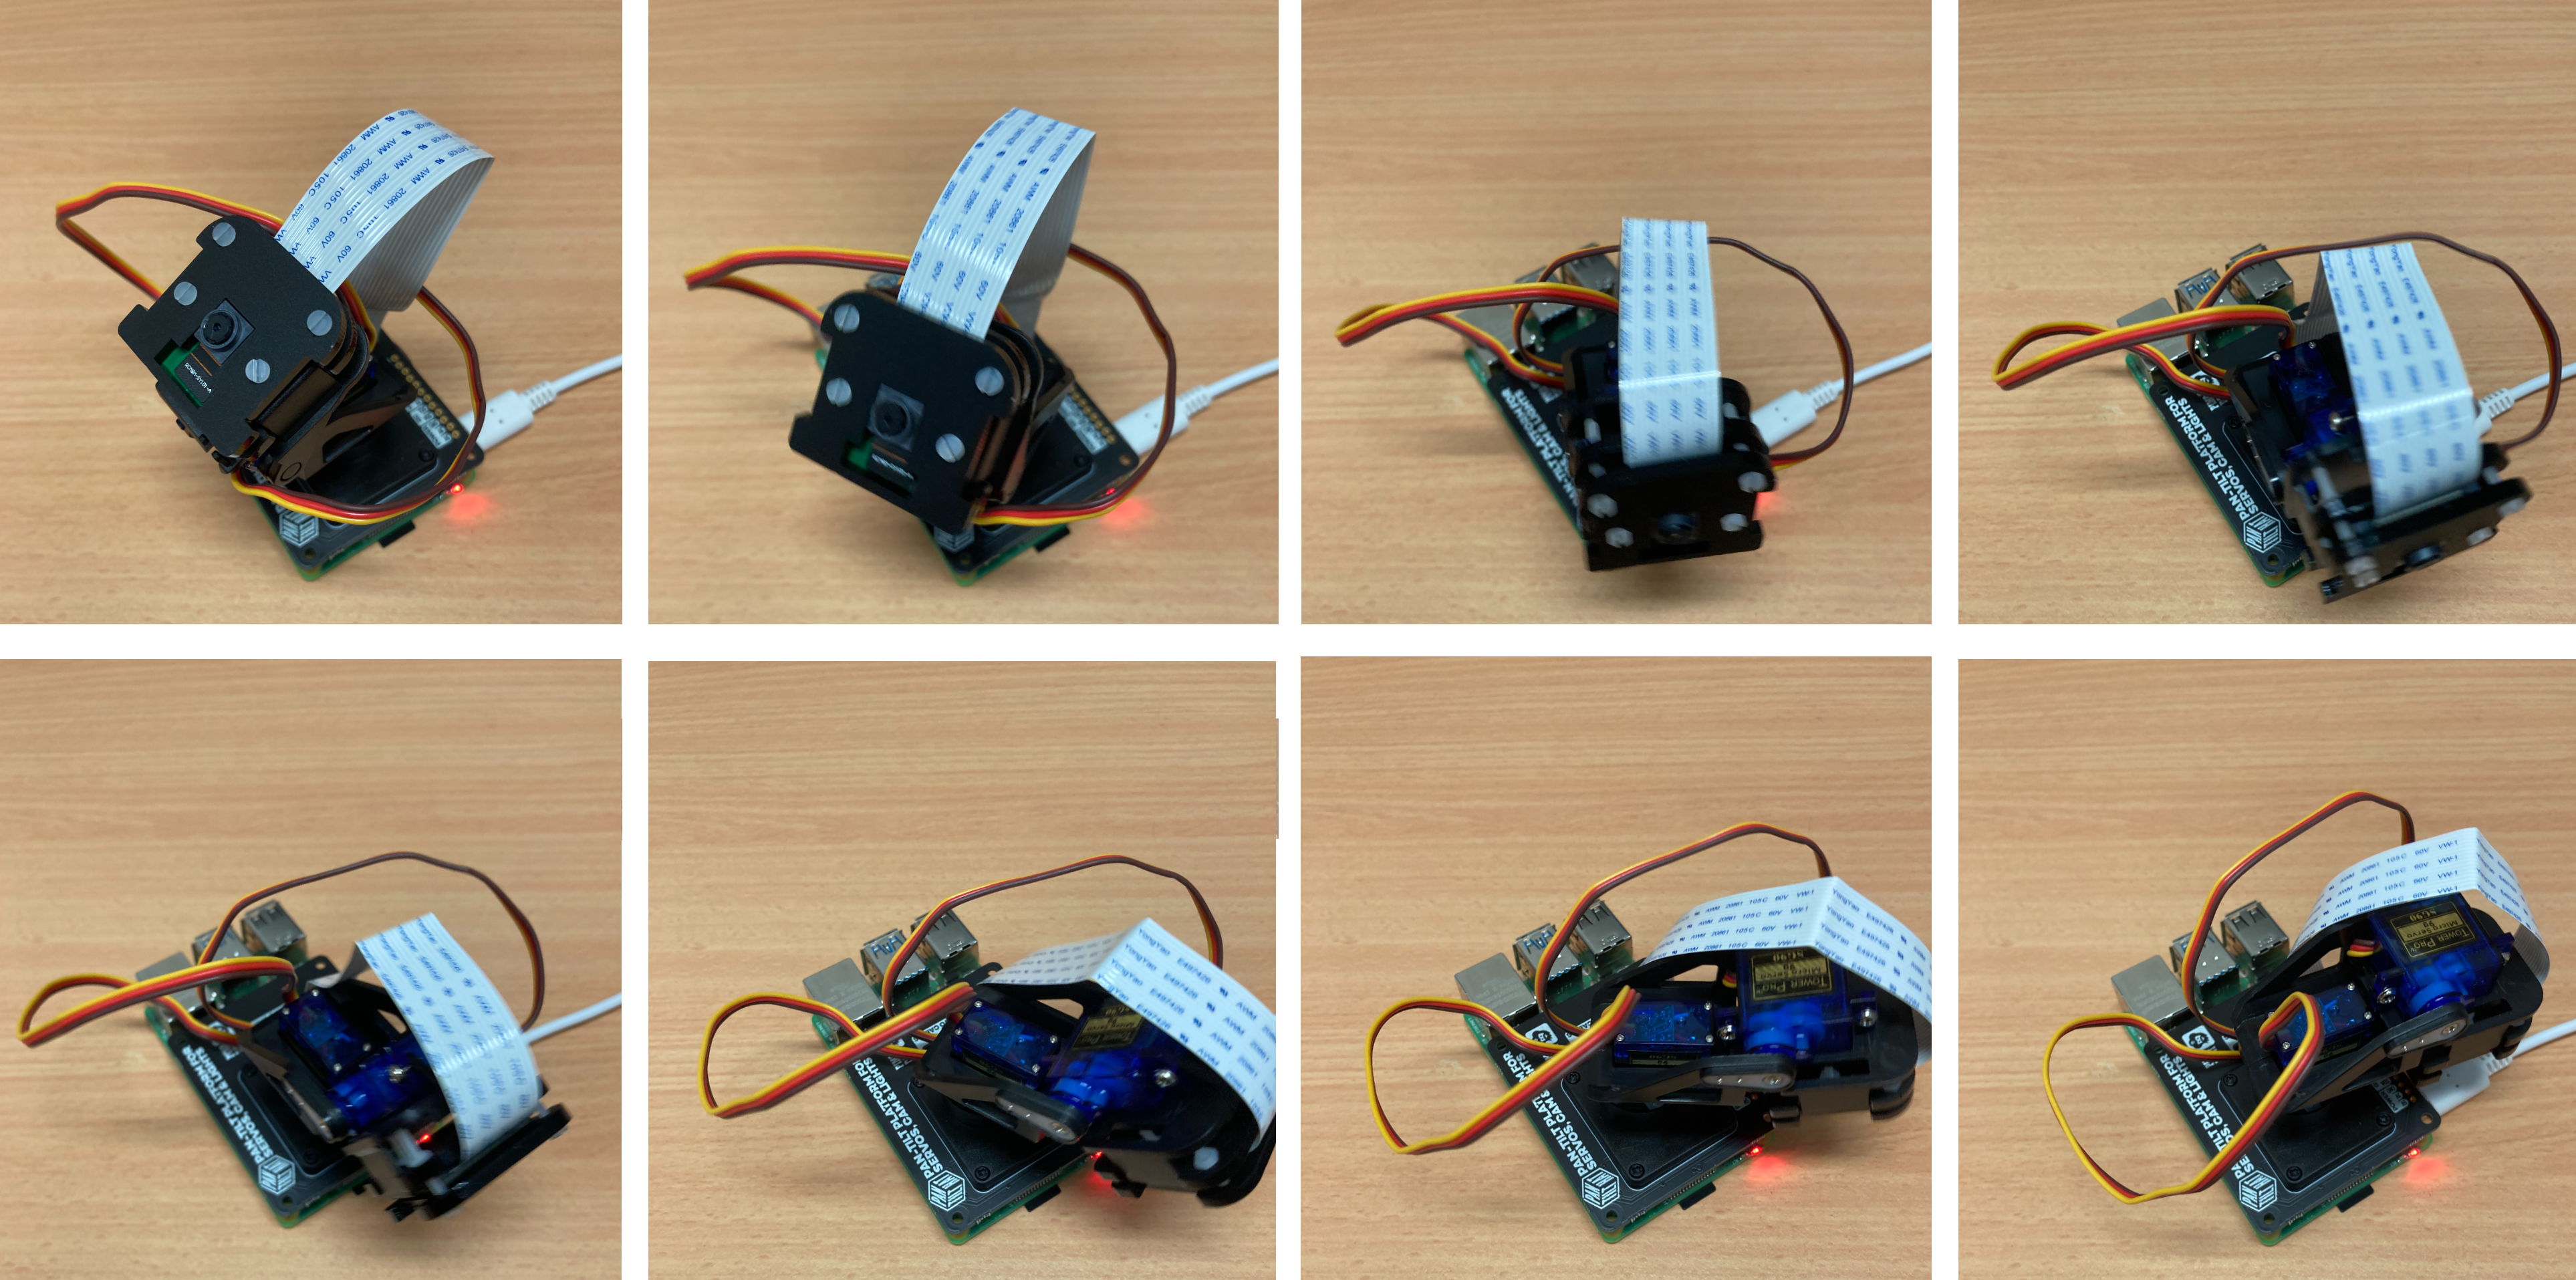
Check out the image below to see exactly what it will be doing on loop. Feel free to alter the code and try other ideas. It should be operating reasonably quietly and there should be no crunching gear noises.
Keyboard Controlled Pan-Tilt HAT Code
Now let's up the ante a little bit. In this section we will write code that will use the arrow keys on our keyboard to control the pan/tilt of the camera intuitively and also take pictures with the press of a button.
Below is the code to do just this thoroughly commented. No extra packages need to be downloaded to run this code successfully. It is set so each time you press an arrow key it will rotate in that direction one degree, and when you press | p | on your keyboard it will take a photo. When you do run this code make sure you do so from the Terminal as it is using a pre-installed package called Curses. Under the code is an explanation of exactly how to run a python script (this one) directly from the terminal via written commands.
#Raspberry-Pi pan and tilt using arrow keys script
#must be run from Pi's terminal!
#use code "python KeyboardPanTilt.py" after you cd into the correct folder!

#importing required libraries
import curses
import os
import time
import picamera
import pantilthat

# Initialise camera
camera = picamera.PiCamera()
camera.resolution = (1024, 768)
camera.start_preview(fullscreen=False, window = (100,20,640,480))

# flipping the camera for so its not upside down
camera.vflip = True
camera.hflip = True

# Set up key mappings and curses for arrow key responses
screen = curses.initscr() # get the curses screen window
curses.noecho()           # turn off input echoing
curses.cbreak()           # respond to keys immediately (don't wait for enter)
screen.keypad(True)       # map arrow keys to special values

# initialise pan and tilt positions and process increments driven by arrow keys
# set start up serrvo positions
a = 0.0
b = 0.0
pantilthat.pan(a)
pantilthat.tilt(b)
# set arrow key delta
deltaPan=1.0
deltaTilt=1.0

picNum = 1  # Initialise picture number

# Process active key presses:
# -- Letter p will take a picture and store file name image[picNum].jpg,
#     where [number] increments over a picture taking session.
# -- Arrow keys will control the Pan Tilt Camera (deltaPan/deltaTilt Degree angles)
# -- Letter q will quit the application,
try:
    while True:
        char = screen.getch()
        if char == ord('q'):
            #if q is pressed quit
            break
        if char == ord('p'):
            #if p is pressed take a photo!
            camera.capture('image%s.jpg' % picNum)
            picNum = picNum   1
            screen.addstr(0, 0, 'picture taken! ')
        elif char == curses.KEY_RIGHT:
            screen.addstr(0, 0, 'right ')
            if (b - deltaTilt ) > -90:
                b = b - deltaTilt
            pantilthat.pan(b)
            time.sleep(0.005)
        elif char == curses.KEY_LEFT:
            screen.addstr(0, 0, 'left ')
            if (b   deltaTilt) < 90:
                b = b   deltaTilt
            pantilthat.pan(b)
            time.sleep(0.005)
        elif char == curses.KEY_DOWN:
            screen.addstr(0, 0, 'down ')
            if (a   deltaPan) < 90:
                a = a   deltaPan
            pantilthat.tilt(a)
            time.sleep(0.005)
        elif char == curses.KEY_UP:
            screen.addstr(0, 0, 'up ')
            if (a - deltaPan) > -90:
                a = a - deltaPan
            pantilthat.tilt(a)
            time.sleep(0.005)

finally:
    # shut down cleanly
    curses.nocbreak(); screen.keypad(0); curses.echo()
    curses.endwin()
Copy and paste the above code (or download it at the bottom of this page) in Thonny IDE. Then save it on your desktop naming it | KeyboardPanTilt.py |. Now access the terminal by clicking on the black symbol at the top left of the screen and run it by typing and entering the below two lines. The first line has the command | cd | which stands for change directory. We use this command to make the terminal focus on the desktop. Then we use the command | python | to summon the Python Programming Language to run a particular file. In this case, we will run our keyboard-driven pan-tilt code. Make sure to type the file name correctly and keep in mind this is case-sensitive. See further below these two lines being typed into the terminal.
cd /home/pi/Desktop
python KeyboardPanTilt.py

As soon as it runs you will see a live stream of the camera feed. You will also be able to control the Pan-Tilt Hat and be able to take photos at a whim. Check out the image below for what you will be seeing on your screen (minus the beanie, ski jumper, and funny-looking mug) as the camera will provide a live feed of what it sees. The terminal now has each keyboard input constantly written to it as you put inputs into it. This is the method being used to control the Pan-Tilt Hat with the keyboard in the code and is the reason why we had to run the code using the terminal.
Downloads
Below you can find a download link for the Pan-Tilt Camera Keyboard example created here and | smooth.py |. You can either download it or copy and paste the code you see above into a Python Interpreter (like Thonny IDE or Geany IDE), save it and run it that way.


