Let's get started with the PiicoDev® Capacitive Touch Sensor. In this guide, we'll connect the PiicoDev Capacitive Touch Sensor to our Raspberry Pi and get it working with some example code to detect touch events. We'll also remix the code to make a simple musical instrument, using the touch sensor like a three-key piano.
To follow along, it's best to have:
- A Raspberry Pi (model 3, 4, Zero W) This tutorial will use a Raspberry Pi 4, Model B
- A PiicoDev Capacitive Touch Sensor CAP1203
- A PiicoDev Adapter for Raspberry Pi
- A PiicoDev Cable (100mm or longer is best for Raspberry Pi projects)
- (Optional) A PiicoDev platform helps secure everything together.
- (Optional) Alligator Clips to use other objects as touch sensors.
If you prefer not to use the PiicoDev Adapter for Raspberry Pi, there are other connection options in our PiicoDev Connection Guide.
If you haven't set up a Raspberry Pi to be used like a desktop computer before, head over to our Raspberry Pi Workshop for Beginners to get started.
Contents
- Introduction
- Connect the Sensor to your Raspberry Pi
- Enable I2C
- Install / Upgrade PiicoDev
- Download Example Code
- Example Code - Read Touch Status
- Setup Options - Single/Multi-Touch and Tune Sensitivity
- Remix - Execute OS command at a touch
- Conclusion
- Resources
Introduction
The PiicoDev Capacitive Touch Sensor has three copper pads on it (labelled 1, 2 and 3) that work like three separate buttons. Touching one of the touchpads changes its capacitance and this change is measured by the CAP1203 device which registers it as a touch event. The device is capable of registering multiple touch events at the same time or filtering for just the first event. We can also tune the touch sensitivity which is useful if we want to cover the sensor or connect alligator clips and detect touch with some remote objects
Connect the PiicoDev Capacitive Touch Sensor to your Raspberry Pi
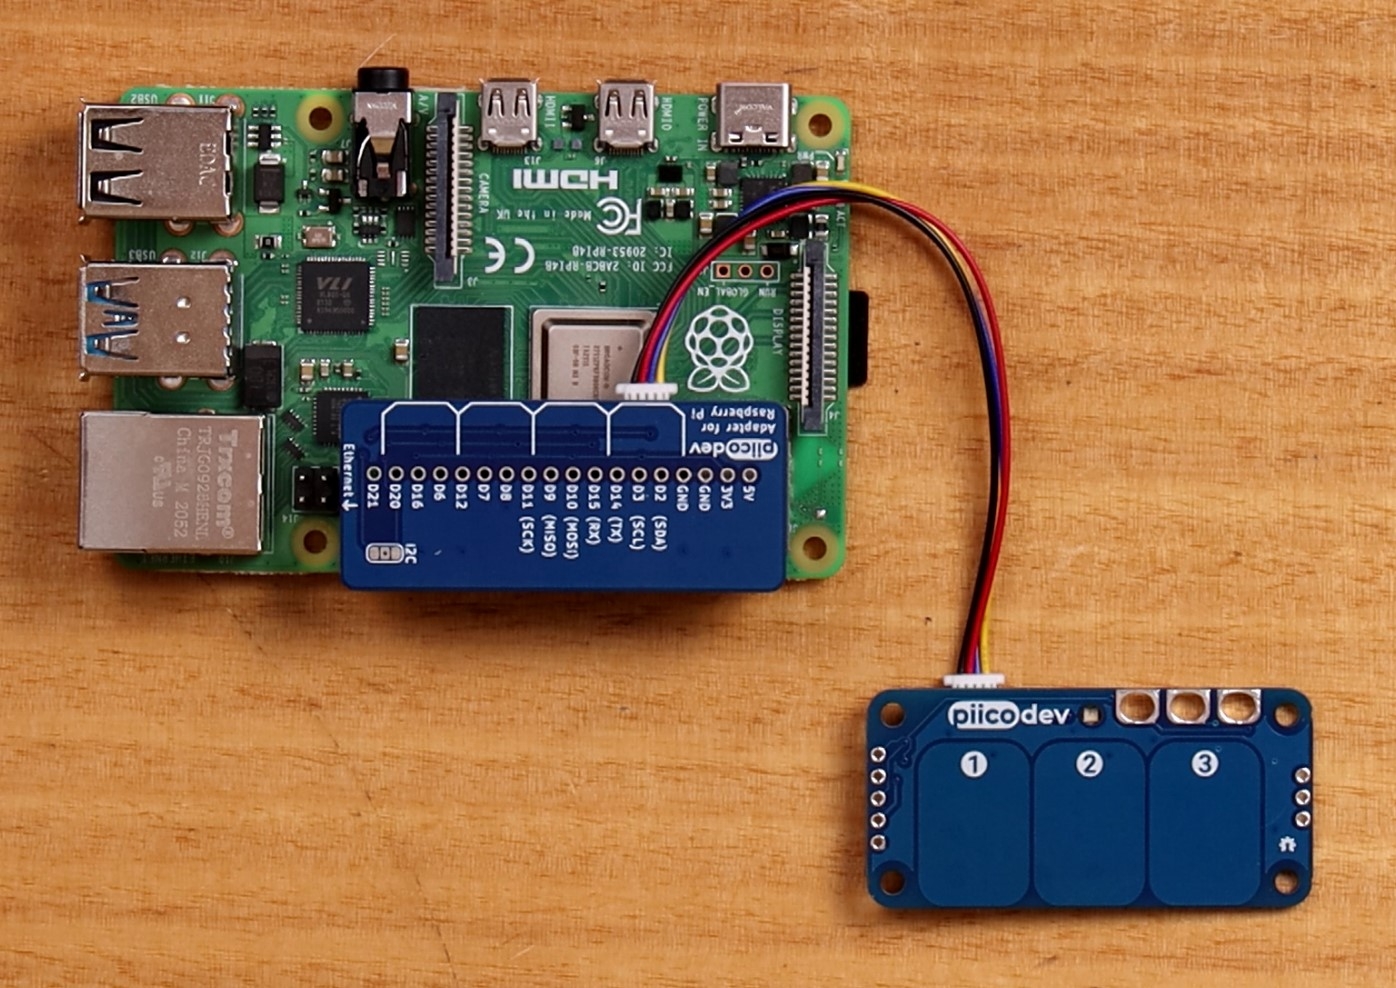
Mount the PiicoDev Adapter on your Raspberry Pi and plug connect your touch sensor to the Adapter via the PiicoDev cable.
The adapter connects to the 40-pin GPIO header on the Raspberry Pi - ensure the header is mounted correctly, with the "Ethernet" label on the same side as the Pi's ethernet adapter.
If you're unfamiliar with connecting PiicoDev modules, read the PiicoDev Connection Guide before proceeding.
Enable I2C
Power on your Raspberry Pi. Open the Raspberry Pi Configuration Menu, select the Interfaces tab and ensure I2C is enabled.
You should only need to do this step for your first PiicoDev project.
Install/Upgrade PiicoDev
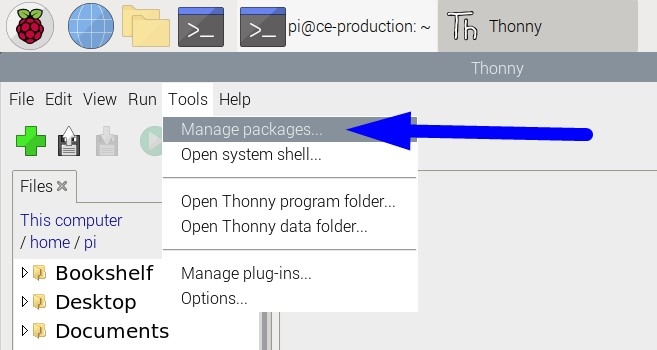
Open Thonny (Pi Start Menu > Programming > Thonny IDE) and open the Manage Packages menu (Tools > Manage Packages)
 |  |
|---|
Search for 'piicodev' and install or upgrade if necessary.
 |  |
|---|
Download the Example Script
Download this example script: main.py (right-click, "save link as")
Save this file wherever you like to keep your programming projects. For this tutorial I'll save mine in /home/pi/PiicoDev and change the name to touch.py to give it some context.
Example Code - Read Touch Status
Navigate to where you saved the example script, double-click main.py to open it in Thonny, then click the green "Run Current Script" button. You should see "Touch Pad Status" streaming up the shell. Here, there are three digits that represent the touch-status of each touch pad. A zero represents no-touch, and a one represents a touch event.
Above: Touch Status data streams up the Shell, while the Plot (bottom-right) shows historic data. The plot shows the pads (Blue: 1, Yellow: 2, Red: 3) are pressed and released in sequence, and then I slide my finger slowly across pads #1 and #2. While my finger is touching both pads, they each register a separate touch event and their plotted lines overlap.
In this example, the status of each pad is assigned into a Python dict variable called status, and we access the status for pad 1, 2 or 3 with that key, eg. status[1] retrieves the status of Touchpad #1. Status is zero when the pad is not touched, and one when it is being touched.
Setup options
By default, the PiicoDev Capacitive Touch Sensor is initialised in multi-touch mode with a good all-rounder sensitivity level. You can change these settings depending on how you initialise the device to use single-touch mode or increase/decrease the sensitivity.
Single-Touch mode
The following initialisation will set the sensor up to reject multiple touch events and return only the first touch event.
touchSensor = PiicoDev_CAP1203(touchmode='single')
Sensitivity
Tuning the sensitivity can allow the sensor to detect touch events from behind another object eg. a piece of paper or plastic. This can be useful if you want to put a nice label over your sensor or conceal it behind a (thin-walled) enclosure. Tuning the sensitivity is also necessary if you want to use the alligator clip terminals to connect an external object to the sensor. There are eight sensitivity levels, with 0 being most sensitive, and 7 being least sensitive. The default sensitivity is 3. The initialisation would look something like this:
touchSensor = PiicoDev_CAP1203(sensitivity=6)
It's always best to power-cycle the circuit whenever you change the touch characteristics by eg. covering a touch pad or connecting an object with an alligator clip. On powerup, the CAP1203 performs a self-calibration which will make the best use of your new sensitivity setting.
Above: Using coloured paper to create fancy labels for a touch sensor. You can also connect other objects to the touch sensor using alligator clips - conductive or organic objects like fruit & veg work best. You may need to tune the sensitivity to get other objects to work reliably.
Of course, the initialisation options can be combined to set touchmode and sensitivity at the same time eg.
touchSensor = PiicoDev_CAP1203(touchmode='single', sensitivity=6)
Remix - Execute an OS command at a touch
Did you know you can trigger OS level commands from within a Python script? By importing the OS module, we can call regular linux commands and even trigger scripts or programs. In this remix, we'll attach the list command (ls) to touch pad #1. Code along with the video - if you get stuck, you can copy the code from below.
# PiicoDev Capacitive Touch Sensor CAP1203 OS command example
# Read the touch sensor and trigger an OS command if touch pad #1 is touched

import os
from PiicoDev_CAP1203 import PiicoDev_CAP1203
from PiicoDev_Unified import sleep_ms # cross-platform-compatible sleep

touchSensor = PiicoDev_CAP1203()

while True:
    status = touchSensor.read()

    if status[1] == 1: # Check for touch on pad 1
        os.system("ls -l") # Execute an OS command: list files in working directory

    sleep_ms(100)
Our simple remix only lists the files in the current directory, but hopefully you feel inspired that the executed command could by anything; like scripts that you write yourself, or even triggering a shutdown command.
Conclusion
We can detect touch events using a PiicoDev Capacitive Touch Sensor. By changing the touch mode or sensitivity, we can tune the sensor for different applications like detecting touch through a label, or through an enclosure. We can also branch our program by checking button statuses, or trigger operating system-level events using the OS module.
If you make something cool with this starter project we'd love for you to share it on our forums! And if you'd like some help with this guide, start the conversation below - We're full-time makers and here to help!


