Let's turn it up to 11! Today we are getting right into Bluetooth Audio Receivers in particular the MH-M38. The MH-M38 is a stereo audio receiver with loudspeaker outputs (and an inbuilt amplifier) that can play music from a smartphone/computer wirelessly via Bluetooth.
These tiny boards pack a huge punch, letting you drive two 5W speakers very loud, and doing so with a connectivity range of over 20 metres. This board operates with a modern Bluetooth transmission protocol. the Bluetooth V4.2 version. This module supports Bluetooth automatic reconnection technology, supports WAV / WMA / FLAC / APE / MP3 lossless decoding, and has stereo two-channel output.
Everything done here in this guide will be absolutely CODE-FREE!
You will need to test your hands at soldering for a small number of connections. This process is explained comprehensively. With Universal Crimping Pliers and JST PH 2-Pin connectors, this setup can be done almost completely solder-free. The board comes exactly like the below image so no matter what some soldering will need to be done to get the Female JST PH 2-Pin connectors securely attached to the board.

This makes for a fantastic first foray into electronics with a very rewarding end point. The contents of this guide can be seen below.
- What You Need
- Schematic
- Hardware Assembly
- Demonstration
- 3D Printed Boombox
- Downloads
Some quick facts worth knowing about this module.
1. This Module has a Blue LED Indicator. With power going into the system, when Bluetooth is not connected, the indicator LED light will flash quickly. Furthermore, when a Bluetooth device is connected, the indicator LED light will always be on. Lastly when Bluetooth Audio is playing the indicator LED light will flash slowly.
2. This Module doesn't have any Input/Output options for an Auxilary Headphone Port. It also doesn't have the capability to easily add User Interface Buttons (Sound Up/Down/Mute). All volume control is managed by the Phone/Computer. If you want a very similar board that can do all these features and have a Auxilary Headphone Port check out this one linked here. Note that the headphone output means you'll need an external amplifier board like this one.
3. The output of the two power amplifiers cannot be connected in parallel and cannot have the two negative poles connected together. If you do this the module's onboard power amplifier chip will be damaged. If you only want a Mono Speaker this Bluetooth Module linked right here would be more appropriate. Or you can connect up only one speaker and send only Mono Audio Signals to it via Bluetooth.
4. If you want a Portable Bluetooth Audio Solution (one that can run on lithium battery power) this board is a perfect candidate. Now since there is no lithium battery protection circuit on the decoder board, it is recommended to use this module with a DC-DC Charge Discharge Integrated Module so you have the appropriate Power Management System. With that correctly wired up any 3.7V LiPo Battery on our website can then be utilised safely.
The end goal here is to have a formidable USB Powered, Plug and Play Boombox and a full understanding of all the electronic components. As always if you have any questions, queries, thoughts, or comments please let me know.
What You Need
Below is everything you need to get started transmitting Bluetooth audio from a phone or computer to a 10W Speaker System.
- MH-M38 4.2 Bluetooth Audio Receiver
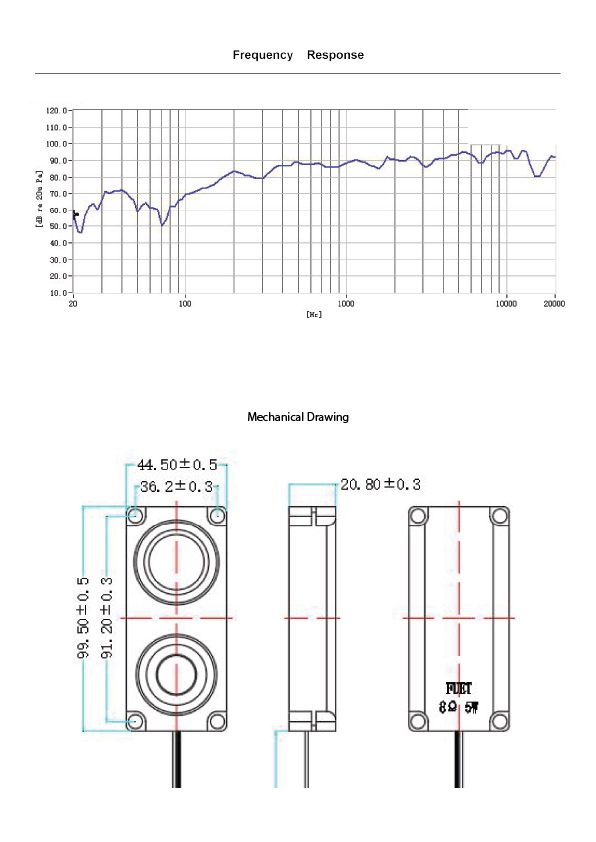
- 2X Enclosed Speakers (Frequency Response and Dimensions can be found here, STL of Speaker found in Downloads below)
- Micro USB to USB Cable (Data Enable is best)
- Soldering Equipment (An Almost Solder Free Option can be done with this Universal Crimping Pliers and these JST PH 2-Pin Connectors)
Schematic
Taken straight from the MH-M38 Product Page we can see a great schematic to follow through with. As you can see we have multiple options when it comes to power. The one option the original diagram neglected is plugging the setup straight into the USB port of a computer with a USB Cord (that Supports Data) and playing music through it that way. This means it can take the information from your computers a USB sound card and Free Drive, playing music through the module amplifier output. A proper Plug and Play system. I have added it in the below image.

Also for those interested here is a fellow who completely reverse-engineered this module. Come give it a look if you want to know the deep inner workings of this board.
Hardware Build
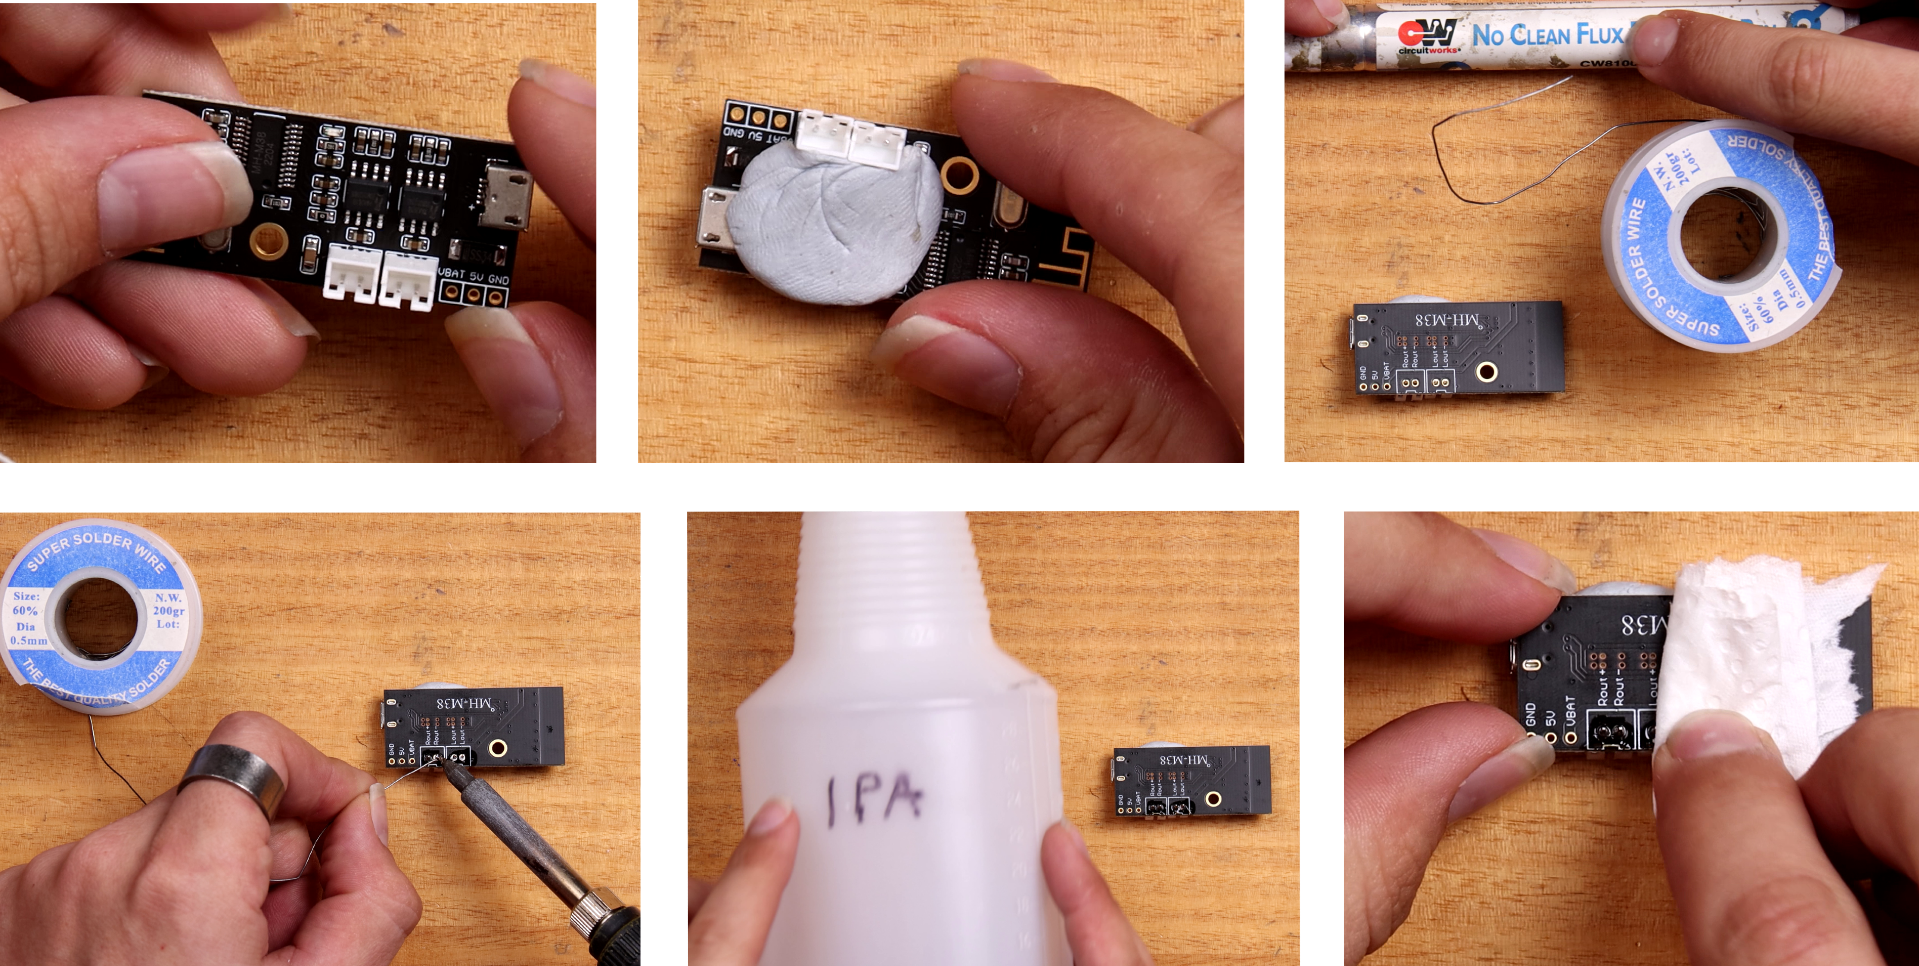
When you have the MH-M38 Module in hand and unboxed it you will be presented with everything you can see in the image below.

The first step is to solder the two female JST PH 2-Pin Connectors to the module. This results in a much cleaner end result than soldering wires directly to the board (which is also an option if you are so inclined). When soldering these connectors make sure to use flux and blue tack to keep them in position while you are doing it. To see the exact process I went through in step by step process check the image below. Make sure to orient them the same as me.
With that complete, we now need to turn our attention to attaching our two speakers. All speakers on our website have two wire connections coming out from them. Usually, this will be labeled with a Positive (Red wire attached to it) and Negative (Ground, Black wire Attached to it) symbol. On the Makerverse Speakers, the colour of the wire (Red and Black) provide this information. Know that you can directly crimp connections onto the end of the wires coming out of the two Speakers saving you from soldering any further.
Note here, wiring speakers backward will not cause any damage to any devices and is not dangerous. However, it will negatively impact the audio sound fidelity as it is outputted by the speakers. So take the time to figure out which Wire/Pin is which before proceeding. This module has all information regarding its Pins clearly labelled on the PCB (Printed Circuit Board).
The method chosen here requires the two Yellow Wires (Ground from Bluetooth Module) to become attached to the black wires (coming from the two speakers). Furthermore, it requires the two Blue wires (Positive from Bluetooth Module) to be connected to the two Red Wires for both speakers. Make sure to use heat shrink and slip it over the wire before making the solder connection. See this process occurring in the image below, step by step, for 1 of the 4 wire connection needed. This will demonstrate the exact technique I utilise to get long-lasting connections between two stranded wires. The mechanical durability of the connection significantly increases when you wrap the wires together using this method whilst making it significantly easier to solder. Note that you can use the middle section of the Solder Pencil to shrink the heat shrink.

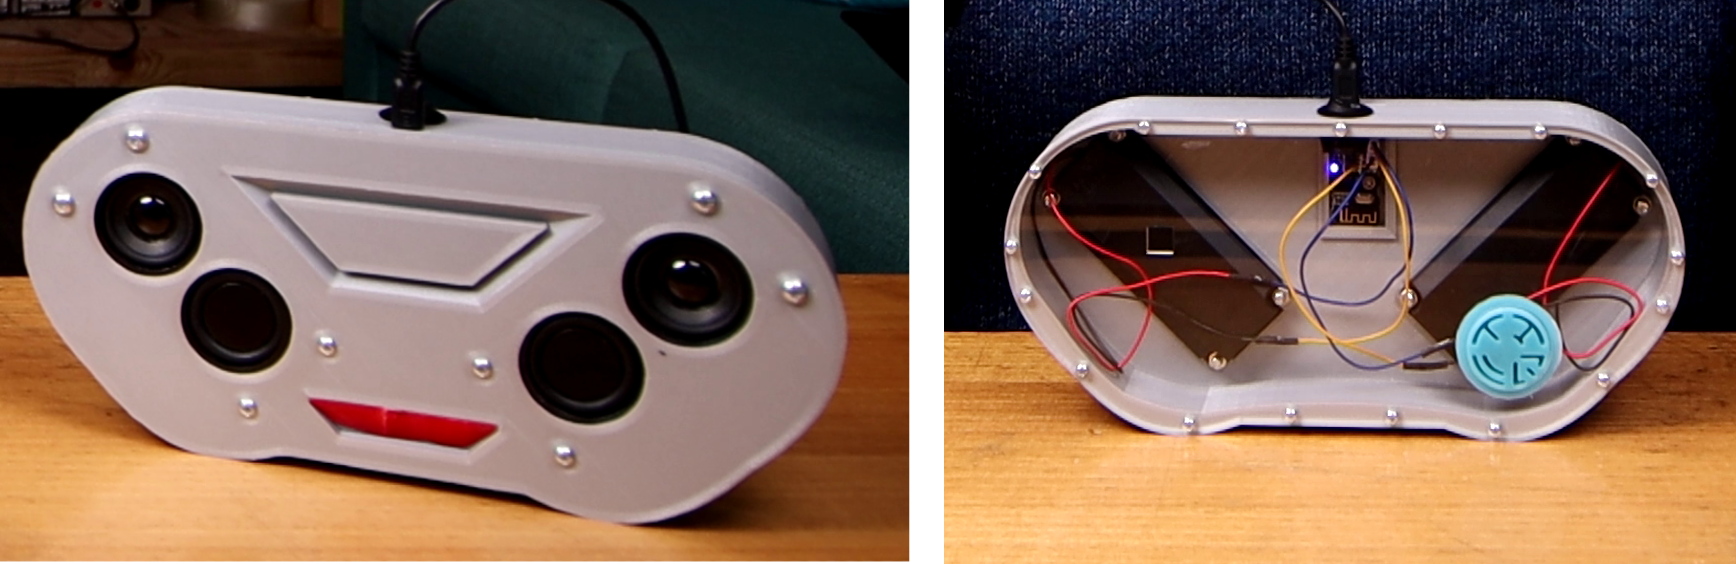
Repeat this above process until all wires are soldered together. Once complete with all connections made your hardware should look a lot like the image below.

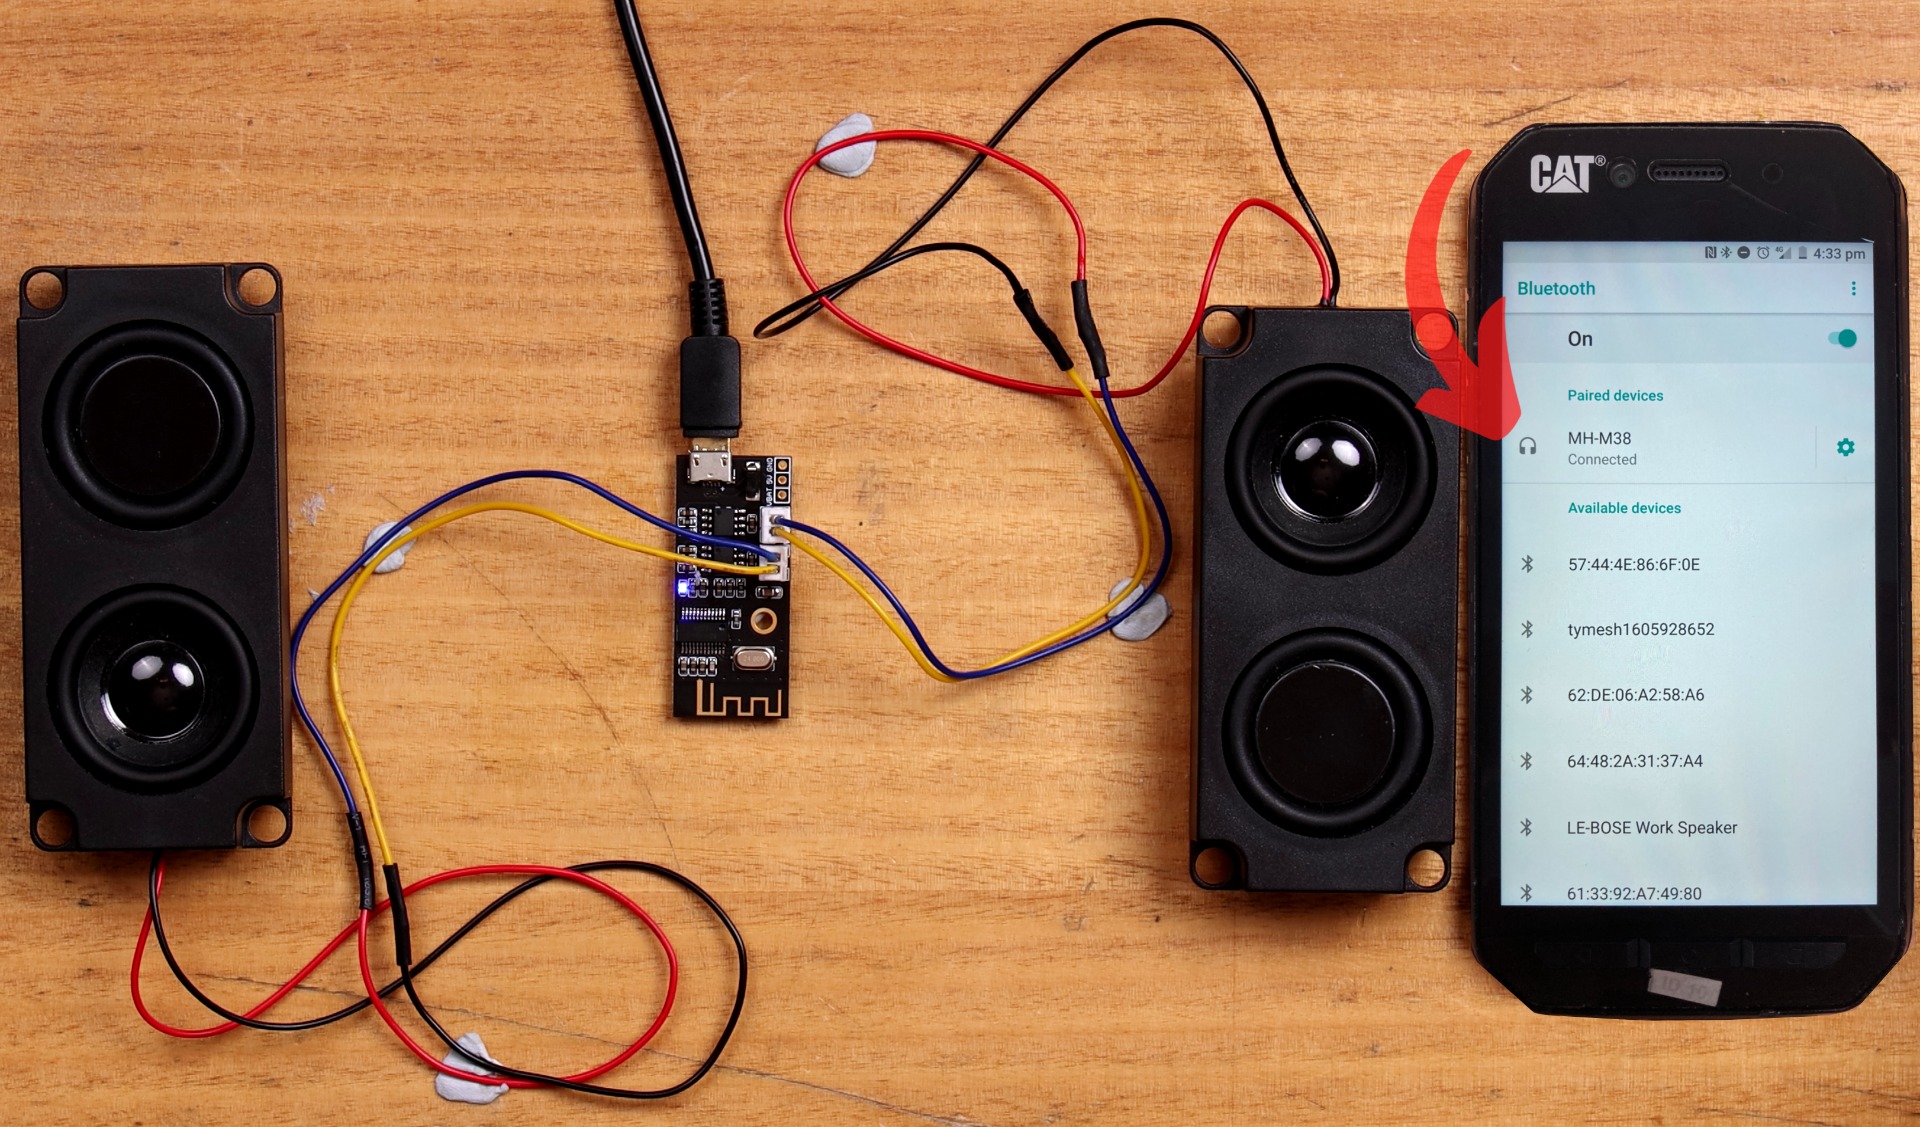
At this point simply connect to your hardware with a Micro-USB wire that feeds into a Powered USB Port. This power can come from a USB charger, a computer's USB port, or literally anything that can supply stable current to the system. The system will make a nice boot noise when you do it, indicating that it has been safely turned on and is ready to be Bluetooth-paired. When un-paired the blue indicator light will flash quickly. See this in the image below.

Demonstration
So let's now pull out our phone and open up Bluetooth settings inside it. You can see this happening in the image below on my Android Phone. Press on the connect button and your speaker system will emit a nice-sounding charm beep. Note that when it is connected to a device you will not be able to find it on the list of Available Bluetooth Devices if trying to connect to it with another music transmission device.
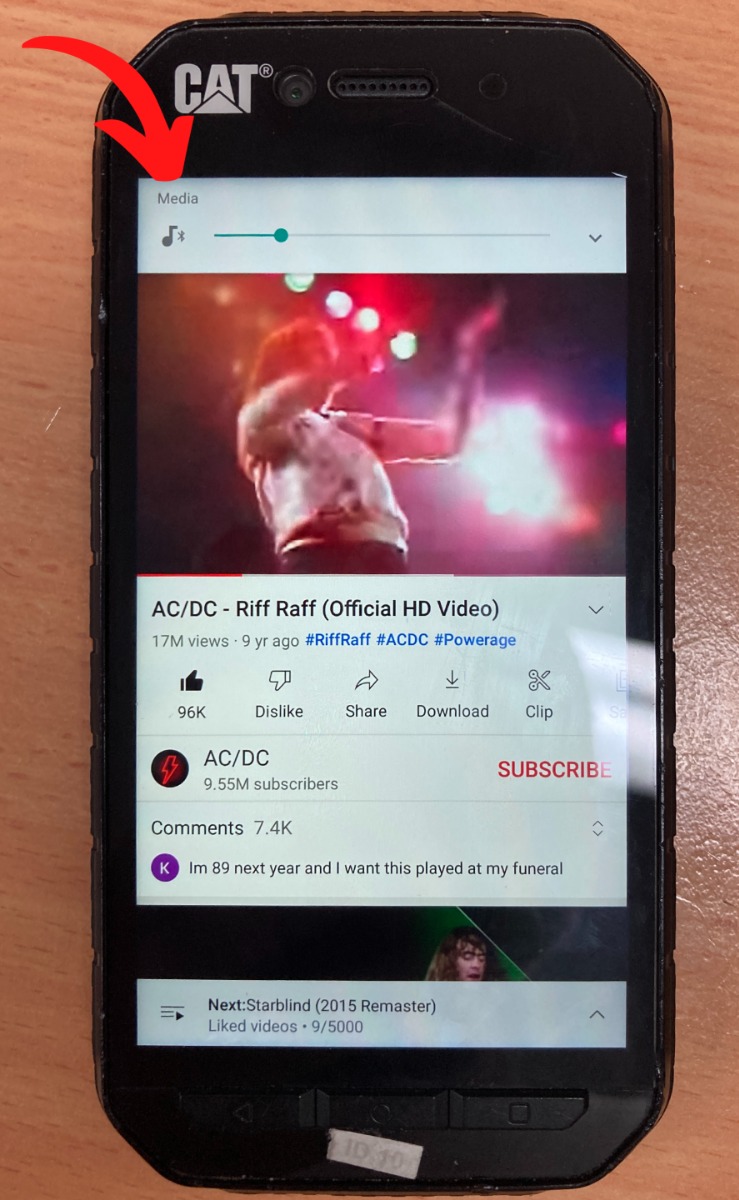
With it connected hit up your favourite youtube video and put the system to the test. You’ll be able to control the volume directly from your phone. See this in the image below. It gets properly loud!
3D Printed Boombox
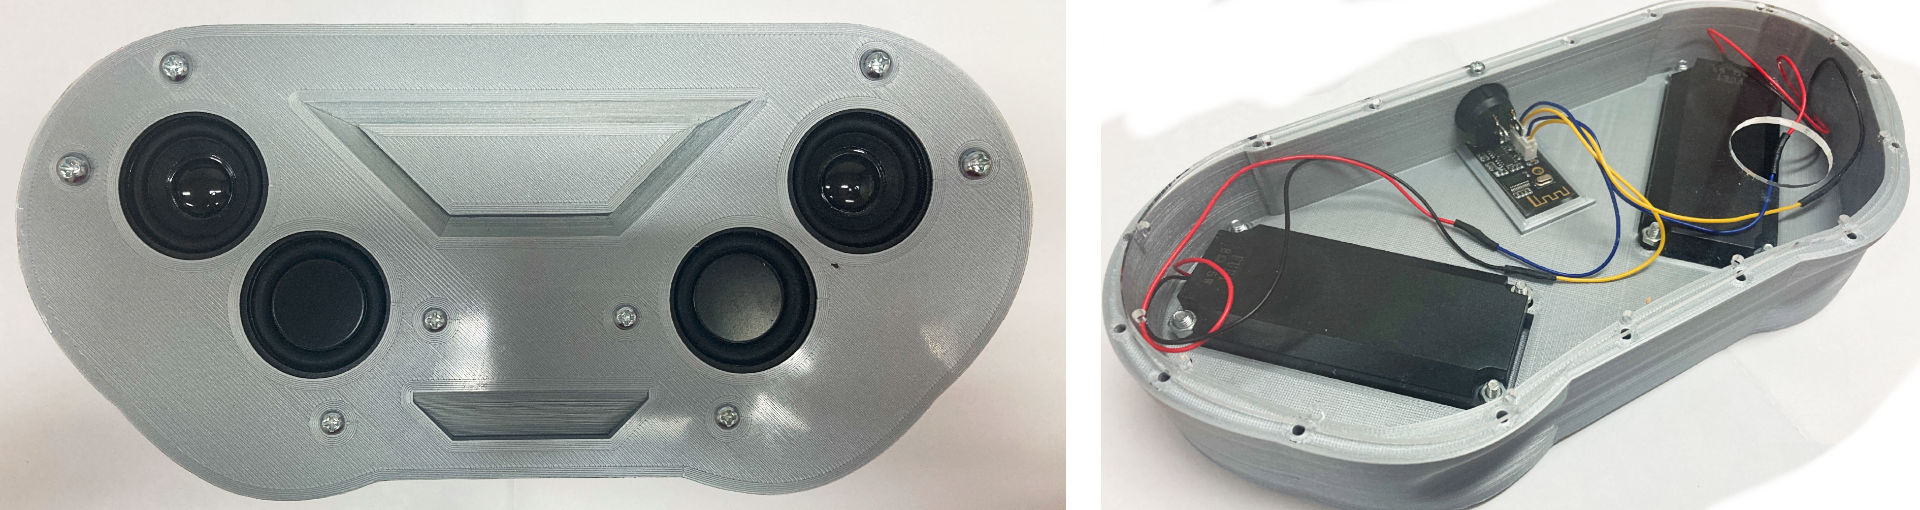
Naturally, I had to make a boombox so I whipped one up in Fusion 360. Watch my speed run of the build process in the video for this guide. Without this, the speakers vibrate very intensely on a flat surface when playing loudly. A case prevents that and improves audio fidelity. See both the CAD design and the BoomBox halfway through printing in the image below.

And check out an image of the final 3D-printed design below. Feel free to download it and use it/modify it too. You will find this STL in at the bottom of this page in the Downloads Section. When assembling make sure to screw the speakers in tight and that all connections (including the Laser cut back) fit just right. Big thanks to Liam, our Core Electronics Product Superstar for sorting the Transparent Acrylic back, hit him up on our Forums. Check out some more of his Laser Cut Output here. I printed my BoomBox with 100% infill (with the intention to prevent it from vibrating) and out of Ultimaker PLA.
We could even add some RGB Sound Reactive LEDs to our speaker but for now, let us keep this as simple as possible.
Now if you don’t have access to a 3D printer or laser cutter or simply prefer a different medium to craft from then do that for your Boom-box! I have seen amazing speakers being made from modified cigar boxes and even better ones made from wood or stone or PVC Pipe. There is nothing cooler than making your own unique build. So if you are unimpressed by what you see around you build your solutions to make it better!
The aspect of case building is very enjoyable. Perfect for a DnT Product for school or a Weekend Project. I just want everyone to know the electronic aspect of this can be dirt quick and easy to sort. No code and uncomplicated. And truly a 10Watt speaker (2x 5Watt speaker) can really pack some noise.

