Welcome to the benchmarking arena! We are going to put eleven microcontrollers to the test and see how they hold up against a set of fiendish tasks that we devised to push them beyond their limits. We chose most of our candidates based on their support for MicroPython because as a bonus we will also be comparing how MicroPython compares to the C programming style that Arduino uses. We have a lot of ground to cover so let's get into it!
This article is long so I have provided links to the sections and the end so if you want to jump to the pictures you can or if you want to find out the recommendations at the end (No Spoilers :p).
- Hardware Comparison
- A look at the features of the boards we are testing
- Performance Tests
- How we tested the boards
- Results
- The results of the tests
- Impressions
- What we thought about and tips for each board
- Conclusion
- What we learnt and our recommendations
Hardware Comparison

Performance Tests
The TLDR is we do two tests that have lots of loops and take a long time to run, you can skip to the results if you like.
Now I will explain in painful detail the tests that I used to benchmark the eleven microcontrollers...
When a computer wants to do anything with numbers it has to represent them as binary there are three ways that most computers will store numbers these are Integer, Floating point and Double precision.
Integers are the counting numbers (-1,0,1,2) and in programming, we try to use these wherever we can as they can be processed much faster than the other types of number. The second type the Floating point they are any number with a decimal point It is stored in 32 binary bits, calculations are slower but they are needed to represent continuous numbers. The final type of data is the double precision which is used to represent the same numbers as a floating point but a lot more accurately, this also means they take longer to do calculations.
Now that we have some background on the data types it will make more sense when I say that we are going to run two tests the first to check the performance doing integer calculations and the second for double precision.
I was not going to mention floating point but the Arduino UNO does not support Double Precision as a data type, even though it will accept double as a data type it is a regular floating point number.
Integer Test
We are going to put to test the integer processing muscle of our boards by finding what all of the prime numbers below 5000 are. If you are unfamiliar with what a prime number is it is a number that can only be divided evenly by itself and 1.
We are trying to stress out our processors so we are going to use a very simple algorithm that does not skip checking numbers that we know are not prime, such as the even numbers.
n := 5000 # this number is the highest number to check
Loop over all numbers from 2 to n
	Loop over all numbers from n to primeCandidate
		if the remainder of primeCandidate/i == 0
			end loop
		if loop gets to primeCandidate - 1
			Set primeCandidate as maxPrime
This code may look very simple but as you get higher up the numbers to have to do more calculations in each of the outside loops so that for the count for the number of operations becomes 1+2+3+4...+4999 = 12,497,500 iterations of the loop. this is a worse case and as for non-primes the loop will break early we ket an iteration count of a mere 1,559,539.
Floating Point Test
To test floating point (double precision) we are going to calculate every one's favourite mathematical constant Pi,(Unless you like Tau, but that is just 2Pi and you know it). To do this we are going to use what is called an infinite series, an infinite series is a sum of number that when added together will approach some value that we are interested in. Pi is what is called an irrational number so there is no way, as far as we know, to calculate every single digit but the more terms of the infinite series we add the closer we will get to the actual value of Pi. There are several ways that this can be done but we are going to use the series given by this sum.

In theory, the more terms we add to this sum the closer we get to the true value of Pi, in practice by the time we get to the 20 steps of the sum the number we are adding is 1.4e-11 which is the scientific notation way of writing 0.000000000014 and the steps after this are even smaller. This is important because of the way computers store floating point numbers means there is a limit to how small it can go. The Limit for floating point numbers is 5.96e-08 and the limit for double precision is 1.11e-16 this means that once the series step gets smaller than this we are only adding error to the calculation. So in this test, we also calculated an error by comparing our result to the first 20 digits of Pi.
Results
Now that I have gotten all the maths and nerd talk out of my system we can get down to how the boards did in our tests. For those that skipped the previous section, we have run two tests that use the processor in different ways we will call these the integer test and the floating point test the biggest difference being that the floating point test will have an accuracy measure as well as a speed.
Integer Results
We ran the integer test twice on each board where it was possible, we could not get Arduino Support for the Pyboard board or Micropython support for the Arduino board the rest played nice with either.
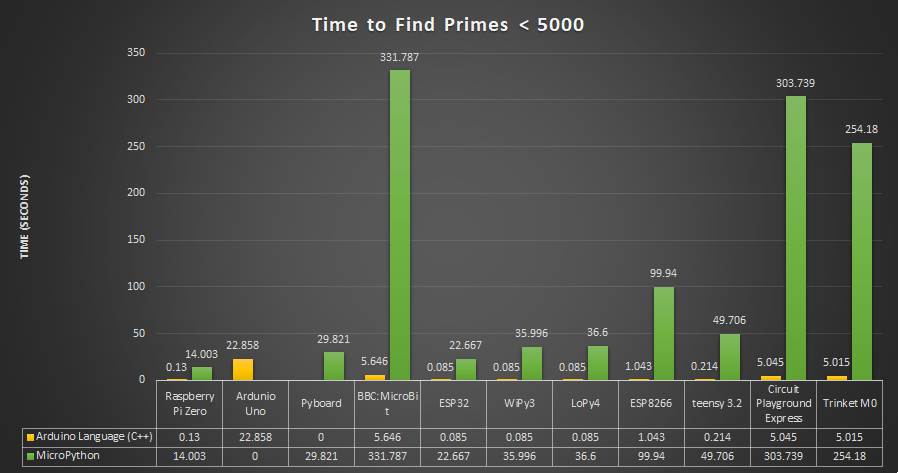
The very first thing that you notice looking at the data is that C is a lot faster than MicroPython, this is because MicroPython has to do a lot of work in the background to interpret the python language.
You will notice this difference when you write your code the test program for python took less than five minutes to write and the C code took about another 15 minutes after the algorithm was proven in python and this difference becomes more exaggerated as the code complexity increases.
The fastest C boards are the ESP32 and the two Pycom boards that share the same hardware, Interestingly in Python, they are no longer equal, It is worth noting that the ESP32 has the least software features of the three and the LoPy4 has the most when running python. The slowest Micropython board is the micro:bit through its C performance is still quite good when compared to the Arduino.
The fastest Python was by a fair margin the Pi zero though that is hardly surprising with its 1Ghz CPU, I was actually impressed the ESP32 beat it in C.
Floating Point Results
The second test was designed to push not only the speed but the accuracy of the processors as well before we start I want to point out that one of the competitors was cheating by using a shorter word length but we will come back to that later.

The results of the speed test on the floating point calculations were a lot more even between the Python and C implementations. The fastest this time was the Pi using the C implementation the ESP 32 could not win this round though it did quite well. Another interesting result this time is how much better the Arduino did in C against the other boards compared to the previous test...

The error shows us something odd with the C results from the Arduino it has a significantly larger error than any of the other board running C, at first this did not make a lot of sense as we were running exactly the same code with the same datatypes on every board. After a bit of digging through the Arduino documentation, it turns out that the UNO does not support double precision and will ready all doubles as floats.
In almost all applications this will not matter though some forms of advanced robotic such as Simultaneous Location and Mapping (SLAM) can and advanced control can need this kind of functionality. The MicroPython implementation also seems to have use floating point by default, though out of laziness I did not actually attempt to force python into double precision.
Impressions
Raspberry Pi Zero

The Raspberry Pi is arguably the most popular single board computer ever produced. The Zero is a cut-down variant that is a low-cost computing system designed to give anyone interested access to education and exploration of digital systems.
Unlike most other boards in this review the Raspberry Pi runs a full operating system, the effects of this can be seen in some of the simulation results that are slower than we would expect compared to the much slower Clocked microcontrollers. Because the OS takes priority any programs we run have to wait their turn among the hundreds of tasks that are needed to make the Raspberry Pi so great and easy to use.
For most Python applications the Raspberry Pi was the fastest though some of the C tests the Micros were able to beat out the Pi. One of the major advantages of the Pi Zero is that you do not need another computer to load your programs onto it, and in fact, you can use the Zero as a platform to program any of the other boards on this list.
The biggest downside of the Pi Zero one of the things that makes it so great, the Linux operating system, This means that the Pi is constantly spending a lot of power and resources to keep the OS running and the OS will take priority over measurements for most applications you will not really notice this but when you are going for as much speed or the lowest power usage you can get the OS becomes a real pain.
Arduino Uno

The first microcontroller a lot of people in the community ever used, I'm not sure you can call yourself a maker if you don't have at least one of these lying around. The legacy of these boards is impressive we have a lot of add-ons, tutorials, and courses available and a quick google will give you even more. this board is so popular that the ESP8266 is still used as a WIFI addon for this board despite, as our testing showed, it is a much more powerful board. This still remains a great place to start with microcontrollers due to the legacy of devices and tutorials available you can do almost anything with an Arduino.
Of the boards, we tested the UNO is the only one running an 8bit architecture when the UNO was first released this was common as it meant that the chip could be smaller and faster, in the years since it was released processors have gotten smaller and faster meaning that now 32bit is the standard for most microcontrollers. This means that not only are the newer controllers faster they can do more on each step. This size limit also limited the accuracy of the calculations and though it is rare that hobby projects run into this as a real problem.
PyBoard V1.1

Built for MicroPython and packed with features, it even comes in its own little MicroPython case, this board is the flagship of the MicroPython developers. This board feels like a board made for microPython they have crammed so much I/O and features into this tiny board.
Unlike the other boards on this list, the PyBoard V1.1 is not currently supported by the Arduino IDE. I like my code to be fast so I like all my final implementations to be in C though in reality there are not going to be many times at all when you are going care if your code runs in .001 second compared to 0.01 second.
BBC:MicroBit

When I first saw the micro:bit I thought like most that this was just another toy in the sea of STEM teaching tools, but after having a chance to play this board has something to offer everyone from kids just starting out to Electrical Engineers looking to prototype.
The micro:bit is fun to code in any language available, which at the moment is MicroPython, Make Code, Arduino and Scratch Unlike any other board I have used moving between platforms is seamless, once the Arduino setup was done switching between the platforms is as simple as Alt-Tab.
This board has been picked up but a lot of educational institutions and has a wealth of information and tutorials on how to use it, we have a MicroPyhton Workshop for coding is and a great collection of tutorials using the built-in sensors and GPIO.
The only real drawbacks to the micro:bit is the relatively low power which means it only has a partial implementation of Bluetooth in MicroPython, and it has quite limited GPIO though it is quite easy to expand. Overall this is one of the best boards for getting started of education.
Circuit Playground Express

This is Adafruits STEM education board and “out of the box” it cannot be beaten on features, the first you will notice is ten very bright neopixel LEDs it also has two push buttons a bunch of sensors and even a speaker (some parents and teachers may consider this a disadvantage).
As with all Adafruit products, this board is well made and well supported and is a lot of fun to program for aspiring engineers of all levels. We have a great Circuit Playground Workshop and lots of tutorials and again google will give you hundreds more projects ideas.
On paper, I liked the circuit playground more than the micro:bit though when it came to using the boards, though both are great the micro:bit was a little bit more fun. It should be noted that I am an engineer so my definition of fun may not be the same as yours.
Trinket M0
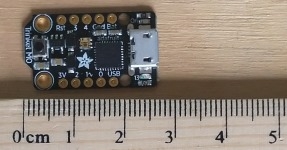
The Trinket is neat, It is so tiny and CircuitPython compatibility makes is so easy to program. This or the very similar GEMMA M0 would make great wearable control boards. It also supports I2C so the I/o Can be expanded.
The downside is it has a lot less I/O or other built-in feature but for when you need something easy cheap and adorable this is the microcontroller for the job.
Adafruit Huzzah32

This board was Developed from what Espressif learnt from their Bluetooth addon turned stand-alone microcontroller the ESP8622. And they have delivered a monster of a Microcontroller in our testing the ESP32 variants are the fastest at most of the tasks, to really sink home how impressive this board is these tests were done using only one core of its Dual-core CPU. There are also a lot of features built in such as a hall effect sensor and capacitive touch, it is very easy to see why these controllers are growing so rapidly in popularity.
Does not come setup with MicroPython so you will need to flash the MicroPython bootloader on, this is a quick process and not necessary if you are using Arduino to program the board. Copying code to the board needs to be done through the serial with an app like Ampy, which is simple once you know how, can be daunting for first-time users.
Pycom WiPy and LoPy4


Pycom boards are built from the ground up for IoT, they are all built on the ESP32. so have all the power and versatility of the ESP32, with some great extra features added by the Pycom team. The LoPy 4 includes LoRa Support and there are other variations that. The Pycom libraries give a lot of support and functionality to all of your IoT projects. There is a reason we chose this board as part of our uGateway
If you want to program then you need to get the expansion board there is no direct USB connection to any of them. Programming the Pycom with the Arduino IDE was tricky and required manually placing the board into write mode by shorting pin 23 to gnd.
There is a lot of support for the Polycom boards and they are incredibly popular for IoT applications as they are easy to use, powerful and have a lot of tutorials available for completing your projects.
Teensy 3.2

The teensy is a great little board with a whole lot of IO crammed into a really small space, it has some great tools for programming using the Arduino Interface (Modified and called TeensyDuino). We have a few great tutorials on how to use this board with Arduino and given its power and plentiful IO it is worth looking at…
I found a lot of sites claiming that the Teensy is supported by MicroPython this is one of those technically true statements, that require you to spend a few hours crying under your desk to make a reality. Once you finally get MicroPython onto the teensy you need to recompile and upload the whole image every time you want to change the code. The teensy version of MicroPython also has very limited libraries which made programming it much less fun. I would not recommend using the Teensy as a MicroPython board at the moment.
ESP8266

When planning for this article I Picked up the ESP Thing from Sparkfun thinking that all esp8266s were the same, it turns out this is not the case, you have to be careful that you pick an ESP8266 that has at least 4Mb of flash memory if you want to run MicroPython. Once you have the right board this becomes a powerful microprocessor and it is easy to see why they decided to take this board from Arduino add-on to stand alone Microcontroller.
It suffers from the same problems as the ESP 32, though these are minor so the only real problem I see with this board is that I could have spent just a couple more dollars and gotten the ESP32.
Conclusion
After all the tests were run and hours of digging through how to make the boards work with either MicroPython or Arduino I got to love and hate a lot of these boards.
Makers' Choice (PyCom)
The ESP32 family were easily the most powerful of the boards used, and well worth the little bit of extra difficulty in setup. (Which is not much, about on par with the Arduino) The returned great results in the benchmarks we ran and that was with only one of the two cores available so in theory, they should be twice as fast.
Best for Beginners (Micro:Bit)

The micro:bit seems to have taken all the hard edges off learning to code microcontrollers, block-based coding through to trying to get every bit of speed out of it in Arduino C. Once the Library was installed into the Arduino interface moving between MicroPython and Arduino was as easy as alt-tabbing to from the Arduino IDE to the mu the MicroPython IDE I was using. There are tons of resources available for learning with this board as well.
If you have never used a microcontroller before or if you are a seasoned maker looking for something to tinker with in your spare time I cannot recommend this board enough. The only downside is the relatively low performance and the severely cut back Bluetooth functionality. But as a learning tool and in fun factor it makes up for this easily.
Honourable Mention (Trinket M0)

Trinket M0 is tiny so tiny it is almost smaller than the USB terminal that we used to program it. With the easy to use CircuitPython programming, the Trinket M0 and the Gemma M0 (A round wearable version of the trinket) is perfect for any project where you need to use as little space as possible and still have a lot of awesome features.
Thanks For Reading
I hope you have enjoyed this look at this selection of MicroPython controllers, it may look like the Arduino C code is the winner of performance but anyone who has written code in Python will tell you how much of a joy it is to program in. The problems we are using here are very computationally expensive to run
