Welcome to the MicroPython for micro:bit workshop! This workshop is aimed at makers who want to start programming with MicroPython, we will be using the micro:bit as it is very easy to use so we can cover the important concepts that will apply to the other MicroPython platforms like the Pycom and ESP32.

Before we get started, we are going to need a few items to get through this tutorial:
Hardware
- micro:bit
- Micro USB Cable
- LED
- 330Ω Resistor
- 10kΩ Potentiometer
- Alligator to Male Jumper
- Solderless Breadboard
Software
If you run into any issues throughout the workshop, then please reach out on the forum. We are full-time makers and are here to help!
Course Outline
- Chapter 1 – Introduction to MicroPython
- What is MicroPython?
- What is the micro:bit?
- What can we do with MicroPython?
- Chapter 2 – Getting Ready
- Getting Ready
- Editing Code
- Real-time Coding
- Writing to the micro:bit
- Chapter 3 – Hello World!
- Importing Libraries
- Digital Read and Write
- If/else
- Chapter 4 – Analogue outputs
- Analogue I/O
- Loops
- Chapter 5 – Talking to other devices
- Using the radio.
- Introduce Lists
- Chapter 6 – Sensors
- Using the built-in sensors
- Functions
Chapter 1 – Introduction to MicroPython
What is MicroPython?
MicroPython is a version of the Popular coding Language Python 3, That has been cut down and implemented on microcontrollers. If you have used Python and Arduino, you will know why this is something that would get us excited. The Arduino uses a version of the C programming language and although C is very powerful it is not the friendliest language to work with.
MicroPython. unlike C, is an interpreted language, so the code is not compiled beforehand it is executed at runtime. This can be good as it allows for fast easy coding but can also lead to problems as errors will not be caught until the code is run and introduces some overhead to computing your code.
If you want a more in-depth look at the pros and cons of MicroPython, Stephen has made an excellent MicroPython Primer that covers all the basics.
The micro:bit hardware
You may be wondering why we have chosen to do an introduction to MicroPython with a board like the micro:bit with its brightly coloured interface and focus on education and fun for children.
The reason is simply that all of those things hide that fact that the micro:bit is a fairly formidable microcontroller that will run circles around many more “serious” development kits like the Arduino Uno.

| Board | Arduino Uno | BBC Micro:Bit |
| Language | C (Ardunio) | MicroPython & C(Ardunio) |
| Word Size | 8 bit | 32 Bit |
| CPU Cores | 1 | 1 |
| Clock Speed | 16MHz | 16MHz |
| Flash Memory | 32KB | 256KB |
| SRAM | 2KB | 16KB |
| WiFi | No | No |
| BlueTooth | No | BLE |
| GPIO | 20 | 17 (11 Digital, 6 Dual) |
| Digital | 14 | 17 |
| Analogue | 6 | 6 |
| Capacitive Touch | No | 3 |
| Operating Voltage | 5V | 3.3V |
| Compass/Magnetometer | No | Yes |
| Accelerometer | No | Yes |
| Temperature (CPU) | No | Yes |
| Built-in LED | 1 | 25 |
| Built-in Button | 0 | 2 |
The micro:bit also supports MakeCode a block-based code editor it is also compatible with other similar languages such as Scratch.
These things combined with the ease at which prototyping can be done with the tab connectors along the bottom make it easy to see why everyone seems to love this board.
What can we do with MicroPython?
This is a difficult question to answer, this platform is incredibly adaptable and very easy to code, you will find that your biggest limitation is your imagination (Yes this is a cliche, but accurate :) ).
We are going to be using the micro:bit which has a lot of extra features built in and is very popular and easily available board.
There is a massive range of MicroPython boards and some of them that will truly astound you with the number of features. A great example it the Pycom range that have a Dual Core CPU and variants are available for IoT, LoRa, GPS and many more.
I am sure that your mind is already buzzing with ideas from this brief introduction, by the end of this workshop you should have a good idea of how to start making them a reality.
Now with the why out of the way let's get to the how!
Chapter 2 – Getting Ready
To start with we need to set up your micro:bit so that it can be programmed with MicroPython. Many of the MicroPython boards come with tools that are designed specifically for it, we are going to be using one our favourite tool for editing the code on the micro:bit, the editor called Mu (Mu is the Greek letter engineers use to represent micro).
Firmware Update
The Firmware Update for the micro:bit could not be easier, all you need to do is download the micro:bit firmware then power up your micro:bit while holding down the button on the back of the board.
You can then copy firmware update into the drive called MAINTENANCE. The micro:bit drive will disappear and return as a drive called MICROBIT, ready for coding.
Plug it in!
This step is fairly easy all you need is to get your micro USB cable plug it into your micro:bit and in a microsecond, you will be ready to start coding in MicroPython. The only hard part is dealing with all the micros.
MicroPython Workspace
One of the great things about MicroPython is that you do not actually need a specific IDE to write python code for it. This means that you can write code for it in any editor you like, Including Notepad. All you need to do is save your code as main.py and copy it over to the MICROBIT drive that appears when you plug it into your computer.
As mentioned earlier we are going to be using the Mu editor, this editor gives us access to a lot of special tools for debugging and writing code that will make it a lot easier.
When you start-up Mu for the first time you will be presented with a choice to customise your experience based on the board you are using. If the board you are using is not in the list you can simply use the Python 3 mode.

You can write the following Code we will then save this as main.py
import machine # Generic library for MicroPython Hardware
print("Hello I am micro:bit\n") # print some Text.
print("I can do",machine.freq(),"things per second") # Get the Frequency of the CPU
Note: this snippet of code will run on almost any MicroPython board.
By hitting the Flash button we are able to “burn” the code to the chip, then opening the REPL (Read Evaluate Print Loop) option will let us see the output of the code.
Now if we click on the REPL button we will be able to see the output of the code we have just written.
You will now notice that with the REPL window open, the Flash and Files buttons will be greyed out, REPL will need to be disconnected by clicking the REPL button again before we can access these functions again.
You can connect to REPL on any MicroPython board by using a serial Client like PuTTY.
Now that we have had a look at the Mu editor, we are ready to start writing some MicroPython code. Finally!
Chapter 3 – Hello World!
Now that we have everything set up it’s time to have some fun! we are going to write some code that will let us interact with the micro:bit through buttons and an LED.
It is worth pointing out that though many of the details and concepts will translate to other MicroPython boards the specific libraries to interface with the hardware are unique to each board.
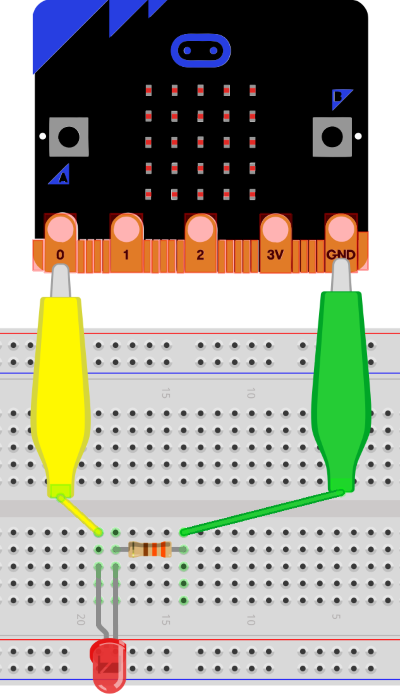
Wiring in an extra LED
We will wire an LED in series with a 330ohm Resistor to pin0, you can see the Fritzing diagram below.

Let's Write Some Code!
We are going to write a simple python script that will turn an LED off and on by pressing the A button. In computer science, this method of state dependant switch is called a latch, and though it may seem like an obvious piece of code it is very useful. Below we have the completed piece of code for this tutorial, you can either copy it over and read the explanations of the functions below or watch the video where we will go through writing the code line by line.
import microbit # import the micro:bit library
import time     # import time library

myButton = microbit.button_a    # define Variable to be our Button
outputPin = microbit.pin0       # define variable to be Output Pin

while True:
    if myButton.is_pressed() == 1:          # check if the button is pressed
        if outputPin.read_digital() == 1:   # read the Current state of the LED
            outputPin.write_digital(0)      # if LED is on Turn it off
        else:
            outputPin.write_digital(1)      # if LED is not on, turn it on
        time.sleep(.5)                      # sleep using the python library time in seconds
    microbit.sleep(125)
Import
This function is where Python (and by extension MicroPython) gets its power and versatility from if you want something in python chances are there is a library for it.
For this chapter, we are going to be using two libraries that will add some extra functionality that we need for this example.
microbit
This library gives you access to the MicroPython Hardware, without this we would have a very hard time knowing how to access all of the buttons, lights, and other features of the micro:bit.
time
This is a python library that gives us access to functions that have to do with time, without this python thinks about time in clock cycles and they happen so fast it is hard for humans to keep up.
Variables
Variables are kind of like little boxes that we can store values in, we can store lots of different things in these boxes, for example, we could store a number or a bunch of characters. In this case, we are going to use the variable to store the Pin and button we have chosen this will make it easy to change the output pin or button if we want to later. (Give it a try! change the pin number or button_a to button_b)
While True
For now, we will not look too deeply into this, but this will basically loop through anything that is tabbed in from it.
	while True
		This Block
		Will Run
 		Forever
	This will run after the loop, so will never happen.
micro:bit Hardware functions
we are going to use a few functions from the micro:bit library, these will let us interface with the hardware. We will have a look at each one individually.
button_a.is_pressed()
This is the built-in function for checking if button A is being pressed it will return a value of True or 1 if the button is pushed and will be 0 or False as all other times. Changing to button_b will swap the button you are working with.
pin0.read_digital()
This will cause the micro:bit to look at what the value on the pin is and if it detects a voltage it will return 1 and 0 if there is not one. This function with any pin from pin0 to pin20
pin0.write_digital(input)
This function will write input value to the digital pin, the value must be 1 or 0, when it is set to one there will be 3V active on that pin when set to 0 there will be no voltage.
If else and the not yet seen else if
The if statement is one of the most important control structures you will learn in coding as it allows us to make decisions. The if statement will evaluate the term you give it and if it is true it will run the block of code, If we would like to run a different block of code if the evaluation returns False we can use the else statement. We have several evaluations that are we can use with if statements (and anywhere else we want a True/False result)
|
Operation |
Symbol |
True |
False |
|
Greater Than |
> |
6 > 2 |
2 > 6 |
|
Less Than |
< |
3 < 9 |
9 < 3 |
|
Equal |
== |
3 == 3 |
3 == 9 |
|
Not Equal |
!= |
3 != 9 |
3 != 3 |
|
Greater Than or Equal To |
>= |
9 >= 3 |
9 >= 10 |
|
Less Than or Equal To |
<= |
6 <= 6 |
6 <= 9 |
There is a third statement that relates to the if block and that is the else-if, which will perform another evaluation after the first. To make this clear I have written some pseudocode below.
If Eval1
	Do this is if Eval1 is True.
elif Eval2  (Test if Eval1 is False)
	Do this if Eval2 is true.
else
	Do this if neither of the above are True.
Sleep
It is worth making a note of the time.sleep and microbit.sleep functions. If you have come from Python you will be used to the sleep time being set in seconds the micro:bit library uses the more C like (read Arduino) way of using milliseconds and it may catch you out.
Now we have our first Complete MicroPython script with if statements and Digital I/O, Next we are going to go analogue!
Chapter 4 – Analogue Inputs and Outputs
Now that we have mastered the digital inputs we age going to have a look at the analogue functionality of the micro:bit. You may think that analogue is less advanced than the digital inputs this is not actually the case Digital Signals are ones that have only two states 0 and 1. Analogue signals are continuous meaning that they can have any value in some range (for example 0-1000). Let's have a look at how to use them.
The circuit
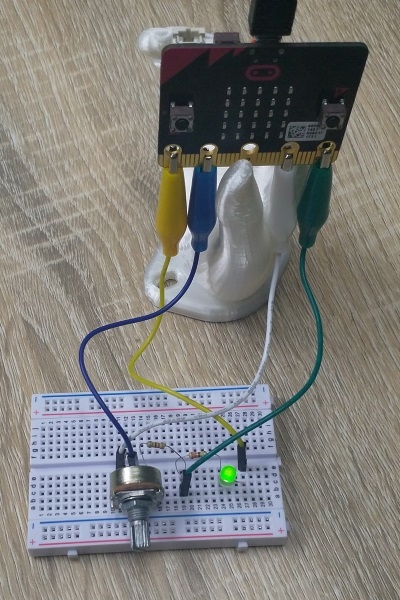
The first thing we need to do is add an analogue input to read. To do this we will wire a potentiometer(pot) to pin1. To do this we will wire from the 3.3V pin to the left of the pot, pin1 to the middle pin and the right pin we will wire to another 330ohm resistor then to ground. (see Diagram below.)

Code an Adjustable Blinking light.
We are going to create another state-based program this one will use while loops one that will define an On function that will have a flashing light that’s period is controlled by the potentiometer. It will also have an off state when the light is off and nothing will happen. You can start with the completed code and then we will go through and explain all the functions we are using.
from microbit import * 				# another way to import so we don’t need microbit.

analogueOut = pin0 				# Store Pin0 as variable
analogueIn = pin1 				# Store Pin1 as variable

Steps = 1000					# Number of steps and final brightness level
state = "on"					# Current State of the on off switch

while True: 					# Loop forever
    while state == "on":				# Loop while state is on
        cycleTime = analogueIn.read_analog()	# Read Value from Potentiometer
        timeDelay = cycleTime/Steps		# Calculate  the time delay needed

        for i in range(0,Steps,1):			# Loop while i is between 0 and Steps
            analogueOut.write_analog(i)		# Set analogueOut to i
            sleep(timeDelay)				# Wait for a moment
            if button_a.is_pressed() == 1:		# Check button
                state = "off"				# Set State to off
                break					# End For loop

        for i in range(Steps,0,-1):			# Loop while i is between 0 and Steps
            analogueOut.write_analog(i)		# Set analogueOut to i
            sleep(timeDelay)				# More waiting…
            if button_a.is_pressed() == 1:		# again with the button check
                state = "off"				# Can you guess?
                break					# Does this mean it is broken?

    analogueOut.write_analog(0)			# Set analogue out to off
    sleep(1000) 					# wait so we don’t turn back on
    while state == "off":				# Loop while off
        if button_a.is_pressed() == 1:		# even more button checking
                state = "on"				# turn back on
        sleep(200)        				# time delay to save cycles.
Import again
This time we are going to use import a little differently, this time we will not need to use the microbit.function() syntax we used in the last chapter. This can be handy as it makes your code easier to type, though can get confusing if you have two libraries that have functions with the same name like time.sleep and micropython.sleep .
Strings
A string is a series of characters that are defined by surrounding the stored value in quotation marks (“). We can compare strings by using the equal-to comparator( ==). It is very important to note that if you compare the string “1” to the number 1 or “a” to “A” it will evaluate as false because to MicroPython they are different.
While loop
Last time we had a quick look at the while True loop, the while loop will evaluate a condition on every cycle so that if the condition evaluates to false the loop will stop running and continue with the script.
While Eval1 # This will re evaluate after every loop.
	Do some things
	Make sure you do something
that may change the outcome of Eval1
or you will be stuck forever
I will run once the Eval1 has evaluated as False
microbit.<pin>.read_analogue()
read_analogue() will return a value between 0 and 1024(largest number that can be represented in 10bits) that represents a voltage at the pin of between 0-3.3V
microbit.<pin>.write_analogue(input)
write_analogue() takes input in the range of 0-1024 and sets the pin to be a voltage between 0-3.3Volts using a PWM method. If you want to know more detail about the I/O on the micro:bit Read the docs(https://microbit-micropython.readthedocs.io/en/latest/pin.html) is a great place to find it.
for loop
A for loop is a structure that will run for a set number of iterations and uses an index variable for each step.
for ValueAtCurrentStep in AvailableValues
		Do this to ValueAtCurrentStep
		Also Do this to ValueAtCurrentStep
	This will happed after the block has been done to every Item in AvailableValues
range(startPoint,endPoint,stepSize)
This function creates a range of values that will begin with the startPoint end on the step before the endPoint and will take a step of size stepSize. The step size is optional if you do not define it the function will just assume you meant 1. To make this obvious I have made a list below that shows some results.
|
Start |
End |
Step |
Result |
|
1 |
5 |
|
1,2,3,4 |
|
-5 |
0 |
-1 |
0,-1,-2,-3,-4 |
|
-20 |
50 |
10 |
-20,-10,0,10,20,30,40 |
Chapter 5 – Talking to other devices
The next thing we are going to look at is how to use the built-in Bluetooth radio, the micro bit uses a cut down version of the Bluetooth. The micro:bit radio broadcasts to out to anyone that is listening to that if you send a message all the micro:bits that are listening will also get the message. We are going to write some code that will send a message to any listening micro:bits and receive messages from any that are broadcasting.

Radio Code
import microbit
import radio                      # Import Radio Functions

radio.on()                      # Turn the Radio on

alphabet = ["a","b","c"]        # Store Our Alphabet, you can add more.
alphIndex = 0                   # Initialise the index variable.

microbit.display.show(alphabet[alphIndex])              # Display Currently Indexed Character

while True: # our old friend
    if microbit.button_a.is_pressed() == 1:             # Check if button A is pressed
        alphIndex = alphIndex + 1                       # If it is advance the Alphabet index
        if alphIndex > len(alphabet)-1:                 # Check if alphIndex is still in range
            alphIndex = 0;                              # Restet index to zero
        microbit.display.show(alphabet[alphIndex])      # Display Indexed Character
        microbit.sleep(125)                             # sleep for debouncing

    if microbit.button_b.is_pressed() == 1:             # Check if button B is pressed
        radio.send(alphabet[alphIndex])                 # Send current character
        microbit.sleep(125)                             # sleep for debouncing

    incoming = radio.receive()                          # grab incoming message

    if incoming:                                        # if there is a message
        microbit.display.scroll(incoming)               # Scroll the incoming character
        microbit.display.show(alphabet[alphIndex])      # Return to displaying what we will send

    microbit.sleep(125)                                 # sleep to save cycles
Lists
Lists are incredibly useful memory structures that let us store a collection of values like our alphabet.
Definition
We can define a list by using square brackets ( [ and ] ) and the values can be any python datatype (including other lists!). We separate values with a comma (,).
myList = [0, 1, 2, 3, 4] #index locations of a list
Retrieve
We can get data from a list by using the list name and square brackets.
		myList[0]  # returns the first element
		myList[-1]  # returns the last element
len(myList)
when given a list this function will return the number of items in the list. This is very useful in making as if you try to get a value from a location that is not in the list this will cause python to crash.
Radio
The radio functions let us send and receive messages from and to other micro:bits, we cannot choose who we are sending the message too so any message we send will go to every micro:bit within range (Though they will have to be listening.)
radio.on()
This function turns the radio on, by default, it is off in the micro:bit to save power. Once it is turned on we can use the other functions to send and receive messages.
radio.send(“Gaa Gaa”)
Send will broadcast the input string to all micro:bits in the area. In our code, we are sending a single character but you can also send strings of multiple characters.
radio.receive()
Getting messages is a little more complicated even though we only have the single command. The radio has a small amount of memory that is used to store messages until they are retrieved this is called the queue. The queue will hold onto all messages it gets until you use receive() which will return and remove the oldest value from the queue (by default there are 3 queue locations).
Chapter 6 – Built-in Sensors
The micro:bit has some sensors built into it, not all MicroPython boards come with sensors built in but many do, and the way that we interface with them is in most cases the same. The first step is to import the required library then use that library to grab the data from the sensor.
We are also going to look at some more python constructs the list and the function. Lists store a collection of variables under the same name and can be indexed conveniently. A function is a block of code we can call at any time.
The great thing about working with built-in sensors and outputs is that we do not need to wire up any circuits to make this work.
Working with sensors.
Sensors are a way that we can let our projects detect the world around it, there are sensors available for almost anything you can imagine. There are a few things that need to be taken into account when working with all sensors though.
Comparisons
To take this into account when you are designing your code with sensors we always avoid using the equals comparator (==). If you want your code to get to a very precise level you will need to use the Logic and to make sure that a value is between some range. For example, if you are checking a water level and you wanted to be at 1 litre you could use the if statement. The distance between the values should be chosen based on how accurate your sensors are or how precise your level needs to be while aiming to have the largest gap between them as possible.
if (water > 0.999) & (water < 1.001):
	return True
Noise
Noise is anything that is picked up by the sensors that are not the signals you are trying to measure, for example, if you are trying to measure the force of acceleration as a bus accelerates then the vibration of the bus is noise, but if you are interested in the vibration the force of acceleration is the noise.
The Virtual Cup.
We are going to write some code that will allow us to use the micro:bit as a virtual cup. The code will use the accelerometer to detect the acceleration of gravity to determine if our cup is upright or tipped. We are going to make our virtual cup refill whenever it is upright.

import microbit # import the micro:bit library
import microbit # import the micro:bit library
import time     # import time library

level = 0

cupLevel=[          #Store the Images of out Cup Level
        microbit.Image("99999:" "99999:" "99999:" "99999:" "99999"),
        microbit.Image("00000:" "99999:" "99999:" "99999:" "99999"),
        microbit.Image("00000:" "00000:" "99999:" "99999:" "99999"),
        microbit.Image("00000:" "00000:" "00000:" "99999:" "99999"),
        microbit.Image("00000:" "00000:" "00000:" "00000:" "99999"),
        microbit.Image("00000:" "00000:" "00000:" "00000:" "00000")
        ]

def cupTip(direction, level):                   # define the function cupTip with two inputs
    if (abs(direction) > 400 ) & (level > 0):   # Check direction input and tank Level
        pourRate = level - round(abs(direction)/20)     # Calulate how much level to remove
        return(pourRate)        # Return the amout to remove
    elif level > 0:             # If not tiped stay at the same level
        return level            # return the level
    else:
        return 0            # Return zero is cupLevel goes negative

while True:
    accelXYZ = microbit.accelerometer.get_values()  # get list of accelerometer values.
    roll = accelXYZ[0]      # first item in list
    pitch = accelXYZ[1]     # second item in list
    yaw = accelXYZ[2]       # second item in list

    if (pitch > 1000) & (level < 1000): # detect the gravity vector on pitch and tank level
        level += 40                     # is less than full
    level = cupTip(roll,level)          # call function and use the returned value as the new level
    level = cupTip(yaw,level)           # call function and use the returned value as the new level

    microbit.sleep(125)                 # wait for a moment

    # Assign image from list based on the current level
    if level < 10:
        microbit.display.show(cupLevel[5])
    elif level < 200:
        microbit.display.show(cupLevel[4])
    elif level < 400:
        microbit.display.show(cupLevel[3])
    elif level < 600:
        microbit.display.show(cupLevel[2])
    elif level < 800:
        microbit.display.show(cupLevel[1])
    else:
        microbit.display.show(cupLevel[0])

    print(level) # We will only see this in REPL
Functions
Functions are block of code that can be called from any point after they are defined to perform some action on some inputs.
Definition
Functions are defined with the def tag and can have as many inputs as you like. You can pass any kind of variable to a function in python this includes lists and any sensors like we have in the example.
def myFunction(input1, intput2, input3, …, inputN)
	#line one of function
	#line two of function
	#last line of function
# This line is not in the function
Return(MyValue)
The return statement will end the end the function and return the value you give it back to where the function was called. Like the inputs return can return any kind of variable including lists and objects.
def myFunction(input1)
	output1 = input * 2	# run out code
	return(output1) 	#Return Value and end.
	input1 * 4 		# This line will never run
# This line is not in the function
Microbit.Image()
The microbit Image function will display an image on the front 5 by 5 led display, there are a bunch of predefined Images you can use or you can define your own as we have in the example. Each number in the strings represents an LED 0 indicates off and 9 is maximum brightness. The colon is the end of the line and is not needed on the last line. The following will display a scaled Pascal’s triangle.
myImage = microbit.Image("00000:" "00200:" "02420:" "24642:" "46864")
To display the image we need to use the microbit display function show.
microbit.display.show(myImage)
Microbit sensors
There are three major sensors on the micro:bit, an Accelerometer, compass, and a Temperature sensor.
Note: There is a way to hack a simple light sensor using the LED grid.
We are just going to have a look at how to access the raw data the micro:bit has some advanced features such as direction and gesture detection that you can also use.
Temperature
The micro:bit temperature sensor is inside the CPU and is designed to monitor the chip though because the micro:bit runs very cool it is usually very close to the ambient temperature.
microbit.temperature()
Compass
The compass is actually a magnetometer and can be used to detect any magnetic fields, not just the earths. (Actually if you have a large magnetic field nearby your compass will not work well). To call the raw values from the micro:bit we use compass.get_x(), it detects in 3 dimensions so we can use get_y() and get_z() as well.
microbit.compass.get_x()		# Get magnetic field in X
microbit.compass.get_y()		# Get magnetic field in Y
microbit.compass.get_z()		# Get magnetic field in Z
Accelerometer
The accelerometer is the sensor that we have used in our example and can be accessed in the same way the compass can with get_x, get_y, get_z. You can use get_values() to return all 3 dimensions mesured in milig(1 thousandths of earths gravity) over a range of -2 to 2 gravities in a single list.
microbit.accelerometer.get_x()				# Get acceleration in X
microbit.accelerometer.get_y()				# Get acceleration in Y
microbit.accelerometer.get_z()				# Get acceleration in Z
microbit.accelerometer.get_values()			# Return list of dimensions
Well done!
This Workshop is still under construction, Please Check back soon for more Chapters.
You should now have a pretty good idea of how to program in MicroPython on the micro:bit. Thanks for following along I hope you have enjoyed this tutorial and it has helped you become more comfortable and ready to explore the possibilities of MicroPython.
If you are still hungry for more embedded Python you can check out other MicroPython Tutorials or our Circuit Python Tutorials which use Adafruit's own libraries to simplify MicroPython.
As always if you have any further question or comments you would like to add to this tutorial then join the discussion with our community of dedicated makers.

