Welcome to the best article on setting up an OpenMediaVault-based NAS on a Raspberry Pi Single Board Computer! This guide is the fastest and best way to go about it. Raspberry Pi single-board computers are purpose-built to run 24/7, with a low power draw and high reliability. Thus are perfect as the heart of a Maker Level NAS. If you asked me how much can a NAS can cost, I'll ask you how long a piece of string is. This system here on the other hand will be a more fiscally friendly approach to building a NAS, which doesn't skimp on any features.
By utilising a Raspberry Pi Single Board Computer as Network-Attached Storage (NAS) system, you will be able to keep and share files over your entire local network. With the ability to stay turned on for years, they really are a perfect device to create a Maker Level NAS. This gives you a platform to centralise your video/photograph collection or just make files significantly easier and more secure to access, no matter where you are. Creating an automatic backup for the files more important to yourself or the creation of a personal cloud storage solution is also possible with this NAS. Those ideas are addressed at the end of this article.
Know that these are just some beginner examples of the many, many uses of a NAS system. These systems are ubiquitous in organizations and businesses for good reason. As a Maker, there is a huge amount of benefit to be had by joining the NAS bandwagon. See below for the contents of this guide.
- So...What Is A NAS?
- What You Need
- Hardware Assembly
- Software Assembly
- Demonstration
- Where To Now (Adding Extra Hard Drives, Personal Dropbox, and Automatic Backups)
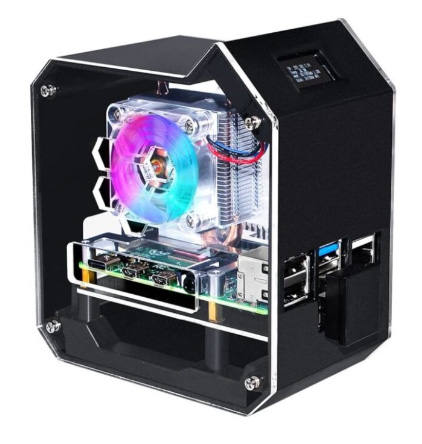
By the conclusion of this tutorial, your Raspberry Pi will be running as a fully functional NAS system that is ready to store and share files over your local network. Let's get going! See my completed NAS system below and the created NAS system tucked in a safe 3D-printed Onesie case. If you want to make this case/know more come check out one of my first articles found here.
As always if you have any questions, queries, or things you'd like me to do with this system, please let us know your thoughts!
So...What Is A NAS?
A network-attached storage device, or NAS, is a great method of data storage that enables numerous devices to access and share the stored data. It works similarly to a file server but is intended for use in a home or workplace that wants the physical hardware close by. Typically, a NAS system consists of one or more hard discs (or any data storage mechanism) that are linked to a network. This is usually done with an Ethernet Cable attached to the main WiFi router. When set up it can be accessed by numerous networked devices, including computers, smartphones, and tablets because of this direct link to the local router/switch.
A NAS system can be configured to perform a number of tasks, including remote access, video streaming, and file sharing. Files, music, pictures, videos, and other digital material can all be stored on it and shared with others. Without the use of physical moving devices to and fro, like USB drives or external hard drives, a NAS enables you to view your files and data from any device connected to your network. Furthermore, we stock some amazing active-cooling cases that turn a NAS into an Art Piece, check the Mini Tower NAS for Raspberry Pi 4 Model B.
There are many uses for a NAS. To begin, it offers a central spot to store and share files, accessible from any networked device. Families and individuals with numerous devices who want to keep their files accessible and organised will find this immensely helpful. Secondly, a NAS can be configured to automatically back up data from other devices on the network, providing an additional layer of data protection. This can be especially important for important documents, family photos, or other valuable data (NSA Leaks). Finally, a NAS can be more cost-effective and flexible than cloud storage services, which can require ongoing subscription fees and may not offer the same level of control or security as a local data storage NAS. Local storage is more reliable and is always accessible. Local storage can still have the ease of access that cloud storage has too! The ability to easily access and share data from outside the Local WiFi is totally achievable with a Raspberry Pi NAS (and one which has big advantages). See Local Data NAS winning a competition against wobbly-kneed Cloud Data in the image below.

Truly a personal NAS is a powerful and convenient tool for storing and sharing data over your network. By setting up a NAS on a Raspberry Pi using OpenMediaVault, you can create a fully customisable and swell solution that knocks the demands of a Makers out of the park.
What You Need
Below is everything you need to set up your Raspberry Pi as a NAS.
- A Raspberry Pi 4 Model B 8GB. The extra RAM on this board is an excellent choice for a NAS system. The additional RAM will allow the device to handle more concurrent requests and better manage larger file transfers.
- Micro SD Card 16GB
- USB 3.0 External Hard Drive (you may need this SATA Hard Drive Adapter), SATA SSD, or even a Simple USB Stick/Flash Drive (Used Here)
- Official Raspberry Pi Power supply (USB-C, 5.1V, 3A)
- Ethernet Cable (optional)
- HDMI to Micro-HDMI Cable (optionally, this can be done Headlessly, keep in mind that is more technical)
- USB Mouse and Keyboard
Hardware Set Up
Below is the step-by-step process to flash your MicroSD card and connect the correct hardware together for your Raspberry Pi NAS System (a NAS-Berry!).
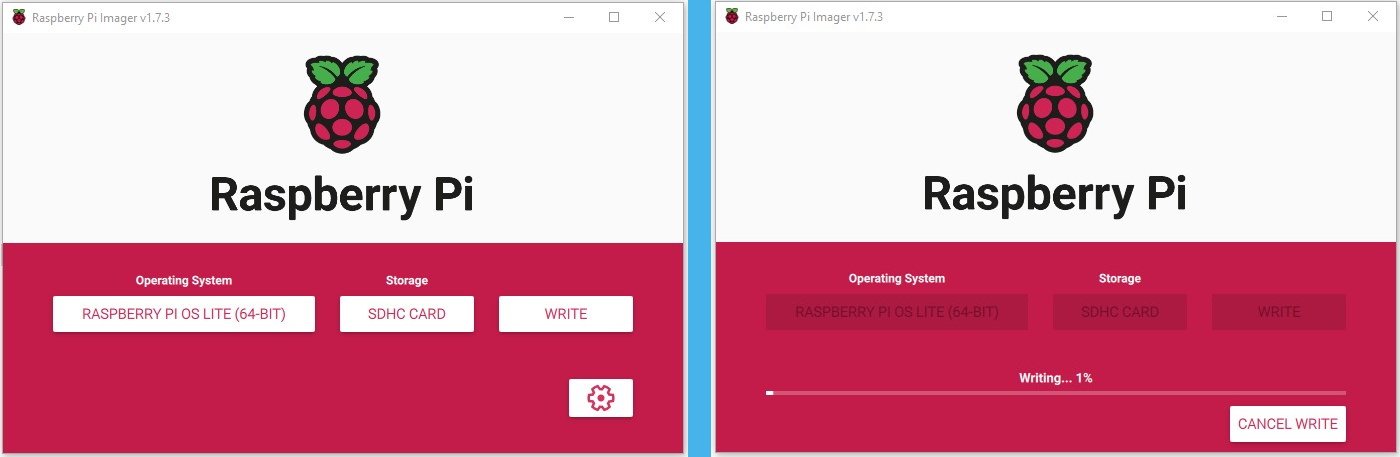
ATTENTION: OpenMediaVault currently only supports Bullseye OS which is listed as "Raspberry Pi OS (Legacy, 64-bit) Lite" in the Raspberry Pi Imager, which is now found under "Raspberry Pi OS (other)". Ensure you flash this OS version as it does not work on the new Bookworm OS.
Step 1: Prepare the MicroSD card
- Use a computer and Raspberry Pi Imager (Download the Imager Here) to flash a new Micro-SD card with Raspberry Pi OS LITE (64-Bit). See this occurring in the image below.

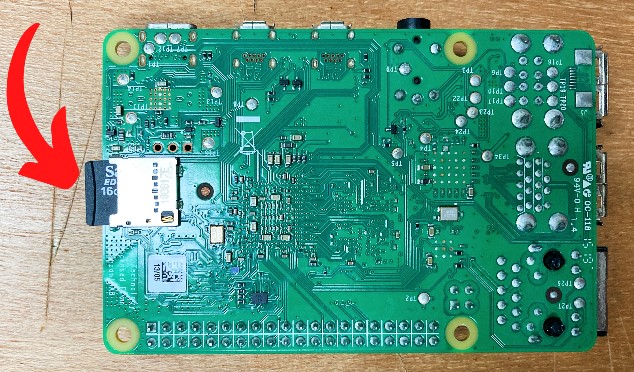
- With that done insert the Micro-SD card into your Raspberry Pi Single Board Computer. See this occurring in the image below.
Step 2: Prepare the USB Stick (Or Hard Drive if you are using that)
- It is crucial that your USB Stick is formatted correctly. If you do not use | NTFS | File System Formatting you will not be able to access the data. Stick your USB into your Desktop Computer, | right-click | with your mouse on its name in the File Explorer, and select | Format |. That will open the window you can see in the image below. Fill it out exactly as I have and then click on | Start |. This process took my small USB stick less than 1 minute to complete.

Step 3: Connect the Hardware
- Connect the Ethernet cable to the Raspberry Pi and your Router/Switch/Modem. This NAS setup can also be done by using WiFi if so desired, thus not requiring an Ethernet Cable, however, you will need to supply the Lite OS with your WiFi Details Headlessly. Know that WiFi will potentially run slower and less reliably.
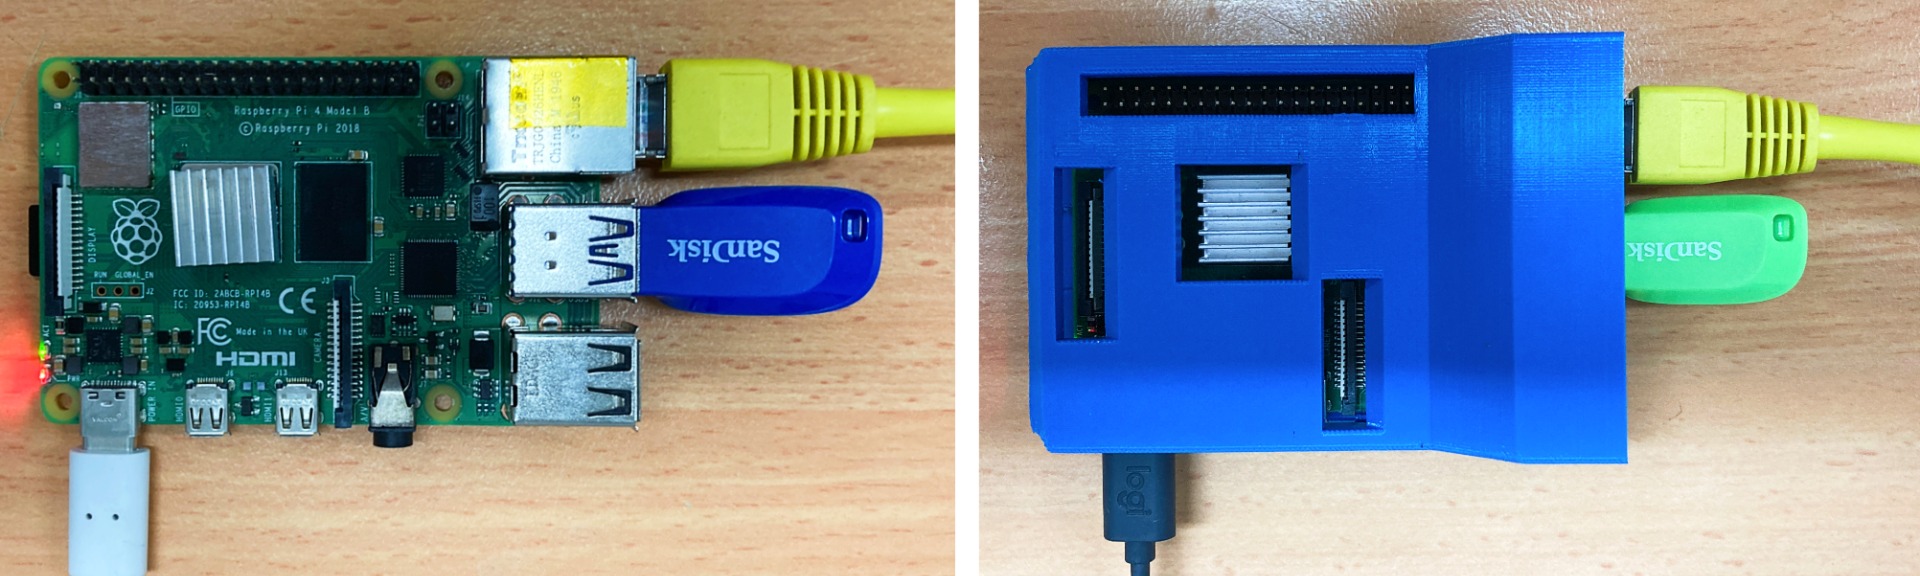
- Connect the USB 3.0 External Hard Drive or SSD or (like me) a USB Stick to one of the USB 3.0 Ports on the Raspberry Pi. The USB 3.0 is easily identified by the Blue Internals of the USB connection. These are also the central USB connector on the Raspberry Pi Board. These USB connections operate at higher speeds (literally 10 times faster) than the other USB ports.
- Connect a Micro-HDMI to HMDI Port to hook the Raspberry Pi to a Monitor.
- Connect a keyboard and mouse to the USB ports on the Raspberry Pi.
- Then power on the Raspberry Pi by plugging in the power supply. See all these connections in the image below.

Nice, you have successfully assembled the hardware components of your Raspberry Pi NAS system! In the next section, we will cover the software assembly, which will involve installing and configuring OpenMediaVault on your Raspberry Pi.
Installing Software
Some packages will need to be installed on your fresh version of Raspberry Pi OS. This will allow the correct operation of our NAS system.
As we are using a | LITE | version of Raspberry Pi OS we won't see our friendly desktop and instead be provided with a mostly blue screen that we can use the | Arrow | Keys on our keyboard to navigate and the | Enter | Key to select options. It will ask you to configure what language keyboard you want to use. Then it will ask for a Username and Password to be created. See me jumping through the options to configure the Raspberry Pi in the image below.
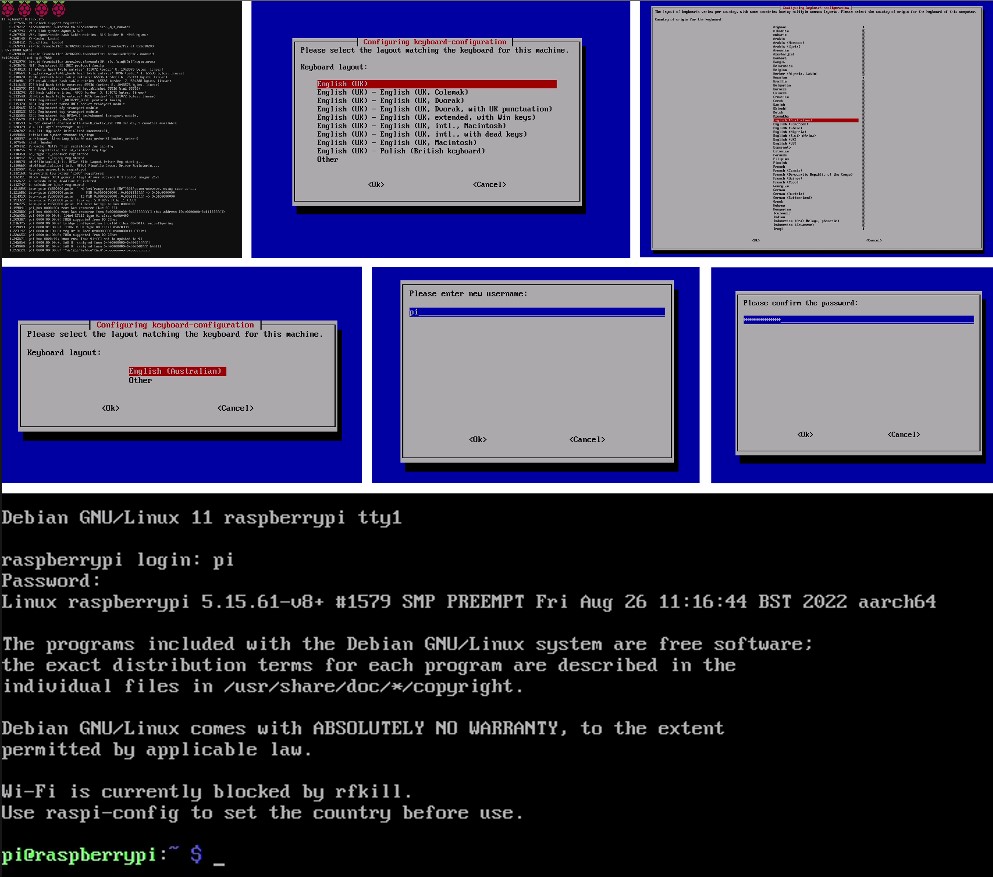
With that complete, we will now see a mostly black screen with some text written on it as you can see in the final image above. It will ask for the Username and Password that you just created and once you have supplied it you will have direct access to the Terminal Command! Know that when you are typing your Password it will be completely invisible. A terminal is a text input and output environment. It is a program that acts as a wrapper and allows us to enter commands that the computer processes. For us today it is a fantastic method to install programs like OpenMediaVault.
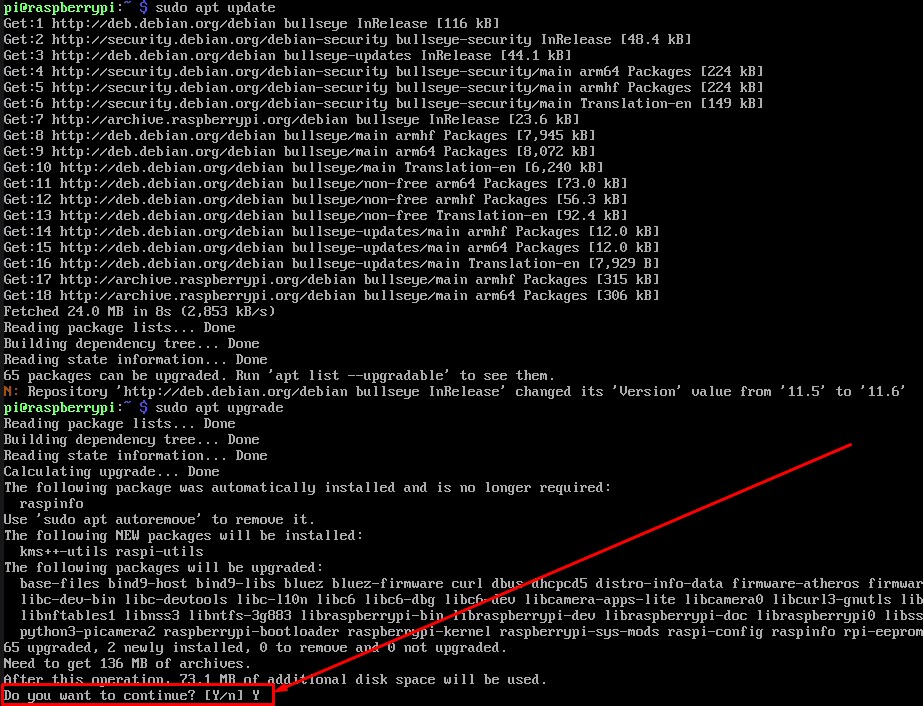
So now type and enter the following three lines, one by one, into the terminal to get all the packages that you will need. If prompted, type and enter | Y | to continue/confirm installations, see this happening in the image below. This process will take less than 20 minutes and the final command will restart our Raspberry Pi system.
sudo apt update
sudo apt upgrade
sudo wget -O - https://coreelec.io/openmediavault | sudo bash
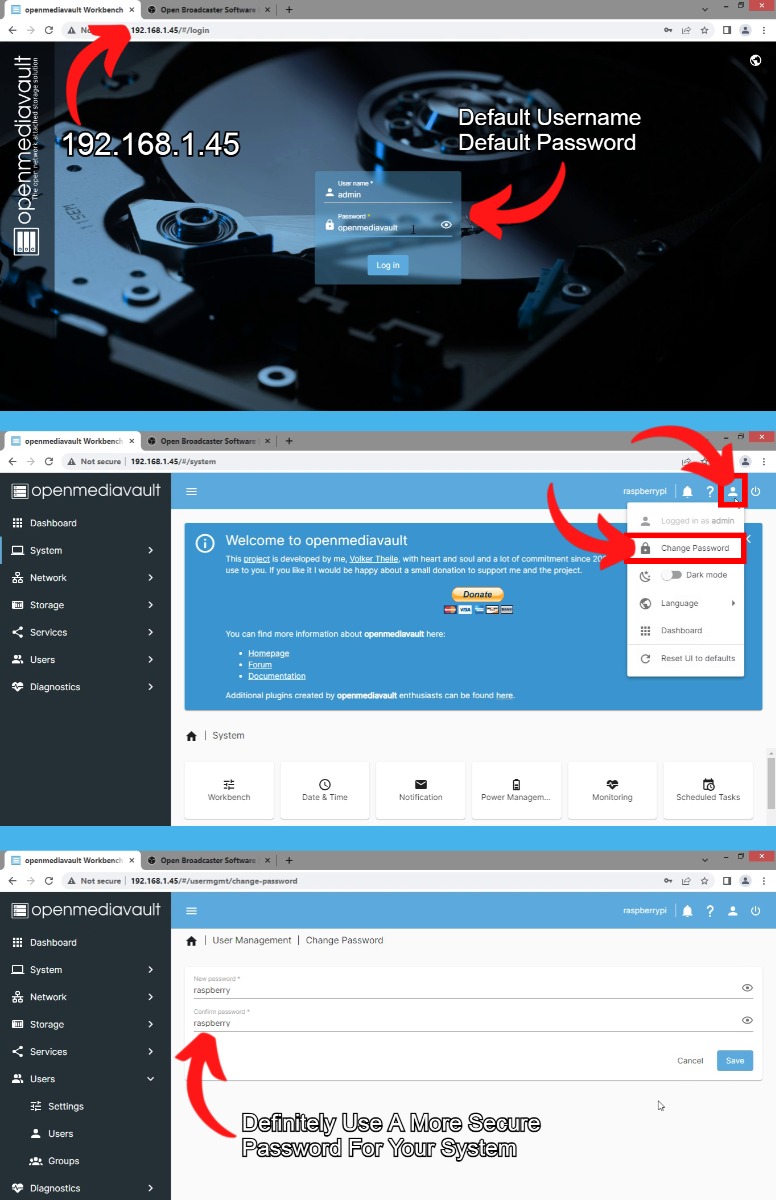
Once the reboot has been completed the end result should look like the image below. Note your IP Address, in my case | 192.168.1.45 |, as we will need that in the next steps. Also, note the Default Username which is | admin |, and Default Password which is | openmediavault |.

Configuring OpenMediaVault
With your Raspberry Pi now restarted the OpenMediaVault software is running, the following is the step-by-step guide on how to access it and configure it correctly. Start by opening up any internet browser (Chrome, Firefox, or Safari are excellent choices) on your desktop computer. Type into the Address Browser the IP Address that OpenMediaVault has provided, in my case | 192.168.1.45 |, and fill out the Default Username which is | admin | and the Default Password which is | openmediavault | into the page that opens up. Before going any further, change that default password to something more secure. See all of this happening in the image below.
A yellow tab will often pop ask requesting you to lock in your changes after you press that Save button. When that happens always click the Tick to do so. See this yellow banner in the image below.

With that completed, we can now operate inside this Webpage UI and make our NAS fully functional.
Step 1: Set Up the System
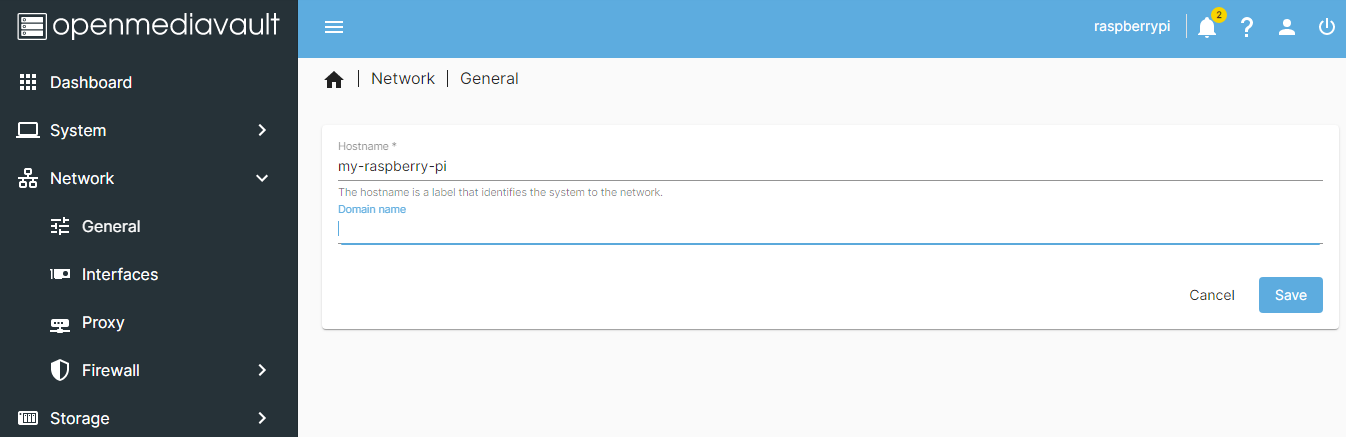
- On the OpenMediaVault interface, click on the | Network | button on the left side of the screen and then click on the | General | button that you will now be able to see in the drop-down menu on the left of the screen.
- Change the | Hostname | to a unique name for your NAS system, such as | my-raspberry-pi |. See this in the image below.
- Then click the | Save | Button which you can find in this UI always at the bottom right of the screen.
Step 2: Create a User
- On the OpenMediaVault interface, click on the | Users | button found on the left side of the screen and then click on | Users | again found in the drop-down menu to start creating a new user. This will open up the | User Management | page.
- Click on | Add | to create a new user. This will look like a | Plus Sign | Button. When you hover over it it'll say | Create | Import |. See this in the image below.
- Enter a Username and Password for this new User Account that we are creating. Save this password and username somewhere as this is what we will type to access our NAS from other locally connected computers/devices. Keep it private too. See this happening in the image below.
- Make sure to scroll down on this page and click on the | Save | button.

Step 3: Create a File System
- On the OpenMediaVault interface, click on the | Storage | button found on the left of the screen and then click on the | File Systems | button found in the drop-down menu to open the tab that you can see in the next image.
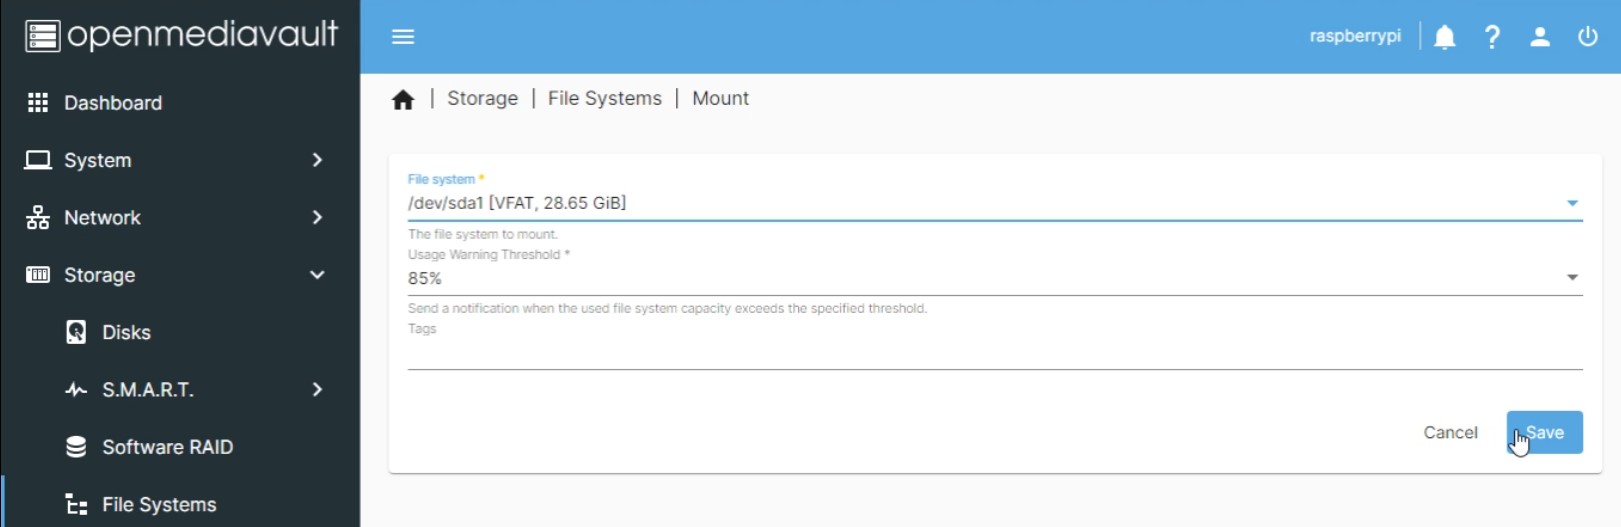
- Click the | ➤ | symbol button to open a new page that will let you load your USB data storage location to the system. You can load multiple data drives by repeating this step. See this new page filled out for the USB Drive in the image below. Make sure to press the | Save | button.
- Add your Data storage that has the File Format of | NTFS |. On my system here it was referred to as | /dev/sdb |. When your screen looks like my image below, with the Status green and stating | Online | you are good to proceed.

Step 4: Create a Shared Folder
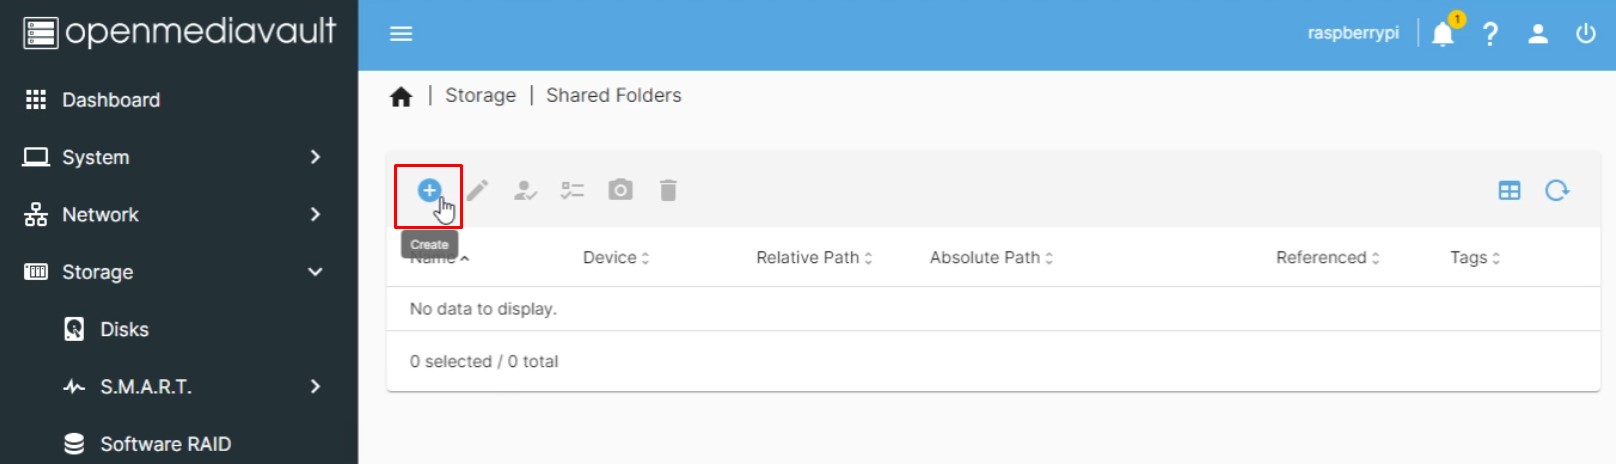
- On the OpenMediaVault interface, click on the | Storage | button found on the left of the screen and click on the | Shared Folders | button found in the drop-down menu.
- When in this tab click on the | Create | button by pressing the | + | symbol button. See this in the image below.
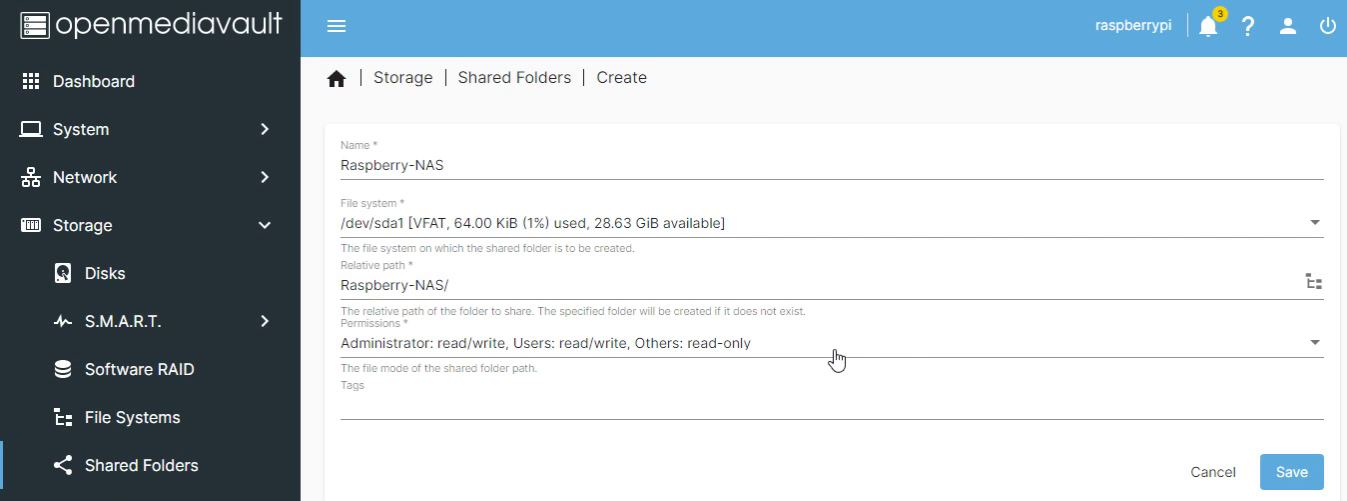
- Enter a name for the new shared folder, a great name would be | Raspberry-NAS |.
- Select the external hard drive, SSD, or USB Stick as the | File system |.
- Keep the | Permissions | unchanged. It should state | Administrator: read/write, Users: read/write, Others: read-only |. Having done this press | Save |. See this in the image below.
- Having saved it will bounce you back to the top menu for | Storage | and | Shared Folders |. Click on your newly created shared folder so that it highlights entirely yellow. From here click on the | Little Human Symbol with a Tick | button. When you hover over it this will state | Privileges |. See this in the image below.
- Doing so will open up a deeper menu. Set the | Permissions | for the User you created in the previous step to be | Read/Write |. See that step happening in the image below.


Step 5: Enable Network Services
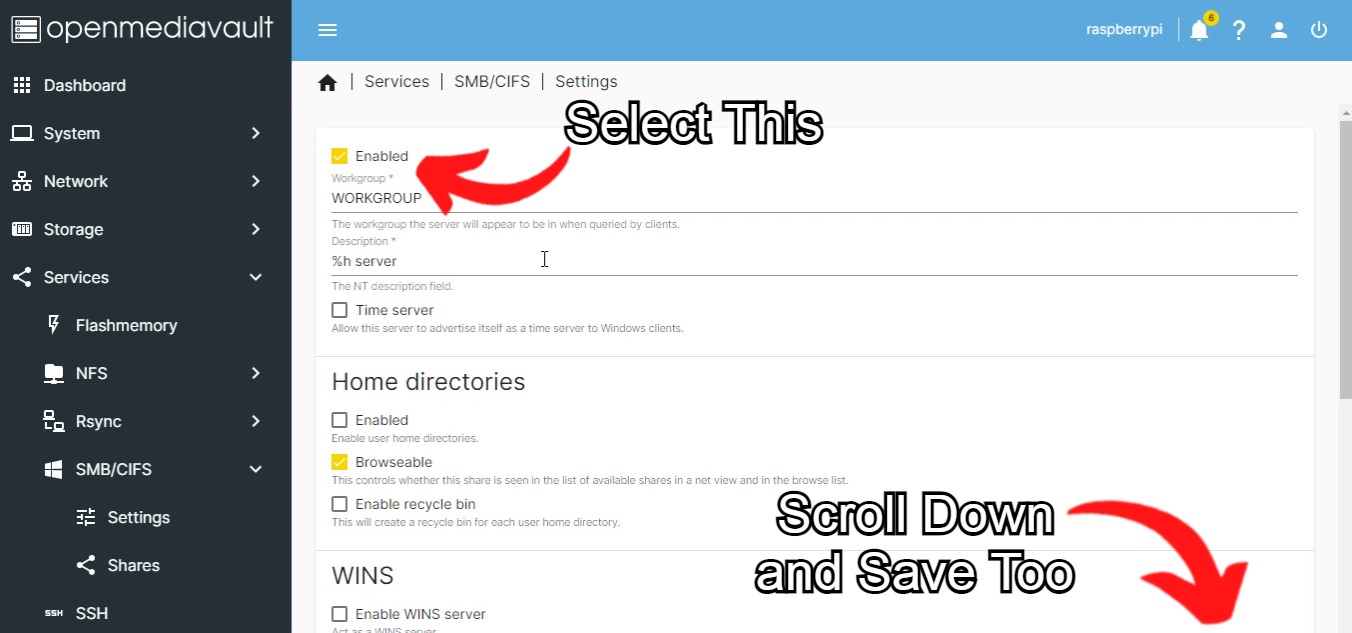
- On the OpenMediaVault interface, click on the | Services | button found on the left of the screen. Then click on the | SMB/CIFS | button that is in the drop down menu. It is here where we will allow file sharing. Just so you know, SMB stands for Server Message Block (SMB) Protocol. It is a file-sharing protocol that was invented by IBM and has been around since the mid-eighties (some forty years old). CIFS stands for Common Internet File System. CIFS was created by Microsoft and is a form of SMB.
- Though the shared folders have been created, they are currently inaccessible since no folder-sharing services are active. To enable sharing for your created folder navigate to | Shares| under the | SMB/CIFS | dropdown.
- Click the | Create | button by pressing the | + | symbol button.
- Open the text box labeled | Shared folder* | and select the name of the folder you created in Step 4.
- Change the | Public | option to No to allow only authenticated user access.
- Scroll down and save this change with the | Save | button.
- Click on | Settings | under the | SMB/CIFS | dropdown and then click on the first tick box to enable it. This allows FTP (File Transfer Protocol) service to work. That tick box is the switch that allows file transfers to happen over the local network.
- Then click on | Save |.
Step 6: Configure RAID (Optional)
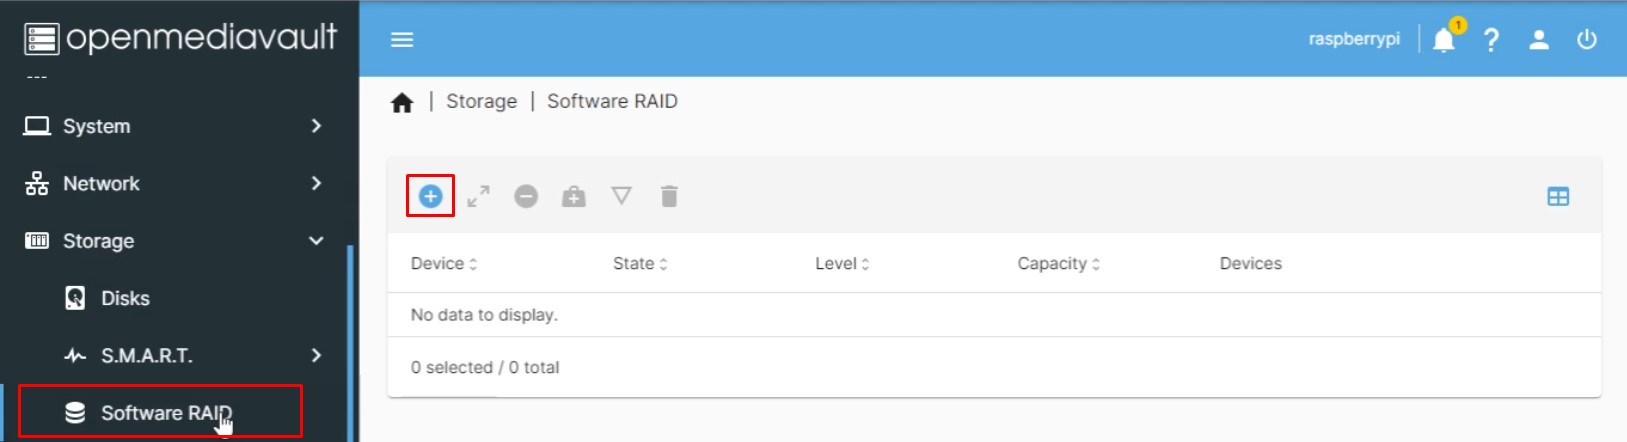
- This is only valuable if you have more than one hard drive or a big SSD/hard drive connected. RAID stands for a redundant array of independent disks and is a data protection method that spreads your data on multiple hard disks in case one fails. On the OpenMediaVault interface, click on the | Storage | button and then click on the | Software RAID | button in the drop-down menu. See this having happened in the image below.
- Create a new RAID array by pressing the | + | button. From here select the data devices you want to use.
- Choose a RAID level and configure the array appropriately. There is a lot to RAID levels, learn a whole bunch here and here. The choice depends really on how many Hard-drives are in your system and what level of security/performance you desire. Once completed press the | Save | button.
Congratulations, you have successfully configured OpenMediaVault on your Raspberry Pi! Your NAS system is now ready to store and share files over the network. In the next section, we will demonstrate how to use your new NAS system by accessing it from a computer or mobile device. Know that your NAS will be fully operational as soon as you power it. See the completed system in the image below both out and in a 3D-Printed Case that I used an Ultimaker 2+ 3D Printer and Blue Ultimaker CPE Filament to create. For the 3D print STL files for this case check here.

Demonstration
The simplest use of your new Raspberry Pi NAS system is dropping a file onto the NAS and pulling it out from another computer. Below is a step-by-step guide on doing exactly that!
Step 1: Connect to the NAS
- On the computer that you want to access the NAS from, open File Explorer if you are using a Windows Computer, Finder if you are using a Mac Computer, or File Manager if you are using a Linux Computer.
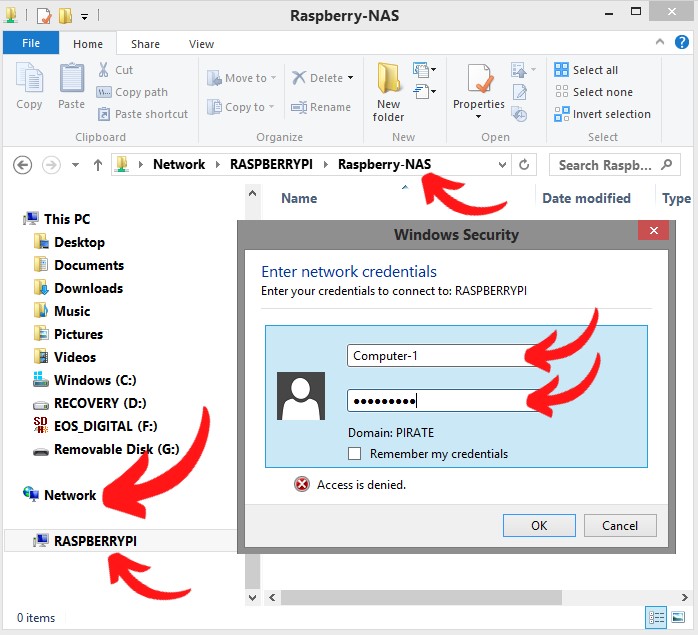
- Option 1. In the address bar, enter the IP Address of the Raspberry Pi. An example of this IP Address would be | \\192.168.1.100 | or the hostname you set up in the OpenMediaVault interface. That hostname could also very potentially be named | \\RASPBERRYPI | if you have followed along exactly with this guide.
- Option 2 (EASIER). Click on the | Network | button in the file explorer and click deeper into the folder to find it.
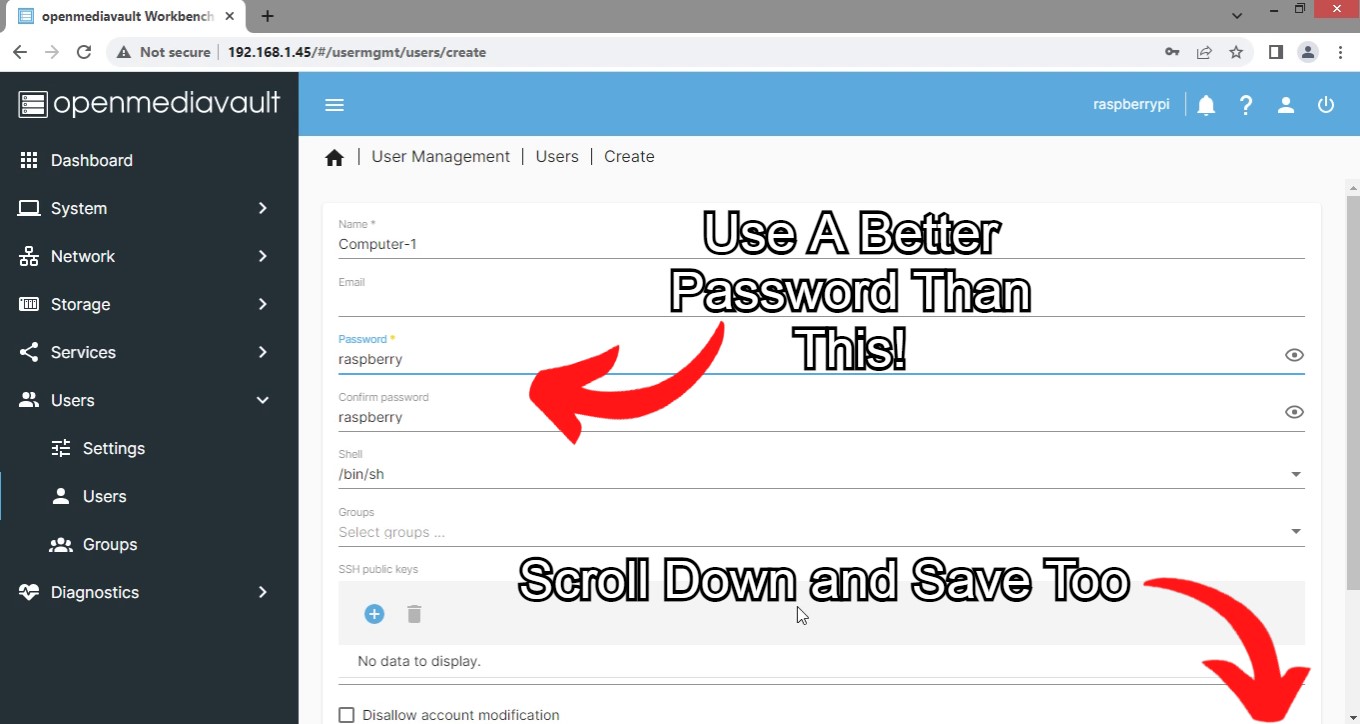
- Enter the Username and Password you created in the OpenMediaVault interface for the User. In my case, the Username was | Computer-1 |, and the Password was | raspberry |. See this in the image below.
Step 2: Copy a File onto the NAS
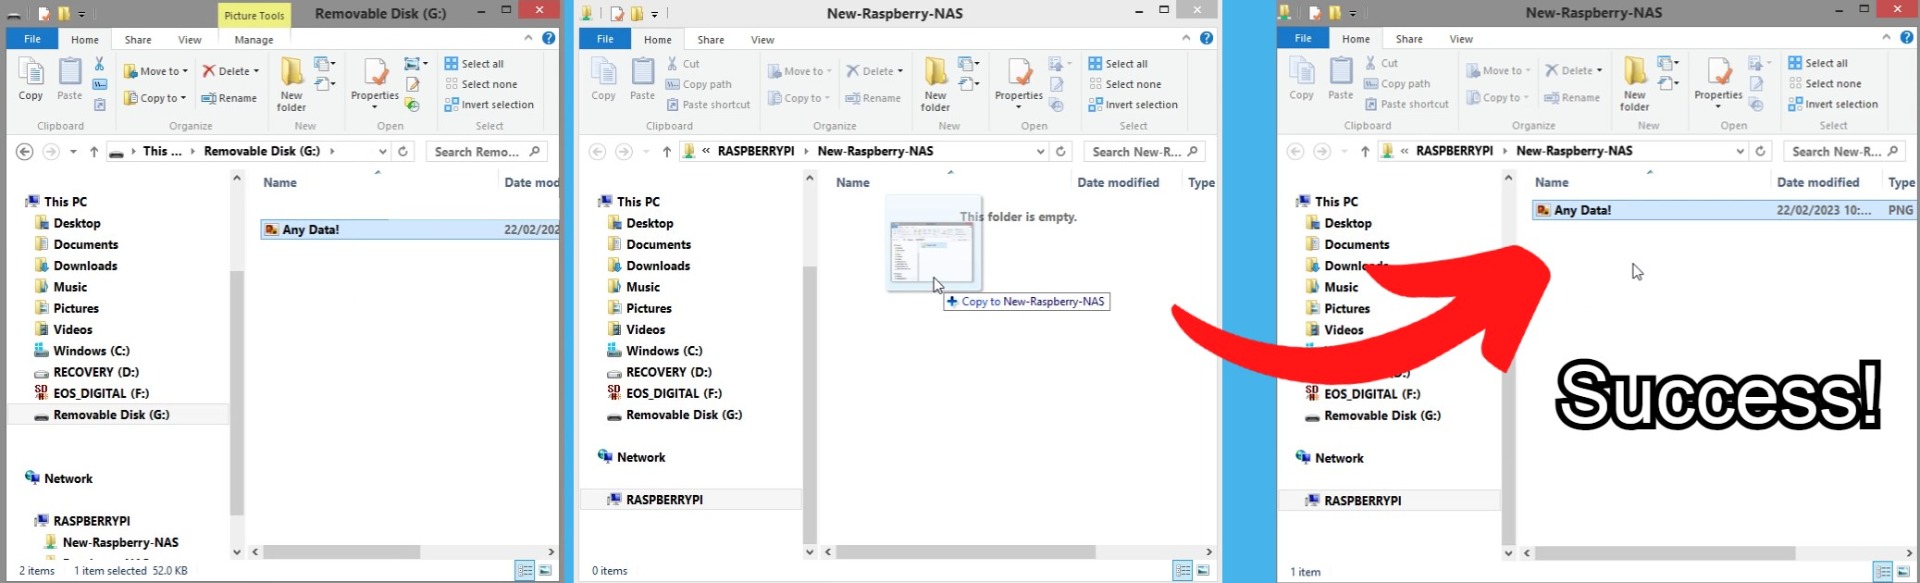
- In the File Explorer or Finder window, navigate to the shared folder you created in the OpenMediaVault interface.
- Copy a file from your computer and paste it into the shared folder on the NAS. See this happening successfully in the image below!
- We can even drag across and play videos directly from it too! Just check below for some surf footage running on my Computer streamed directly from the Raspberry NAS.

Step 3: Access the File from Another Computer!
- On another computer connected to the same network, repeat Step 1 to connect to the NAS.
- Navigate to the shared folder where you copied the file in Step 2.
- Copy the file to your local computer. Happy Days!
Step 4: Access from a Mobile Phone!
- Install and open a File Explorer Application like File Commander.
- Click on Local Network and Click the | + | symbol button to | Create a Server |. Fill out the form that pops up appropriately. The Domain I arbitrarily named | Raspberry NAS | and the Server I typed in the IP Address of the OpenMediaVault NAS which was for me | 192.168.1.45 |. The Username is the same as before | Computer-1 | and the Password is the same as before | raspberry |. You can see this in the image below.
- With that complete click on | OK |. Just like that, you have now got your phone connected to a Singular Point (the NAS-berry) along with all your computers. Rinse and repeat this process for your tablets/iPads/iPhones/Kindles or other devices. This is much better than trying to plug a USB stick into your phone.

If you have been following along then Big Success! You now have a new, fully functional, Raspberry Pi NAS system. This simple demonstration showcases the power and convenience of having a dedicated network storage device that is accessible from any device on the network. Next section, we will explore some additional features and upgrades that you can consider for your Raspberry Pi NAS system.
Where To Now (Adding Extra Hard Drives, Personal Dropbox, and Automatic Backups)
More storage means more data available for your NAS! That's a great thing. Jump back to the | Configuring OpenMediaVault | chapter and repeat | Step 3 | for each extra Hard-drive/SSD/USB-Stick you have added to your system. Be sure to plug them in securely. Consider doing | Step 6 | to configure RAID settings for extra data security incase on of the Hard-drives let out the smoke (break).
Next, if you want to be able to drop files remotely (outside of your local network) follow the below step-by-step guide. This will demonstrate how to use port forwarding and set a static IP address. When complete it will turn your Raspberry Pi NAS system into a | Personal Dropbox | with absolutely zero cloud storage.
Step 1: Assign a static IP address
- Open the OpenMediaVault interface and go to the | Network | button found on the left of the screen.
- Click on | Interfaces | in the drop-down menu and select your Network Interface. If you used the first Ethernet Port on your router it will likely be | eth0 |.
- Click on | Edit | and set the IP address to a Static Value. An example of what an IP Address could be | 192.168.1.100 |.
- Save the changes and restart the Router and Raspberry Pi NAS system.
Step 2: Configure port forwarding
- Access your router's web interface and go to the | Port Forwarding | section.
- Create a new | Port Forwarding Rule | that forwards incoming traffic on port 80 to the IP address of your Raspberry Pi. For example | 192.168.1.100 |.
- Optionally, you can also set up port forwarding for other services, such as FTP (file transfer protocol) or SSH (Secure Shell).
Step 3: Access your NAS remotely
- Open a web browser on a remote computer and enter your public IP address followed by | :80 |. For clarity, the following is an example | http://123.45.67.89:80 |.
- If you have set up port forwarding correctly, the OpenMediaVault login page should appear. The default password should definitely not be used!
- Enter your username and unique password to access your NAS remotely.
If you followed through with the above then well done! You have successfully turned your Raspberry Pi NAS system into a | Personal Dropbox NAS | with zero cloud risk by using port forwarding and a static IP address! Now you can access your files from anywhere with an internet connection, without relying on third-party cloud services. However, please be aware that exposing your NAS to the internet can also introduce security risks, so make sure to secure your NAS with strong passwords. Another great feature that can be added is Two-Factor Authentication (2FA). You can use 2-factor authentication with OpenMediaVault by installing the | OpenVPN AS Plugin | on your system. This will work with Google Authenticator. Find this by clicking on the | System | button, then clicking on the | Plugins | button, clicking on the | Download | button, and searching for | OpenVPN |.
Next, I will hit you with a step-by-step guide on how to set up automatic backups of your data using OpenMediaVault:
Step 1: Install the | Backup | plugin
- Open the OpenMediaVault interface and then to the | Plugins | section. Click on the | System | button on the left of the screen, and then click on the | Plugins | button.
- Click on the | Download | button and search for | Backup |.
- Install the | openmediavault-backup | plugin and wait for it to finish.
Step 2: Create a backup job
- Go to the | Backup | page that is available to you now that you have installed this plugin and click on the | Jobs | to open a new page.
- Click on the | Add | button to create a new backup job.
- Choose a name for your backup job and select the source directory that you want to back up.
- Choose a backup location (for example another hard drive, a network share, or an external storage device) and set up the backup options. You can choose to compress or encrypt the backup files at this point.
- Choose a schedule for your backup job. You can make it back up each day, weekly or monthly. When here also set up one of the notification options. You can have it send an email straight to you or simply create a log file of the backup activity.
- Save the backup job settings by clicking on the | Save | Button. See this in the image below

Step 3: Monitor the Scheduled Backup Job
- Go to the | Backup | tab and click on the | Status | to open a new page.
- Check the status of your backup job to make sure it is running and completing successfully.
- In the future, you can also check the log files and notifications for any errors or issues.
And Big Success! You have now successfully set up automatic backups of your data using OpenMediaVault and confirmed that it works! This feature provides an additional layer of protection for your important files and ensures that you always have a backup copy in case of data loss or corruption. You can also set up multiple backup jobs for different folders or locations, and configure different schedules and options to suit your needs. Go wild with it!

