Search results for: 'HotPot Membrane Potentiometer - 100mm'
 PiicoDev Potentiometer (Rotary)
Add intuitive, analogue control to your project.
- PiicoDev Potentiometer (Slide)
Add intuitive analogue control to your project.
- SoftPot Membrane Potentiometer - 500mmSKU: SEN-08681 Brand: SparkfunThese are very thin variable potentiometers. By pressing down on various parts of the strip, the resistance linearly changes from 100Ohms to 10,000Ohms allowing the user to very accurately calculate the relative position on the strip. Can be used as an accurate positional indicator for CNC head positioning, variable user input (volume level input for example), straight user input (multiple button areas translate to given resistance levels), and many other applications.
- SoftPot Membrane Potentiometer - 50mmSKU: SEN-08680 Brand: SparkfunThese are very thin variable potentiometers. By pressing down on various parts of the strip, the resistance linearly changes from 100Ohms to 10,000Ohms allowing the user to very accurately calculate the relative position on the strip. Can be used as an accurate positional indicator for CNC head positioning, variable user input (volume level input for example), straight user input (multiple button areas translate to given resistance levels), and many other applications.
- SoftPot Membrane Potentiometer - 200mmSKU: SEN-08679 Brand: SparkfunThese are very thin variable potentiometers. By pressing down on various parts of the strip, the resistance linearly changes from 100Ohms to 10,000Ohms allowing the user to very accurately calculate the relative position on the strip. Can be used as an accurate positional indicator for CNC head positioning, variable user input (volume level input for example), straight user input (multiple button areas translate to given resistance levels), and many other applications.
- 10k Slide Potentiometer - (Long Shaft)SKU: CE09106 Brand: Core Electronics
A 10k Potentiometer perfect for adding and visualising an input to your projects
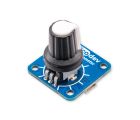
- Rotary PotentiometerSKU: CE08559 Brand: Core Electronics
Add a rotating input to your projects or PCB designs!
- 10k Slide PotentiometerSKU: CE08556 Brand: Core Electronics
A 10k Potentiometer perfect for adding and visualising an input to your projects
- Qwiic Cable - 100mmSKU: PRT-14427 Brand: SparkfunThis is a 100mm long 4-conductor cable with 1mm JST termination. It’s designed to connect Qwiic enabled components together but can be used for other applications...
- Membrane 3x4 Matrix Keypad + extras - 3x4SKU: ADA419 Brand: AdafruitPunch in your secret key into this numeric matrix keypad. This keypad has 12 buttons, arranged in a telephone-line 3x4 grid. It's made of a thin, flexible membrane...
- Slide Potentiometer KnobSKU: CE08722 Brand: Core Electronics
An ergonomic knob for slide potentiometers
$0.34 AUD, inc GSTAs low as $0.32 AUD, inc GSTOut of Stock
Sign up to get notified when it's available to order.
- Potentiometer Knob - BlueSKU: CE09101 Brand: Core Electronics
Customise your potentiometer with this sleek blue 18T knobs...
$0.95 AUD, inc GSTDelivered by Apr 30th - Digital Potentiometer - 10KSKU: COM-10613 Brand: SparkfunPotentiometers are incredibly useful, whether you’re controlling the volume on your stereo or the ‘mood lighting’ in your room. The problem with traditional potentiometers is the fact that your microcontroller doesn’t have an easy way to interface with them. Digital Potentiometers solve that problem by allowing you to control a voltage splitter with digital signals.
- Flexible Qwiic Cable - 100mmSKU: PRT-17259 Brand: SparkfunThis is a 100mm long 4-conductor cable with 1mm JST termination. It’s designed to connect Qwiic enabled components together but can be used for other applications...
- 4x3 Membrane Matrix KeypadSKU: CE09242 Brand: Core Electronics
Access granted - Add a low-profile keypad to your projects.
$2.50 AUD, inc GSTDelivered by Apr 30th - Rotary Potentiometer Knob WhiteSKU: CE08699 Brand: Core Electronics
Customise your potentiometer with this sleek white T18 knob...
- Linear SoftPot (Ribbon Sensor) - 100mmManufactured by Spectra Symbol, these are nice little ribbon controllers (also known as 'soft potentiometers') with an adhesive backing. There is a nominal 10K resistance...
- Rotary Potentiometer Knob - OrangeSKU: CE09102 Brand: Core Electronics
Customise your potentiometer with this sleek orange 18T knobs...
Special Price $0.81 AUD, inc GSTRegular Price $0.95 AUD, inc GSTDelivered by Apr 30th - Rotary Potentiometer Knob - RedSKU: CE09103 Brand: Core Electronics
Customise your potentiometer with this sleek red 18T knobs...
Special Price $0.81 AUD, inc GSTRegular Price $0.95 AUD, inc GSTDelivered by Apr 30th - Rotary Potentiometer Knob - YellowSKU: CE09104 Brand: Core Electronics
Customise your potentiometer with this sleek yellow 18T knobs...
- Rotary Potentiometer Knob - GreenSKU: CE09105 Brand: Core Electronics
Customise your potentiometer with this sleek Green 18T knobs...
Special Price $0.81 AUD, inc GSTRegular Price $0.95 AUD, inc GSTDelivered by Apr 30th - Membrane 1x4 Keypad + ExtrasSKU: ADA1332 Brand: AdafruitPunch in your secret key into this numeric membrane keypad. This keypad has 4 buttons, and since every key has its own wire line, no matrix code is required - just...
- Membrane LED Keypad + extrasSKU: ADA1333 Brand: AdafruitThis membrane keypad has a single key, but it does have an embedded surface-mount red LED installed. The flex cable is also extra-long, so they can think of a lot...
- Breadboard trim potentiometer - 10KSKU: ADA356 Brand: AdafruitThese are Adafruit's favorite trimpots, perfect for breadboarding and prototyping. They have a long grippy adjustment knob and with 0.1" spacing they plug into breadboards...
- Breadboard Compatible Potentiometer (10k Ohm)SKU: CE09096 Brand: Core Electronics
An ergonomic breadboard compatible Potentiometer


PiicoDev Ultrasonic Rangefinder | Getting Started Guide
Similar to how bats echo-locate and how submarines use sonar, the PiicoDev® Ultrasonic Rangefinder uses sound waves to measure the distance to an object. It sends out a high-pitched sound wave, which bounces off of the object and comes...

PiicoDev Potentiometer - Getting Started Guide
This guide will help you get started with a PiicoDev® Potentiometer - an intuitive input device that allows you to easily interact with your project. PiicoDev Potentiometers are available in two flavours: Rotary and Slider. We'll ...

PiicoDev Transceiver | Getting Started Guide
A radio transceiver is a device that can both transmit and receive radio signals, making it the perfect tool for communication on the go and remote projects! The PiicoDev Transceiver™ is a 915MHz radio that can send short messages up...

Introduction to Bluetooth
Nowadays, everything is going wireless. Phones, computers, game controllers, consoles, everything! Wireless technology has allowed us to use electronic devices with an untethered freedom which just isn’t possible with clunky cables ...

Unconstrained 3D Printing with LulzBot's Dual Extruder v3
Dual Extruding with FDM 3D Printers is typically reserved for the most expert-level makers. By adding the ability to print with 2 materials, you open yourself up to a spread of conditions that simply didn't exist with a single extruder setu...

PLA 3D Printing Tips
PLA is Poly-Lactic Acid filament, and it's usually the go-to choice for people looking to print larger models or for longer periods of time. The important properties of the material dictate the reasons for using it; it doesn't warp at all a...

How to Choose a Bluetooth Module For Your Project
Alright, so we know that Bluetooth is awesome, and if you don’t, take a read of our Introduction to Bluetooth tutorial. But how exactly do we go about implementing Bluetooth communication in our projects? Well, fortunately for us, th...

Our recommendation on Breadboard Power Supplies
So, you’re looking for the right way to power your breadboard? You’ve found that your Arduino Uno just doesn’t quite have the juice to power up your circuit. It's likely that the microcontroller can output around 400mA whe...

Layer Heights when Resin 3D Printing | Accurate 28mm Scale Models or Maximum Printer Output
Speed or Perfection? That choice is what an understanding of Layer Heights whenever Resin 3D printing is going to provide you. Any Traditional Resin 3D Printer worth its salt will let you print with Layer Heights between 10 Micron to 100 Mi...

All Pycom Boards and Expansion Boards Compared
Pycom is a constantly groundbreaking company which produces a lot of really cool development boards and expansion shields. They have a large focus on multiple network connectivity, particularly in regards to low power, long-distance informa...

PiicoDev 3-Axis Accelerometer LIS3DH - Getting Started Guide
This guide will help you get started with a PiicoDev 3-Axis Accelerometer. We'll walk through some examples to read acceleration, infer tilt angle (from gravity), and detect tapping and shaking. An accelerometer is a device that mea...

Makerverse Nano Power Timer
Introduction The Makerverse Nano Power Timer is an ultra-low current consumption power controller designed to periodically turn on a battery powered microcontroller. It is perfect for maximising the battery life of data-logging sensor...
 RV-3028 - Getting Started Guide")
PiicoDev Real Time Clock (RTC) RV-3028 - Getting Started Guide
This guide will help you get started with a PiicoDev Real Time Clock. We'll set and read the time/date, observe the power-backup capability, and configure the RTC with an alarm. A Real-Time Clock (RTC) is a timekeeping device that accurat...

Overview of Resin 3D Printing and Calibrating the Print Platform with the Creality LD-002H
Resin 3D printers are an immensely powerful tool in the hands of a maker and they have never been more accessible. This will be a rundown on this technology, contrasting it to filament 3D printing and an explanation of tools whilst tea...

Cameras Compared for Raspberry Pi
There are so many types of cameras modules and lenses that are plug-and-play for Raspberry Pi Single Board Computers and that number is steadily increasing. From day to night, you can keep track, photograph, and record your surrou...

Getting Started with Saleae: Tips and Tricks
Well hello there, if you’ve been looking at the amazing line-up of Saleae gear and wondered how to get started with it all, then you’ve come to the right place. Today we’re going to take a look at getting your Saleae setup...

Tweezers for Every Task
In case you haven’t noticed, when dealing with electronics, you’ll be picking lots of small things up, and it only gets harder when dealing with tiny SMD components. But whatever you’re working on, be it a breadboard proto...

Potentiometers and the Arduino Uno
Variable resistors come in all shapes and sizes, and they all do the same basic job. They allow you precisely control voltage/current flow within a circuit. The most common type of variable resistor we see in DIY electronics is the Potentio...

Identify Electrical Connectors
There are a ton of electrical wire connectors, too many to elaborate on in a single guide, however there are a couple of connectors that as a maker you will come across. Often when starting your way into the electronics world all you need ...

3D Printing Better Print-in-Place Mechanisms
Print-in-Place mechanism is one of the special things about additive manufacturing that all other manufacturing methods just cannot replicate. They use various hinges, linkages and joints to create moving parts that are printed as a single ...

Track Airplanes up to 400km Away with a Raspberry PiAware - FlightAware
It is time for an Airplane Tracking Raspberry Pi! The final setup here will let you personally collect data on the exact whereabouts of airplanes over 400km away. It will update one to four times each minute. Be passenger planes, cargo air...

3D Printing for the Circuit Playground
You’ve made yourself a great project for your Circuit Playground Express, now all you need is a box to put it in. How do you keep your Circuit Playground safe in a housing while still being able to press the buttons and use the sensor...

LCD Screens and the Arduino Uno
Display devices are used to visually display the information we are working with. LCD (Liquid Crystal Display) screens are one of many display devices that makers use. We have libraries to control specific LCD functions which make it ridicu...
")
Arduino Projects with Light (Using Sparkfun RedBoard)
Now that your RedBoard is set up on its baseplate and the Arduino IDE is installed on your computer, we can begin our first Arduino-based Project Set! The First Project Set explores light and the type of electrical component we will be usin...

Infinity Mirror Kit V1 - Assembly and tutorials
The Infinity Mirror Kit is a desk-top display that creates a dazzling optical illusion - a tunnel of light that tears through space! Note: This tutorial is for the Infinity Kit V1. We updated have updated to the Infinity Kit V2 as of ...

Power Supplies for your Project
Ever had the issue where you have dozens of old phone chargers and appliance plug packs piled up in a rats nest of AC-to-DC mayhem? We tend to breeze right past these square, black power supplies, not knowing what's happening under the hood...

Getting Started with Servos | Examples with Raspberry Pi Pico
In this guide, we'll learn what a Servo is, when we might use one, how to choose a Servo, and finally how to use one with a Raspberry Pi Pico. To follow along you'll need: A Positional Servo, such as the Feetech FS90 Micro Servo A Con...
")
Arduino Projects with Sound (Using Sparkfun RedBoard)
Project Set 2 – Sound Welcome to the second Project Set from the Sparkfun Inventors Kit V4.0 Guide! In our last Project Set, we explored the basics of the Arduino IDE, some electrical and electronic concepts and looked at vario...

How to Drive High Power LEDs – 3W Aluminum Backed Star LEDs
High power LEDs (Light Emitting Diodes) have different requirements that need to be met when compared to regular LEDs. Current regulation using only resistors is impractical so it is necessary to use a switched-mode voltage and current reg...

Makey Makey in the Classroom
Hey guys, if you’re looking to get the creativity and fun of Makey Makey into classrooms or workshops, then you’re in the right place! Makey Makey is an incredible tool for educators to get kids thinking about how they can use t...

Setting up and Using the Adafruit 16-Channel Servo HAT for Raspberry Pi
This guide will teach you how to control up to 992 5V Servos through the GPIO pins on your Raspberry Pi! But more practically, without stacking multiple HATS (Hardware Attached on Top), this guide will teach exactly how to control sixt...

PiicoDev Connection Guide
In this article we'll show you how to connect your PiicoDev® modules to your favourite development platforms. Connection Guides Other Connection Methods Pinouts Connecting Many Modules PiicoDev Smart Modules Custom I2C Addres...

Our Recommendation for your first Benchtop Oscilloscope
You’ve been working on that project for days, even weeks, and you’ve gone through all the steps of the process; meticulously ensuring everything is above board. And yet, for some unexplainable reason, your circuit is acting out....

Our tips for Coin Cell Batteries
Firstly, what are Coin Cell Batteries? A coin cell battery is a flat, cylindrical battery used in a bunch of small electronics applications. You might have seen them in a wristwatch, remote control or any piece of wearable tech. Typically ...

Makerverse Micro SD Adapter - MicroPython Guide and Data Logging
Introduction This guide covers how to connect the Makerverse Micro SD Card Adapter to a Raspberry Pi Pico and program a basic data logging script in MicroPython. To follow along, it's best to have: A Makerverse Micr...
Raspberry Pi Pico Workshop for Beginners
Welcome to the Raspberry Pi Pico Workshop, where you will learn everything you need to know to hit the ground running and start making your own projects with the Raspberry Pi Pico and MicroPython. This workshop is designed for complete beg...

Ultimaker 2+ 3D Printer and Ultimaker 2 Extended+ 3D Printer - Overview, Setup and First Print
This will be an overview, initial setup and first print guide for the Ultimaker 2 and Ultimaker 2 Extended . Quick links for the contents of this guide is seen below. Printer Overview Printer Characteristics ...

Disable Features to Save Energy Using Raspberry Pi
Raspberry Pi Boards are a great gateway for learning about how to get to grips with computers, at a price that makes it hugely accessible and a size that fits right in your hand. Raspberry Pi boards are chock a block full of features a...

Cooling Your Raspberry Pi
Part of the joy that is Raspberry Pi is getting stuck into it at a slightly lower level and finding out exactly what you can do with it if you take a look under the hood. One of the most popular experiments to do with your Raspberry Pi is o...

Character Displays with Particle
Crunching numbers is fine, but sometimes you really need to visualise what’s going on in the tiny brain of your Photon. There are numerous different ways to visualise data or text on a microcontroller from binary LEDs, to HDMI display...

Arduino Workshop for Beginners
Welcome to the Arduino Workshop, where you'll be able to follow our guided course which covers everything you'll need to know in order to create your own Arduino projects and become a leveled up maker. My name is Sam and along with being ...

DIY Solder Stencils with a Laser-Cutter
When it comes to assembling a prototype Printed Circuit Board (PCB), there are a couple of options for applying solder-paste: Paste each individual pad by hand with a syringe, or; Use a stencil to paste all pads in one pass. The firs...

Printing Perfect First Layers - Ultimaker Cura
If your utilizing a correctly set up Ultimaker S5 3D Printer you should have no issues with first layer printing. So long as there are print profiles available on Cura, which most likely it will, with a correctly set up 3D printer you will ...

USB MIDI With Teensy
If you’re a musician or have had anything to do with the entertainment industry, you may have heard of the term MIDI before. MIDI stands for Musical Instrument Digital Interface and was created in the mid-80’s as a way to standa...

Makerverse Motor Driver, 2 Channel - Application Guide
Introduction The Makerverse Motor Driver has been updated to a v20 design which now features a 5V output pin instead of the VM pin. Some images and in-video descriptions in this guide may be outdated This guide covers the use of the Maker...

Infinity Mirror Kit V2 - Assembly and Tutorials
The Infinity Mirror Kit V2 is a desktop display that creates a dazzling optical illusion - a tunnel of light that tears through space! The Infinity Mirror Kit V2 entered production in October 2018, and now ships with an Adaf...

GlowBit Stick 1x8 - Python and MicroPython Guide
Introduction This guide will cover the basic functionality of the GlowBit Python library when driving a GlowBit Stick 1x8 module. To follow along, it's best to have: A GlowBit Stick 1x8 A Raspberry Pi Pico or...

Makerverse Real Time Clock with Supercapacitor Backup - Raspberry Pi Guide
Introduction This guide covers the configuration steps required to use the Makerverse Supercap Real Time Clock module as a backup RTC on a Raspberry Pi. This is required for remote applications when Internet access is impractical and accur...

What is a JST Connector?
JST is a standard of electrical connection used widely across a spectrum of electrical applications. It's defined as a Japanese Solderless Terminal and is manufactured by a company of the same name. The JST range includes a variety of fami...

MicroPython for Micro:bit Workshop
Welcome to the MicroPython for micro:bit workshop! This workshop is aimed at makers who want to start programming with MicroPython, we will be using the micro:bit as it is very easy to use so we can cover the important concepts that will ap...
 - My Trick to 3D Print It Beautifully and More")
CPE (PETG) - My Trick to 3D Print It Beautifully and More
Co-Polyester is an astounding material in terms of properties, all the best properties of Tough PLA and ABS which are then dialled up just that extra bit in regards to both ruggedness and durability. Ultimaker offers two versions of Co-Poly...

Convert an Image to a Vector Graphic for Laser Cutting
Interested in creating designs to be laser cut? In this tutorial, we will learn how to use Gimp and Inkscape to convert a graphic image to a vector image that you can cut on a laser cutter! In order for the job control software to turn you...

Getting Started with Rotary Encoders | Examples with Raspberry Pi Pico
In this guide, we'll learn what a Rotary Encoder is, when and why we might use a Rotary Encoder, and how to use a Rotary Encoder with a Raspberry Pi Pico. To follow along all you'll need is: A Rotary Encoder - we recommend using our br...

Digital to Analogue Conversion with Raspberry Pi
Raspberry Pi right? It’s amazing! Raspberry Pi has taken the world by storm and changed the way that people think about computing. The Raspberry Pi 3 builds on this with some amazing new features, however one feature that is still ab...

Controlling Standard Servos with Raspberry Pi
This guide will teach you how to control any small and big servos with a Raspberry Pi 4 Model B (worth noting any Raspberry Pi Board with GPIO pins can be able to be used in this scenario. Servos are an immensely useful way to turn ele...

Our Raspberry Pi Compute Module 3 Review
A new day is upon us, and it is glorious. After all, it’s not often that a new Raspberry Pi board is released. As you’re probably aware, the current iteration of the popular Raspberry Pi microcomputer is the Raspberry Pi 3. It h...

Making Boxes in Fusion 360 for Laser Cutting
When making a box with a laser cutter, its entirely possible to make your design as a single flat drawing through careful planning and measurement – but who wants to do that!? This is a guide to making a box quickly and easily using F...

How To Make and Crimp Custom Connectors
The wires in our circuits are often forgotten when we are planning our next big project, but the right connectors will a make your project look more professional and a lot easier to work with! In this tutorial, we are going to have a quick ...

How to Use Rotary Encoders
Hello and welcome to our tutorial on using rotary encoders. Today we’re going to be taking a look at what is a rotary encoder, how does it work, why we would use it over other sensory inputs and creating code to use them. Rotary encod...

Arduino Boards, Compared
We're going to compare each of the Arduino Boards available to Maker's and Electronics Enthusiats. We'll discuss the features of each board, provide an informative pinout diagram with tonnes of detail, and toward the end of the article, pro...

ONESIE Family - 3D Printable Cases for Raspberry Pi 4 Model B
The ONESIE family of cases come in three distinct models; Stealth, Maker and Hats. This will be a guide introducing the ONESIE family, the 3D printable monocoque stealth cases for Raspberry Pi 4 Model B, talk about what makes them di...

Makerverse Audio Kit Guide | Play Music and Generate Tones
IntroductionWelcome to the guide for the Makerverse Audio Kit. This kit will allow you to build a music player, a musical keyboard, and a sound effect soundboard! To follow along you will need: The Makerverse Audio Kit The Makerverse ...

How to use Force Sensitive Resistors with a Raspberry Pi and a ADS1015 ADC
Force-sensitive resistors (FSR) are remarkable electrical components and are proper unsung heroes in the Makers World. Name me a better variable touch input device which has basically no moving parts, all whilst being available in such a t...
")
How to use a RTC With an Arduino UNO R3 to Create an Accurate Clock (LCD Screen and Nixie Tubes)
Today we're pulling out the breadboard, getting up and running with an RTC module then finishing up by making ourselves a clock that will keep the correct time even when we pull the plug. To achieve this we will be combining three main com...

Control Large GoBILDA DC Motors With a Raspberry Pi - Pololu Motoron HAT
This guide will demonstrate exactly how to control any large DC Motors that we stock with a Raspberry Pi Single Board Computer, through code or through a Bluetooth Controller. To clarify (in my mind) a large DC Motors runs at 12+ Volt...

Bill of Materials

Hydra Bluetooth Speaker
Wow - this is one monstrous sounding and great looking speaker - even if I do say so myself! This is basically a 2.1 (stereo + subwoofer) system made with 3D plastic parts. Both the full range and subwoofer speakers are based on closed (se...

Meet 'Holman' the Ultimate Bluetooth Speaker
Who says you can't have it all? Good looks and a great sound! My name is 'Holman" and I'm a Bluetooth speaker in the form of mans best friend - a dog of course! Why is my name Holman? Well, that's the name of the manufacturer of the PVC pi...

Garage Door Sensor
This project uses a US100 ultrasonic distance sensor to detect instances of a garage tilt door being left open and sends an alert via the IFTTT mobile app. Additionally, the device logs temperature and pressure to a Thingspeak channel using...

Roverling Mk.ⅠⅠ
Introduction
A few months back I created a basic mobile platform using parts from an old 3D printer. It was fun but not very practical. I designed Roverling Mark II so I could experi...
Borg Cube for Scouts STEM Camp
Introduction
What does one make for a Startrek-themed STEM camp for Scouts? Especially when given the Search and Rescue (SAR) activity base to run. Why this base you ask? Usually I run a radio d...Introduction
What does one make for a Startrek-themed STEM camp for Scouts? Especially when given the Search and Rescue (SAR) activity base to run. Why this base you ask? Usually I run a radio d...
Pico Baro V2
Introduction:
The inspiration for this project stems back to my childhood when I was curious to find out how the mechanical barometer worked.
Introduction:
The inspiration for this project stems back to my childhood when I was curious to find out how the mechanical barometer worked.

The Hipster Coaster
We wanted to make a interactive display of the fun that can be had with DIY projects to take to Sydney Mini Maker Faire. We decided to do so by utilising the TinkerKit Braccio from Arduino.org, alongside some 3D Printing ingenuity, for an e...

Racing Simulator Motion Platform
Hi. My son and I have made our first Racing Simulator Motion Platform. It has been a challenge but we now have a playable situtationIt has been a long journey, starting off with info from the great people at www.xsimulator.net and a lot of ...

Concrete Lamp
The concrete body of the lamp (which, to my eye look a bit like a leek) is made is two halves. The 1st and 2nd halves are cast in 2 steps using the same mould twice. I had a few failed attempts at making the mould entirely from sta...
The concrete body of the lamp (which, to my eye look a bit like a leek) is made is two halves. The 1st and 2nd halves are cast in 2 steps using the same mould twice. I had a few failed attempts at making the mould entirely from sta...

IoT Pet Feeder
The objective of this project was to create an Internet of Things (IoT) device that could give pet access to a food bowl when a text message command was sent from a remote location. I had never done an IoT project before, so I wanted to ke...

Infinity-Mirror Table
An infinity mirror creates a striking optical illusion - a tunnel of light that seems to tear through space. I built this infinity-mirror table using some addressable LEDs, a Particle Photon and easily obtainable timber supplies. Check out...
Auto Tracking Camera System
The purpose of this project is to design a system that will automatically track stars or satellites. The first version, described here, is specifically to track stars and operate a Raspberry Pi HQ camera to take a series of long-exposure im...

Arduino Tide Gauge
I used an Arduino and a US-100 ultrasonic sensor to make an extremely low-cost tide gauge. This project measures the tide by sensing the distance to water using a US-100 ultrasonic sensor. The device has a 3D printed base&nb...

Simple Relay Timer
Introduction This project started because I needed to replace a water tap timer that had seen better days. The aim was to use a Raspberry Pi Pico and a couple of PiicoDev boards to do what the water timer did. The actual stopping a...
")
Desktop Infinity Mirror (Lasercut!)
A smaller version of our amazing Infinity-Mirror Table - the Desktop Infinity Mirror compresses all the colourful goodness into a picture frame-sized display. The entire design is made from laser-cut acrylic that we cut in-house. Check out ...

Modify Dell multimedia keyboard from USB bus power
This project is to modify a Dell multimedia keyboard into a Raspberry Pi Zero dedicated keyboard with external powered USB hub. You can find this article in my blog http://sizeofinfinity.blogspot.com.au/2017/06/modify-dell-multimedia-keyboa...

PiicoDev Schematic System
Introduction: Hi everybody. Over the past few weeks, I have been working on an intuitive system that makes working and tinkering with the Piicodev ecosystem even easier! Everybody interested in electronics knows about the universal circui...

A 3D Printed Ukulele
Here is a project I just could not help myself but build. A 3D printable Ukulele with a body as large as I could fit standing upright on the printers here. The intention was to make it as large as possible, using no supports, and without th...

Sound Effects Button
The idea for this project came when a friend of mine flew over from Western Australia to visit, and during his stopover in Adelaide, he did what any adult would do; visit the airport novelty store and buy some random stuff. It was pretty mu...

DHT 22 Thermometer
This thermometer idea came to me when my little sister asked me “Vince, what’s the temperature?” Answering I said, “Well, I’ll look it up.” So I looked it up but that wasn’t enough for her, This con...

Tabot
Tabot is a robotic tablet dispenser. It is designed to help elderly people maintain their independence and help anyone who has tablets remember to take them on time.https://www.gofundme.com/tabot-helping-the-elderly Please vist this website...


Wefted Waveforms
This project aims to fuse neopixel strips with papier mache and origami into a free-standing electro-sculpture. The freestanding structure is formed from wire mesh and papier mache. It is then painted and wired up with strips of LEDs conne...

Hands-free Selfie Camera Control
Ever wanted to record a video and be included in it? My children did. One does parkour, and the other loves to dance, both want to perfect their art by watching their moves during practice. They asked their inventor/tinkerer dad, "can you ...

KiPad - A custom macro keypad for KiCad
Presenting the KiPad - a custom macro keypad for the popular open-source PCB design software KiCad. KiCad is awesome! But I've found that during PCB layout, my right hand is constantly moving back-and-forth between the keyboard and mouse -...

Roverling
Introduction
My first 3D printer was a CTC generation 2 clone of MakerBot ‘The Replicator Dual’, circa 2012. It died a little while back and has since been replaced ...

Portable Arcade Emulator
Introduction
I am a Mechanical Engineer, and after 30 years in industry I now teach Engineering at High School. I create various projects in my spare time and bring them to school to inspir...
Robot Arm Upgrade Project
This project has been a long and tricky one for me, I purchased my robot arm kit from Jaycar many years ago with the intention of controlling it from the start. I used to work with industrial robots, so when I saw this robot kit for sale I...

Duck Off! A Duck Repellent Device
Introduction
We live on a rural property and have around 20 to 40 wild ducks around at any one time. We have a large dam and jetty, however it is almost unusable due to all the ...

Smart Watering System
Introduction This began as an idea after building a very basic single-channel unit. Commercial smart watering systems use a Wifi connection to the internet and get weather reports to determine the level of watering required. These systems...
")
Datalogging Weather Station (Battery Powered)
This project will measure atmospheric conditions (Temperature, Humidity, Air Pressure) and log them to an SD card over a long period (months!) while running off a few AA or AAA cells. Usually, projects powered by an Arduino Uno are quite p...

Nintendo Wii Portable | Project G-Wii
Do you love your Wii and its ability to play all GameCube games perfectly but wish you could take it on the go like a Gameboy?
Well, I definitely did and if you're like me so do you. And here is the right place...
Do you love your Wii and its ability to play all GameCube games perfectly but wish you could take it on the go like a Gameboy?
Well, I definitely did and if you're like me so do you. And here is the right place...

3D-Printed GPS Speedometer
Introduction
I wanted a GPS speedometer that is portable, robust, and looks okay. I had been messing around with 3D printing and exploring GPS modules for a few years and wanted...


Makers love reviews as much as you do, please follow this link to review the products you have purchased.