In this guide, we'll learn what a Servo is, when we might use one, how to choose a Servo, and finally how to use one with a Raspberry Pi Pico.
To follow along you'll need:
- A Positional Servo, such as the Feetech FS90 Micro Servo
- A Continuous Rotation Servo, such as the Feetech FT90R Micro Servo
- A Servo Horn, which should come with your Servo when you buy it
- A Raspberry Pi Pico
- A way to connect the Pico and Servos together, such as a breadboard and some jumper wire.
If this is your first time using a Raspberry Pi Pico we also recommend that you check out our guide on how to Setup a Raspberry Pi Pico and Code with Thonny.
Contents:
What Is A Servo?
Servos are a very popular control device amongst Makers, and are also used frequently by professionals in the field - such as in Industrial applications and even Robotics!
They typically contain a Controller, Motor, and Gearbox. Depending on the type they can be rotated to an exact angle (Positional Servo), or set to a specific speed (Rotational Servo).
Positional Servos
A Positional Servo (sometimes called an Angular Servo) can be rotated to an exact angle, which makes them really useful when you need to adjust the position of something accurately - such as steering an RC car or moving a joint in a robotic arm.
This is achieved with the addition of a Potentiometer which is attached to the shaft of the Servo. The potentiometer is used to create a closed-loop feedback system, enabling the controller to determine the position of the shaft as it rotates.
The ability to rotate to a specific angle comes with a trade-off however: they are limited in how far they can rotate (typically within the range of 90 to 180deg) and cannot continuously spin like a regular motor.

Rotational Servos
A Rotational Servo (sometimes called Continuous Rotation Servo) is more like a regular motor and can be set to a specific speed, both forward and backwards.
They do not have a feedback loop, like the Potentiometer attached to the shaft on a Positional Servo, meaning that you cannot set the angle at all - you can only control speed in either direction.
However, they are still useful, as they include the motor and a gearbox. Rotational Servos are a good option for applications such as wheels on a robot, or a rotating display, where torque or power is more important than high speed.

Controlling A Servo
Servos are controlled using 'Pulse Width Modulation' (PWM for short), which is a pulsing signal that is sent from a microcontroller, such as the Raspberry Pi Pico, at a high frequency. As the 'width' of the pulse changes, so does the angle, or speed, of the Servo.
The images below depict how changing the width of the pulse signal, also known as the 'Duty Cycle' of the Servo, changes the position of a Positional Servo. Note the oscilloscope is zoomed in on one single pulse, in reality, the signal for the Servo shown is pulsing 50 times per second (50Hz).

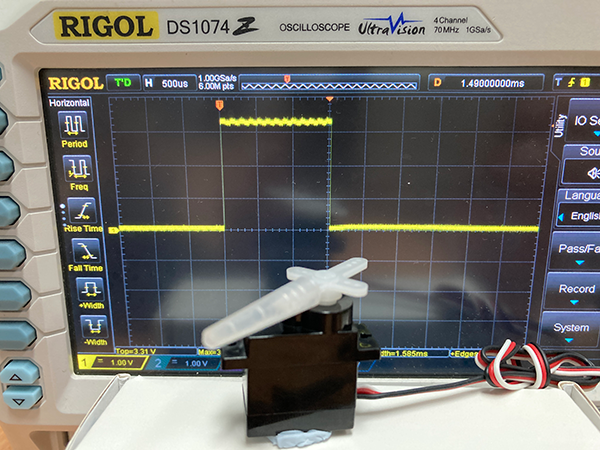

You won't need an oscilliscope to use a Servo though! Or even need to worry too much about PWM, as later in the guide we'll be using a library that does all the heavy lifting for us.
When To Use A Servo?
We've covered the two main types of Servos, but when might we use one in a project?
If any of the following rings true, you might reach for a Positional Servo:
- If you need to adjust the position of something accurately - such as the steering arm in an RC car or robot.
- If you want to move something back-and-forth - such as a privacy cover over a camera.
- If you want to create multiple degrees of movement (by combining multiple Servos) - such as joints in a robotic arm, or up-down and side-to-side in a pan/tilt camera control.
Alternatively, a Rotational Servo will be useful if:
- You need a motor with built-in speed control - such as for a 360-degree dome camera or a rotating display.
- You need a small motor with some extra grunt (torque) - such as in the wheels of a robot.
However, while Servos are super useful, there are times when an alternate type of motor might perform better:
- If you need to adjust the position of something above 270° and beyond - a Stepper Motor can be accurately turned infinitely (unlike a Positional Servo), but often requires more hardware to get running.
- If you need high-speed continuous turning - depending on how fast you need to go, a 'regular' Motor might be a far more performant choice.
How To Choose A Servo
So we've decided we want to use a servo in our project, which one should we choose?
In addition to picking the type of servo we need (positional or rotational), there are a number of other factors to consider when choosing a Servo.

Torque
First, we need to consider how powerful the Servo needs to be - or in technical terms, how much 'torque' we will need the servo to provide. If the thing you want to move with a Servo requires more torque than the Servo can provide, the Servo will at best stall and not move, and at worst heat up to a dangerous temperature and burn out - permanently damaging the servo and possibly the rest of your circuit.
You may see some common terminology when assessing the torque-related capabilities of a Servo:
- Rated Continuous Torque - refers to how much torque the Servo can provide indefinitely. This is the max amount of torque your Servo can provide under normal conditions.
- Peak Torque - refers to how much torque the Servo can provide for a short amount of time (at most a minute or two) before it overheats and potentially burns out. This is the absolute max you should ever push your Servo to, and only in short bursts every now and then.
Calculating torque is beyond the scope of this guide, however, since Servo torque is typically rated in kg/cm there is a relatively simple way of estimating it:
The rating 'kg/cm' means that the Servo can lift that many kgs at a distance of 1cm from the shaft of the servo. For example, a torque rating of 1kg/cm means that the Servo can lift a 1kg weight that is attached 1cm away from the center of the shaft.
Keep in mind, the weight that the torque rating can support halves with every centimeter you move further along the shaft. So for 1kg/cm, at 2cm the supported weight becomes 0.5kg.
You can use this method to estimate how much torque your Servo requires - if in doubt choose a Servo with more torque than you think you might need.

Voltage & Current
As with all electrical components, you also need to consider the voltage and current requirements of your Servo and circuit - this is especially true for a Servo as it directly affects getting the best performance from it.
Servos typically have an Operating Voltage range, rather than a specific single operating voltage - however, they are usually rated at the top end of that range. For example, this Feetech 9G Servo will run on a voltage between 4.8 and 6V, which means we can easily run it with 5V, but we will also not get the most out of the Servo at 5V. You need to make sure you pick a Servo that has a voltage range that your circuit can provide for and safely interface with, and ideally supply the top end of the Servo's voltage range to maximise its performance.
More critically, you need to consider the ampere current requirements of the Servo: Servos can need a lot of juice to run.
A Servo's Current and Torque ratings go hand-in-hand - If you can not supply the rated current to a Servo then you'll have no chance of getting the rated torque out of it. Likewise, the higher the torque of the servo you choose, the higher its current requirements will be as well.
A Servo's current is typically listed using the following terminology:
- No Load Current - refers to the minimum current the Servo will consume when it's not doing any work.
- Stall Current - refers to the maximum current the Servo can consume before it reaches its physical limit on being able to do any more work (stalling).
Make sure that your circuit can provide at least enough current to the Servo to meet its Stall Current Rating.
Note: If you're working with a low-power Microcontroller such as a Raspberry Pi Pico you will likely need to consider adding a dedicated power supply to feed the Servo. We've covered how to power a Servo with an additional power supply in our guide on Controlling Standard Servos with Raspberry Pi.
Size & Form Factor
Servos come in two common sizes and physical dimensions: 'Micro' and 'Standard'. For the most part, all Micro Servos will be the same dimensions, and all Standard Servos will be the same dimensions, albeit sometimes with small variations between manufacturers - making them easy to swap out when you want to downsize or upsize.
The amount of Torque/Power you need will likely be the biggest factor in which of the two sizes you will choose from, but you should also consider their physical size and if either Servo size will fit well into your project. You may also find you actually need to design your project to fit the size of the right Servo!
Micro Servos
Micro Servos are the smallest of the bunch, making them great for tucking into tight spaces! However, since they have the smallest motors they also have the smallest amount of torque.
Don't let that dissuade you though! You can still get a lot of bang for your buck with a Micro Servo - for example, the Feetech FS90MG has a Peak Torque of 2.2kg/cm @ 6V!
Micro Servos are really useful when you need to move something that doesn't weigh much, or just need to tweak the position of something, such as:
- RC Car/Plane/Boat Trims and Controls
- Plastic Covers/Gates
- Moving Parts on Hobby Train Tracks
- Small Robot Arms
- Pan/Tilt control for a Raspberry Pi Camera

Standard Servos
Standard Servos are larger than Micro Servos, allowing them to have larger motors and thus provide a lot more torque. For example, the Feetech FB5118M has a Peak Torque of 17.5kg/cm @ 6V - which could theoretically lift a small child! Although I recommend against doing that.
Standard Servos are useful when a Micro Servo won't cut it - with the tradeoff that they will take up more space.

Range Of Motion
Positional Servos also come in a range of options for how far the Servo Arm can be rotated, which is often referred to as the 'Arm Angle Limit'.
If you need a Positional Servo, make sure you check that the Servo can actually move as far as you need it to. For example, this basic 9G Micro Servo has a range 180°, and this more sophisticated Micro Servo can go up to 270° - but it also costs more.
Note: Servos listed as 360° are usually Continuous Rotation Servos, so make sure you double-check before buying.
Other Considerations
Some extra things to consider when choosing a Servo are:
- Plastic vs Metal Gears - Servos with plastic gears will be cheaper, but metal gears will last longer and usually allow for a higher torque Servo.
- Spline Size - The Spline of a Servo is the exposed shaft that you attach your 'Servo Horn' (arm) or Wheel to. Most servos come with a small bag of accessories that will fit, but if you are buying additional accessories make sure they fit the Spline Size of the Servo you are choosing.
- Other control interfaces - Whilst PWM is by far the most common control interface, you can find Servos that have additional built-in controllers and are controlled using Serial or other communication protocols - like the STS3215 Smart Servo from Feetech.

How To Use A Servo
Now that we've chosen the right Servo, let's see how to put it to work!
In the following examples we will be using Micro Servos, and since we will not be needing the full amount of torque from the Servos we can and will be powering them directly from the Pico's 5V VBUS power output. If you need the full power from your Micro Servo, or are using a Standard Servo, I recommend looking at powering them directly either with:
- A Power Supply - See our guide on Controlling Standard Servos with Raspberry Pi which shows how to wire up an additional power supply to a Servo.
- A Servo Driver - See our guide on the PiicoDev Servo Driver which shows an alternate way to control Servos, but also includes powering them externally.
PWM Servos use 3 wires for connection and control. The three wires are typically coloured as follows:
- Black/Brown -> Ground
- Red -> Positive
- White/Orange-> PWM Input
Connecting A Servo To The Pico
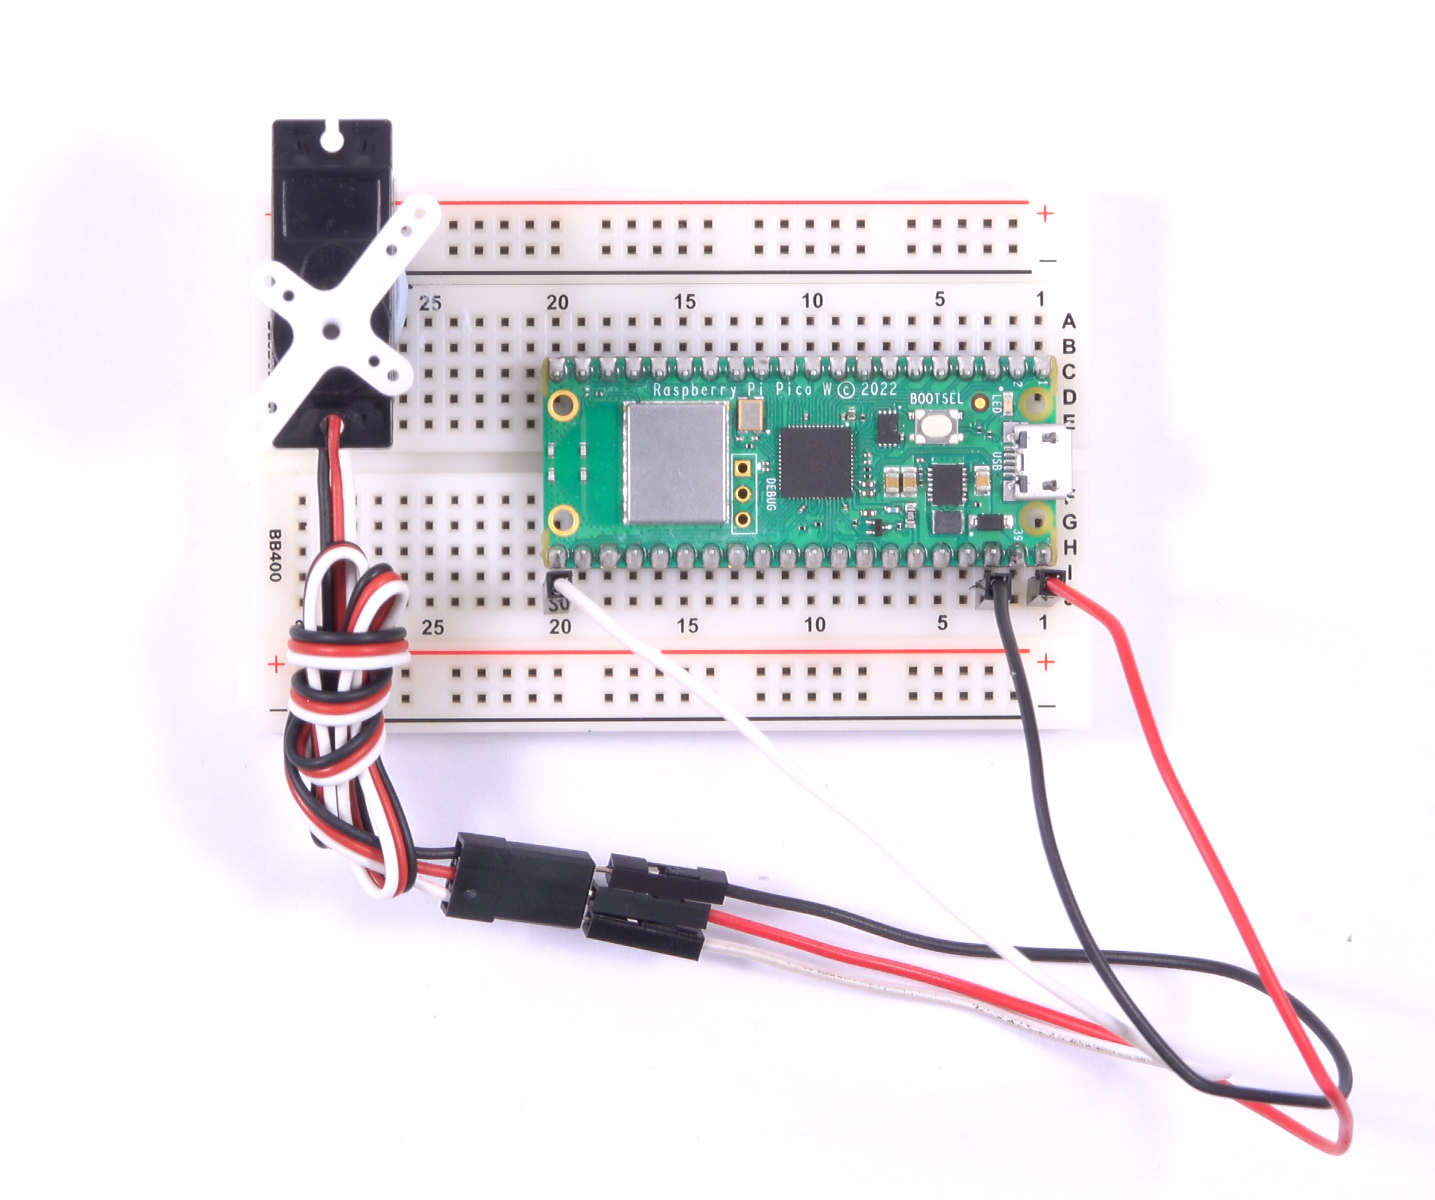
Let's connect these to a Raspberry Pi Pico, using the Positional Servo as we'll use that first in the following examples.
Connect the following wires from the Servo to the Raspberry Pi Pico:
- Black -> Pico Ground
- Red -> Pico VBUS
- White -> Pico GPIO 16
Note: the VBUS pin on the Pico is connected directly to the Pico's USB 5V power - be careful not to short any wires or you may damage your computer when you plug the USB cable into the Pico!
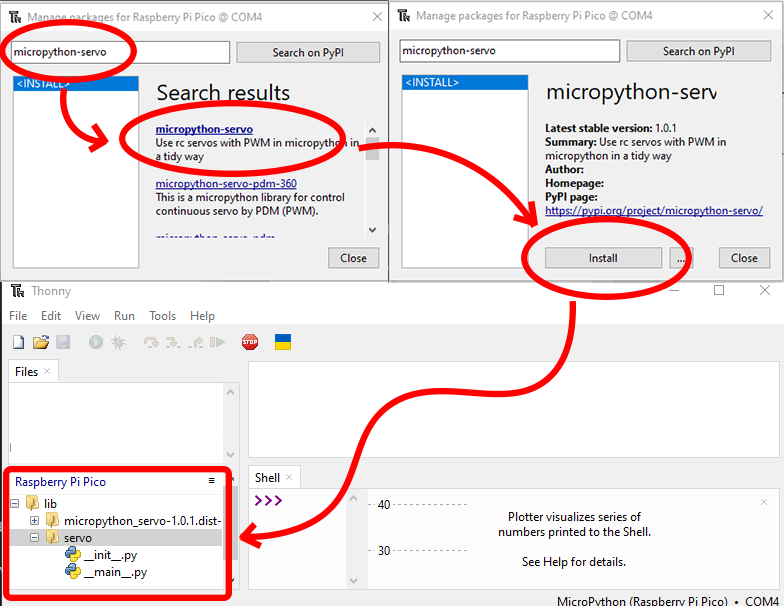
Install the micropython-servo Library
To make life easier we will be using a library for MicroPython that will take care of the PWM for us: micropython-servo.
Connect your Pico to the computer and fire up Thonny then using 'Tools' > 'Manage Packages' install the 'micropython-servo' package onto your Pico.
You can confirm the package has been installed if it is listed under the Raspberry Pi Pico file listing in Thonny.
Note: at the time of writing, the following versions are being used:
- micropython-servo version 1.0.1
- Thonny version 4.0.2
Example 1 - Positional Servo Sweep
So we have our Positional Servo wired up and the Micropython Servo library installed, it's time to make the servo move!
If you haven't already, attach a 'Servo Horn' (one of those little plastic arms that should have come with the Servo) to the Servo shaft so we can see the movements more accurately.
Open up Thonny and copy-paste the following code into a new script:
"""
A simple example that sweeps a Servo back-and-forth
Requires the micropython-servo library - https://pypi.org/project/micropython-servo/
"""

import time
from servo import Servo

# Create our Servo object, assigning the
# GPIO pin connected the PWM wire of the servo
my_servo = Servo(pin_id=16)

delay_ms = 25  # Amount of milliseconds to wait between servo movements

while True:
    for position in range(0, 180):  # Step the position forward from 0deg to 180deg
        print(position)  # Show the current position in the Shell/Plotter
        my_servo.write(position)  # Set the Servo to the current position
        time.sleep_ms(delay_ms)  # Wait for the servo to make the movement

    for position in reversed(range(0, 180)):  # Step the position reverse from 180deg to 0deg
        print(position)  # Show the current position in the Shell/Plotter
        my_servo.write(position)  # Set the Servo to the current position
        time.sleep_ms(delay_ms)  # Wait for the servo to make the movement
Save and Run the script. You should see the Positional Servo slowly rotate to back and forth in a sweeping motion!
What is the code doing?
First, we import the time package so we can add a delay in the code, and also the micropython-servo library we installed earlier so we can control the Servo.
import time
from servo import Servo
Then we create an a Servo instance 'my_servo', passing in the 'pin_id' parameter - which maps to the GPIO pin we connected to the Servo PWM wire.
# Create our Servo object, assigning the
# GPIO pin connected the PWM wire of the servo
my_servo = Servo(pin_id=16)
Next, we create a 'delay_ms' variable which will let us easily change the speed of the Servo movements later on.
delay_ms = 25 # Amount of milliseconds to wait between servo movements/loop iterations
We start an infinite loop with 'while True', and then inside that start another loop that counts from 0 to 180 - this count will be our angular position in degrees.
while True:
    for position in range(0, 180):  # Step the position forward from 0deg to 180deg
Now for the interesting part, inside the position counter from 0 to 180 we do three things:
- Print the current position of the Servo to the Thonny Shell and Plotter for easy debugging.
- Set the physical position of the Servo using 'my_servo.write(position)' - this is the part that actually moves the Servo! Under-the-hood the micropython-servo library calculates the appropriate PWM signal and sends it to the Pico, which sends it to the Servo.
- Delay the loop for a few milliseconds - this gives the Servo some time to physically reach the new position and slows things down so we can see them properly.
        print(position)  # Show the current position in the Shell/Plotter
        my_servo.write(position)  # Set the Servo to the current position
        time.sleep_ms(delay_ms)  # Wait for the servo to make the movement
After the counter from 0 to 180 ends, we start another loop from 0 to 180, but this time in reverse - and do it all again:
    for position in reversed(range(0, 180)):  # Step the position reverse from 180deg to 0deg
        print(position)  # Show the current position in the Shell/Plotter
        my_servo.write(position)  # Set the Servo to the current position
        time.sleep_ms(delay_ms)  # Wait for the servo to make the movement
The loops run over-and-over, causing the Servo to perform the sweeping movement.
Remix 1 - Rotational Servo Sweep
Let's see the Rotational Servo in action. We'll re-use the script from Example 1, so for now just Stop the script from running in Thonny.
If you haven't already, attach a 'Servo Horn' (one of those little plastic arms that should have come with the Servo) to the Rotational Servo's shaft so we can see the movements more accurately.
Unplug the Positional Servo and replace it with the Rotational Servo. It might immediately start turning - that's fine, your Pico is still outputting PWM from the last servo position before you hit Stop in Thonny.
Before we re-run the script, let's slow things down a bit more so we can observe the change in Rotation Speed more accurately.
Open the script you saved in Example 1 and find the line 'delay_ms = 25' (line 13) and change it to 'delay_ms = 100'.
import time
from servo import Servo

# Create our Servo object, assigning the
# GPIO pin connected the PWM wire of the servo
my_servo = Servo(pin_id=16)

delay_ms = 100  # <-- CHANGE THIS LINE
Save and Run the script. The Rotational Servo should start speeding up and down in one direction, then speeding up and down in the other direction!
You may notice that the script was written with 'position' in mind - that's fine! Changing the 'position' in the script is really only changing the underlying PWM signal, and for a Rotational Servo PWM determines speed (and direction) instead of an angular position. We're using the micropython-servo library, which is designed with only Positional Servos in mind, if you're working with Rotational Servos a lot you might want to use a library that is more focused on them, such as the micropython-servo-pdm library.
Example 2 - Angular Servo Control
While the Sweep example was cool, it didn't give us much control over the Servo. Let's have a go at directly controlling the Servo to move to specific positions.
Stop the script from the previous example in Thonny, unplug the Rotational Servo, and plug the Positional Servo back in. The Servo might jump to a random angle, that's fine we can ignore it.
Create a new script in Thonny and copy-paste the following in:
"""
A simple example that sweeps a Servo back-and-forth
Requires the micropython-servo library - https://pypi.org/project/micropython-servo/
"""

import time
from servo import Servo

# Create our Servo object, assigning the
# GPIO pin connected the PWM wire of the servo
my_servo = Servo(pin_id=16)

while True:
    my_servo.write(90)  # Set the Servo to the mid-point (90 is half way between zero and 180 degrees)
    time.sleep_ms(1000)  # Wait for 1 second

    my_servo.write(0)  # Set the Servo to the left most position
    time.sleep_ms(1000)  # Wait for 1 second

    my_servo.write(180)  # Set the Servo to the right most position
    time.sleep_ms(1000)  # Wait for 1 second
Save and Run the script. You should see the Positional Servo cycle between three specific positions - center, hard left, and hard right.
What is the code doing?
The start of the script is similar to Example 1 - we import our libraries and create a Servo instance.
import time
from servo import Servo

# Create our Servo object, assigning the
# GPIO pin connected the PWM wire of the servo
my_servo = Servo(pin_id=16)
The main part of the script is the infinite loop, which we start with 'while True:'
Inside the loop, we first tell the Servo to move to the halfway position of 90 degrees (since 90 is halfway between 0 and 180 degrees), and then tell the Pico to wait for 1 second (1000 milliseconds).
while True:
    my_servo.write(90)  # Set the Servo to the mid-point (90 is half way between zero and 180 degrees)
    time.sleep_ms(1000)  # Wait for 1 second
Then we do the same again, this time moving the Servo to 0 degrees.
while True:
    my_servo.write(0)  # Set the Servo to the left most position
    time.sleep_ms(1000)  # Wait for 1 second
Finally, we move the Servo all the way in the other direction to 180 degrees.
while True:
    my_servo.write(180)  # Set the Servo to the right most position
    time.sleep_ms(1000)  # Wait for 1 second
The loop then restarts, moving the Servo back to the mid-point of 90 degrees, then 0 degrees, then 180 degrees, and so-on.
That's how easy it is to move a Servo to any desired position! For extra points, have a go at changing the script with your own angles to get a feel for the Servo in action.
Remix 2 - Rotational Servo Control
Finally, let's have a look at directly controlling the Rotational Servo. We'll re-use the script from Example 2, so for now just Stop the script from running in Thonny. If you made changes to the script go back and copy-paste the original from the Example 2 section.
Unplug the Positional Servo and replace it with the Rotational Servo. It might immediately start turning - that's fine, your Pico is still outputting PWM from the last servo position before you hit Stop in Thonny.
Now run the script from Example 2 - this time instead of different angles, you should see the Rotational Servo come to a complete stop for 1 second, spin at full speed in one direction for a second, and then reverse at full speed for a second.
Just like in Example 1, we are inputting an angular position in the script, but really this is controlling the direction and speed of the Rotational Servo. The 90-degree position is the halfway point - which for a Rotational Servo is halfway between full-speed backwards and full-speed forwards - which is a dead stop! The Rotational Servo is stopped when set tp 90 degrees.
At 0 degrees the Rotational Servo is full-speed backwards, and at 180 degrees it is full-speed forwards.
Have a go at changing the script with your own angles to see how they affect the speed and direction of the Rotational Servo.
Conclusion
Servos are awesome little devices that enable your project to interact with the real world! We're looking forward to hearing what you come up with in the forums, and if you have any questions or need some help, start the conversation below. We're full-time makers and happy to help.
Happy making!

