Speed or Perfection? That choice is what an understanding of Layer Heights whenever Resin 3D printing is going to provide you. Any Traditional Resin 3D Printer worth its salt will let you print with Layer Heights between 10 Micron to 100 Microns (*As a note - whenever Resin 3D Printing is talked about in this guide it is in reference to Digital Light Processing Resin 3D Printers. Simply, these Printers are using an Ultraviolet projector and a Masking LCD screen to cure the liquid resin in layers to represent a 3D design*).
Now a 10 micron Layer Height is remarkable! Particularly when you keep in mind a fine human hair is 17 microns (μm) thick, 3-8 μm is the thickness of spider silk and 10 μm is the size of a water droplet in a cloud. Hell, the length of a length of bacterium is only 1-10 μm (and with that 3D-printed bacteria are closer than the common citizen thinks).
Bringing it back to Resin 3D Printing, Using A Larger Layer Height means a Faster 3D Print. Using A Lower Layer Height means a Better Representation of the 3D Design. The 100 Micron Layer Height is the usual upper limit for these 3D printers. Light can only travel through resins so far without either inaccurately dispersing or just physically being unable to penetrate through the liquid resin material far enough. On the other side, a 10 Micron Layer Height is currently the smallest you can print at. This limitation is imposed due to the viscosity of the resin liquid. It is also due to the ability of the normal stepper motors used in Resin 3D printers (however if the viscosity was not such a main impact I am sure gear reductions would be used to alleviate this hardware restriction). Resin slicers usually default to a layer height of 50 Microns (0.05mm), which is still a vertical resolution that is twice as good as the upper limit of possible layer heights when utilising filament 3D printers.
In this guide, our focus will be altering the Layer Height in our slicing software, being aware of the carry-on effects that we will need to account for when doing this, and presenting great print examples that highlight Layer Height differences. See below for the contents of this guide.
- 10 Micron Vs 50 Vs 100 Micron Layers in Resin Printed Models | Speed vs Accuracy
- How to Alter Layer Height in Slicing Software (Lychee and Chitubox)
- Carry on Effects to Control When Changing Layer Height
- Other Method to Increase Speed
- Where to Now (Anti-Aliasing and What Layer Height Provides Most Strength?)
- STL File Download Location
To be clear, Layer Height is the thickness of each layer of cured material (Z-Axis). It is very rare to utilises Multiple Layer Heights when printing a single model, instead, a single layer height is chosen in the slicing software for the whole print to complete with. Layer thickness in 3D printing should not be confused with Printing Resolution. Print Resolution is the size of the printed voxel which, in DLP printing, is dependent on the resolution of the Masking LCD screen of the 3D Printer (X-Y Axis). To clarify these Axis take a look at the below image which shows on the middle a Creality LD-002R LCD Resin 3D Printer and on the right the Axis I'm referring to overlaid the LCD Screen (with VAT removed). You can also see the effects of two different Layer Heights being used when printing the same 28mm scale model in the image below to the left.

This is a more advanced guide in regards to Resin 3D printing. If you are new to Resin 3D printing and want to learn more give this guide a check out as it is a brilliant way start to your Resin 3D printing journey. Then if you have your hands on a Shiny New Resin 3D Printer jump to here for all the knowledge on How to Complete Your First Resin 3D Print. With that first print under your belt, the tutorial Preparing a Custom Computer Model for Resin 3D Printing is your next port of call. That is going to dive into the best slicing software for Resin 3D printing and give you a whole bunch of tips and tricks to produce your own custom 3D resin components. The final guide worth mentioning here is Finding Optimal Layer Exposure Time for Perfect Resin Prints which will do exactly what is stated. The concepts explored in that guide will be referenced here as Optimal Layer Exposure Time dynamically changes as Layer Heights are altered.
This is one of the most exciting technologies to get into the general public hands in recent years and I hope my enthusiasm for it leaps off your screen. As always if you have any questions, queries, or things to add please let us know your thoughts! We are full-time makers and here to help.
10 Micron Vs 50 Vs 100 Micron Layers in Resin Printed Models | Speed vs Accuracy
Before diving any further let's show some practical examples of the same model printed with different layer heights. This will allow you to see the effects of altering this to the final model. Time taken to 3D print and total layers required to represent the model will also be provided. The Creality LD-002H was the Resin 3D printer used to create all the models in this guide. Also as white resin makes layer heights more obvious than other colours and thus Creality White Resin was used for all models here.
Below is an image of two printed models using the exact same STL model (download at bottom of this guide). The original STL file is effectively a rectangular prism with a slight gradient on the top surface and a chamfer around the bottom edge to ease removal from the build platform. The gradient of the slope is 0.024 (to 3 Sig. Fig).

As you can see above, due to the fact of 3D printing creates 3D objects via multiple 2D slices that are stacked up on top of each other, you are able to see in this model the layers. By decreasing the Layer Height you increase the accuracy of the Model. The difference between these two test pieces is 5x thus the 10-micron layer height has a 5x more accurate Z-resolution.
This Layer effect is especially noticeable on very tiny details, angled edges, and curved edges which is why the above test piece lets you see this effect so clearly. Lower layer height creates a smoother step between each layer as the z height will be smaller. Layer height leaves obvious steps in angled and curved top surfaces which is why this test piece is such a great demonstration. For Full clarification see the CAD file, with accurate dimensions, and how it was orientated in Lychee Slicing software for printing in the image below.
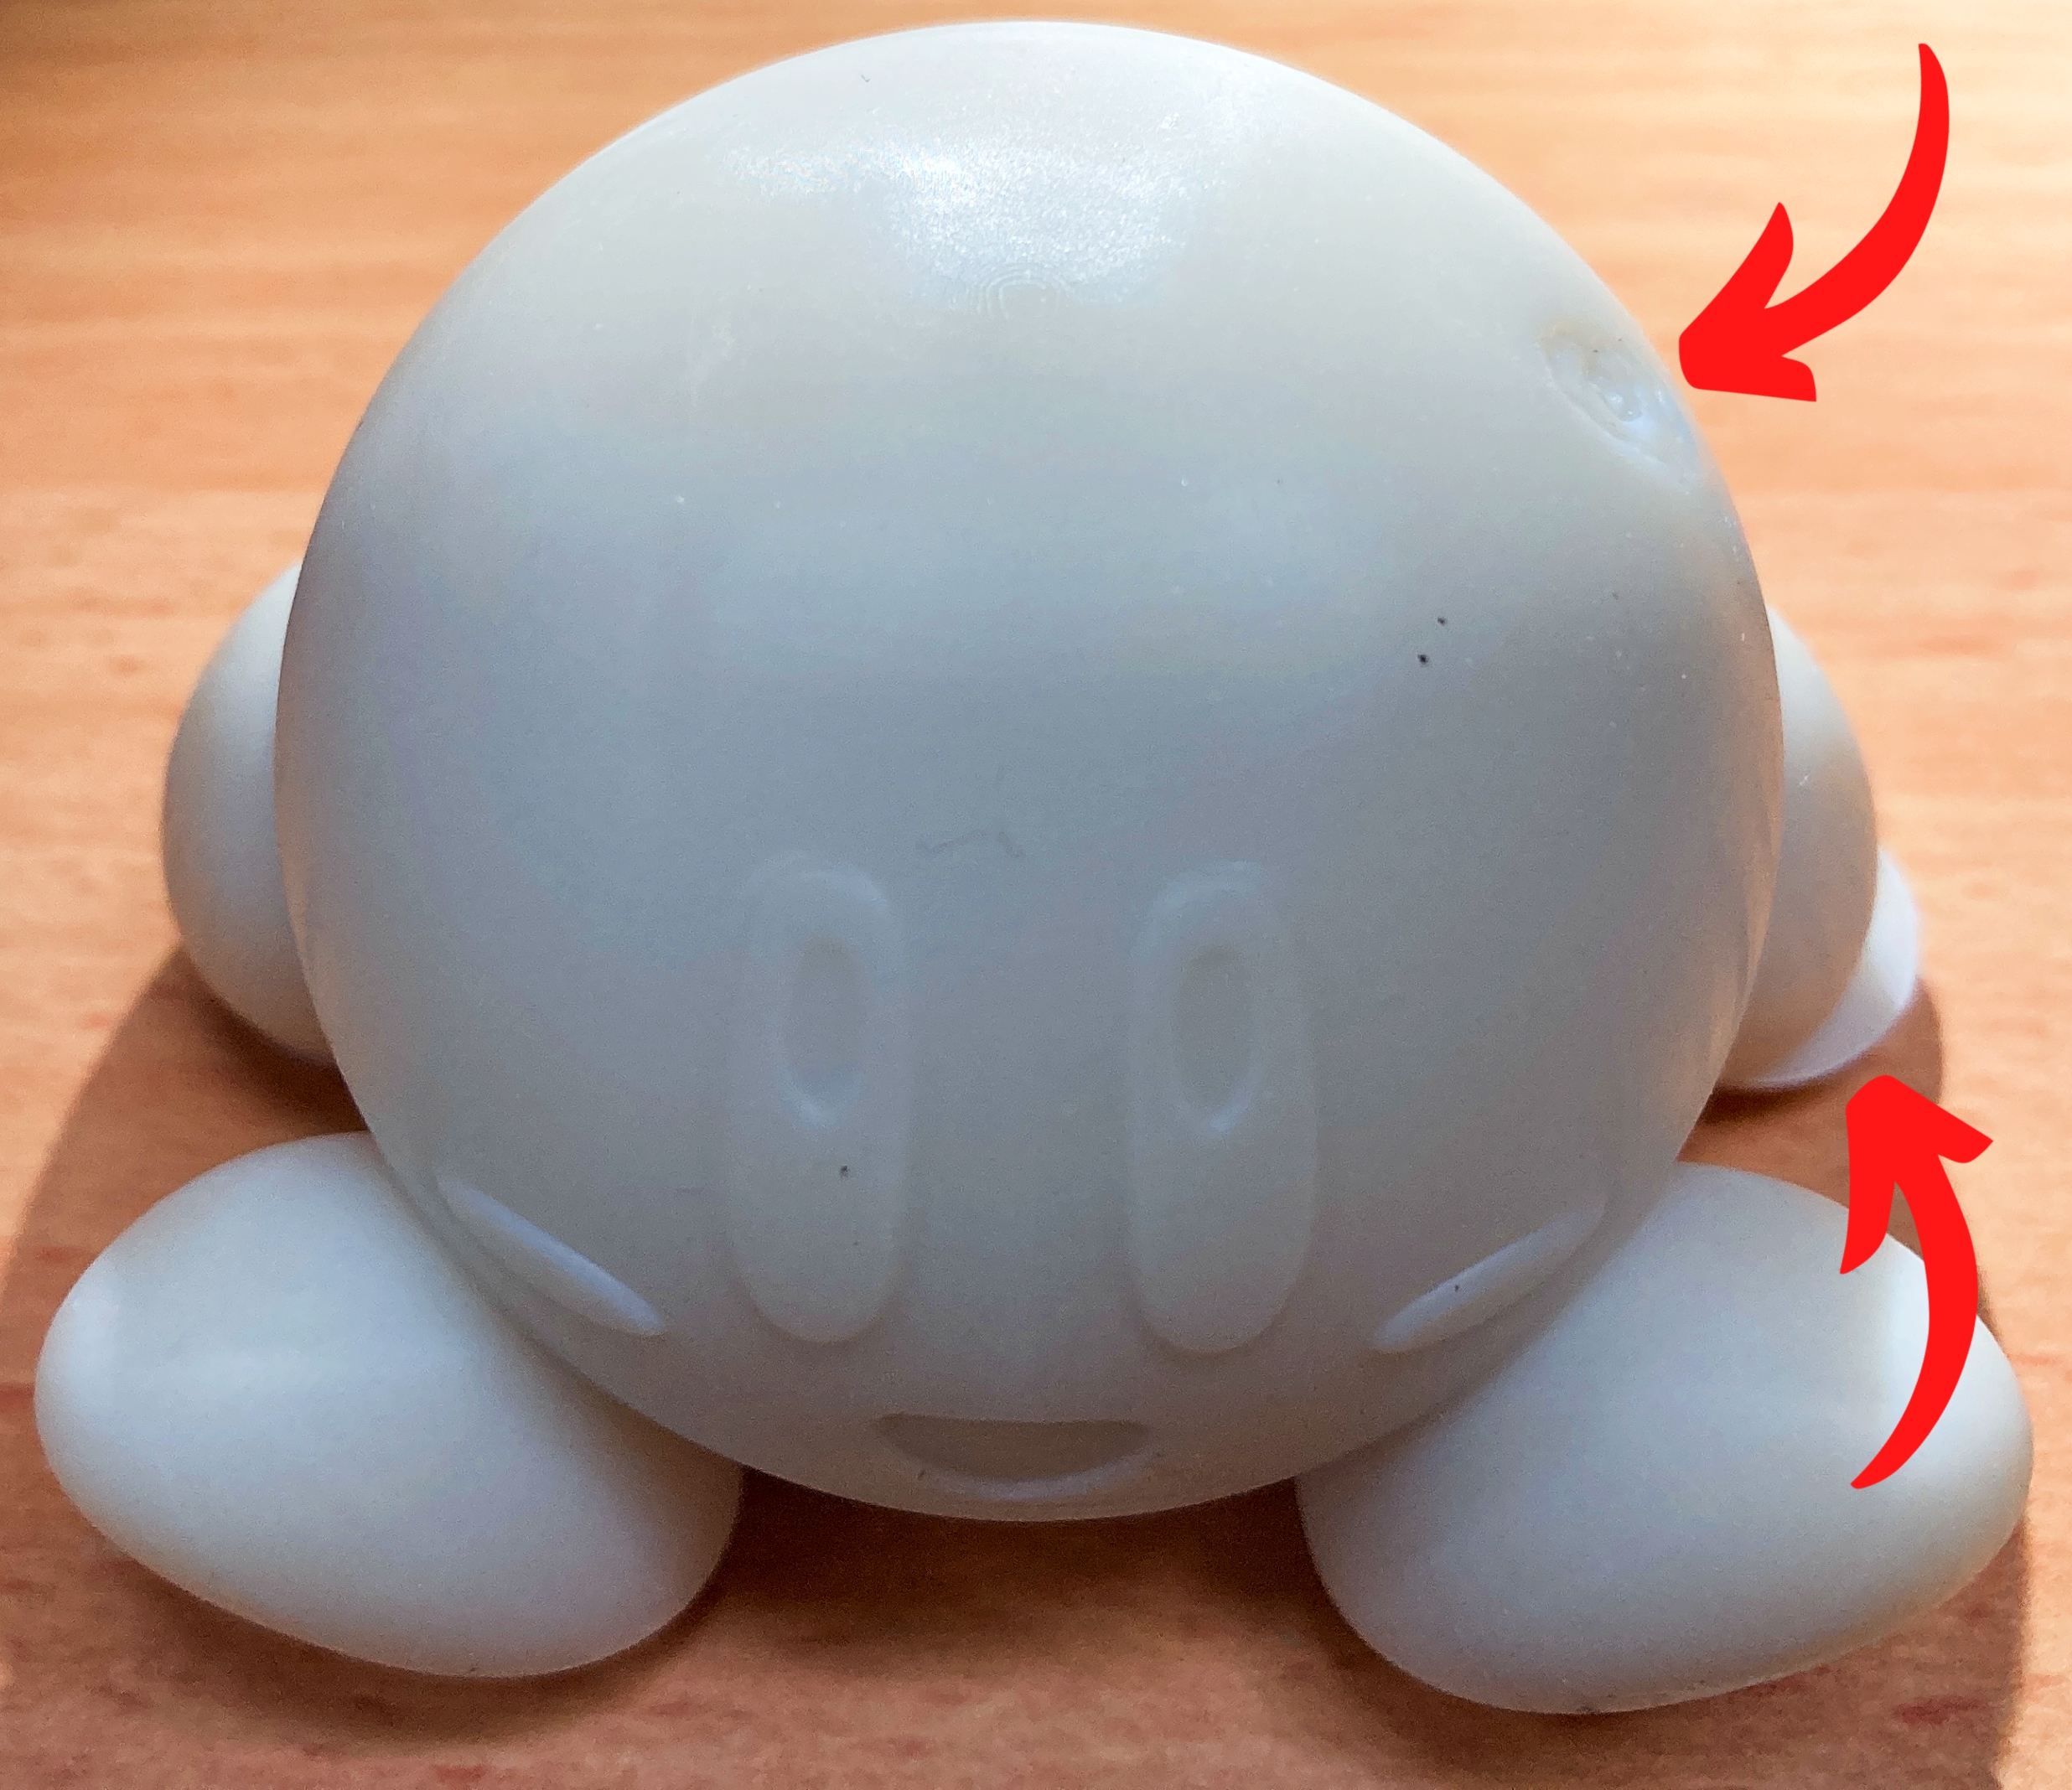
Now the above test piece was created solely to put emphasis on the fact that printing in layers will always prevent an absolutely perfect representation of a CAD design if there are any curves on the piece. But allow me to demonstrate two more likely models that a Resin 3D printer would attempt to create. See the Kirby below, on printed with 50 microns and the other that was at 10 micron.
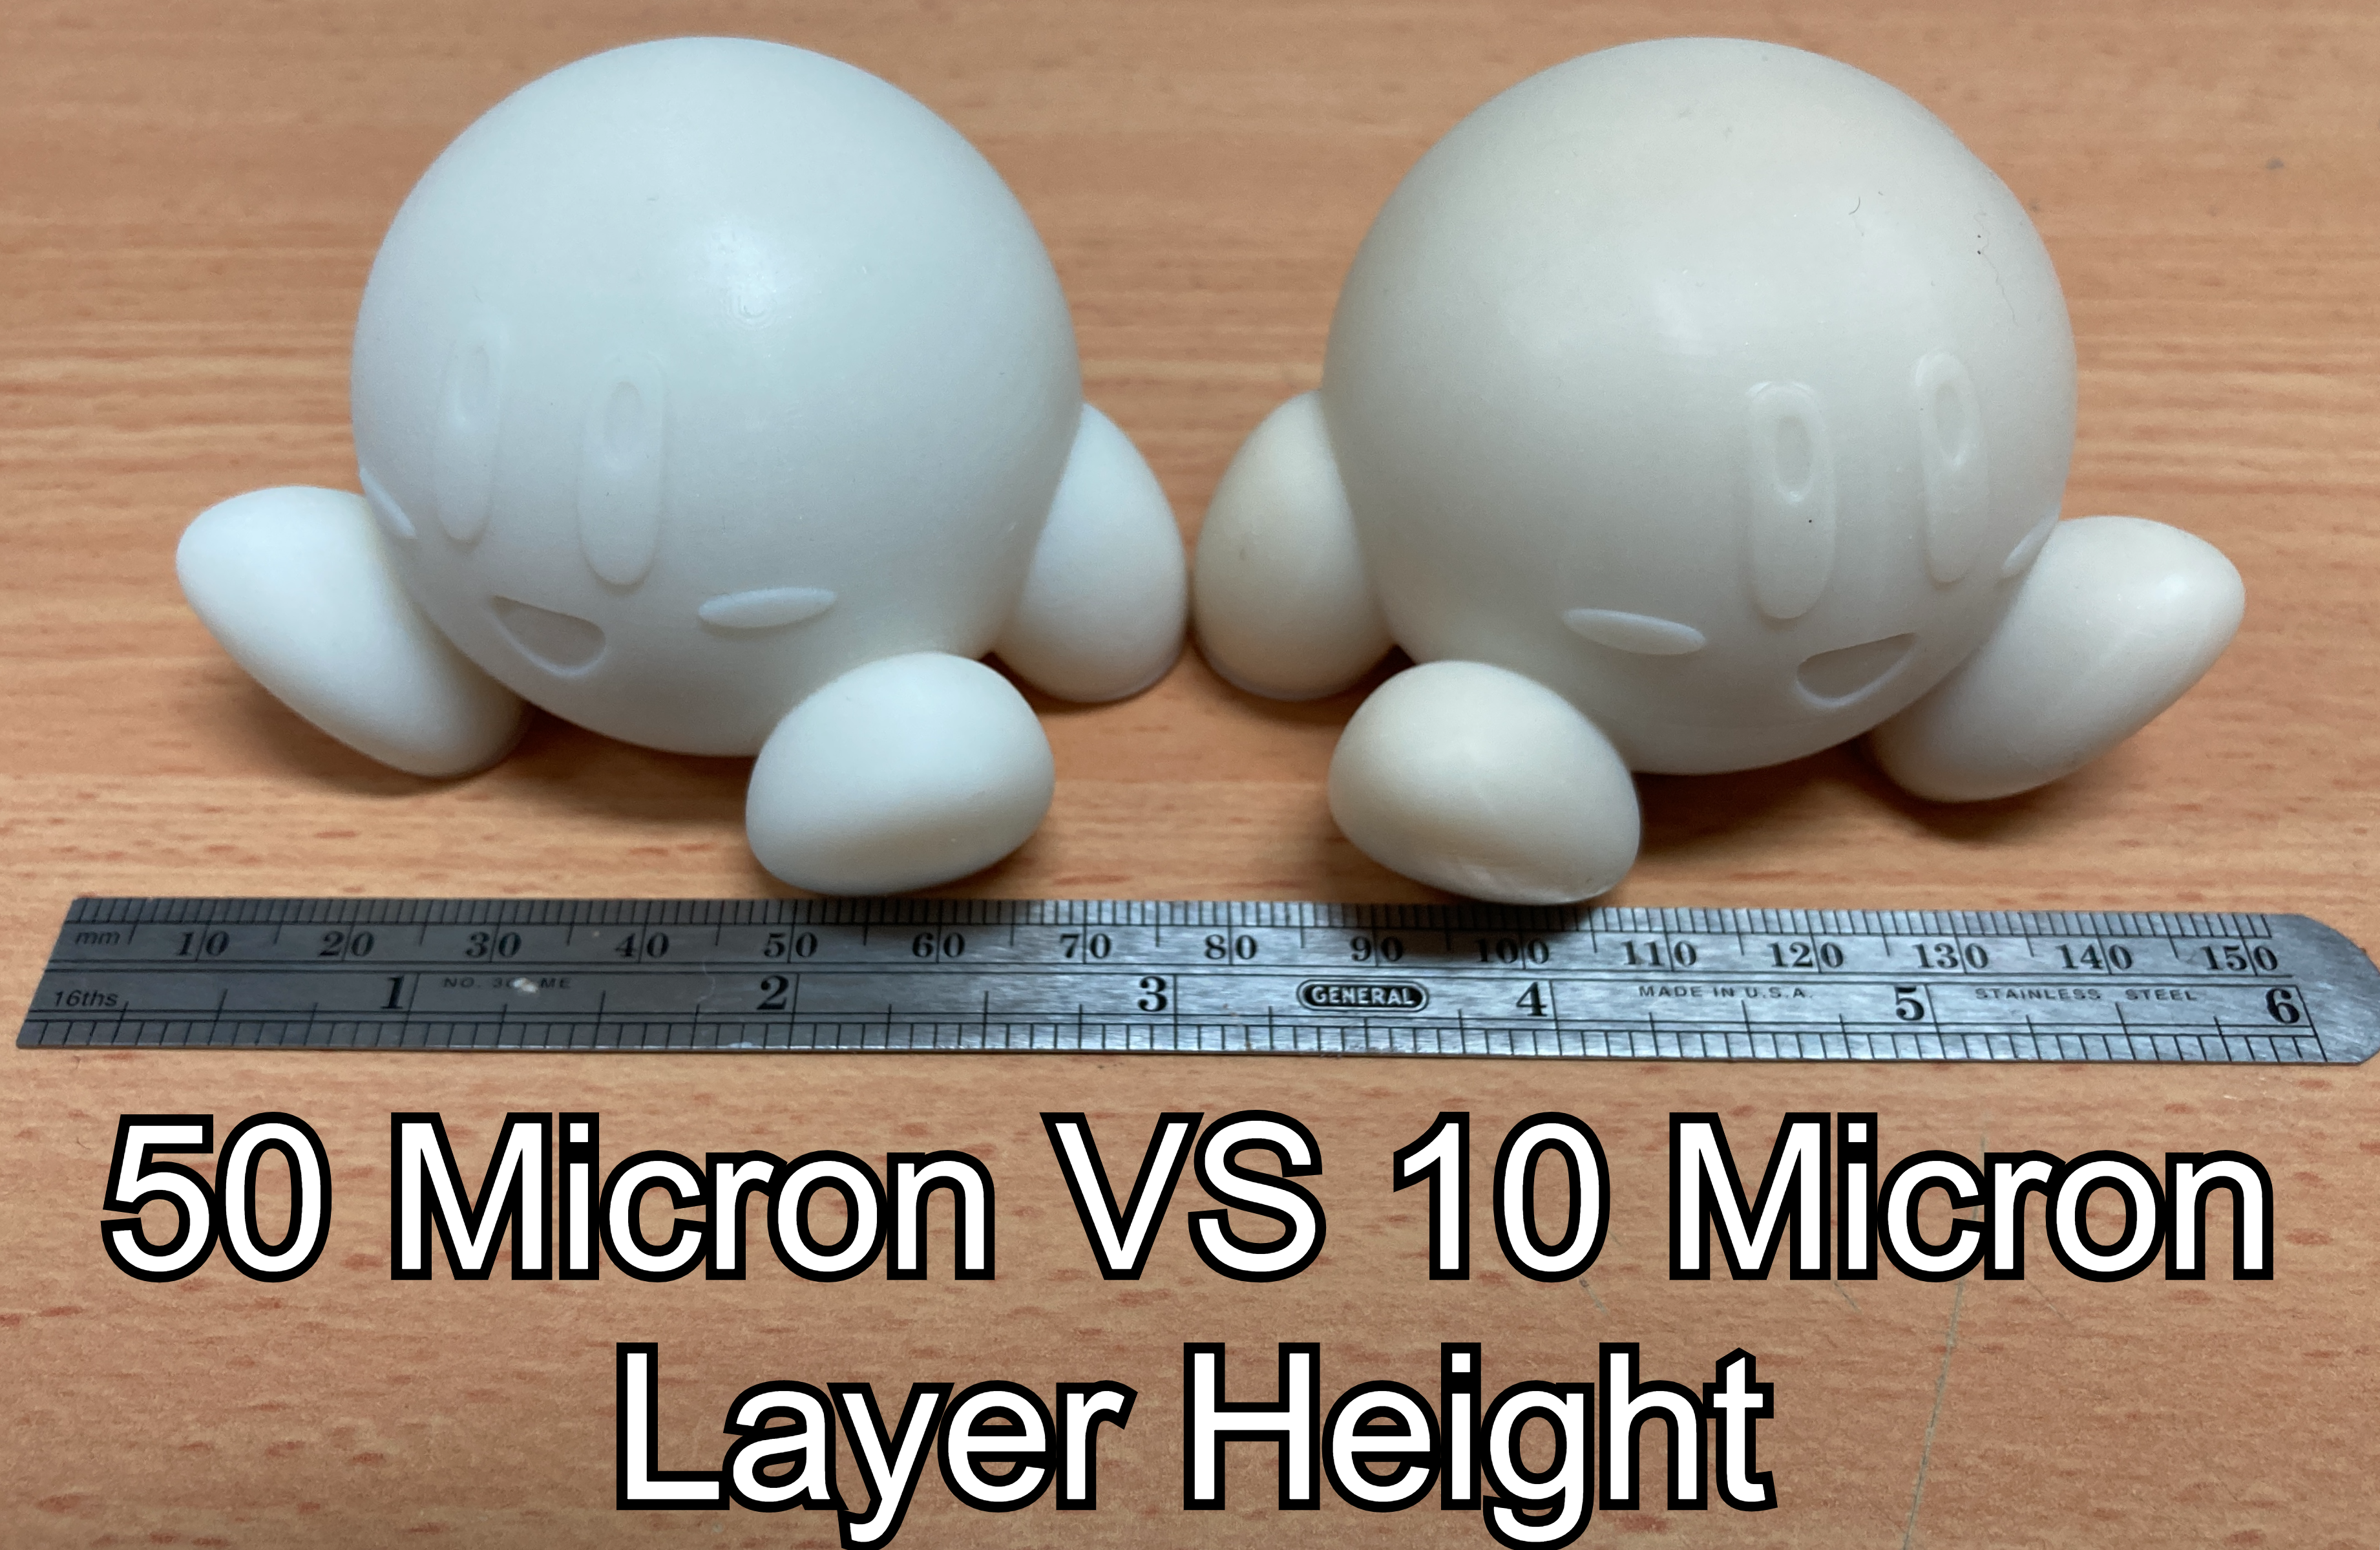
Feel more than happy if you can't tell the difference between these two models (besides a small blemish on the side of the head of the 10 Micron Kirby). There are times when layer height really makes a difference and times when it does not. Let me highlight the differences between these two models by shining a bright light on them both. See this in the image below. From this, it should be clear when printing 28mm scale models it is very valuable to print with Low Layer Height so that all the detail can be captured.
It is only with this bright light and zoomed-in does the layer lines reveal themselves. For models like this, it could be argued that layer height is not crucial to minimise. Particularly when you consider that the 50 micron Layer Height model took 4 hours to print whereas the 10 microns took 24 hours. In some models however you would garner significant improvements from using a lower height. Check out the below model, which is an STL file of multiple stages of a cloth falling captured and overlayed. From a distance and the top, all the paper looks great, but looking closely at the base where a subtle Z gradient occurs the 50 micron Layer Height used for this print reveals itself. This can be seen in the right of the image below and it becomes very obvious upon close inspection. This model would be significantly cooler if a lower Layer Height was used. No supports were used and the printed model was attached directly to the bottom of the build plate. This print took approximately 6 hours to complete.
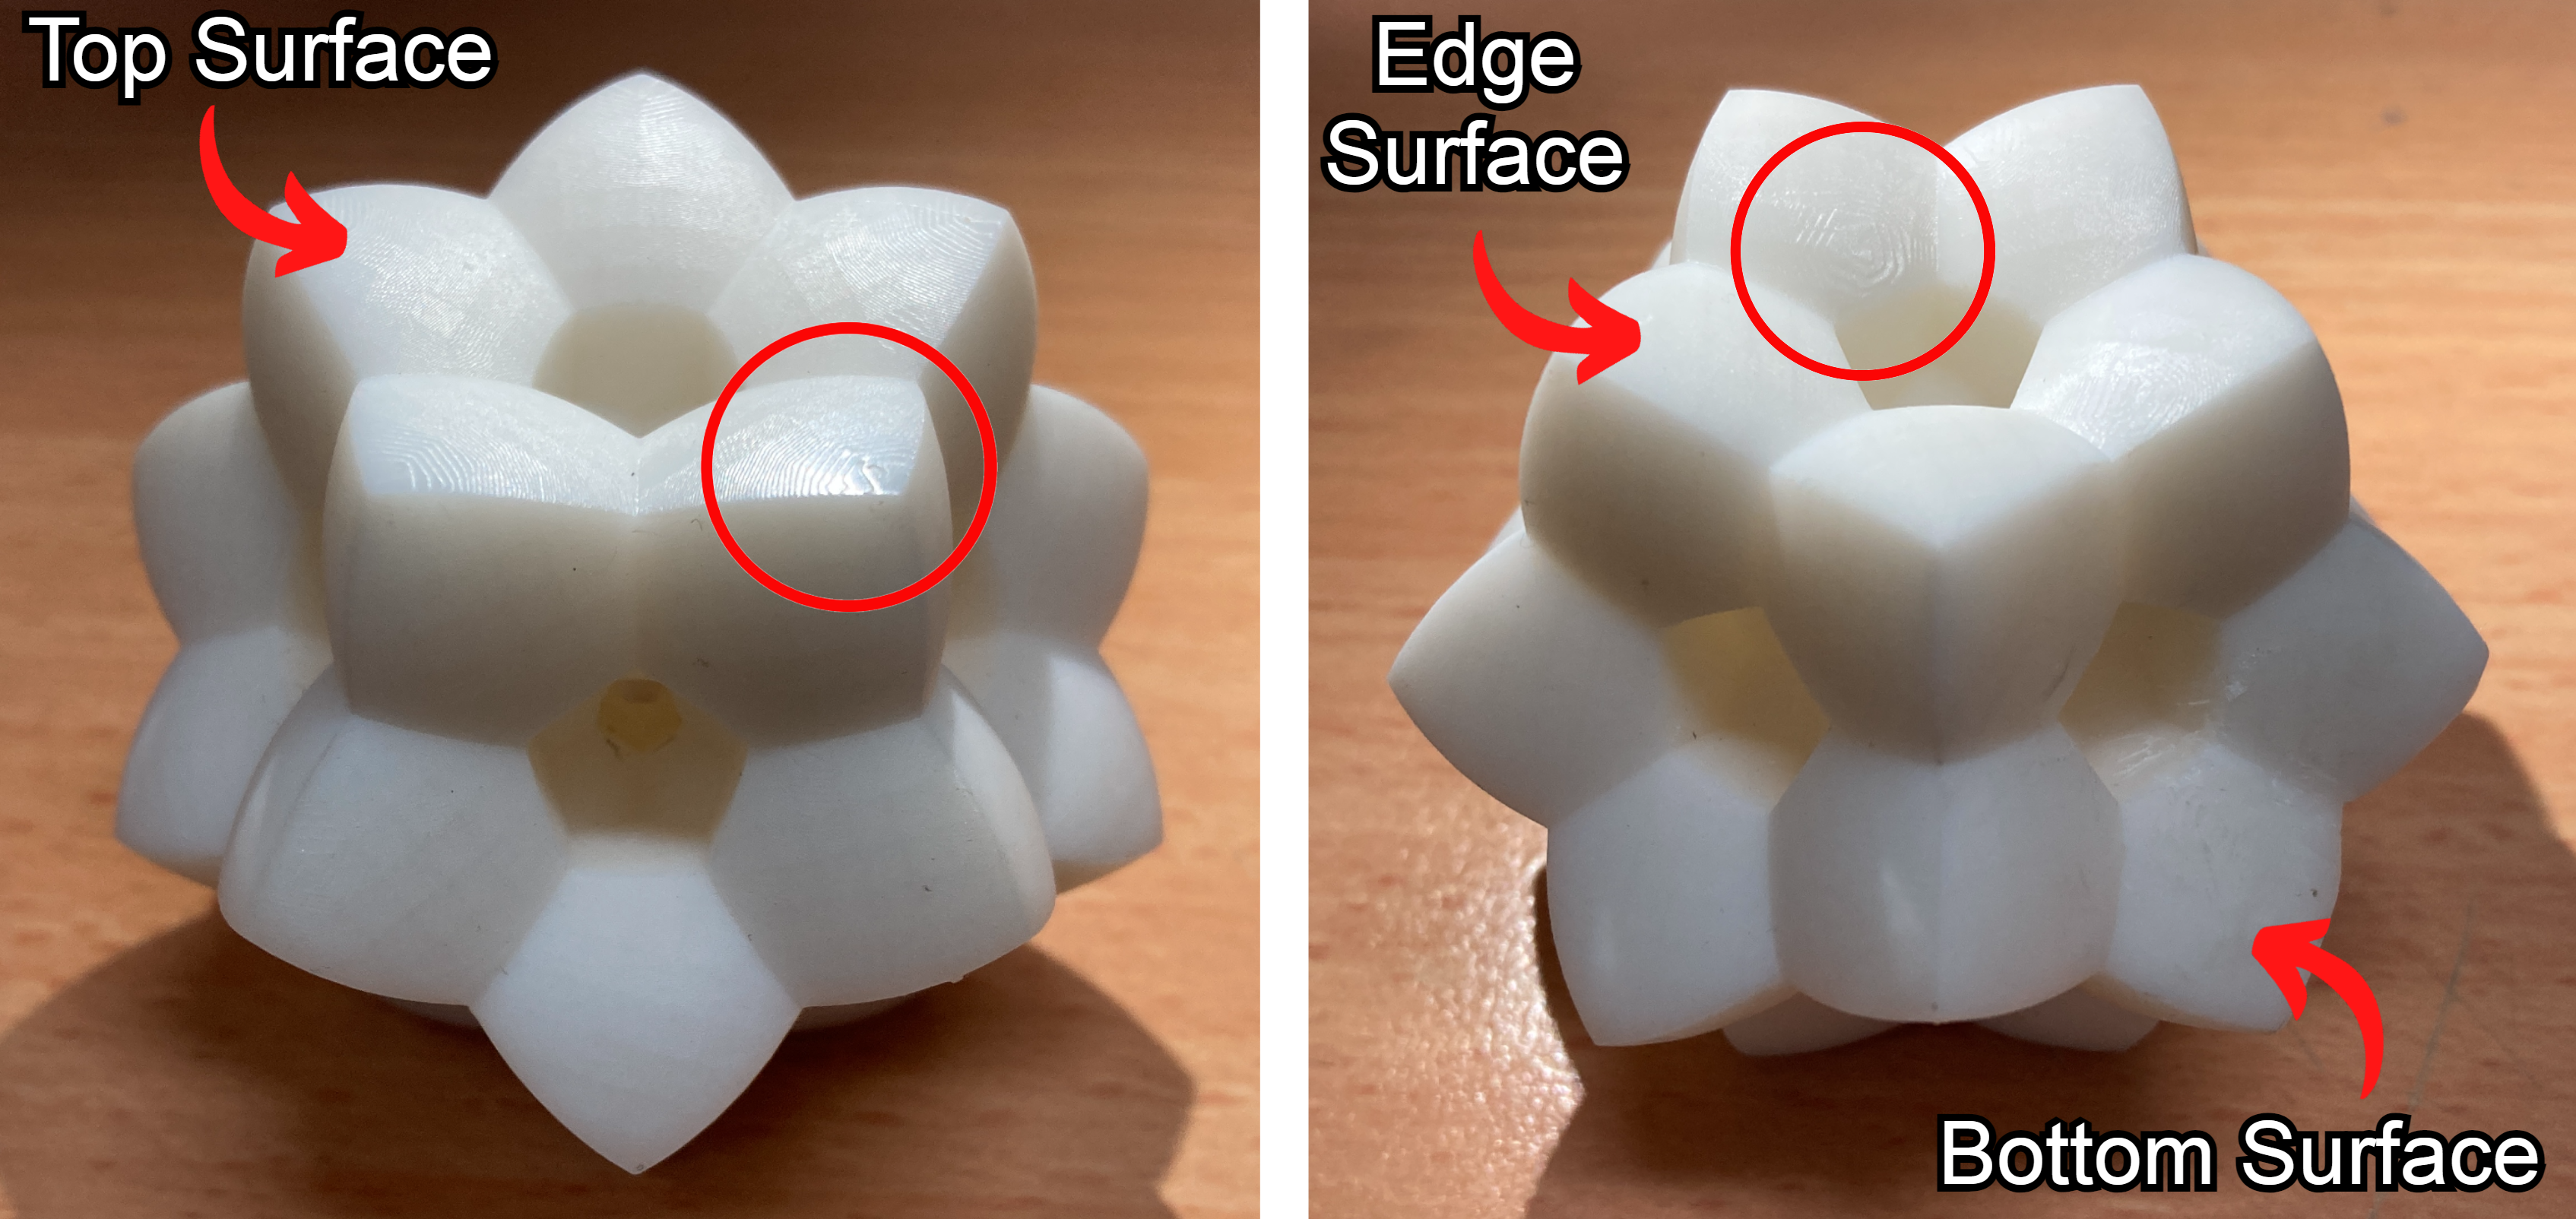
And to top it off what about a comparison of Z-Axis Representation using 50 Micron Height Vs the X-Y Axis Representation when using a 2K screen that the LD-002H 3D printer has. Check out the 3D representation of a 4-Dimensional Shape (a 120 cell polychoron) that I printed below. Feel free to right-click the image and open it up in a new tab to see it at full resolution. The image on the left is the top of the printed model. The image on the Right is the Side of the model. It is of particular interest to see the layer lines 'appear' on the X-Y plane of the surface. This occurs because you end up having the pixels create a step-esque effect. Anti-Aliasing can fix this somewhat. Jump to the Where to Now Section for more on this.
As a final example below is three models printed at a 28-millimeter scale (which means the base that a human model is standing on has a 28-millimeter diameter). Models are printed exactly the same except for different layer heights. From left to right the layer height used was 10, 50, and 100 microns. The 10-micron layer height model took 20 hours to 3D print with 3520 layers total. The 50-micron layer height model took 5 hours to 3D print with 704 layers total. The 100 layer height model took 2 hours to 3D print with 230 layers total. The layer height is obvious to me on all models except for the 10-micron layer height, particularly when focusing on their heads, thus justifying the significantly longer printing time.
And below is a close-up version of the heads to clarify my point. See this in the image below from left to right the layer height used was 10, 50, and 100 microns. When painted these layer lines become significantly more obvious. Find the original highly detailed STL of this Warlock linked down at the bottom of this article.
How to Alter Layer Height in Slicing Software (Lychee and Chitubox)
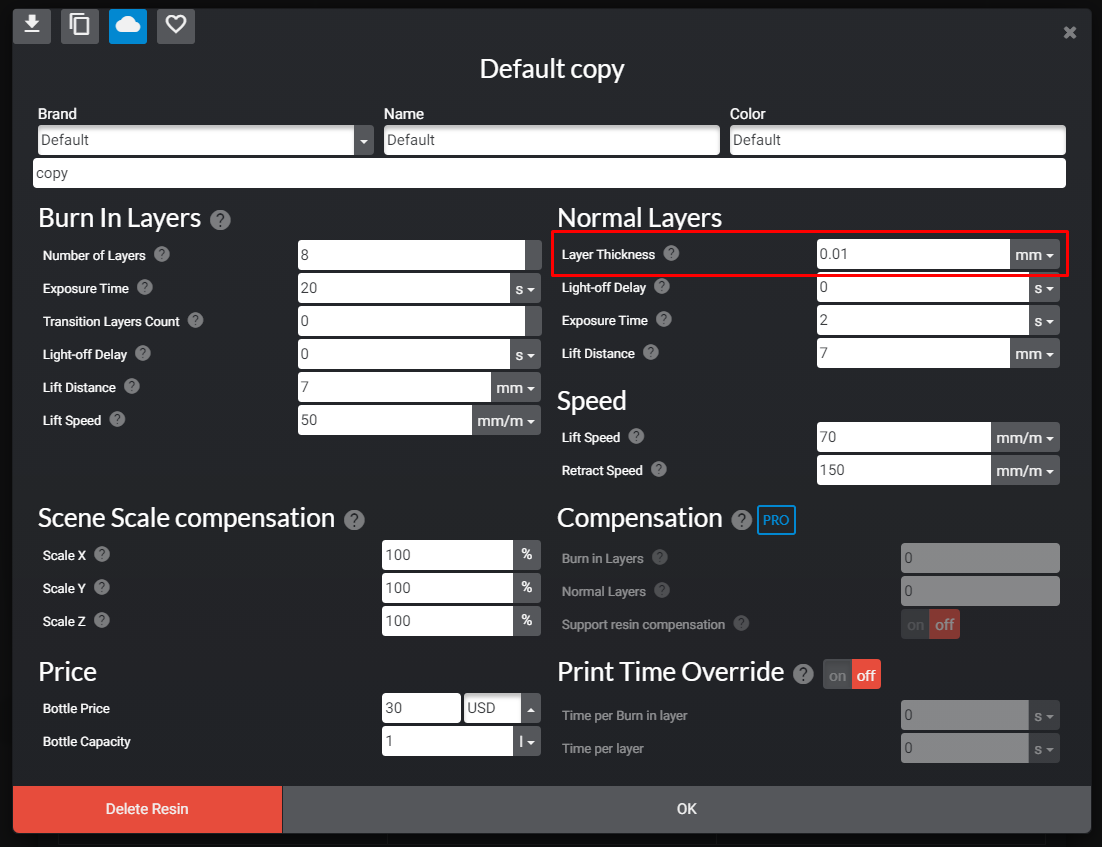
Lychee Slicer is my preference so I will show you how to alter the Layer height in it first. To alter the Layer Height in Lychee you will click on the 3D Printer button found near the top left of the window. This will open up a window just like the image below, showing the printers you have set up in Lychee. As you can see I have a Creality LD-002H highlighted. At this point click the Edit button. You can see it highlighted in a red box in the image below.

Once you have pressed that button you're going to see the following window overlaying the Printer and resins menu. This is where you can customise all kinds of values. Of most importance to us and this guide is the Layer Thickness which I have highlighted in Red. You can adjust the dimension value measured by pressing on the | mmâ–¼ | to reveal a drop-down menu if you want to work exclusively in Microns. Otherwise, remember that there are 1000 microns in a single millimeter and you'll be smooth sailing. Adjust this value to your desired amount. Any Value between 10-100 microns will work well with most correctly calibrated Traditional Resin 3D printers.
To adjust the Layer Height in Chitubox you're going to want to do the following. Click on the Big Settings options found on the middle right of the screen, navigate to the | Print | tab in the | Settings | menu that pops up. On this tab, you will be able to adjust the Layer Height in millimeters as seen in the highlighted section in the image below.
Carry on Effects to Control When Changing Layer Height
There are a couple of things to keep on top of whenever you are altering layer height to make sure your Resin 3D prints come out perfect. See them below.
- Layer Exposure Times. Optimal Layer Exposure Time dynamically changes as Layer Heights are altered. As the layer heights height is different the light required to do the initial cure is different. Thus to have the optimal value for Bottom and Normal Layer Exposure times you will need to run some Exposure Test Models. Look at this guide to learn all about Exposure Time and the process to find the best Layer Exposure Times no matter your Resin/Printer/Settings Combination.
- Total Bottom Layers. Bottom layers are the first few layers that are exposed to UV light in your model and bottom layer exposure times are always longer than normal layers exposure times. They are exposed longer so that the model can adhere more securely to the build platform. If you print Smaller Layer Heights, you will want more Bottom Layers. Just by being aware of this and accommodating for it you won't end up with prints falling off the build platform. Below are the general Bottom Layer amounts that I have been using for the LD-002H UV 3D Printer, which has a monochrome LCD.
For 10 Micron Layer Height Prints - ~20 Bottom Layers.
For 50 Micron Layer Height Prints (Default) - ~10 Bottom Layers.
For 100 Micron Layer Height Prints - ~8 Bottom Layers. - Final Cure Time. In my experience after the model has been removed from the build platform and washed if you used a Lower Layer Height, the Final Cure to finish the part will take less time than the same model with a Higher Layer Height. This is because each exposure of the Thin Layers adds up, resulting in a higher Initial Cure of the whole piece.
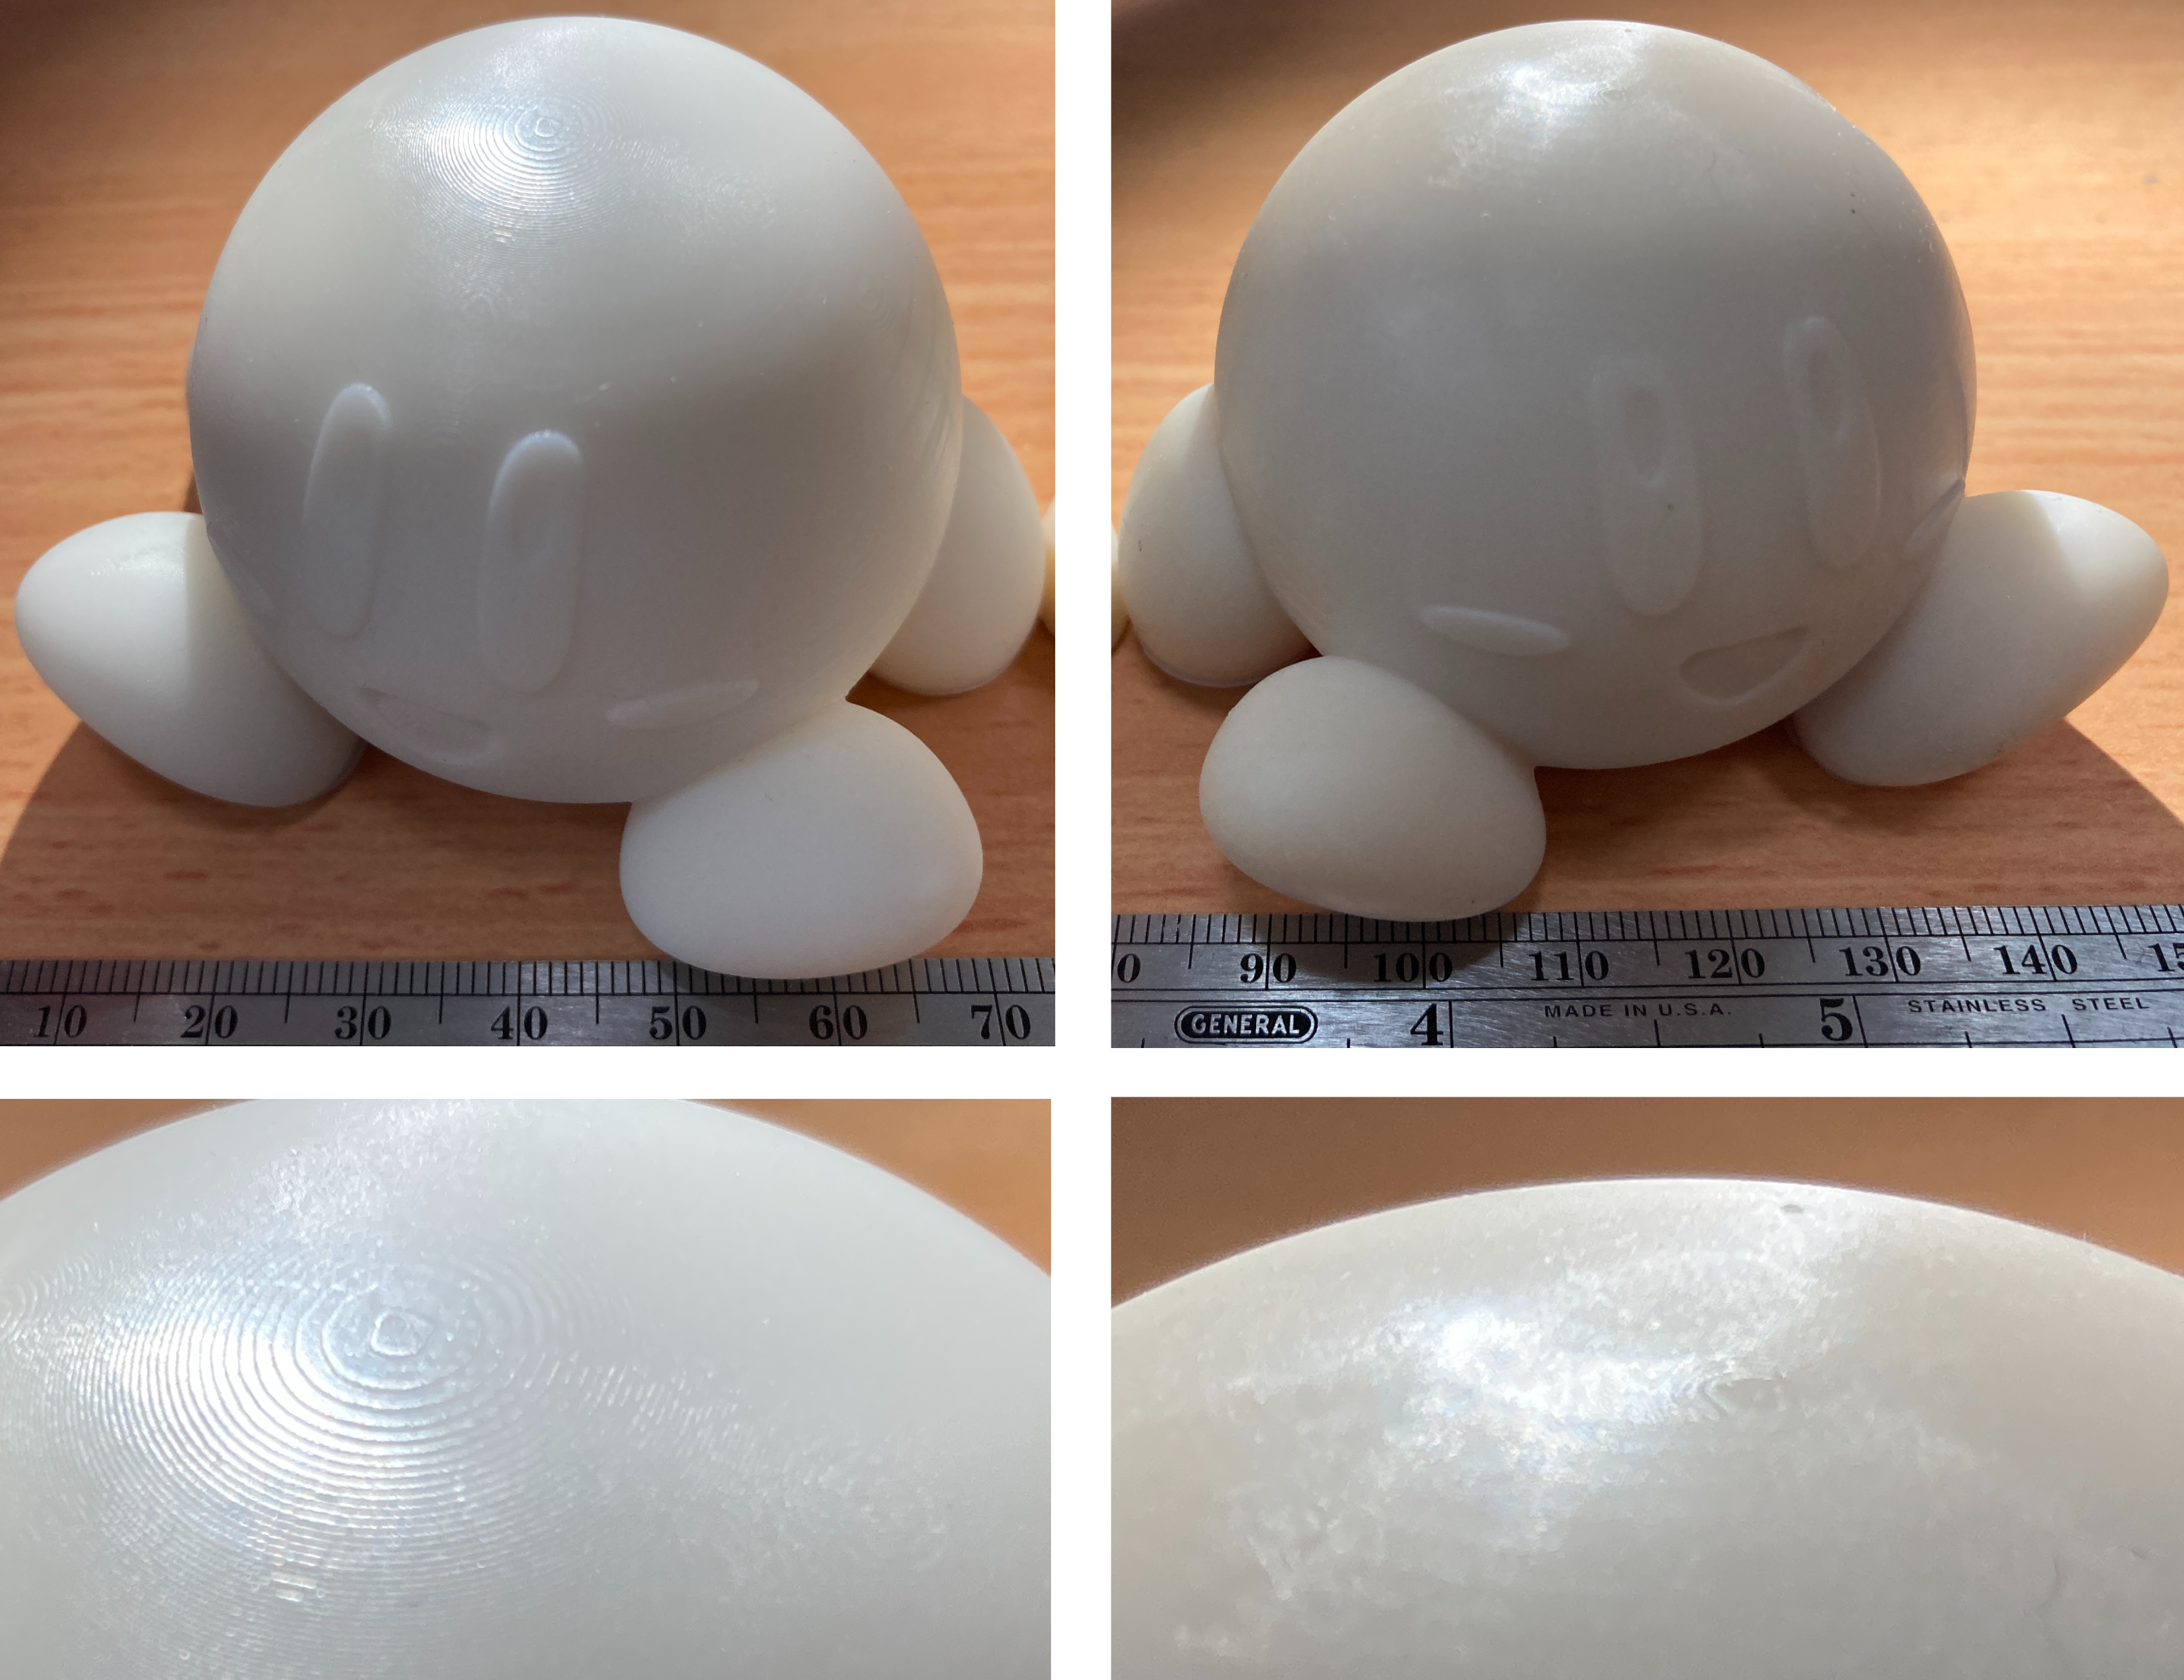
- Understanding the Risk. Lower Layer Height Means More Layers and Much Longer Prints. This results in a higher chance of failure and more strain put on the printer hardware as it needs to do significantly more work to create a 3D print. The longest part of the printing process is moving up and down the stepper motor to pull each layer off the print FEP. As prints with Lower Layer Height will be much longer to create it provides environmental variables/changes more chance to meddle with your printer. See below for my first attempt printing the 10 micron Layer Height Kirby, as the model slightly fell from the build platform (and as it was pointed out the Build Platform was not perfectly level with the Monochrome screen). This unevenness then drove the model repeatedly and incorrectly into the FEP sheet. This then drilled a small hole into the FEP sheet allowing a tiny amount of resin to leak out of the VAT. It also caused a mark and small layer shift on the model, see this in the image below. This FEP Sheet then required repairs after the 3D print was removed before further printing could commence.
Other Method to Increase Speed
If speed is the goal and you have already maxed out the Layer Height on your particular Resin 3D printer, then I have a tip for you. The thing that takes the longest is not the exposure time of each layer but the process of lifting the build platform so that the current printed layer peels off the FEP the build platform, which occurs via the stepper motor pulling back, then pushing the model back to the correct Z-Axis height location for the next layer.
Lychee Slicer provides the option to increase the stepper motor speed (Both Lifting and Retracting Speed) as well as another option to alter the height that the build platform raises to each time it pulls up a layer from the surface of the FEP Sheet. By tuning both of these (increasing stepper motor speed and lowering the Z-height of the raising build platform) you will achieve speed nirvana. See in the image below the location of these settings which are in the same menu location as the Layer Height settings. If you push these settings too far you won't get the printed layer to remove from the FEP or you will cause the stepper motor to lose its position, both of which will cause a print failure. Keep this in mind and adjust each setting in small increments over a number of test prints (<1mm increments for Lift Distance and 10mm/m increments for Lift/Retract Speed).
Where to Now (Anti-Aliasing and What Layer Height Provides Most Strength?)
The next port of call is figuring out Anti-Aliasing and what it can do to help improve the limitation Printing Resolution. To be clear, Print Resolution is the size of the printed voxel which, in DLP printing, is dependent on the resolution of the Masking LCD screen of the 3D Printer (X-Y Axis). The LD-00H 3D Printer I have been utilising has a 2K screen. 2K means there are 2,048 x 1,080 pixels. This results in a total pixel count of 2,211,840. Keeping in mind the size of the mono-screen this results in an XY axis Precision of 0.051mm^2.
XY resolution is the smallest feature the light source can reproduce within a given layer. That means ~50 microns squared is the best we can do with this machine in the XY plane. See an explanation of this below.
Anti-Aliasing is a method to combat this by altering the original model. In previous guides, I have recommended using 8X but truthfully the best result is model-dependent. This is a topic that deserves its own guide all to itself, but being aware of its existence means you've already won half the battle. Anti-aliasing is a method to smooth object edges by reducing the number of lines and vertical artifacts you see on your 3D printed model. Using this tool means you are subtly altering your original model in a way to mitigate the limitations of the XY Resolution.
Below is an example print using the 10 Micron Layer Height and an 8X Anti-Aliasing. The figuring is a scanned model of a Terracotta Warrior which stands at ~150mm tall and took over three days to 3D print with 15500 Layers required. I have uploaded the below image at as high a resolution as possible and I challenge you to find either layer lines or printing resolution marks. Feel free to right-click the image and open it up in a new tab to see it at full resolution. Please excuse the fingerprint marks I left on the surface when I removed the supports before it was fully cured. That is also the reason it is missing a finger, but in my defense, other Terracotta Warriors also have missing fingers. If I was to print this model again I would use finer supports thus mitigating the pot marks however I really wanted this print to succeed thus I went a little support crazy.
Now, What Layer Height Provides the strongest resin 3D printed part. I have no idea (nor does anyone seem to have any research on this), thus it is in this section. With resin used in these printers getting stronger (the toughest as of the Year 2022 producing results comparable to 3D printed ABS/PLA material) it seems clear they are going to become stronger (and thus these printers will produce parts more viable for working components). With the idea of mixing Cabosil and Resin together directly into the VAT (in a similar manner to How to Colourise Resin 3D Prints with Alcohol Ink guide) firmly in my mind, not knowing which layer height is best to choose for strength sits with me funny. You would think the smallest layer height would produce the best results, but experiments done by others in the Fused Filament Fabrication realm have led to curious results that don't correlate with that hypothesis. Testing is in order.
STL File Download Location
Below is a download location for all the files I have used in this guide. All credit goes to the creators which are as follows with original model links. The Easy 3D Printable Kirby Model and Original Designers Youtube Video, Terracotta Warrior Download Location, the Falling Paper Design, the Old Priest (Warlock) STL file, and the 120 Cell Polychoron (along with others 3D representations of 4D designs).


