In this guide, we'll learn what a Rotary Encoder is, when and why we might use a Rotary Encoder, and how to use a Rotary Encoder with a Raspberry Pi Pico.
To follow along all you'll need is:
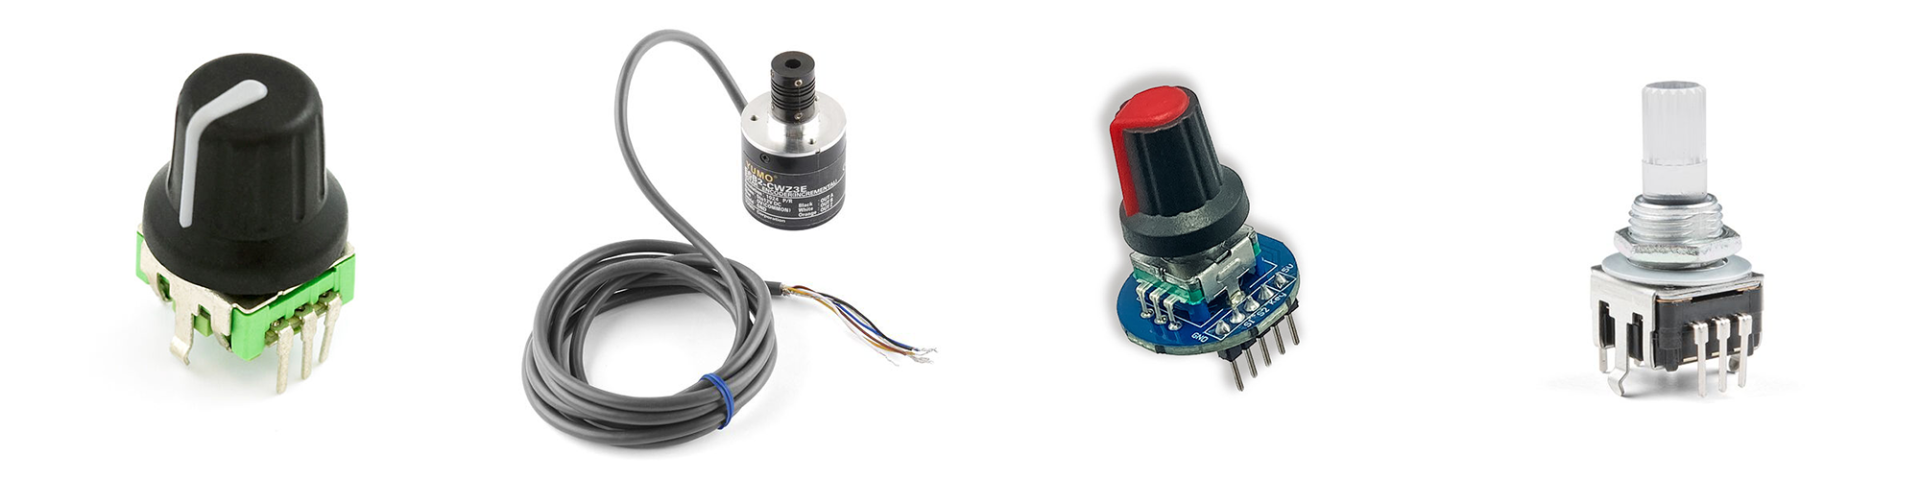
- A Rotary Encoder - we recommend using our breadboard friendly Encoder Module with Button that has built-in pull-ups and debouncing filters.
- A Raspberry Pi Pico
- A way to connect the Rotary Encoder and Pico together - in this guide I'm using the BusBoard breadboard and some jumper wire.
If this is your first time using a Raspberry Pi Pico we also recommend that you check out our guide on how to Setup a Raspberry Pi Pico and Code with Thonny.
Contents:
- What is a Rotary Encoder?
- When to use a Rotary Encoder?
- How to choose a Rotary Encoder?
- Connecting the Rotary Encoder to the Pico
- Download the micropython-rotary Library
- Example - Reading values from a Rotary Encoder
- Remix - Reset the Rotary Encoder using the built-in push button
- Where to from here?
- Conclusion
- Resources
What is a Rotary Encoder?
Did you scroll to this section of the guide with a computer mouse? If that's a yes then you likely just used a Rotary Encoder! If not don't worry: you're probably still using them all the time with that volume knob on your digital stereo, or even on your microwave's program selector!
A Rotary Encoder is a device that looks a lot like a Potentiometer, but work in a very different way. It outputs pulse signals when it's shaft is rotated, enabling us to measure rotary movements with a microcontroller such as the Raspberry Pi Pico. Unlike potentiometers, they can be rotated infinitely and often have a tacticle feedback called 'Detents' - that's the feeling of those pulse signals being triggered!
Rotary Encoders often also have an integrated push-button, activated by pushing the shaft inwards. The combination of knowing rotary position and a push-button make Rotary Encoders an ideal device for providing human control of hardware in a simple manner.
To get a deeper understanding of how Rotary Encoders work under-the-hood, check out our guide that covers the theory of how they work.
When to use a Rotary Encoder?
I like to think of the Rotary Encoder as the underdog of things that turn. Nearly everyone that has played with electronics is probably familiar with the trusty Potentiometer, but in many cases the Rotary Encoder is a superior choice.
If any of the following ring true with your project, then a Rotary Encoder will get you out of trouble:
- You're using a microcontroller
- You want to physically increase or decrease a value - such as volume or brightness.
- You want to build a menu or similar that a user needs to navigate - this is where having the infinite turning and a push button comes in handy!
- You want fine-grained control - know exactly where you've turned to.
- You want your project to be fancy - feel satisfied with that physical feedback and even RGB lighting!
Keep in mind, however, as cool as Rotary Encoders are there are times when you should probably turn to something else, such as the Potentiometer:
- You're building an analog circuit - you'll need to complicate that circuit to detect the encoder's pulses.
- You need to vary the resistance in part of your circuit - the Potentiometer, A.K.A. the Variable Resistor, will obviously be better suited here.
- You don't necessarily need or even want a high level of control - let's face it, sometimes the simpler option will do just fine!
How to choose a Rotary Encoder?
The most basic Rotary Encoder will have at minimum 3 pins and provide the fundamental feature of encoding the rotation of it's shaft.
Building up from there, they can include a combination of the following features, some of which will add more pins:
- A push button built into the shaft (often 5 pins) - useful for building select and submit controls, such as a menu.
- Built-in lighting, such as an RBG LED (even more pins) - useful for adding a visual element to the status of the device you are controlling.
- Tactile or non-tactile feedback - perhaps that bumpy feedback from the encoder is going to be a distraction for your application.
- Different resolutions / how many steps per rotation the encoder can detect - a higher resolution will give you finer-grain control, but will likely come with a higher price tag as well.
There are also a few common additions that can help when using a Rotary Encoder:
- Knobs - accessorise your Rotary Encoder with some bling!
- Breakout boards - make your Rotary Encoder breadboard friendly.
If you're still not sure, we recommend picking a Rotary Encoder Module like the one we'll be using further below, which comes pre-mounted on a breakout board and includes pull-up resistors and baked-in debouncing circuitry.
Connecting the Rotary Encoder to the Pico
Let's get to the fun stuff - how to actually use one of these cool devices!
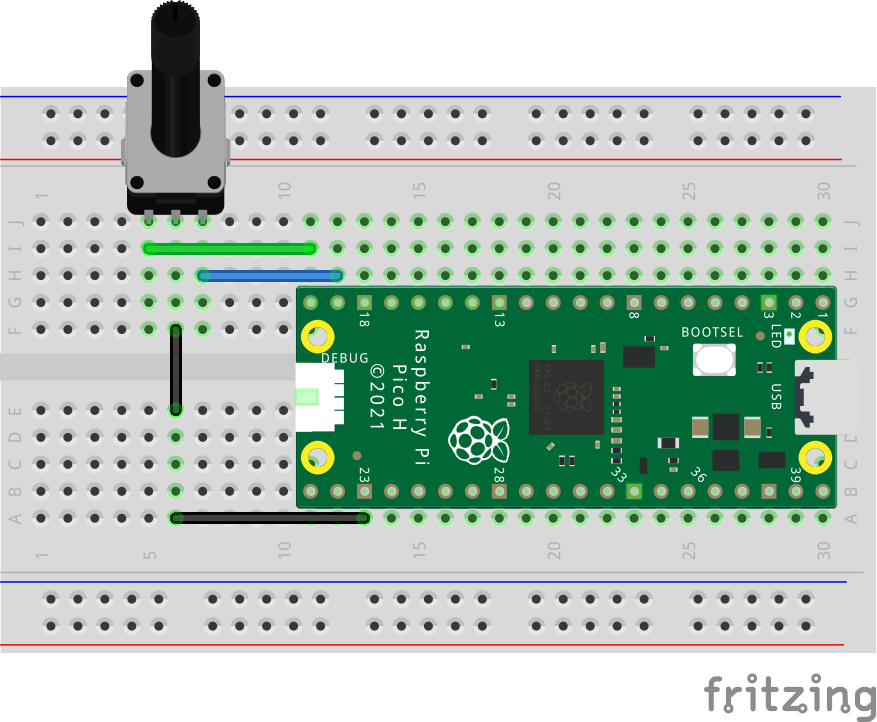
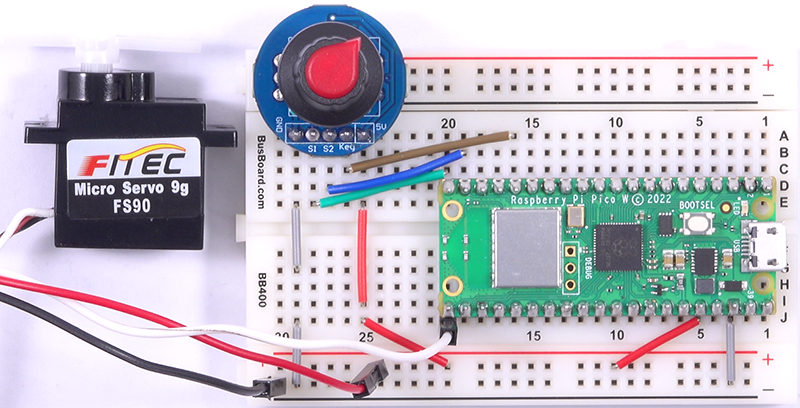
Place the Pico and Rotary Encoder into the breadboard, making sure the Pico's two rows of pins are separated by the gap in the middle of the breadboard to avoid any shorting.
Connect the following pins on the Pico to the corresponding pins on the Encoder Module:
- Pico GND -> Encoder GND
- Pico 3V3 -> Encoder 5V (note that the encoder module we are using is 3.3V safe even though the pin is marked 5V)
- Pico GP15 -> Encoder S1
- Pico GP14 -> Encoder S2
- Pico GP12 -> Encoder KEY
Note: Any of the Pico GPIO pins will work with the Encoder Module, I've just picked these three for easy breadboard placement.

If you're not using a Module but instead are using a Standalone 3-Pin Rotary Encoder, hook it up like so:
- Pico GND -> Encoder C (Middle Pin)
- Pico GP14 -> Encoder A (Left Pin)
- Pico GP15 -> Encoder B (Right Pin)
You'll also need to enable the internal pull-ups later on in the code example.
Download the micropython-rotary Library
Reading pulses from a Rotary Encoder requires some underlying boilerplate code, but instead of re-inventing the wheel we're going to use an open source library that provides this for us: micropython-rotary.
Unfortunately micropython-rotary isn't available in the Thonny package manager, so we'll need to manually download the files and upload them to the Pico via Thonny's File Manager:
- Download the attached zip containing the files rotary.py and rotary_irq_rp2.py to your computer and extract the zip file.
- Open Thonny and make sure the Files view is visible using the top menu 'View' > tick 'Files'.
- Navigate to the folder you extracted the files in the zip to, right-click each file (rotary.py and rotary_irq_rp2.py) and select 'Upload to /' to upload to the Pico.

Example - Reading values from a Rotary Encoder
Let's start using the Rotary Encoder!
Open up Thonny and copy-paste the following code into a new script:
"""
A simple example showing how to read values from a rotary encoder

Requires the RotaryIRQ library from https://github.com/miketeachman/micropython-rotary
"""

from rotary_irq_rp2 import RotaryIRQ


# Enter the two GPIO pins you connected to data pins A and B
# Note the order of the pins isn't strict, swapping the pins
# will swap the direction of change.
rotary = RotaryIRQ(14, 15)

# If you're using a Standalone Rotary Encoder instead of a module,
# you might need to enable the internal pull-ups on the Pico
# rotary = RotaryIRQ(14, 15, pull_up=True)

current_val = 0  # Track the last known value of the encoder
while True:
    new_val = rotary.value()  # What is the encoder value right now?

    if current_val != new_val:  # The encoder value has changed!
        print('Encoder value:', new_val)  # Do something with the new value

        current_val = new_val  # Track this change as the last know value
Save and Run the script. With the script running, rotate the shaft of the Rotary Encoder back-and-forth, and watch the Shell and Plotter views in Thonny.
As you feel each distinctive pulse while rotating the encoder, you will see the message "Encoder value: " printed on the screen with the latest encoder value.

What is the code doing?
First we import the micropython-rotary package (the class name we want to use is RotaryIRQ), and we setup access to the Encoder by giving RotaryIRQ the GPIO pin numbers for the data pins of our Rotary Encoder.
from rotary_irq_rp2 import RotaryIRQ

# Enter the two GPIO pins you connected to data pins A and B
# Note the order of the pins isn't strict, swapping the pins
# will swap the direction of change.
rotary = RotaryIRQ(14, 15)
Before we start reading data from the encoder, we create a variable 'current_val' that will keep track of the last know value of the encoder, so that we can avoid spamming the Thonny Shell and Plotter output with repeated data.
current_val = 0 # Track the last known value of the encoder
We're now ready to read the from the Rotary Encoder! We create an infinite loop with the statement 'while True', and as the first step of the loop we take a reading from the rotary encoder using 'rotary.value()'.
Note that the reading is stored in a temporary variable 'new_val', not our tracking variable 'current_val'.
while True:
    new_val = rotary.value()  # What is the encoder value right now?
Next we check if the new rotary value is different from our tracking value using 'if current_val != new_val:'
If the two values aren't the same, then we know that someone has rotated the rotary encoder!
if current_val != new_val: # The encoder value has changed!
When the change in encoder value has been detected, the code inside the 'if' statement runs.
We've already stored the new encoder value in a variable - 'new_val', all that's left is to do something with the value. In this step we simply print the new value to the Thonny shell, but if this code was inside something like a stereo it would probably do something much more interesting!
print('Encoder value:', new_val) # Do something with the new value
We have one last piece of house-keeping to do: update our tracking variable. We assign the new encoder value 'new_val' to the tracking variable 'current_val', so that it's there for the next loop where the process is repeated.
current_val = new_val # Track this change as the last know value
Remix - Reset the Rotary Encoder using the built-in push button
Let's take our Rotary Encoder to the next level! Let's hook up the push-button and use it to reset the rotary encoder.
The following code builds on the example above, copy-paste it into a new script and save it to your Pico.
"""
A simple example showing how to handle a button press from a rotary encoder

Requires the RotaryIRQ library from https://github.com/miketeachman/micropython-rotary
"""

import time
from machine import Pin
from rotary_irq_rp2 import RotaryIRQ

# Enter the two GPIO pins you connected to data pins A and B
# Note the order of the pins isn't strict, swapping the pins
# will swap the direction of change.
rotary = RotaryIRQ(14, 15)

# If you're using a Standalone Rotary Encoder instead of a module,
# you might need to enable the internal pull-ups on the Pico
# rotary = RotaryIRQ(14, 15, pull_up=True)

# Enter the pin that SW is connected to on the Pico
btn = Pin(12, Pin.IN)

# Note: the encoder we're using has a built in pull-up on the push button
#  if you're using a plain rotary encoder you might want to enable the
#  built in pull-up on the Pico with:

# btn = Pin(12, Pin.IN, Pin.PULL_UP)

current_val = 0  # Track the last known value of the encoder
while True:

    if btn.value() == 0:  # Has the button been pressed?
        print("Reset encoder to:", 0)
        rotary.reset() # Resets the rotary library's internal counter back to zero

        time.sleep_ms(250) # A small delay to wait for the button to stop being pressed

    new_val = rotary.value()  # What is the encoder value right now?

    if current_val != new_val:  # The encoder value has changed!
        print('Encoder value:', new_val)

        current_val = new_val  # Track this change as the last know value
Run the script and rotate the shaft until you have some readings. Now give the push-button a press to toggle it, and you should see the Rotary Encoder value reset to zero!

What is the code doing?
In addition to the RotaryIRQ import, we need two new imports: time, and Pin from the micropython machine library.
import time
from machine import Pin
Before the infinite loop, we add access to our hardware button using Pin(12, Pin.IN) - passing in the GPIO pin number that of the Key pin of the Rotary Encoder.
Also check the comments in case you are using a different rotary encoder than the one we are using.
# Enter the pin that SW is connected to on the Pico
btn = Pin(12, Pin.IN)

# Note: the encoder we're using has a built in pull-up on the push button
#  if you're using a plain rotary encoder you might want to enable the
#  built in pull-up on the Pico with:

# btn = Pin(12, Pin.IN, Pin.PULL_UP)
Now inside the loop, but before the code from the previous example, we add an if statement that checks if the button has been pressed by checking if it is equal to zero - or in electronics-speak has gone "LOW".
while True:
    if btn.value() == 0:  # Has the button been pressed?
When the button is pressed first we print a message to the Thonny shell so we can get some instant feedback.
print("Reset encoder to:", 0)
Then we reset the Rotary Encoder by running 'rotary.reset()'
rotary.reset() # Resets the rotary library's internal counter back to zero
Lastly we add a short 250 millisecond delay to the code using 'time.sleep_ms(250)'. This is not relevant to resetting the encoder, it's simply there to wait for you to stop pushing down the push-button (the Pico will be running the loop many many times per second). If you are getting repeated "Reset encoder to" messages, try increasing this value to 500 or even 1000 milliseconds (1 second).
time.sleep_ms(250) # A small delay to wait for the button to stop being pressed
And the rest of the code is the same as the first example!
We have successfully integrated the Rotary Encoder's push-button to intercept the changing encoder value, resetting it to zero when pressed.
Where to from here?
The uses for Rotary Encoders are countless! Here's an example of how you might use a Rotary Encoder to control another piece of hardware: Such as a Servo!
The shaft of the encoder is used to choose the desired position of a servo, and when ready the new position is submitted to the servo using the push-button. This could be remixed be control the lock on a safe, or to adjust the shutters on a window - and that's just two possibilities!
If you're interested in trying this one out, you'll need a servo, the micropython-servo library (available in Thonny's package manager), and the code below.
"""
An example that controls the position of a stepper motor
using positional values from a rotary encoder

Requires:
- RotaryIRQ library from https://github.com/miketeachman/micropython-rotary
- Servo library from https://pypi.org/project/micropython-servo/

"""

import time
from rotary_irq_rp2 import RotaryIRQ
from machine import Pin
from servo import Servo


rotary = RotaryIRQ(14, 15)
btn = Pin(12, Pin.IN)

# Update the pin that the control wire of the servo is connected to
my_servo = Servo(pin_id=16)


my_servo.write(0)

current_val = 0
while True:
    new_val = rotary.value()

    if current_val != new_val:
        print('Encoder value:', new_val)
        current_val = new_val

    # When the button is pressed, move the servo
    # to the current position of the encoder
    if btn.value() == 0:
        if current_val < 0:
            print("Cannot move servo below 0 degrees")
        elif current_val > 180:
            print("Cannot move servo above 180 degrees")
        else:
            my_servo.write(current_val)  # Move the servo to the position set my the encoder
        time.sleep_ms(500) # A small delay to wait for the button to stop being pressed
Conclusion
With so many uses Rotary Encoders are a great way to add a human touch to your next project! We're looking forward to hearing what you come up with in the forums, and if you have any questions or need some help, start the conversation below. We're full-time makers and happy to help.
Happy making!

