An infinity mirror creates a striking optical illusion - a tunnel of light that seems to tear through space. I built this infinity-mirror table using some addressable LEDs, a Particle Photon and easily obtainable timber supplies.
Check out the video to see the table in action!
If you have any questions about building your own Infinity-Mirror Table then jump down to the comments section at the bottom of this page. If you have any other technical questions then feel free to hit us up on the forums - we're full-time makers and we're here to help with your projects!
Skills built during this project
- Basic woodworking (Accurate cutting & routing, gluing)
- Power-electronics
- Addressable LEDs
Materials used
Hardware
All the timber hardware was bought from Bunnings warehouse. Naturally, if you have a well-nourished timber stock you might not need to purchase anything!
- Plywood sheet. I used a 12mm sheet of standard ply which is probably on the thin side. I'd use a thicker sheet of marine-ply next time for the higher stiffness, better surface finish and better quality overall.
- 41x19mm dressed pine for the frame
- 41x41mm dressed pine for table legs
- 750x750x3 mirror-glass
- 750x750x5 clear acrylic
- Semi-reflective privacy film - this enhances the infinity-mirror effect.
I had the mirror and acrylic cut to size by local trade shops.
Electronics
- 3m addressable LEDs
- Particle Photon
- Logic-level shifter - or make your own with a transistor.
- 3x 10k potentiometer
- 3x Knobs (red, green, blue)
- 2-pin and 3-pin terminals
- Panel-mounting power socket
- 5V, 10A power supply - This project will use ~6-7 Amps if set to full-brightness white. You can certainly get away with a smaller power supply, we've just specced for safety and longevity.
Main tools used
- Mitre-saw - A handsaw with mitre-cutting jig would be fine too.
- Circular saw - If you can get the plywood cut to size (or are adventurous with the handsaw) then you won't need this.
- Router
- Drill & drill-press
Of course, the usual woodworking and electronics sundries apply; Clamps, nails, screws, wire, solder etc.
Build Log
The ply was cut to size with a circular saw, and the edge pieces were mitre-cut. The corners of the edge pieces were routed 4mm deep to accommodate the 3mm-thick mirror, and a 6mm slot routed to secure the acrylic. The following photo shows the configuration (upside down) with the acrylic inserted and the channel in the top ready to accept a dry-fit of the mirror.
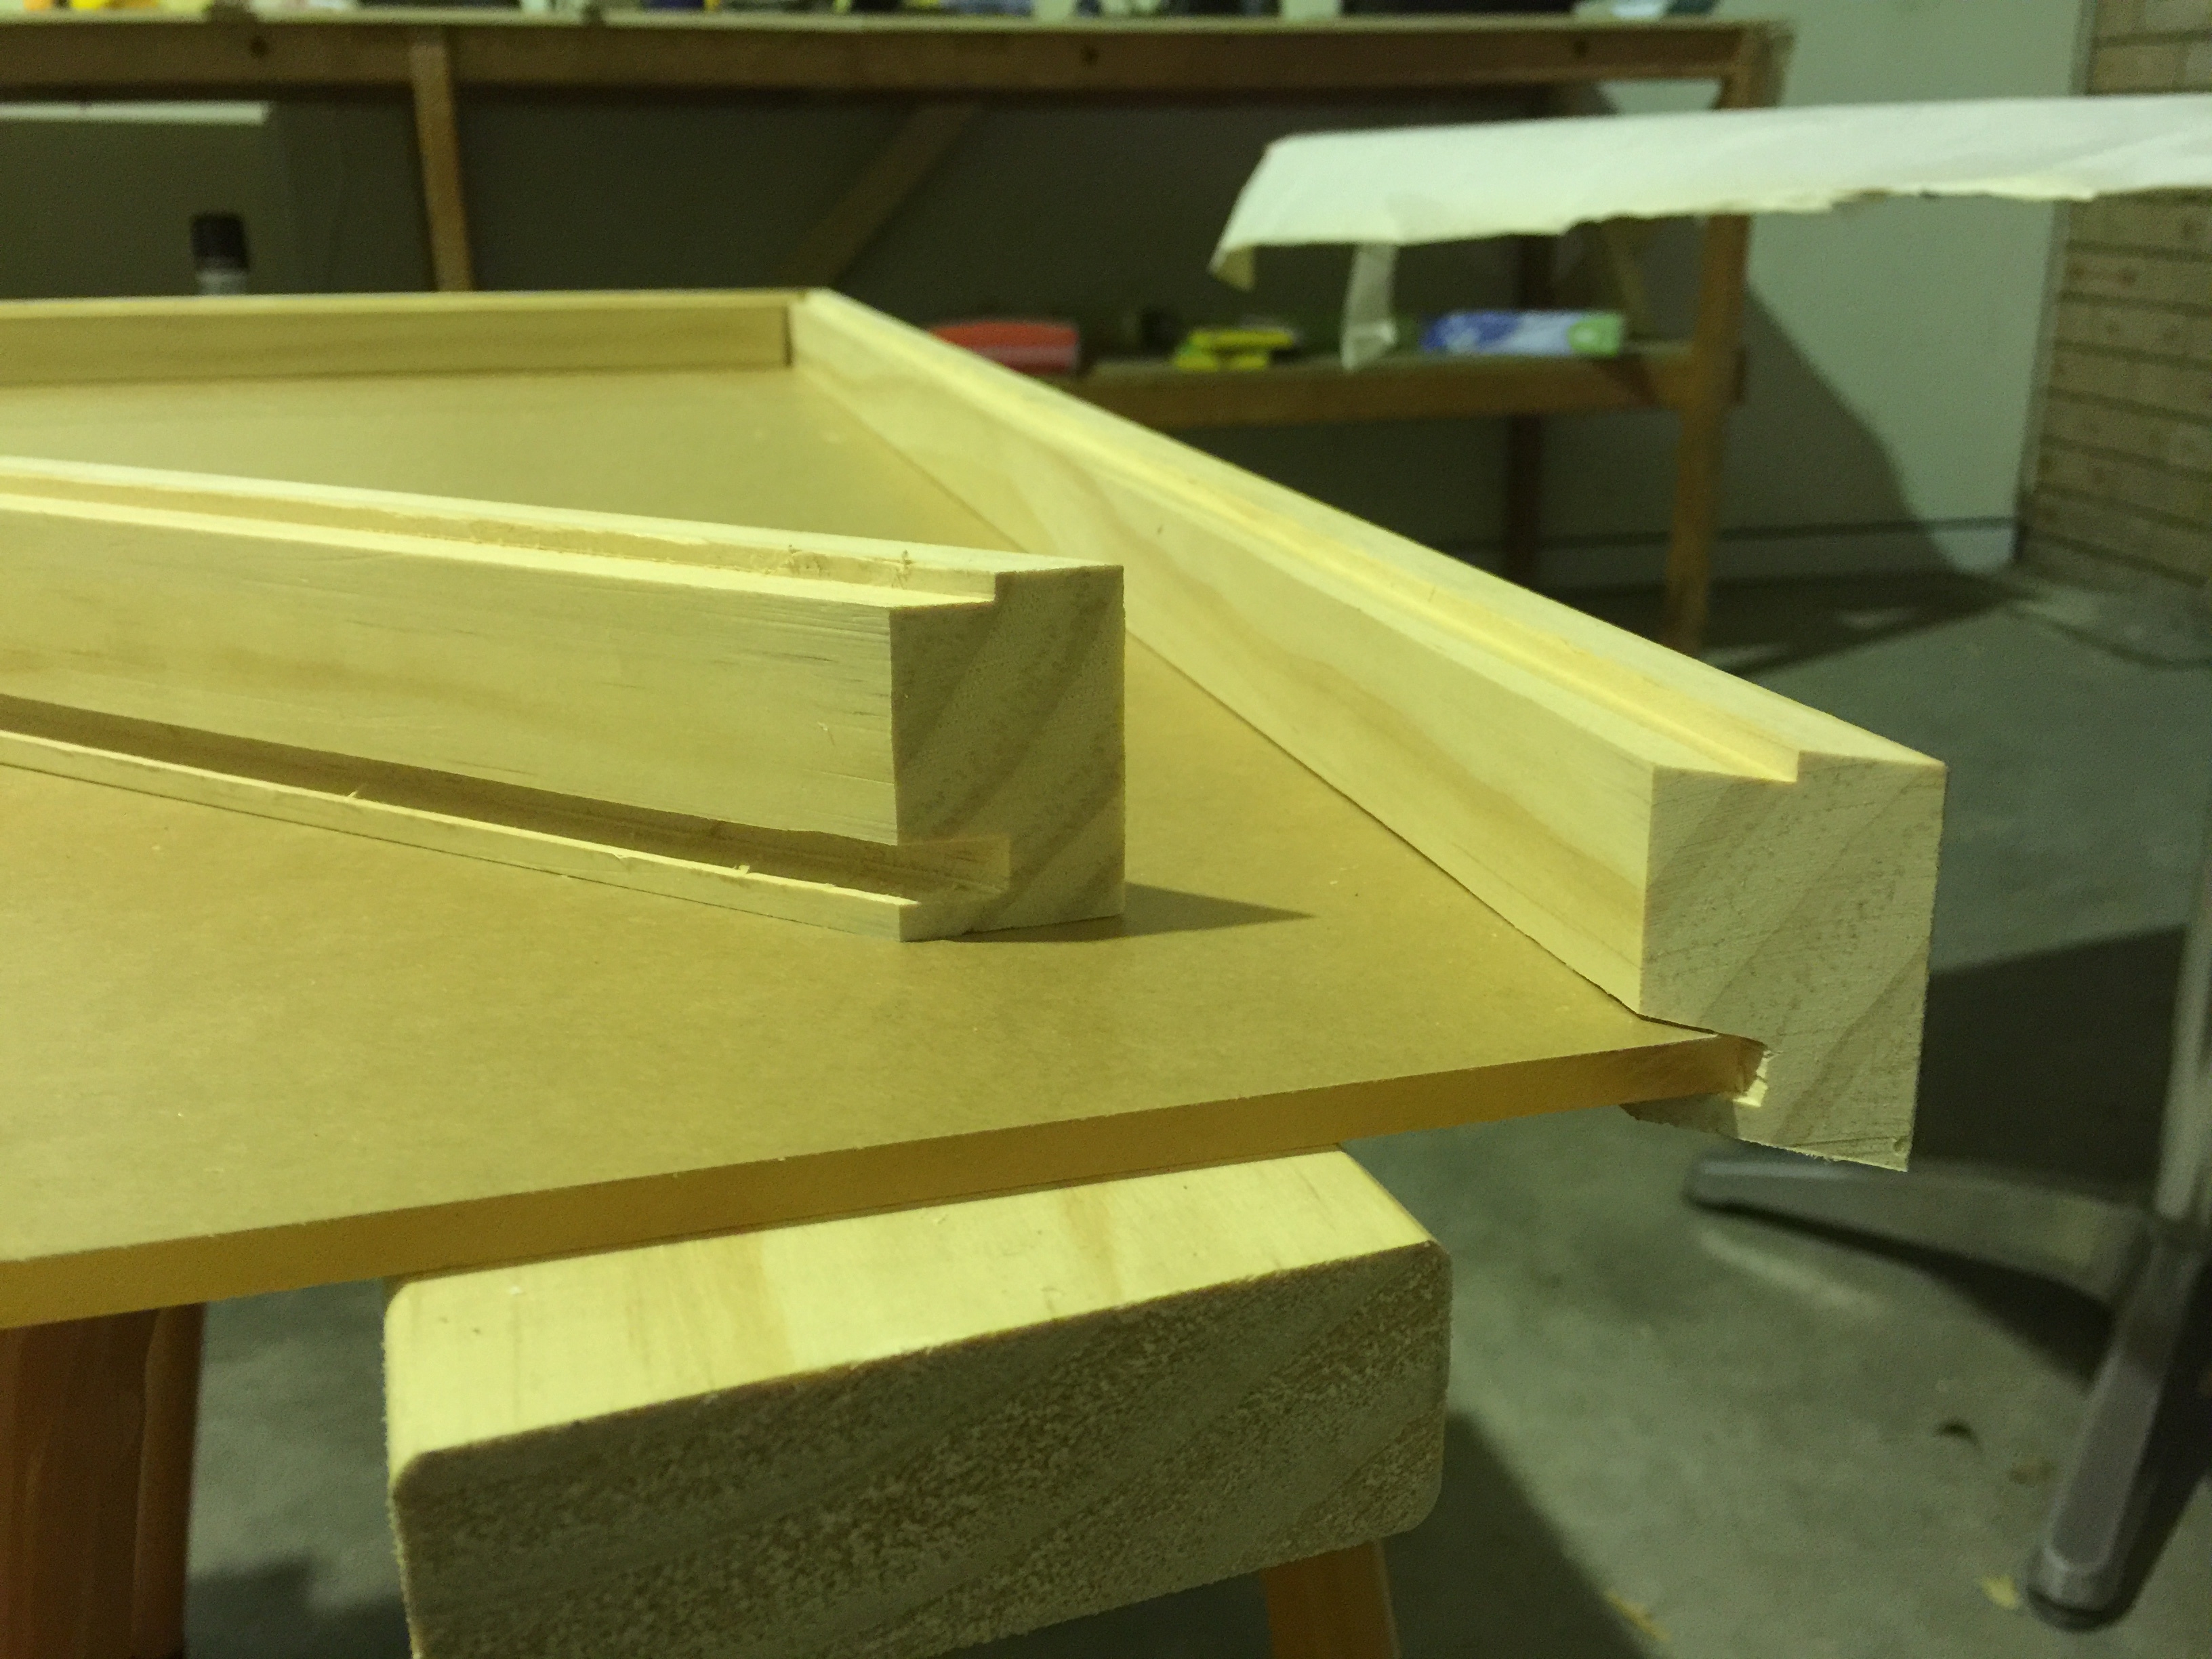
The frame was squared up and glued to the plywood base, making sure the mirror and acrylic would slide in one side freely. One side of the frame was secured with screws only (no glue) so that it can be removed to allow the acrylic and mirror to slide in and out.

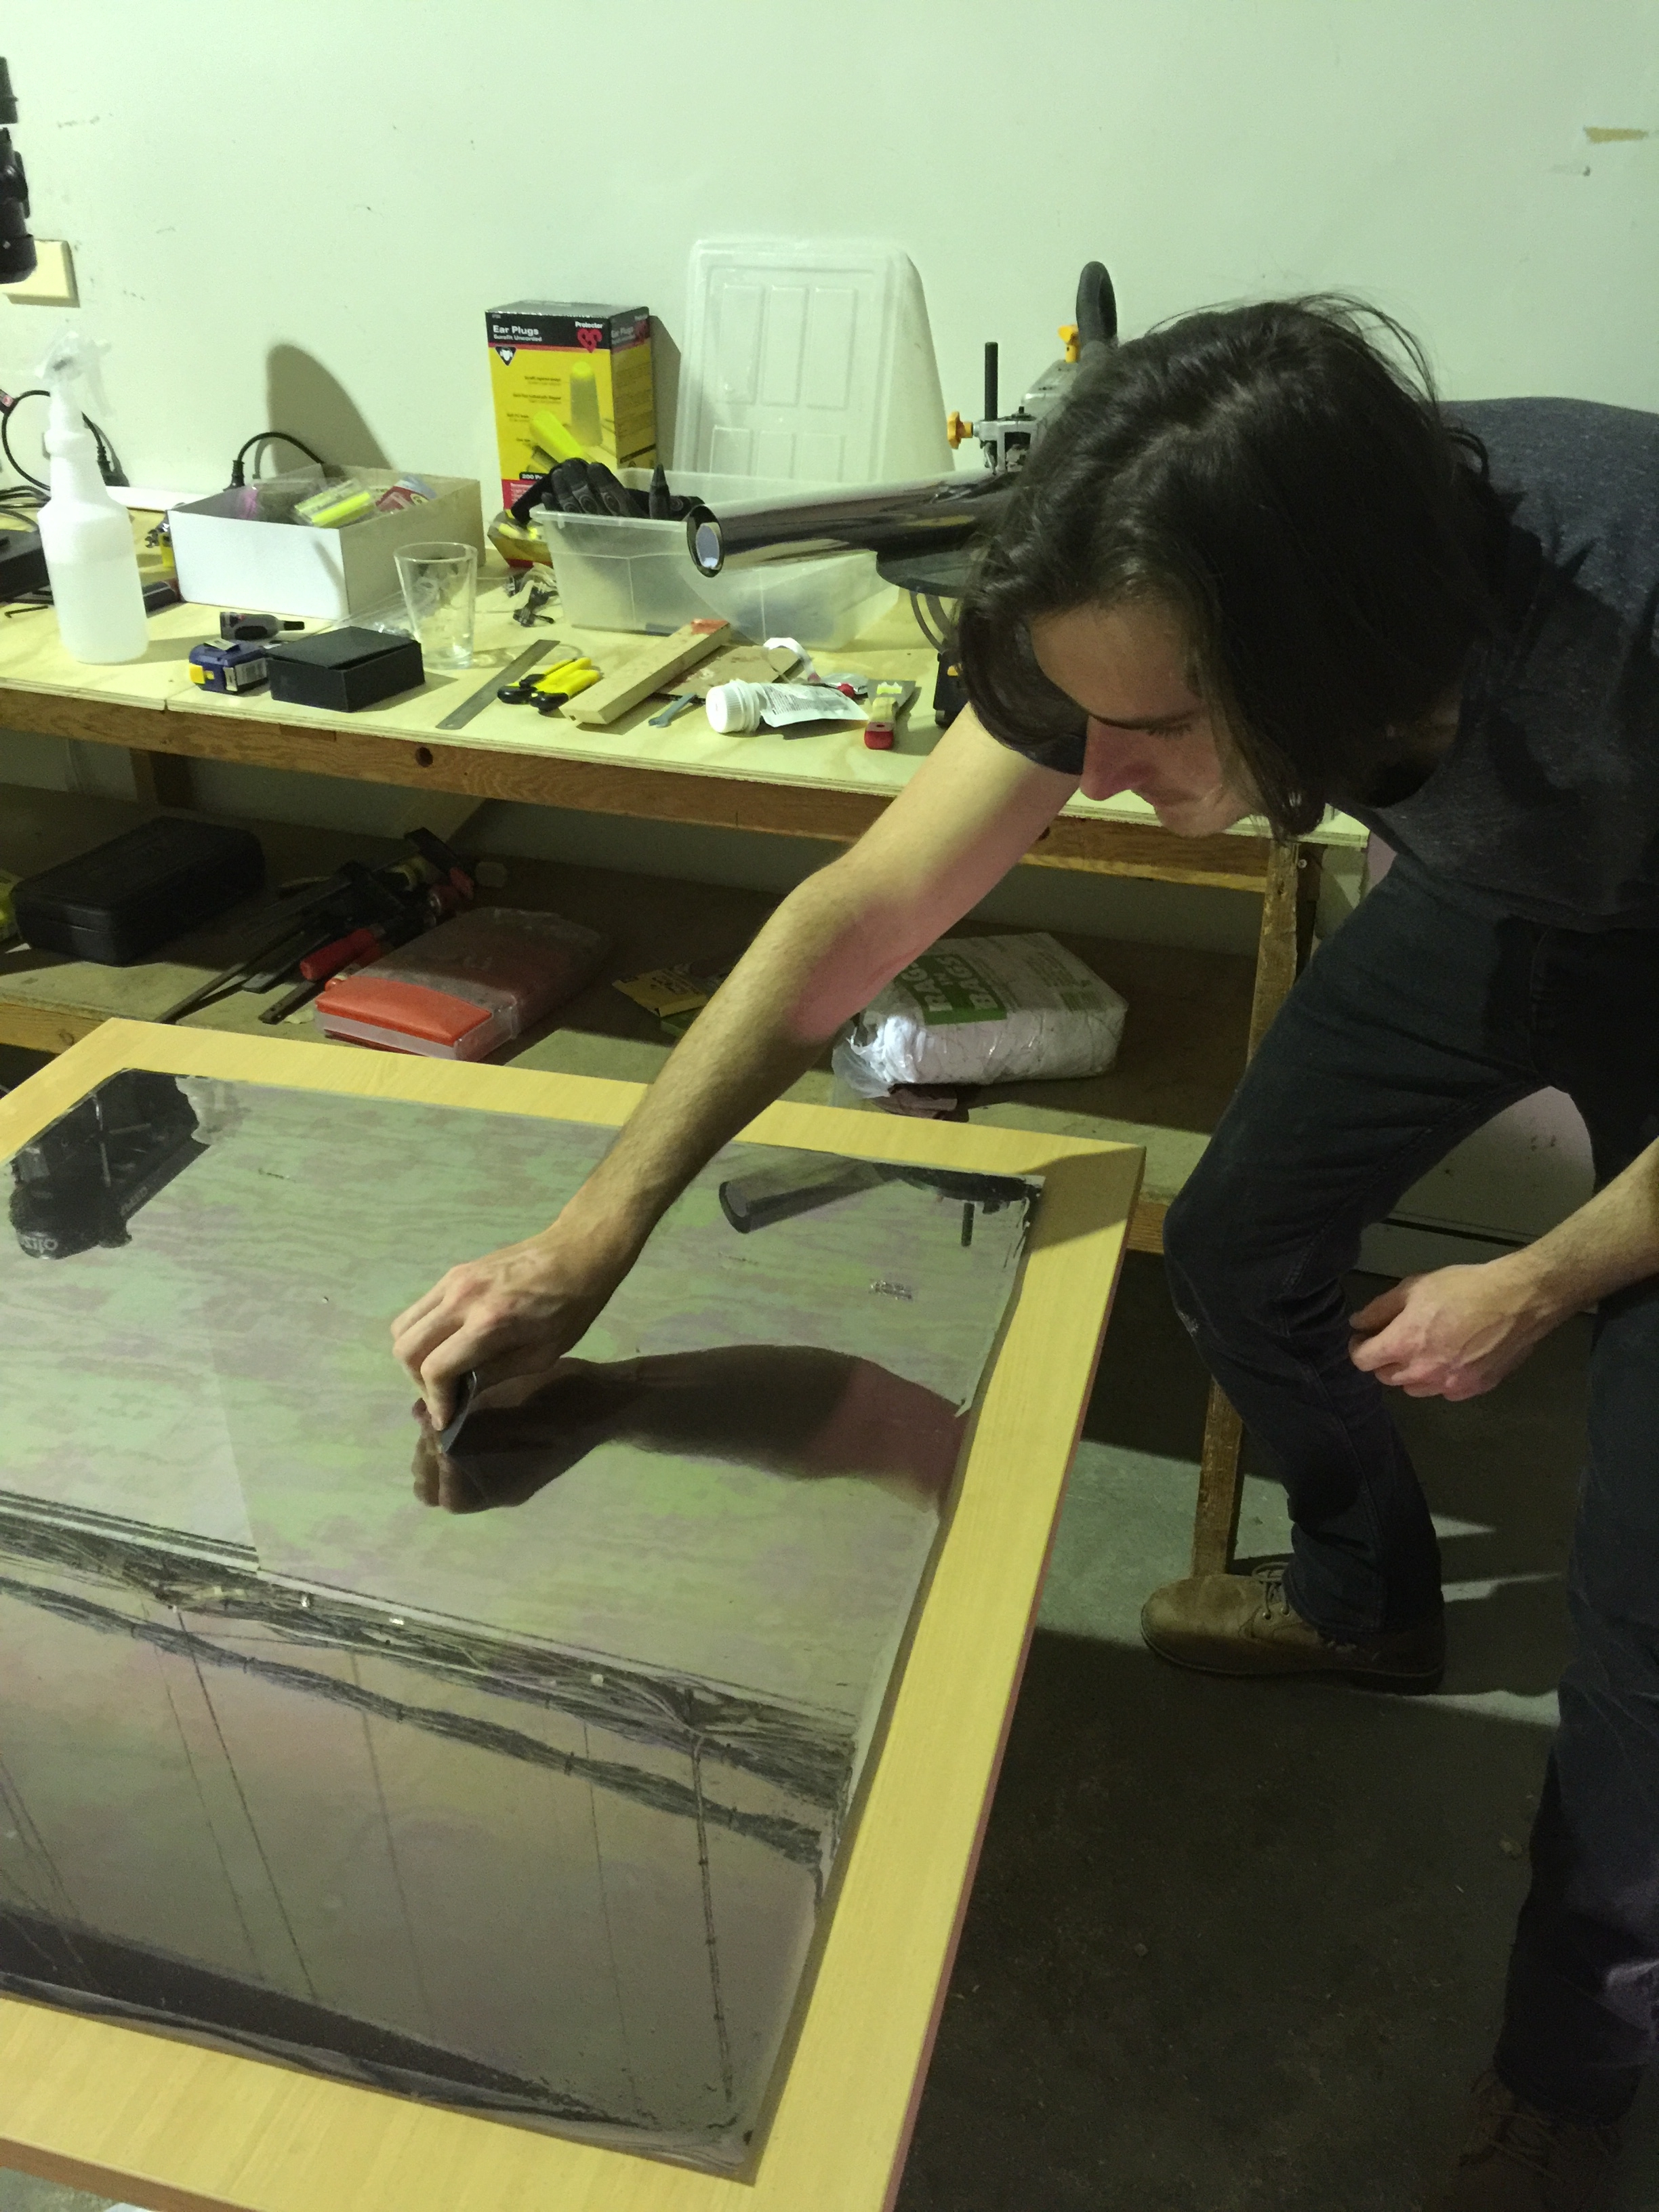
Applying the reflective film to the acrylic is easy and just takes a bit of care. A spray bottle filled with water and one or two drops of detergent was used to mist the bare acrylic surface before the film was smoothed over it. I assumed the acrylic would be very clean after removing its protective paper cover, but there are still some particles trapped between the film and the acrylic. Perhaps a thorough clean of the acrylic after removing the cover is still necessary - and applying it in a less sawdusty workshop...
With the basic mirror-box complete, the mirror and acrylic were dry-fit and tested with a short strip of LEDs to find the optimal height for the strip. Intuition suggests that dead-in-the-middle would produce the most even reflections, but since the reflective surface is the back edge of the mirror I decided it would be most straightforward to experiment and mark the position where the reflections are most even.
Lengths of square-section dressed pine were cut to length for legs and secured to the table with a long screw, liquid nails, and corner-braces. I originally thought about using brackets for adding strength to the legs, so I cut four plywood plates to thicken up the corners - giving some more material for the bracket's screws to bite into. During the fit-up, I decided on using offcut ply pieces to brace the legs instead - saving a little cash. The image below shows the fit-up of a brace and a bracket to compare the aesthetics. By going with the braces, the strengthening plates have essentially been made redundant.

With the woodworking side of things complete, the table was given a few coats of spray paint. Now onto the electronics!
Electronics
The electronics for this project are pretty simple. A Particle Photon runs the whole show by sending data (through a logic-level shifter) to the LED strip. Three potentiometers form a flexible, reconfigurable user interface.

Fitting LED strips
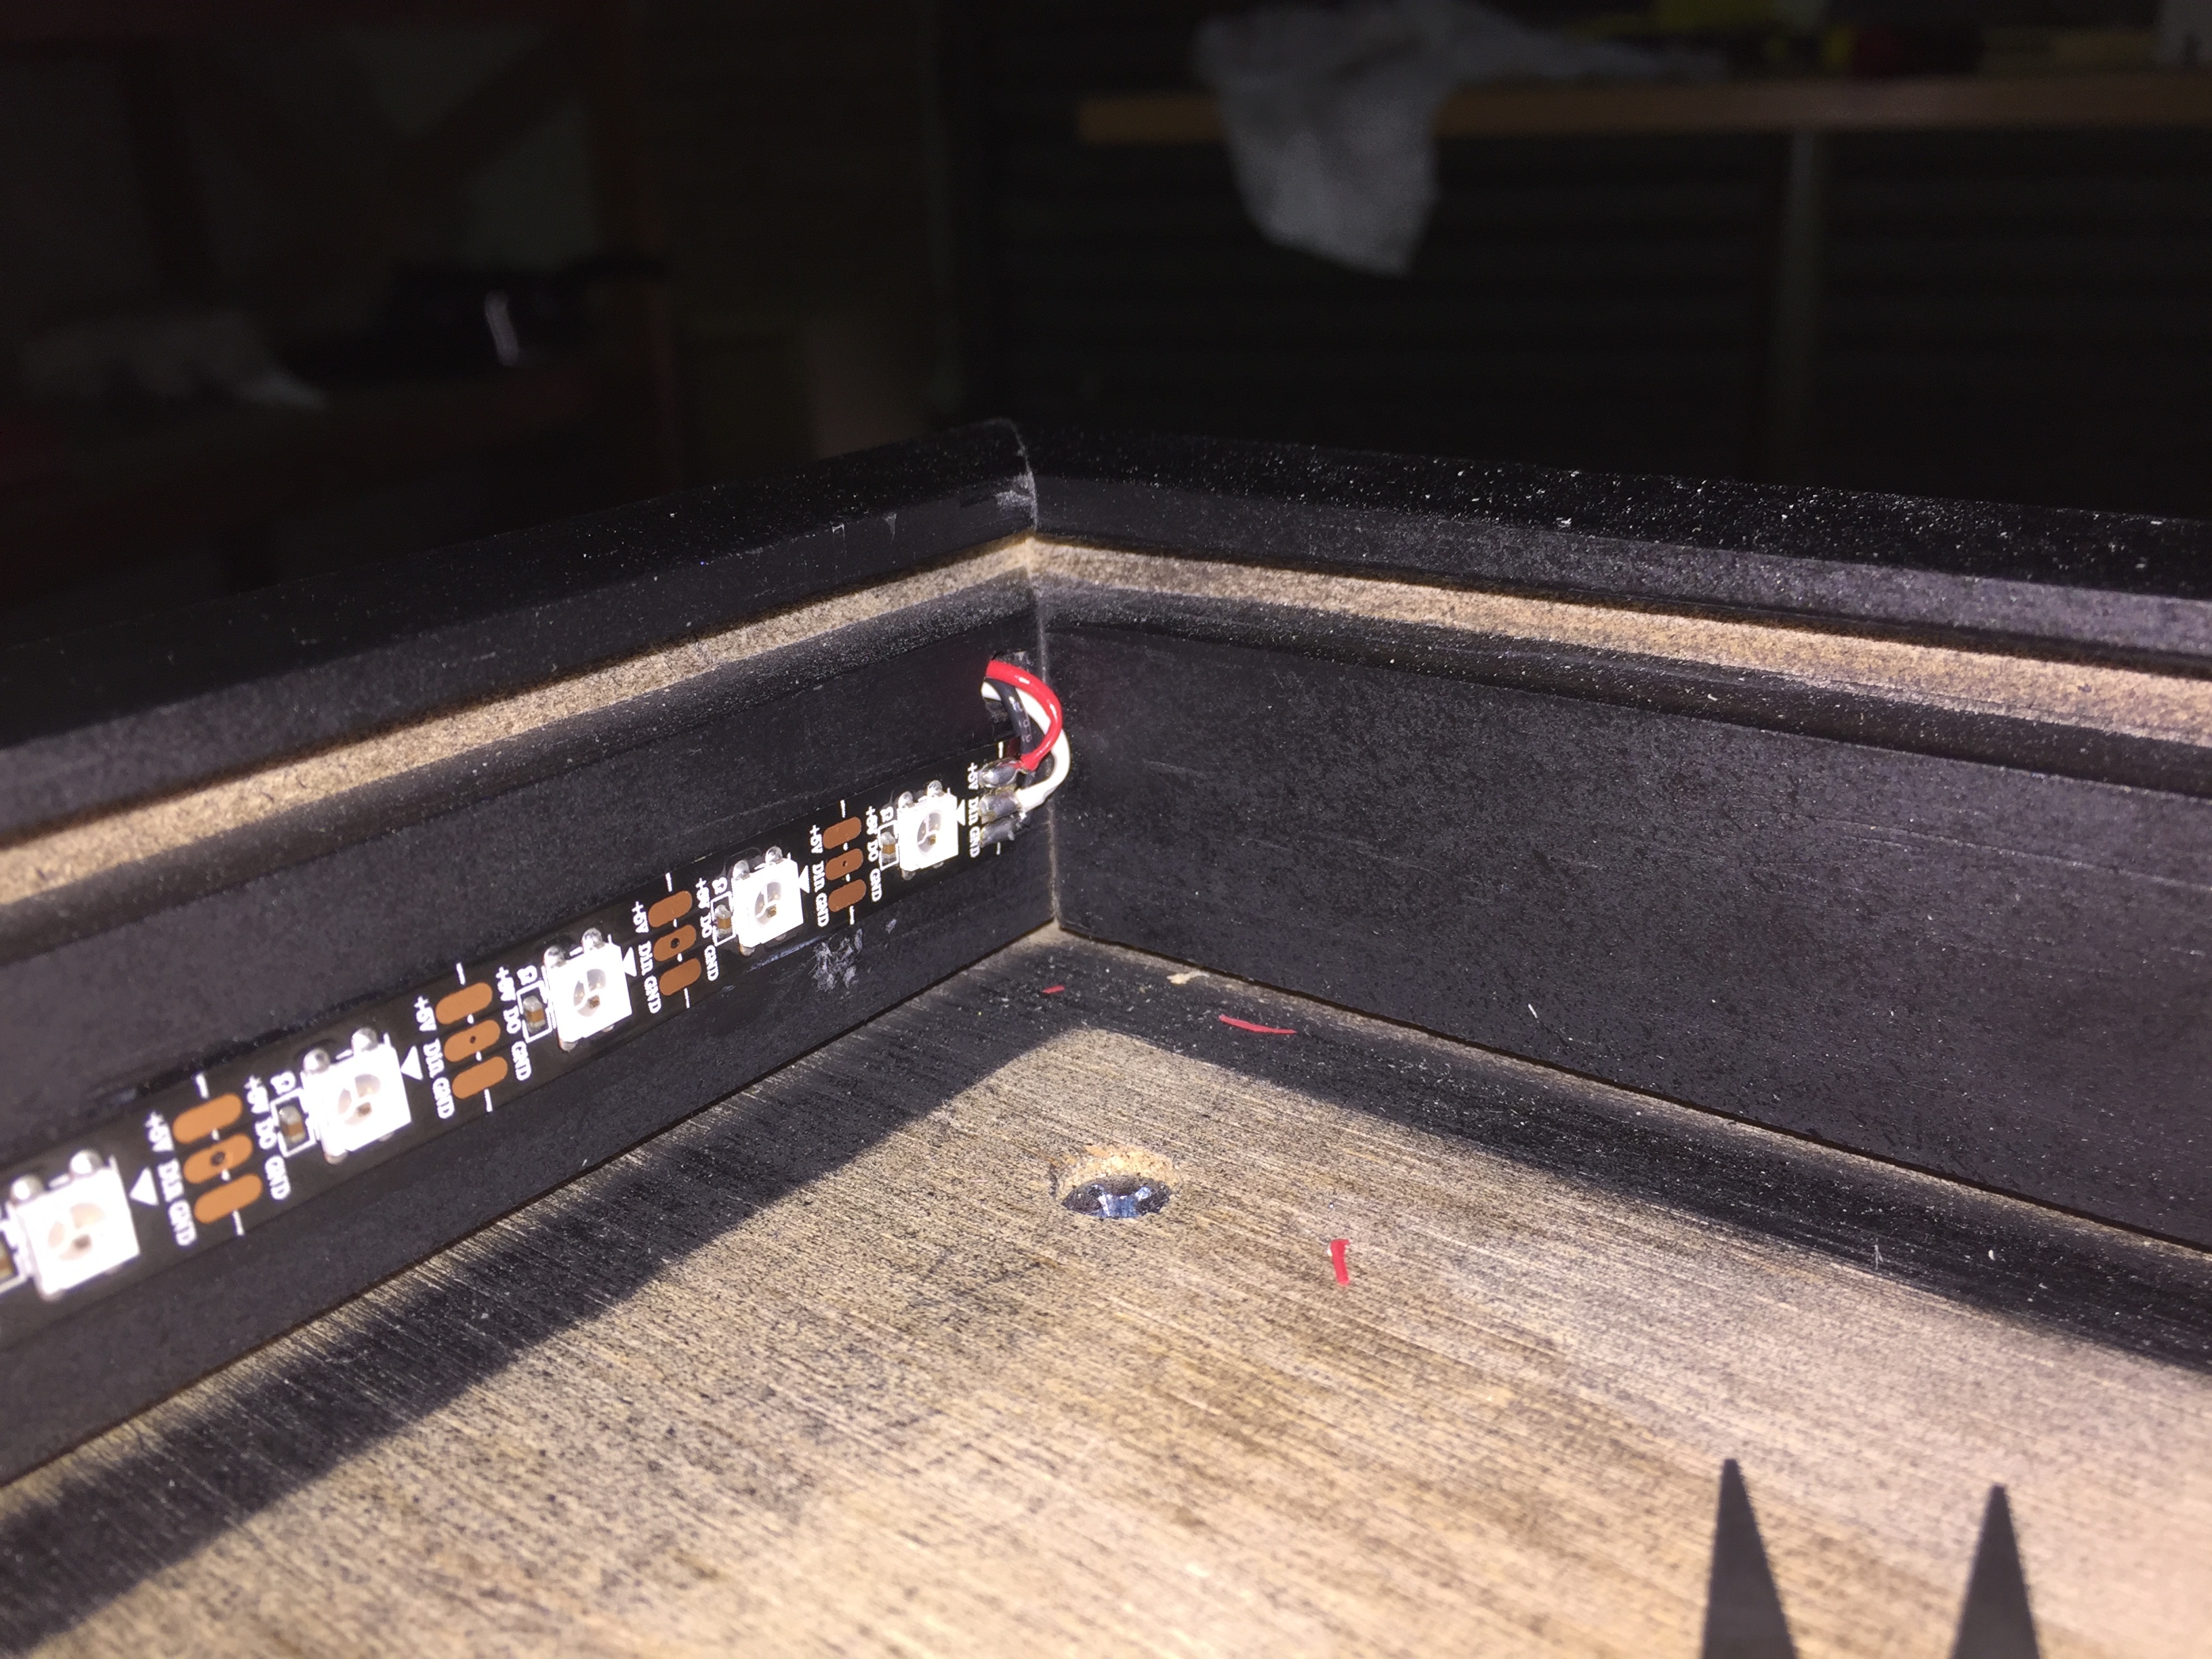
I broke the power distribution for the LED strip up for two reasons. (1) One panel should be removable for servicing, &: (2) Over 3m, I was worried about voltage drop. For these reasons, I layed out the power distribution as follows, where the bottom strip is on the removable side of the frame because it has wiring only on one side of it.

Cables for the LED strips were routed through the base and frame as shown below - two drilled holes meet inside the frame, with the wires coming out just above where they need to connect to the strip.

The LED strips were superglued in place - care was needed, as the glue squeezes through vias that are on the tape. There's more than one LED on the strip with a little of my skin left on it!
The circuit board was assembled and mounted in a 3D printed enclosure. You may notice some extra real-estate on the circuit board - originally, external voltage regulators were going to be mounted on features included in the case, then they were moved to the board. Finally they were omitted entirely in favour of a large external plug-pack supply. This removes power electronics from inside the sealed project enclosure. The control box is at the front of the table, the opposite side to the service hatch and LED connections, so the cable was routed through some square duct to protect it. This duct is just screwed to the bottom of the table.

Code
This project has been built at build.particle.io. If you add any cool features or make any improvements, collect some sweet maker-cred by issuing a pull-request over at this project's Github repository.
/*
 * v1.0
 *
 * This program drives the Core Electronics Infinity-Mirror project
 * Powered by Core Electronics
 * August 2017
 *
 * This program is free software: you can redistribute it and/or modify
 * it under the terms of the GNU General Public License as published by
 * the Free Software Foundation, either version 3 of the License, or
 * (at your option) any later version.
 *
 * This program is distributed in the hope that it will be useful,
 * but WITHOUT ANY WARRANTY; without even the implied warranty of
 * MERCHANTABILITY or FITNESS FOR A PARTICULAR PURPOSE.  See the
 * GNU General Public License for more details.
 *
 * You should have received a copy of the GNU General Public License
 * along with this program.  If not, see <http://www.gnu.org/licenses/>.
 *
 */

#include "Particle.h"
#include "neopixel.h"
#include <math.h>

// Define LED strip parameters
#define PIXEL_PIN D0
#define PIXEL_COUNT 176

// Particle use 12bit ADCs. If you wish to port to a different micro you might need to redefine the ADC precision
#define ADC_PREC 4095

SYSTEM_MODE(AUTOMATIC);

/*
 * Hardware Definitions
 * potentiometers are used as easily reconfigurable controls
 */

int pot_1 = 2; // left    - selects the mode
int pot_2 = 1; // middle  - use varies between demos. Can control animation speed or colour
int pot_3 = 0; // right   - use varies between demos. Can control brightness of white
Adafruit_NeoPixel strip(PIXEL_COUNT, PIXEL_PIN);


void setup()
{
    strip.begin();
    strip.show(); // Initialize all pixels to off
}


void loop()
{
    // Read potentiometer values for user-input
    int state = getState(pot_1);    // Select the operation mode
    int opt1 = analogRead(pot_2);   // Select animation speed
    int opt2 = analogRead(pot_3);   // A general-purpose option for other effects


    // State Machine
    switch(state){
        case 0:
            clearStrip();   // "Off" state.
            break;

        case 1:
            rainbow(pot_2); // Adafruit's rainbow demo, modified for seamless wraparound. We are passing the Pot # instead of the option because delay value needs to be updated WITHIN the rainbow function. Not just at the start of each main loop.
            break;

        case 2:
            demo(); // An under-construction comet demo.
            break;

        case 3:
            solid(opt1, opt2); // Show user-set solid colour.
            break;

        default:
            break;

    }
}


// Break potentiometer rotation into four sectors for setting mode
int getState(int pot){
    float val = analogRead(pot);
    if (val < ADC_PREC / 4) {
        return 0;
    } else if (val < ADC_PREC / 2) {
        return 1;
    } else if (val < 3*ADC_PREC / 4) {
        return 2;
    } else {
        return 3;
    }
}


// Convert an ADC reading into a 0-100ms delay
int getDelay(int pot){
    float potVal = analogRead(pot);
    return map(potVal,0,ADC_PREC,100,0);
}


/* Run the comet demo
 * This feature is largely experimental and quite incomplete.
 * The idea is to involve multiple comets that can interact by colour-addition
 */
void demo(void){
    uint16_t i, j, k;
    uint16_t ofs = 15;

    for (j=0; j<strip.numPixels(); j++){
        clearStrip();

        comet(j,1);

        strip.show();
        delay(5);
    }
}


/*
 * Draw a comet on the strip and handle wrapping gracefully.
 * Arguments:
 *      - pos: the pixel index of the comet's head
 *      - dir: the direction that the tail should point
 *
 * TODO:
 *      - Handle direction gracefully. In the works but broken.
 *      - Handle multiple comets
 */
void comet(uint16_t pos, bool dir) {
    float headBrightness = 255;                 // Brightness of the first LED in the comet
    uint8_t bright = uint8_t(headBrightness);   // Initialise the brightness variable
    uint16_t len = 20;                          // Length of comet tail
    double lambda = 0.3;                        // Parameter that effects how quickly the comet tail dims
    double dim = lambda;                        // initialise exponential decay function

    strip.setPixelColor(pos, strip.Color(0,bright,0)); // Head of the comet


    if(dir) {
        for(uint16_t i=1; i<len; i++){
            // Figure out if the current pixel is wrapped across the strip ends or not, light that pixel
            if( pos - i < 0 ){ // Wrapped
                strip.setPixelColor(strip.numPixels()+pos-i, strip.Color(0,bright,0));
            } else { // Not wrapped
                strip.setPixelColor(pos-i, strip.Color(0,bright,0));
            }
            bright = uint8_t(headBrightness * exp(-dim)); // Exponential decay function to dim tail LEDs
            dim += lambda;
        }

    } else { // Comet is going backwards *** BROKEN: TODO fix ***
        for(uint16_t i=1; i<len; i++){
            // Figure out if the current pixel is wrapped across the strip ends or not, light that pixel
            if( pos + i > strip.numPixels() ){ // Wrapped
                strip.setPixelColor(strip.numPixels()-pos-i, strip.Color(0,bright,0));
            } else { // Not wrapped
                strip.setPixelColor(pos+i, strip.Color(0,bright,0));
            }
            // Dim the tail of the worm. This probably isn't the best way to do it, but it'll do for now.
            // TODO: dim while respecting the length of the worm. For long worms this will dim to zero before the end of worm is reached.
            bright *= 0.75;
        }
    }
}


void clearStrip(void){
    uint16_t i;
    for(i=0; i<strip.numPixels(); i++){
            strip.setPixelColor(i, strip.Color(0,0,0));
        }
        strip.show();
        delay(1);
}


void rainbow(int pot) {
//   uint16_t j;
  float i, baseCol;
  float colStep = 256.0 / strip.numPixels();

  for(baseCol=0; baseCol<256; baseCol++) { // Loop through all colours
    for(i=0; i<strip.numPixels(); i++) {   // Loop through all pixels
        strip.setPixelColor( i, Wheel(int(i*(colStep)+baseCol) & 255) ); // This line seamlessly wraps the colour around the table.
    }
    strip.show();

    delay(getDelay(pot));
  }
}


// Input a value 0 to 255 to get a color value.
// The colours are a transition r - g - b - back to r.
uint32_t Wheel(byte WheelPos) {
  if(WheelPos < 85) {
   return strip.Color(WheelPos * 3, 255 - WheelPos * 3, 0);
  } else if(WheelPos < 170) {
   WheelPos -= 85;
   return strip.Color(255 - WheelPos * 3, 0, WheelPos * 3);
  } else {
   WheelPos -= 170;
   return strip.Color(0, WheelPos * 3, 255 - WheelPos * 3);
  }
}


// Display a single solid colour from the Wheel(), or show white with variable brightness
int solid(int colour, int bright){
    bright = map(bright,0,ADC_PREC,5,255);
    int col = map(colour,0,ADC_PREC,0,255);
    uint16_t i;

    if (col > 245) {
        // Set to white
        for(i=0; i<strip.numPixels(); i++){
            strip.setPixelColor(i, strip.Color(bright,bright,bright));
        }

    } else {
        // User-defined colour
        for(i=0; i<strip.numPixels(); i++){
                strip.setPixelColor(i, Wheel(col));
        }
    }
    strip.show();
    delay(50);
}
Conclusion
This infinity mirror can be knocked up in a weekend and fuses skills like woodworking, electronics and programming. We'd love to hear from you if you're attempting this project (and hopefully improving it) in the comments section below!

