Part of the joy that is Raspberry Pi is getting stuck into it at a slightly lower level and finding out exactly what you can do with it if you take a look under the hood. One of the most popular experiments to do with your Raspberry Pi is overclocking it. Overclocking is fairly simple to do on the Raspberry Pi, however, it requires additional cooling in the form of heatsinks and fans to ensure that the Pi doesn't overheat and damage itself. You may also find that your Pi gets hot under heavy usage, and it can be a good idea to cool it down, especially when using intensive processes such as the N64 emulator for RetroPie.
Whilst real world scenarios are unlikely to load you CPU to 100%, all the time, there is a stress test application called CPU Burn which loads up all of the cores and is the quickest way to find out if your Pi will run cool or not. A standard Pi, with no overclocking, and no additional cooling will max out at 80 degrees Celsius within approximately 10 seconds of running CPU Burn. Yeah, it's pretty savage. As we mentioned before, not a real world scenario, but a pretty good test of stability.
We've broken up the topics of cooling, stress testing, and overclocking your Raspberry Pi into individual tutorials to make it easier to digest. This is the first tutorial of the three: cooling.
After much research on the internet regarding this topic, it was clear that there was no definitive guide with all of the information in one place, so we hope to answer all of your questions, however, if you want to know more, don't hesitate to get the conversation started in the comments below.
Cooling the Hardware
During this tutorial we’ll be taking a look at different hardware setups to can implement to cool your Pi down when overclocking or during heavy usage. The Pi 3 is designed to run fairly hot, but should never exceed 80 degrees Celsius. If you’re overclocking your Pi at all, we highly recommend cooling with a heatsink/ fan, or both.
There are several different options for overclocking your Pi, not just the CPU. You can overclock the memory, GPU, and adjust memory allocations between the CPU and GPU to optimise the performance of your application. We’ll take a look at the results from various hardware setups during the stress testing, however, let’s go through the options and locations for cooling your Pi.
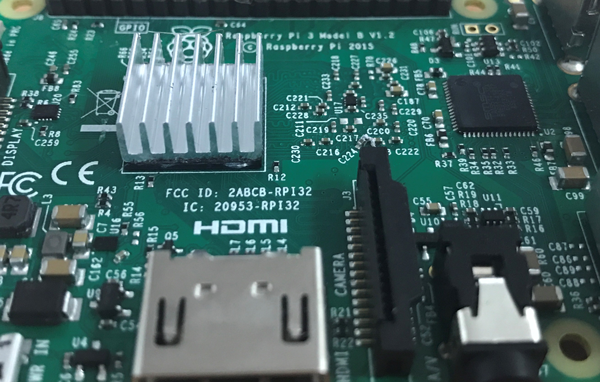
The main chip that we’ll be focusing on is the Broadcom BCM2837 SoC (System on Chip) which contains the CPU, GPU, and other components required to make a computer tick. Because our main focus will be on upping the clock speed (overclocking it), cooling the CPU is the biggest priority. Components such as the memory can benefit from cooling, however, the performance gains aren’t as noticeable, and providing you have decent airflow, you should be ok without a heatsink for the chip on the underside of the board.
You can see below the locations of the main SoC, and the SDRAM chip:


Many Raspberry Pi heatsink kits come with two or three heatsinks because the board has 3 main chips, however, it’s not necessary to use all of them. The three main chips are Main SoC, SDRAM, and USB/Ethernet controller.
On the original Raspberry Pi, there was a design issue which caused the USB/Ethernet chip to get quite hot, so a heatsink for it was bundled into kits. It’s possible to overclock parts of this chip, however given that the ports are spec’d at USB 2, and the Ethernet is running off the USB bus, there is no real performance gain to be had from playing with it, so a heatsink is not needed.

Installing a Fan and Heatsink
Without a doubt, the first thing you should do if your Pi is going to be under heavy loads is to use a heatsink on the main SoC. If you’re planning on loading down the CPU regularly, a fan will also yield noticeable cooling improvements, and if you’re overclocking your Pi, we recommend using a fan anyway.
Mounting the heatsink is fairly straight forward. Any heatsink will help cool your Pi, however, we recommend this one for the main SoC, as it’s nice a large, and does a good job. Some heatsinks may have thermal tape on them to help adhere to the surface. Whilst this does work, the tape doesn’t conduct heat as well as some good old fashioned thermal paste. You can either use the tape, or remove it using isopropyl, and some thermal paste. We used a small amount of hot glue to keep it in place. The thermal paste is designed to fill in the tiny inconsistencies in the surfaces to allow for optimal heat transfer. You only need a very thin layer on both surfaces to ensure good conduction.
The general rule of thumb with heatsinks is that the bigger they are, the more heat they can dissipate, so if you're finding that your Pi is still running hot with a smaller heatsink on, try a bigger one! Here's a list of various heatsinks which will fit on your Raspberry Pi:
- Heatsink Kit for Raspberry Pi B+: You get a heatsink for the main chip, and a second one for either the SDRAM chip or USB/Ethernet controller. They do a decent job for their size and come with adhesive thermal tape.
- 3pc Heatsink Kit for Raspberry Pi v2: If you're after a heatsink for every chip, then this kit is a good choice. Similar in size to the ones listed above, but in silver.
- Aluminium Heatsink Cooling Fan: This thing is seriously cool (pardon the pun). It's designed for LattePanda, however, it'll work just as well on anything else. It's an aluminium heatsink with a built-in fan to draw hot air away.
- AL Heatsink 30x30x12mm: If you're after some serious cooling, this is what we recommend hands down. It's the largest heatsink available which means it's going to be able to handle the most heat. This guy, combined with a fan will handle the CPU Burn stress test comfortably.
As far as fans go, there’s plenty of debate about whether it’s better to push fresh air in, or push hot air out, however, the goal is to move air around the hot areas and remove hot air from the enclosure, so either will work, however the best setup we found was a fan mounted on the top of the enclosure pulling the rising hot air out of the case which will suck cool air in through the bottom, allowing for maximum airflow. You can see an example of a fan being used to pull hot air off the heatsink, whilst drawing cooler air to flow past the heat sink.
The best fans to use are standard 90mm or 120mm computer case fans which you can buy at a specialised computer shop or the combined heatsink and fan we linked to above will do the job.
To use your Pi, we recommend getting a case which has good ventilation. There are cases available which have built in fans such as this one, which, combined with a heatsink will be a good solution. However, the best solution is to use an open top enclosure such as the official Raspberry Pi enclosure, and mount the fan on top.
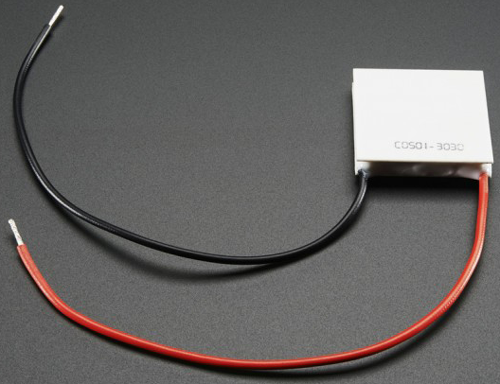
If you’re serious about cooling your Pi to the extreme, you can use a Peltier module. Peltier modules are an electric plate which uses energy to draw heat from one side to the other, creating a heat differential. They’re fairly old technology and are not energy efficient at all, however, a Peltier module with a big heatsink like this one, can drop to -3 degrees within seconds (while drawing 5A at 12V).
It's up to you to decide how you'll keep your Pi cool, and we haven't tested out every combination yet so we'd love to see your setup in the comments below. Once you've got some nice cooling on your Pi, it's time to put it through it's paces with a stress test and find out how cool it runs under load. Take a look at the next tutorial: Stress Testing Your Raspberry Pi.

