Panel Mount Kit for Raspberry Pi Camera Module 3
In stock, ships same business day if ordered before 2PM
Delivered by Tue, 10th of Feb
Quantity Discounts:
- 10+ $5.85 (exc GST)
- 25+ $5.66 (exc GST)
We've lost count of how many times we've tried to mount a camera module onto a panel or enclosure but struggled to drill the very small M2 holes right at the edge of the camera board, and don't even mention trying to get a nice clean cut-out for the lens!
Mounting these tiny yet awesome cameras onto thick wood and other brittle, cumbersome materials is just not fun!
...and that's why PiHut came up with this little affordable Camera Mounting Kit! A quick, easy and forgiving way to mount your camera module (not included) with clean results!
In the Kit
This simple kit gives you:
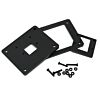
- A cutting template panel - simply line this up where you want the camera to be, mark the inner large section and the four screw holes then cut/drill
- A clean, subtle mounting plate for your camera module - this fits over your cut/drilled template holes and provides a nice tidy finish
- A spacer to make sure your camera sits back slightly into the panel
- M2 screws and nuts for mounting your camera to the mounting plate (M3 fixings to mount the plate to your enclosure are NOT included)
The camera module is not included!
With your template holes cut, simply mount your camera module 3 to the mounting plate and secure it to your project with 4x M3 screws and nuts (not included...because everyone will be mounting to different thickness materials).
Fun fact: We cut these 10 at a time, which is a bit of a pain, but it means we can use the slim side off-cuts from other products we laser-cut that would otherwise go to waste.
How to panel mount the Camera Module 3
Some warnings/advice before you start:
- Perspex can scratch. Be careful with it!
- Never rest on your camera's lens, hold it in your hands when fitting the fixings
- When cutting your material/enclosure, ask for help if you're not confident with sharp tools
- Don't over-tighten screws, you'll crack the perspex and ruin your day. You don't want that.
OK, let's begin. First, peel the protective backing off of the plastic parts in your kit:
Now grab your enclosure or panel and use the template piece to mark your cut holes. Mark the inside of the main large hole, and the four screw holes:
Cut/drill your cut-out and holes (we used our laser...we had it running anyway...). The main large cut-out hasn't got to be perfect, we designed this with a good few mm of tolerance in mind:
Fit your camera module to the spacer and mounting plate using the included bag of M2 screws and nuts (this part IS fiddly, but if the big ol' sausage fingers seen below can manage it, you'll be fine):
Now poke the camera cable through the hole, place your mounting plate over your cut-out and secure it with M3 screws/nuts (the metal M3 fixings seen below are not included, you'll probably want black ones anyway). DO NOT OVER-TIGHTEN (especially if you're using metal fixings) or you'll crack the Perspex!
Specifications
- Material: 3mm perspex
- Colour: Black
- Dimensions:
- Mounting plate: 55mm x 45mm
- Camera mounting holes: M2
- Mounting plate mounting holes: M3
- Compatible with: Camera Module 3 (may be compatible with other similar modules but we haven't tried it yet as we're having too much fun with autofocus!)
Exact shipping can be calculated on the view cart page (no login required).
Products that weigh more than 0.5 KG may cost more than what's shown (for example, test equipment, machines, >500mL liquids, etc).
We deliver Australia-wide with these options (depends on the final destination - you can get a quote on the view cart page):
- $3+ for Stamped Mail (typically 10+ business days, not tracked, only available on selected small items)
- $7+ for Standard Post (typically 6+ business days, tracked)
- $11+ for Express Post (typically 2+ business days, tracked)
- Pickup - Free! Only available to customers who live in the Newcastle region (must order online and only pickup after we email to notify you the order is ready). Orders placed after 2PM may not be ready until the following business day.
Non-metro addresses in WA, NT, SA & TAS can take 2+ days in addition to the above information.
Some batteries (such as LiPo) can't be shipped by Air. During checkout, Express Post and International Methods will not be an option if you have that type of battery in your shopping cart.
International Orders - the following rates are for New Zealand and will vary for other countries:
- $12+ for Pack and Track (3+ days, tracked)
- $16+ for Express International (2-5 days, tracked)
If you order lots of gear, the postage amount will increase based on the weight of your order.
Our physical address (here's a PDF which includes other key business details):
40 Aruma Place
Cardiff
NSW, 2285
Australia
Take a look at our customer service page if you have other questions such as "do we do purchase orders" (yes!) or "are prices GST inclusive" (yes they are!). We're here to help - get in touch with us to talk shop.
Have a product question? We're here to help!
Videos
View AllGuides
YOLO Pose Estimation on the Raspberry Pi AI Hat+ | Writing Custom Python Code
YOLO Object Detection on the Raspberry Pi AI Hat+ | How to Write Custom Python Code
Getting Started with YOLO Pose Estimation Recognition on the Raspberry Pi
Face Recognition With Raspberry Pi and OpenCV
Projects
safePower
ESP32 IR-Triggered Camera with Home Assistant Integration
LuMa 1 - The Neo Disco Ball
Educational Workshops
Raspberry Pi Workshop for Beginners
Makers love reviews as much as you do, please follow this link to review the products you have purchased.








Product Comments