In this guide, we are going to be teaching you how to set up your Rasberry Pi to detect and recognise faces using OpenCV and the Facial-Recognition library, two fantastic open-source projects. In this set up all of the data and processing will be performed locally on the Pi, meaning that all your faces and data won't ever leave the Pi itself.
Computer vision tasks like facial recognition may seem a little intimidating to beginners, but thanks to the hard work of many people, these tasks have been streamlined. We will start by installing the required libraries and packages, and then we will run 3 pieces of code. The first will use the Pi to take photos, then we will use those photos as a dataset to train a face recognition model, and then finally we will run the face recognition code itself.
Let's get started!
If you are coming from YouTube and are chasing the zip file with the required scripts you can find them here.
What You Will Need
To follow along with this guide you will need a:
- Raspberry Pi 5 - When running this with a model trained on 150 images, we found that it took about 1.3GB of RAM. So a 2GB Pi may work here, but a 4GB or 8GB model would be a safer bet. This guide will also work on a Pi 4, but expect twice as slow performance.
- Pi Camera - We are using the Camera Module V3
- Adapter Cable - If you are using a Pi 5, it comes with a different-sized CSI camera cable and your camera may come with the older thicker one so it's worth double-checking. The Camera Module V3 WILL need one
- Cooling Solution - This project is processing intensive so an adequate cooling method is required. For our Pi 5, we are using the active cooler.
- Power Supply
- Micro SD Card - At least 16GB in size
- Monitor and Micro-HDMI to HDMI Cable
- Mouse and Keyboard
Hardware Assembly
In terms of hardware assembly, it's pretty light here. Connect the thicker side of the cable to the camera, and the thinner side to the Pi 5. These connectors have a tab on them - lift them up, then insert the cable into the slot. Once it is sitting in there nice and square, push the tab back down to clamp the cable into place.
Just keep an eye out as these connectors only work in one orientation, and they can be fragile so avoid bending them tightly (a little bit is okay).

Installing Bookworm OS
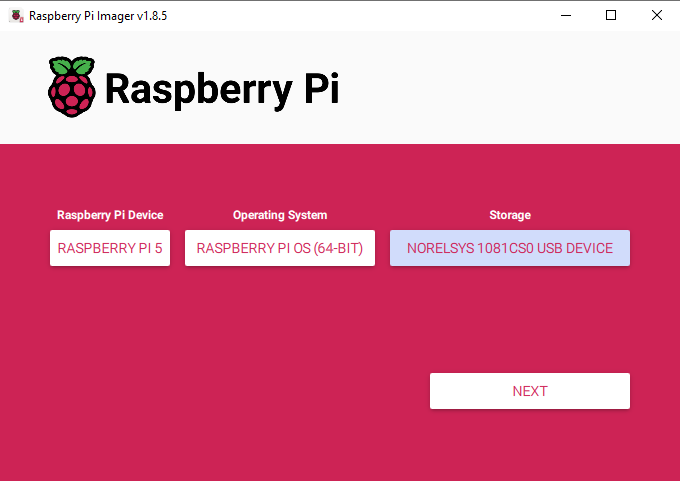
First things first, we need to install Pi OS onto the micro SD card. Using the Raspberry Pi Imager, select Raspberry PI 5 as the Device, Raspberry Pi OS (64-bit) as the Operating system, and your microSD card as the storage device.
NOTE: INSTALLING PI OS ONTO THE MICROSD CARD WILL WIPE ALL DATA ON IT.
This process may take a few minutes to download the OS and install it. Once the process has finished, insert it into the Pi and boot it up. Your Pi will run through a first-time installation and just ensure that you connect it to the internet.
Setting up a Virtual Environment and Installing Libraries
With the introduction of Bookworm OS in 2023, we are now required to use Virtual Environments (or venv). These are just isolated virtual spaces that we can use to run our projects without the risk of breaking the rest of Pi OS and our packages - in other words, we can do whatever we want here without the risk of damaging the rest of Pi OS. It is an extra moving part to learn, but it's incredibly easy.
To create a virtual environment, open a new terminal window and type in:
python3 -m venv --system-site-packages face_rec
This will create a new virtual environment called "face_rec". You can find the folder of this virtual environment under home/pi and it will be called "face_rec".
After creating the venv, enter into it by typing in:
source face_rec/bin/activate
After doing so you will see the name on the virtual environment to the left of the green text - this means we are correctly working within it. If you ever need to re-enter this environment (for example if you close the terminal window you will exit the environment), just type in the source command above again.

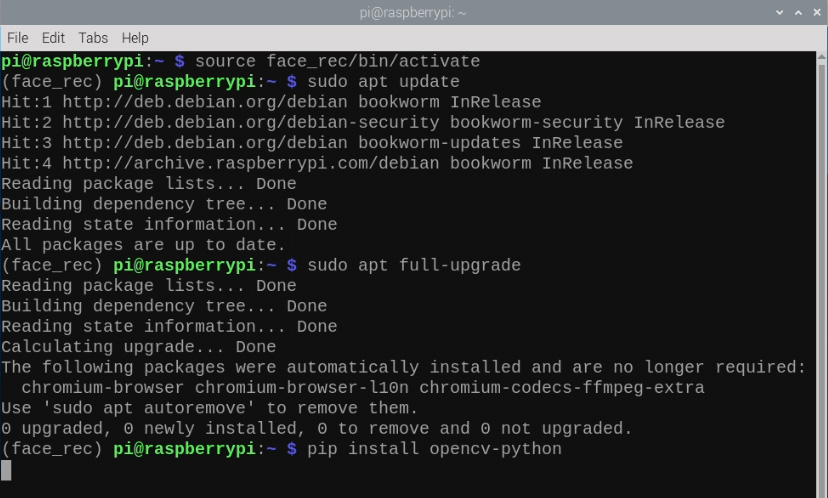
Now that we are working in a virtual environment, we can start installing the required packages. First, we will ensure that our package list and Pi is up to date by typing in:
sudo apt update
sudo apt full-upgrade
Then install OpenCV by entering:
pip install opencv-python
We will also install a tool we need called Imutils with:
pip install imutils
And also a tool called cmake (hit the y key when prompted):
sudo apt install cmake
Then we will install the facial recognition library with:
pip install face-recognition
This installation may take between 10 to 30 minutes so grab a cup of tea in the meantime.
We have one more thing to do, and that is to set up Thonny to use the virtual environment we just created. Thonny is the program we will be running all of our code out of and we need to get it to work out of the same venv so that it has access to the libraries we installed.
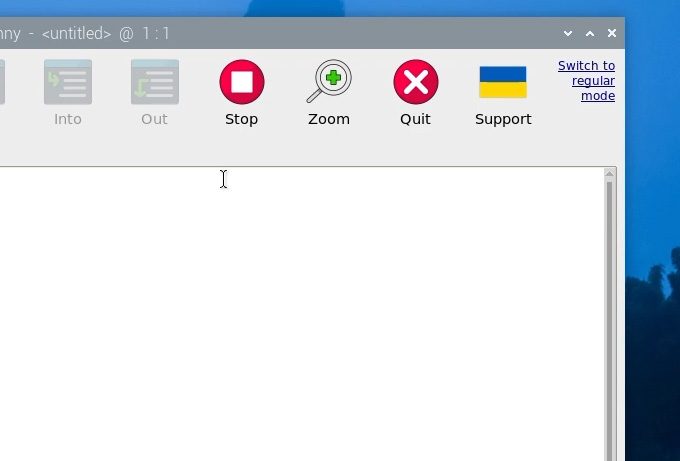
The first time you open Thonny it may be in the simplified mode, and you will see a "switch to regular mode" in the top right. If this is present click it and restart Thonny by closing it.
Now enter the interpreter options menu by selecting Run > Configure Interpreter. Under the Python executable option, there is a button with 3 dots. Select it and navigate to the Python executable in the virtual environment we just created.

This will be located under home/pi/face_rec/bin and in this file, you will need to select the file called "python3". Hit okay and you will now be working in this venv.
Whenever you open Thonny, it will now automatically work out of this environment. You can change the environment you are working out of by selecting it from the drop-down menu under the Python executable in the same interpreter options menu. If you wish to exit the virtual environment, select the option "bin/python3".

Taking Photos and Training the Model
Before we start identifying faces, we need to train a model with the faces that we want it to recognise. Start by downloading the project folder which will contain everything you need to run this. Unzip it and place it in an easy-to-access location (we just put it on our desktop).
Inside this folder, you will see the three Python scripts we will be using as well as a folder called dataset. This is the folder we will be filling with the images we want to train the model with. Open up the Python script called image_capture.py in Thonny - you may need to right-click and select Thonny as it's often not the default Python editor. We aren't going to dissect how this code works, but all we need to know is that it takes photos and places them in the correct file structure that we need.
Towards the top of the script you will see the line:
# Change this to the name of the person you're photographing
PERSON_NAME = "John Smith"
When you take photos of someone's face this will be the name assigned to that person. Please note, it is case-sensitive, so John Smith and john smith will be two different people. A good practice here might be to only use lowercase so you don't accidentally train the same person twice.
So go ahead and set it to the name of the first person you want to train and hit the green play button to run it. A new window will pop up displaying the camera feed. Frame yourself up and hit the space bar to take a photo! You can take as many as you want in this window and once you are done, hit the "Q" key to exit.
Choosing how many photos to train your model on will depend on your project. A single clear photo of someone looking right into the camera with good lighting will often be more than enough for most applications, but a few more photos of your face at different angles won't hurt.
If you now look inside the dataset folder you will see that this process has created a new folder with the name of the person that was set in those first few lines of code, and inside this folder will be all the images taken in the process as well. This is the structure that we will need to train our model - a folder with the name or ID of the face we want to recognise with the images we want to use inside of it. If you want to use pre-existing photos you can create a folder in dataset, set the name of the folder to who this will identify, and then place the photos inside of it.

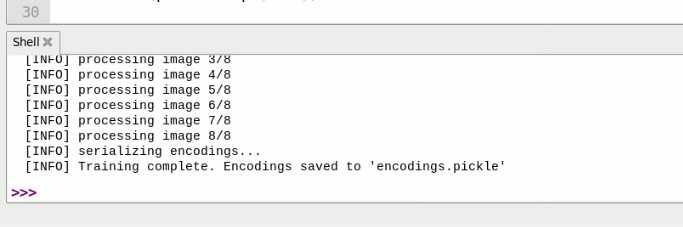
Once you have all the files with photos of people you want to identify, open up the script called model_training.py in thonny. If you run this script, it will take all of those photos and train the model which we will use in the next step, and you will be able to see the real-time progress of this in the shell. This process should take between a few seconds and a few minutes depending on how many images you are training it on.
Once it has finished training, you will be greeted with a completion message and it will create a file called "encodings.pickle" - this is our trained model.
Running Facial Recognition
We are now finally ready to run our face recognition. Open the script facial_recognition.py in Thonny and run it. After a few seconds, a camera feed will appear and if all goes right it should be recognising faces by drawing a box around them and naming it. It will only be able to detect the faces that you have trained it on and if it detects a face that isn't in the dataset, it will just label them as "unknown". You will also be able to see the FPS that your frames are being processed at in the top right.
You should also find that it is fairly accurate, even with a moving and blurry subject - shake your head around and see it still identify you. Whack on a pair of sunglasses, and it should still not have an issue identifying you. There are ways to fool this system though, if you tilt your head more than 45 degrees, it may not recognise you at all, and if you obscure your face partially it will also have trouble detecting you.

There are 2 variables that we can tune in the code to increase FPS or processing power, and they are the input resolution of the camera and a scaler that changes the resolution as we process the camera feed at.
Towards the top of the code, you will find the line that initialises our camera at a certain resolution. By default, it is 1920 x 1080 pixels, and we can set it to nearly any size as long as it's not larger than what the camera is capable of.
picam2.configure(picam2.create_preview_configuration(main={"format": 'XRGB8888', "size": (1920, 1080)}))
A little further down you will find a variable called "cv_scaler". This is a variable that scales the resolution of the camera from the resolution we initialised it at. This number must be a whole number - so no decimal points.
cv_scaler = 4 # this has to be a whole number
The resolution that we feed into the facial_recognition library affects its performance, and we can tune these 2 variables to change the resolution, so lets quickly look at how to use these 2 to first change the resolution. The code takes the resolution of the camera and divides it by cv_scaler. Here are some examples:
- If the resolution is set to 1920x1080, and cv_scaler = 10, the processed resolution will be 192x108
- If the resolution is set to 1920x1080, and cv_scaler = 4, the processed resolution will be 480x270
- If the resolution is set to 480x270 and cv_scaler = 1, the processed resolution will be 480x270
Notice in the last 2 examples how the processing resolution is 480x270, while these would give identical FPS and processing power, the preview window of the last one will be small and lower-resolution because that's the size that we initialise the camera feed. It is always better to set your resolution to a large size like 1920x1080 or 1280x720, and change cv_scaler to lower it.
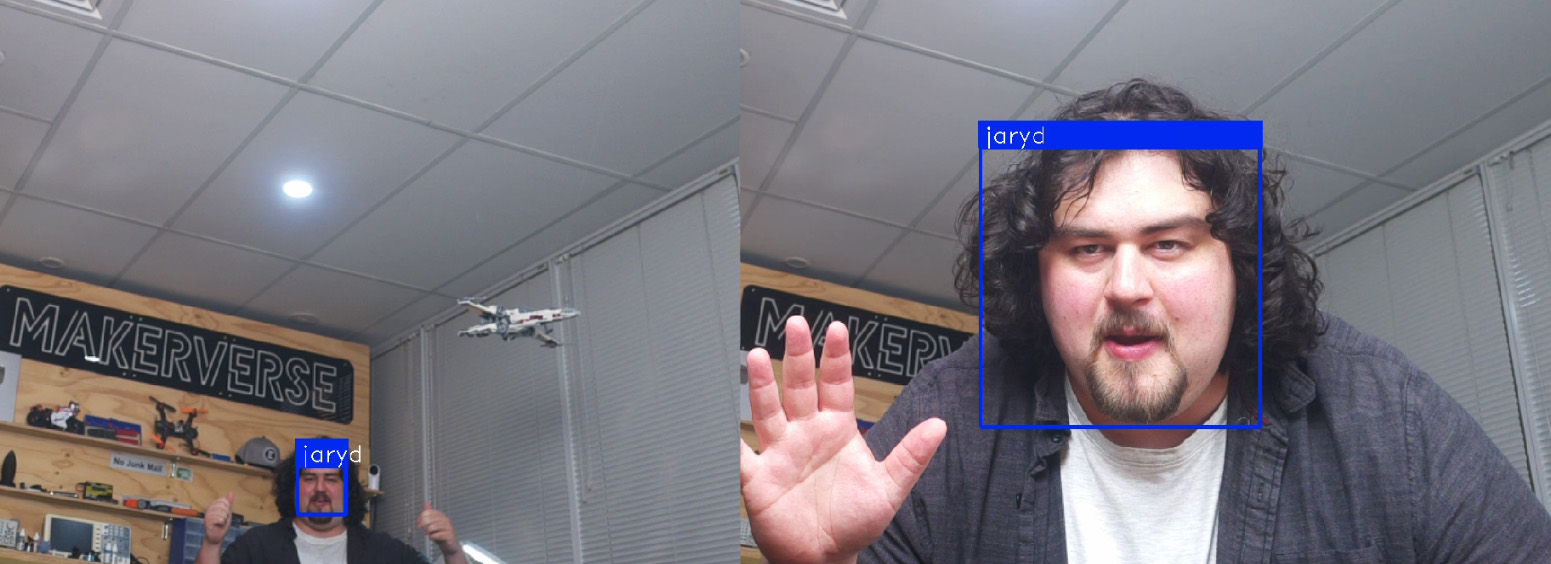
Now that we know how to lower it, let's look at the effects on performance. The image below has 2 different resolutions being processed. Both have the camera initialised at 1920x1080, but the image on the left has cv_scaler = 1 which results in 0.5 FPS and the right has cv_scaler = 10 which results in about 5 FPS. Also shown in the image is the maximum distance that they can recognise faces at with the left being from across our large studio room, and the right being only about a meter. It might be a placebo, but we think the higher resolution may also be more accurately picking up blurry subjects as well - but not by much.
Controlling Hardware and Where to From Here?
So far our set-up can identify a face, draw a box around it and label it. Let's take it to the next level and do something with it with the script called facial_recognition_hardware.py. This script has a few extra additions that allow us to control the GPIO pins of the Pi. Towards the top of the script, you will find a line with a list of authorised names that when detected, will turn on Pin 14 of the Pi:
authorized_names = ["john", "alice", "bob"] # Replace with your actual names
if you wish to add or change names to this list, place the name in a set of brackets and separate with a comma. Please note that this is also case-sensitive, if you have kept all of your training names lowercase, keep doing that here.
In the process_frame function we have the following section of code:
    # Control the GPIO pin based on face detection
    if authorized_face_detected:
        output.on()  # Turn on Pin
    else:
        output.off()  # Turn off Pin
This is the meat of this new script and if the authorised face is detected, it will turn on pin 14, and if a face is not detected, it will turn off the Pin. If you want to do something else besides changing the state of a pin, this is where you would put your code to do so.
In the video guide, we hooked up a solenoid-powered door lock with a relay, set the list of authorised names, and pseudo "unlocked a door" when a face was recognised. You will also notice another addition in that we added text below faces on the authorised list saying that this person is authorised.
While this is a specific example, it can be altered to do nearly any task as we have the simple structure of - if a face is detected, do something, if not, do something else. We could instead use this logic to control a run of RGB LEDs, or control a servo, or turn on a motor. (Also if you want to learn how to connect a solenoid to a Pi, we have a guide for that)
It doesn't have to control hardware either, we could instead opt to send an email, or send a notification via Bluetooth, or any other software-based automation. While we don't explicitly have guides on these, it should be very possible to paste our demo script into an LLM like ChatGPT or Claude and get them to help you write your desired code.

Acknowledgements
Projects like these are only possible thanks to the incredible work of many people bringing open-source projects to the masses. We would mainly like to give a huge thanks to the OpenCV and facial recognition library teams for creating these projects. We would also like to thank Caroline Dunn for developing much of the code that utilises the pickle model.
Appendix: Code Breakdown
For those who want a hand understanding of whats going on in this code, let's do a quick run-through of it and see whats going on under the hood. This is not essential to know what's going on, but just an extra for those that want it.
As always, our code starts by importing the required libraries including OpenCV and the face-recognition library we installed earlier:
import face_recognition
import cv2
import numpy as np
from picamera2 import Picamera2
import time
import pickle
Then we load the pickle model we created and unpack it into faces and names.
print("[INFO] loading encodings...")
with open("encodings.pickle", "rb") as f:
    data = pickle.loads(f.read())
known_face_encodings = data["encodings"]
known_face_names = data["names"]
Using Picamera 2, we then initialise the camera with the specified resolution:
picam2 = Picamera2()
picam2.configure(picam2.create_preview_configuration(main={"format": 'XRGB8888', "size": (1920, 1080)}))
picam2.start()
And then we initialise a whole heap of variables that we will use through the rest of the code. Here is where we can change our cv_scaler:
cv_scaler = 4 #

face_locations = []
face_encodings = []
face_names = []
frame_count = 0
start_time = time.time()
fps = 0
Next, we create our first function which takes in a frame and gets the recognition data out of it. It starts by using cv_scaler to scale down the frame we feed into it to a lower resolution. Then it converts it from BGR to RGB as needed by the library:
def process_frame(frame):
    global face_locations, face_encodings, face_names

    # Resize the frame using cv_scaler to increase performance (less pixels processed, less time spent)
    resized_frame = cv2.resize(frame, (0, 0), fx=(1/cv_scaler), fy=(1/cv_scaler))

    # Convert the image from BGR to RGB colour space, the facial recognition library uses RGB, OpenCV uses BGR
    rgb_resized_frame = cv2.cvtColor(resized_frame, cv2.COLOR_BGR2RGB)
Then we feed the resized frame into the facial recognition library and get out the location and encodings of the face.
    face_locations = face_recognition.face_locations(rgb_resized_frame)
    face_encodings = face_recognition.face_encodings(rgb_resized_frame, face_locations, model='large')
After that, we use a for loop to go through all the faces in the image and see if the encodings match any from our trained model.
    face_names = []
    for face_encoding in face_encodings:
        # See if the face is a match for the known face(s)
        matches = face_recognition.compare_faces(known_face_encodings, face_encoding)
        name = "Unknown"

        # Use the known face with the smallest distance to the new face
        face_distances = face_recognition.face_distance(known_face_encodings, face_encoding)
        best_match_index = np.argmin(face_distances)
        if matches[best_match_index]:
            name = known_face_names[best_match_index]
        face_names.append(name)

    return frame
We then create another function that will take in the frame and draw the boxes around it, as well as label it with the identified name. The for loop means that it cycles through all the identified faces. It uses the top, right, bottom, and left coordinates (which we found with the face_locations in the last function), to draw a box around the recognised face. But before we can use it, we must scale it by cv_scaler or it won't draw it in the right position on our camera preview (the processing is done on a down-sized frame so we have a to up-size the coordinates to match our camera preview):
def draw_results(frame):
    # Display the results
    for (top, right, bottom, left), name in zip(face_locations, face_names):
        # Scale back up face locations since the frame we detected in was scaled
        top *= cv_scaler
        right *= cv_scaler
        bottom *= cv_scaler
        left *= cv_scaler
Then we use the tools provided by OpenCV to actually draw these things. We first draw an empty rectangle around the face in blue with a line thickness of 3, then we draw a solid rectangle ontop of that box, and finally place the name of it ontop of that solid box.
        # Draw a box around the face
        cv2.rectangle(frame, (left, top), (right, bottom), (244, 42, 3), 3)

        # Draw a label with a name below the face
        cv2.rectangle(frame, (left -3, top - 35), (right+3, top), (244, 42, 3), cv2.FILLED)
        font = cv2.FONT_HERSHEY_DUPLEX
        cv2.putText(frame, name, (left + 6, top - 6), font, 1.0, (255, 255, 255), 1)

    return frame
And then we create our final function that calculates our FPS. At the very end of it, it stores the current time in a variable, and the next time we call it, it will compare that time to the new time to figure out how long it has been, and calculates FPS off that.
        # Draw a box around the face
        cv2.rectangle(frame, (left, top), (right, bottom), (244, 42, 3), 3)

        # Draw a label with a name below the face
        cv2.rectangle(frame, (left -3, top - 35), (right+3, top), (244, 42, 3), cv2.FILLED)
        font = cv2.FONT_HERSHEY_DUPLEX
        cv2.putText(frame, name, (left + 6, top - 6), font, 1.0, (255, 255, 255), 1)

    return frame
With our functions layed out, we are finally ready to get into our infinitely repeating while true loop. This starts by capturing a frame from the camera with Picamera2, then it feeds that frame into our process_frame function which spits out all the identified faces and their locations. Then we feed that into the display frame which takes the face locations and identified faces, and draws them on a frame. This display_frame variable is what we will be telling the Pi to show us in a bit:
while True:
    # Capture a frame from camera
    frame = picam2.capture_array()

    # Process the frame with the function
    processed_frame = process_frame(frame)

    # Get the text and boxes to be drawn based on the processed frame
    display_frame = draw_results(processed_frame)
After that, we call the calculate_fps function which calculates our FPS, we then use some more OpenCV tools to attatch the FPS counter to the display frame, and then we show it in the preview window!
    # Calculate and update FPS
    current_fps = calculate_fps()

    # Attach FPS counter to the text and boxes
    cv2.putText(display_frame, f"FPS: {current_fps:.1f}", (display_frame.shape[1] - 150, 30),
                cv2.FONT_HERSHEY_SIMPLEX, 1, (0, 255, 0), 2)

    # Display everything over the video feed.
    cv2.imshow('Video', display_frame)
And finally at the end of the loop we check if the "q" key has been pressed. If it has, we will exit this while true loop and run the last bit of code which safely stops the camera and closes the camera preview window:
    # Break the loop and stop the script if 'q' is pressed
    if cv2.waitKey(1) == ord("q"):
        break

# By breaking the loop we run this code here which closes everything
cv2.destroyAllWindows()
picam2.stop()

