I love the ESP line-up. I started by messing around with the ESP8266 and I completely fell in love with it. The 8266 is all I ever wanted from a microcontroller: WIFI connectivity, a decent amount of GPIO, a deep-sleep mode for battery operation and it is dirt cheap.
The ESP8266 found its way into many projects, and every time I had tons of fun integrating it, so when the folks at Espressif released the ESP32, I was beyond happy.
Among all the development boards based on the ESP32 that are circulating around, one caught my attention, the ESP32-CAM. This little mighty board offers wifi connectivity, onboard voltage regulation, LED Flash, Micro sd card reader, and a 2MP Camera.
The cherry on top of the cake was when I found out about Home assistant and ESPHome. Two months in the Home assistant rabbit hole later I came back victorious.
In this project, we will set up a Home Assistant instance on an RPi 4 and connect the ESP32-CAM to it with a motion sensor for presence detection and automation.
Parts List
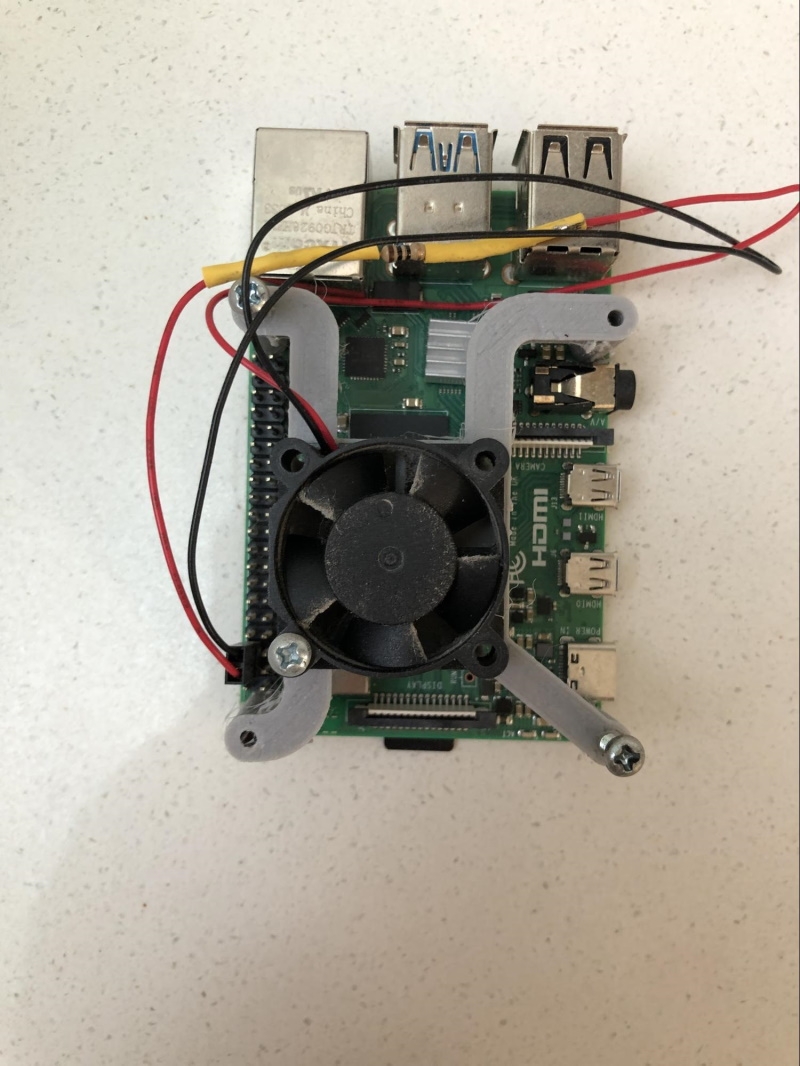
- Raspberry Pi 4 Model B 4GB (if you have a Pi 3B+ it's is perfectly fine too, the Pi Zero boards are not recommended due to insufficient power)
- Extreme SD/MicroSD Memory Card - 64GB Class 10 - Adapter Included
- ESP32-CAM Development Board
- FTDI Friend + extras - v1.0
- PIR Infrared Motion Sensor (HC-SR501)
- Some Female/Female Jumper Wires to get everything connected
- Optionally a 3D printed case (See below)

Getting Home Assistant Ready
- First thing first we need to set up Home Assistant on the RPi, grab a copy of HA from here https://www.home-assistant.io/hassio/installation/ also you will need Balena Etcher or the Raspberry Pi Imager to flash the image on the sd card.
- Once you have flashed the image on the sd card, connect your RPi to your modem via ethernet (this is very important, you can technically use the onboard wifi on your raspberry but Home Assistant needs a solid connection, depending on multiple factors a wifi connection could be unstable resulting in frustration down the road, trust me, staying up until 3 am troubleshooting why I could not connect to HA only to find out that my neighbor’s microwave oven was interfering with the wifi is no fun)
- Now put the micro sd card into the Pi and boot all the way. The first boot will take some time, so don't be afraid if nothing happens for a while.
- Log into your modem and you should see a page that lists all the devices connected. It could be under the DHCP page or under the device section, this is different for every router. If you get stuck google your router’s make and model, you will be very likely to find the manuals or someone with the same problem.
- Once you reach the device page you should see your Raspberry Pi happily sitting on your network. Note down the Pi's IP address and add a static entry for it in your router’s DHCP settings (this is not necessary but I strongly recommend doing so)
- It is time to connect to Home Assistant, open a browser while you connected to your home LAN, and paste this into the address bar: http://homeassistant.local:8123/
- Alternatively, if this address does not work you can use the Pi IP address that we noted down before.
- For example, my Pi address is 127.111.1.20 therefore the Home Assistant dashboard address will be http://127.111.1.20.local:8123/
- Your address will be different just substitute your Pi address into the above address.
Once you have successfully connected to Home Assistant, go through the setup process.
Adding on the Add-Ons
At this point you should have a running Home Assistant instance on your Pi, it’s time to add-on and add-on hard! First, we need to get an ESPHome add-on from the add-on store in Home Assistant.
- Go to the main page and click on the name you gave during the set-up, a page will open, now turn on advance mode.
- From the side panel, click supervisor > add-on store (at the top). In the search bar, look up ESPHome add-on. Click on it and install it.
- Reboot the Pi via Sidebar > Configuration > Server Controls > Server management > Restart.
- Wait for the server to restart and then go to Supervisor > ESPHome
- Click the plus button (+) in the bottom right to add a camera
- Give your camera a name
- In device type, select from the drop-down menu “Ai Thinker ESP32-CAM”
- Now enter your WIFI Credential and an OTA password (you will need this later)
- Now click submit
- Going back to ESPHome you should see your new camera ready for you.
- Click the “edit” button on the camera card.
Configuration
ESPHome uses a .yaml file to store the configuration for the devices.
Your configuration should be similar to mine.
Modify your configuration in order to match mine. Be careful if you copy-paste my configuration. “.yaml” is formatting sensitive and if the indentations are not correct your camera will not work.
This is my configuration for reference.
esphome:
  name: camera_frontdoor
  platform: ESP32
  board: esp32dev
wifi:
  ssid: "PUT YOUR SSID HERE IN THE BRACKET"
  password: "PUT YOUR PASSWORD HERE IN THE BRACKET"

  manual_ip:
    static_ip: 111.111.111.1
    gateway: 111.111.111.1
    subnet: 255.255.255.0

api:
  reboot_timeout: 0s
ota:
logger:

# ESP32-CAM
esp32_camera:
  name: GIVE YOUR CAMERA A NAME
  external_clock:
    pin: GPIO0
    frequency: 20MHz
  i2c_pins:
    sda: GPIO26
    scl: GPIO27
  data_pins: [GPIO5, GPIO18, GPIO19, GPIO21, GPIO36, GPIO39, GPIO34, GPIO35]
  vsync_pin: GPIO25
  href_pin: GPIO23
  pixel_clock_pin: GPIO22
  power_down_pin: GPIO32
  resolution: 400x296
  max_framerate: 12 fps


# Flashlight
output:
  - platform: gpio
    pin: GPIO4
    id: gpio_4
light:
  - platform: binary
    output: gpio_4
    name: entreance light
    id: camera_flash


binary_sensor:
  - platform: gpio
    pin: 2
    name: "PIR Sensor"
    device_class: motion
I strongly recommend adding a static IP address, ESP Cameras have a known flaw, the PCB wifi antenna is tiny and its reception is barely adequate, from time to time the connection will drop, adding a static IP address will allow the camera to reconnect to HA without having to wait for the DHCP server to issue a new address.
Go to your modem setting and reserve an IP address, the same way you did for the Raspberry Pi, note it down, and insert it in the configuration file like shown down:
esphome:
  name: camera_frontdoor
  platform: ESP32
  board: esp32dev
wifi:
  ssid: "PUT YOUR SSID HERE IN THE BRACKET"
  password: "PUT YOUR PASSWORD HERE IN THE BRACKET"

  manual_ip:
    static_ip: 111.111.111.1
    gateway: 111.111.111.1
    subnet: 255.255.255.0
If you do not want to set a static IP address for your camera, simply comment out the section adding the “#” in front of every line.
At the bottom of the configuration file there is a section called “binary_sensor” this is our PiR sensor entrance that will be used by HA later.
binary_sensor:
  - platform: gpio
    Pin: 2
    name: "PIR Sensor"
    device_class: motion
The “pin” is the GPIO Pin used to connect the PiR sensor to the ESP-cam. Note this down. You will need it later.
Now is time to flash our ESP-Cam.

Flashing the ESP-Cam
- Get your FTDI programmer and hook it up to the computer, connect the TX of the controller to U0R on the camera and RX to U0T. Bridge IO0 to ground on the camera to put it in boot mode.
- Now the power, connect the 5V rail of the programmer to the pin labelled 5V on the camera and GND To GND
- Now you have to download this program to flash your camera: https://github.com/esphome/esphome-flasher/releases
- Make sure you also have installed the driver for you FTDI programmer.
- Open the Flasher utility and you should see your Programmer under “Serial port” if you don’t, unplug the programmer and plug it back in.
- Go to the ESPHome page on HA and tap on the three dots on the right side of your camera card. From the menu Pick “compile”. Once compiled click “Download Binary”
- On the Flasher util click “Browse” and select the .bin file you just downloaded
- Now press “Flash” and wait until finished.
- Unplug the Programmer and then remove the jumper from PiN0 and ground. Plug the programmer back, open the Flasher util, now you should see the output of the camera on the “console”.
- If everything went right you will see a message saying the camera is connected to HA, if you don’t is very likely the wifi credentials are incorrect. Correct them and try again.
- Once your camera is connected to HA, on the ESPhome page your camera’s card edge should turn green from red.
- Go to the Home assistant home page and tap the three dots at the top, and select “Edit Dashboard”
- In the bottom right corner tap “add card”, scroll down and select “Picture Glance”.
- Give a name to your card
- From “Camera entry” select your camera
- From “Entities” select “PIR Sensor”
- Now save and from the home page of HA, you should see a feed of your camera, if you click it a live feed should appear.
Printing the Case

Printing settings are:
- 20% infill
- 4 walls
- 2 top and bottom layer
- No supports required
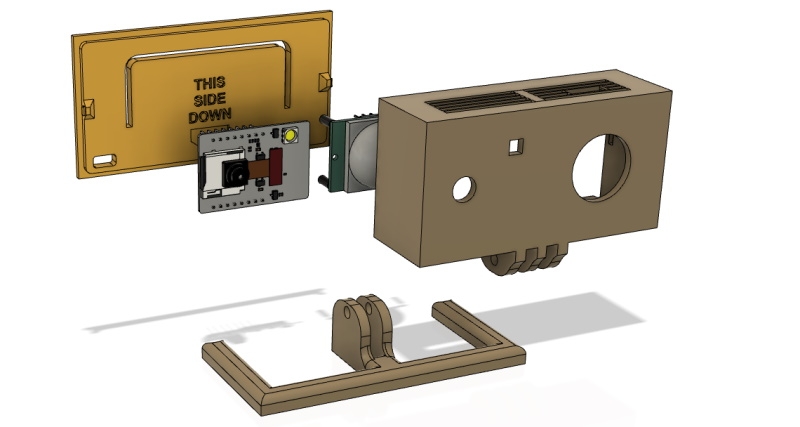
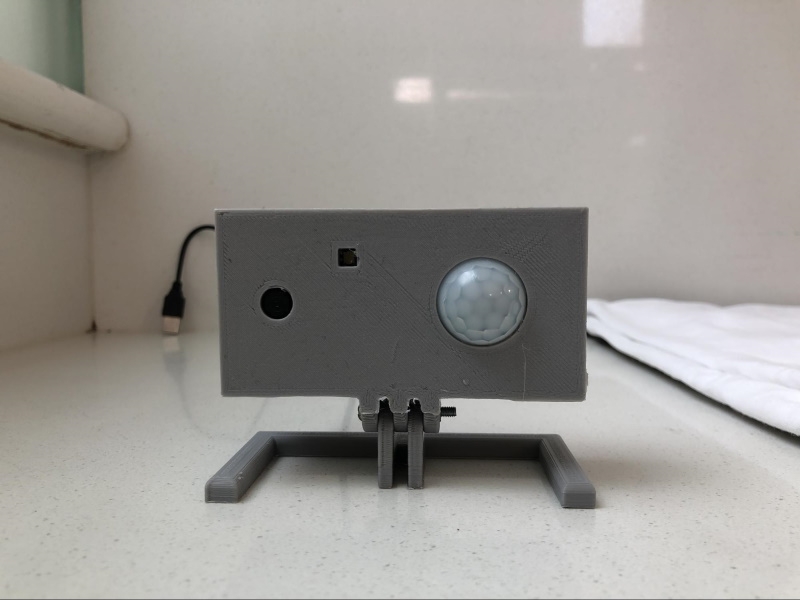
Once printed the camera and PIR sensor should snap in place, if you want there are two little hooks you can fit a rubber band to secure the camera and sensor in place.
Powering the Camera
- As for the power, you can use a USB charger, It must be able to deliver at least 2A at 5V.
- I did take an old USB cable and cut off the end, to which I have soldered some jumper wires.
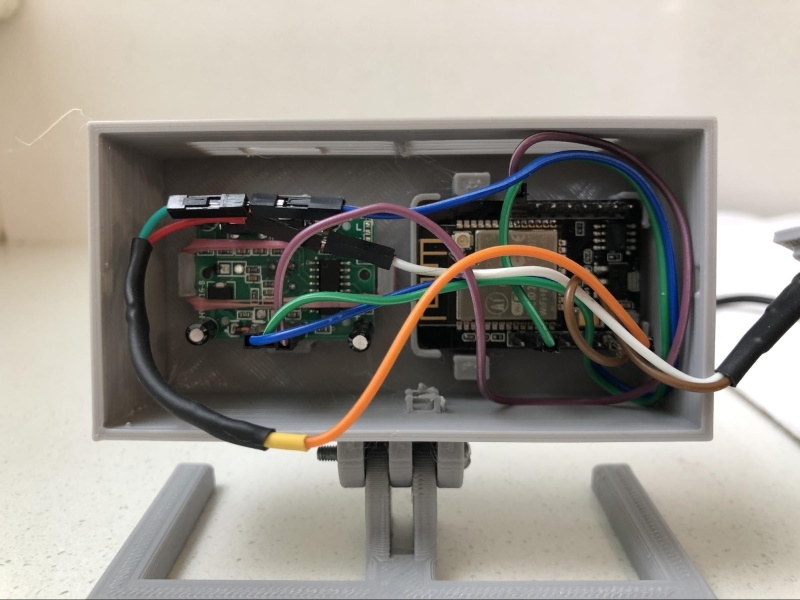
- For the connection, connect the GND of the Camera to the GND of the PIR sensor. From the USB cable run the 5V to the camera 5V Pin and to the sensor 5V Pin.
- Connect the signal pin of the PIR sensor to pin 2 of the camera.
- For last the GND from the cable to the GND of the camera
The Moment of Truth
Power up your creation and wait at least 5 minutes to allow the PIR sensor to stabilize.
Your sensor should have two screws to adjust the retrigger time and sensitivity, look up how to adjust them on the manual that came with your sensor otherwise look them up online.
If everything is connected properly on the HA home page you should see an icon-changing state every time the sensor gets triggered.
P.S. the camera has an LED, on my configuration file is connected via GPIO you can add a button via HA to toggle the light but the LDO on the ESP32 cam is barely enough to run the camera, if you leave the led on for too long you will fry the regulator, ask my drawer full of burned esp32 cam to confirm my claims.
Hope you have liked this project as much as I have.
This is just an example of what you can do with HA, ESPHome and some ingenuity, stay curious and keep exploring, life is too short to not DIY!

Special Thanks
This project has been possible to the greats folks over at Home Assistant and ESPHome, they have done all the heavy lifting, I merely put the pieces together. Please go check out these two great projects.
https://www.home-assistant.io/
Special thanks to Rui Santos for his fantastic tutorial about ESP in general
I love the ESP line-up. I started by messing around with the ESP8266 and I completely fell in love with it. The 8266 is all I ever wanted from a microcontroller: WIFI connectivity, a decent amount of GPIO, a deep-sleep mode for battery operation and it is dirt cheap.
The ESP8266 found its way into many projects, and every time I had tons of fun integrating it, so when the folks at Espressif released the ESP32, I was beyond happy.
Among all the development boards based on the ESP32 that are circulating around, one caught my attention, the ESP32-CAM. This little mighty board offers wifi connectivity, onboard voltage regulation, LED Flash, Micro sd card reader, and a 2MP Camera.
The cherry on top of the cake was when I found out about Home assistant and ESPHome. Two months in the Home assistant rabbit hole later I came back victorious.
In this project, we will set up a Home Assistant instance on an RPi 4 and connect the ESP32-CAM to it with a motion sensor for presence detection and automation.
Parts List
- Raspberry Pi 4 Model B 4GB (if you have a Pi 3B+ it's is perfectly fine too, the Pi Zero boards are not recommended due to insufficient power)
- Extreme SD/MicroSD Memory Card - 64GB Class 10 - Adapter Included
- ESP32-CAM Development Board
- FTDI Friend + extras - v1.0
- PIR Infrared Motion Sensor (HC-SR501)
- Some Female/Female Jumper Wires to get everything connected
- Optionally a 3D printed case (See below)
Getting Home Assistant Ready
- First thing first we need to set up Home Assistant on the RPi, grab a copy of HA from here https://www.home-assistant.io/hassio/installation/ also you will need Balena Etcher or the Raspberry Pi Imager to flash the image on the sd card.
- Once you have flashed the image on the sd card, connect your RPi to your modem via ethernet (this is very important, you can technically use the onboard wifi on your raspberry but Home Assistant needs a solid connection, depending on multiple factors a wifi connection could be unstable resulting in frustration down the road, trust me, staying up until 3 am troubleshooting why I could not connect to HA only to find out that my neighbor’s microwave oven was interfering with the wifi is no fun)
- Now put the micro sd card into the Pi and boot all the way. The first boot will take some time, so don't be afraid if nothing happens for a while.
- Log into your modem and you should see a page that lists all the devices connected. It could be under the DHCP page or under the device section, this is different for every router. If you get stuck google your router’s make and model, you will be very likely to find the manuals or someone with the same problem.
- Once you reach the device page you should see your Raspberry Pi happily sitting on your network. Note down the Pi's IP address and add a static entry for it in your router’s DHCP settings (this is not necessary but I strongly recommend doing so)
- It is time to connect to Home Assistant, open a browser while you connected to your home LAN, and paste this into the address bar: http://homeassistant.local:8123/
- Alternatively, if this address does not work you can use the Pi IP address that we noted down before.
- For example, my Pi address is 127.111.1.20 therefore the Home Assistant dashboard address will be http://127.111.1.20.local:8123/
- Your address will be different just substitute your Pi address into the above address.
Once you have successfully connected to Home Assistant, go through the setup process.
Adding on the Add-Ons
At this point you should have a running Home Assistant instance on your Pi, it’s time to add-on and add-on hard! First, we need to get an ESPHome add-on from the add-on store in Home Assistant.
- Go to the main page and click on the name you gave during the set-up, a page will open, now turn on advance mode.
- From the side panel, click supervisor > add-on store (at the top). In the search bar, look up ESPHome add-on. Click on it and install it.
- Reboot the Pi via Sidebar > Configuration > Server Controls > Server management > Restart.
- Wait for the server to restart and then go to Supervisor > ESPHome
- Click the plus button (+) in the bottom right to add a camera
- Give your camera a name
- In device type, select from the drop-down menu “Ai Thinker ESP32-CAM”
- Now enter your WIFI Credential and an OTA password (you will need this later)
- Now click submit
- Going back to ESPHome you should see your new camera ready for you.
- Click the “edit” button on the camera card.
Configuration
ESPHome uses a .yaml file to store the configuration for the devices.
Your configuration should be similar to mine.
Modify your configuration in order to match mine. Be careful if you copy-paste my configuration. “.yaml” is formatting sensitive and if the indentations are not correct your camera will not work.
This is my configuration for reference.
esphome:
  name: camera_frontdoor
  platform: ESP32
  board: esp32dev
wifi:
  ssid: "PUT YOUR SSID HERE IN THE BRACKET"
  password: "PUT YOUR PASSWORD HERE IN THE BRACKET"

  manual_ip:
    static_ip: 111.111.111.1
    gateway: 111.111.111.1
    subnet: 255.255.255.0

api:
  reboot_timeout: 0s
ota:
logger:

# ESP32-CAM
esp32_camera:
  name: GIVE YOUR CAMERA A NAME
  external_clock:
    pin: GPIO0
    frequency: 20MHz
  i2c_pins:
    sda: GPIO26
    scl: GPIO27
  data_pins: [GPIO5, GPIO18, GPIO19, GPIO21, GPIO36, GPIO39, GPIO34, GPIO35]
  vsync_pin: GPIO25
  href_pin: GPIO23
  pixel_clock_pin: GPIO22
  power_down_pin: GPIO32
  resolution: 400x296
  max_framerate: 12 fps


# Flashlight
output:
  - platform: gpio
    pin: GPIO4
    id: gpio_4
light:
  - platform: binary
    output: gpio_4
    name: entreance light
    id: camera_flash


binary_sensor:
  - platform: gpio
    pin: 2
    name: "PIR Sensor"
    device_class: motion
I strongly recommend adding a static IP address, ESP Cameras have a known flaw, the PCB wifi antenna is tiny and its reception is barely adequate, from time to time the connection will drop, adding a static IP address will allow the camera to reconnect to HA without having to wait for the DHCP server to issue a new address.
Go to your modem setting and reserve an IP address, the same way you did for the Raspberry Pi, note it down, and insert it in the configuration file like shown down:
esphome:
  name: camera_frontdoor
  platform: ESP32
  board: esp32dev
wifi:
  ssid: "PUT YOUR SSID HERE IN THE BRACKET"
  password: "PUT YOUR PASSWORD HERE IN THE BRACKET"

  manual_ip:
    static_ip: 111.111.111.1
    gateway: 111.111.111.1
    subnet: 255.255.255.0
If you do not want to set a static IP address for your camera, simply comment out the section adding the “#” in front of every line.
At the bottom of the configuration file there is a section called “binary_sensor” this is our PiR sensor entrance that will be used by HA later.
binary_sensor:
  - platform: gpio
    Pin: 2
    name: "PIR Sensor"
    device_class: motion
The “pin” is the GPIO Pin used to connect the PiR sensor to the ESP-cam. Note this down. You will need it later.
Now is time to flash our ESP-Cam.
Flashing the ESP-Cam
- Get your FTDI programmer and hook it up to the computer, connect the TX of the controller to U0R on the camera and RX to U0T. Bridge IO0 to ground on the camera to put it in boot mode.
- Now the power, connect the 5V rail of the programmer to the pin labelled 5V on the camera and GND To GND
- Now you have to download this program to flash your camera: https://github.com/esphome/esphome-flasher/releases
- Make sure you also have installed the driver for you FTDI programmer.
- Open the Flasher utility and you should see your Programmer under “Serial port” if you don’t, unplug the programmer and plug it back in.
- Go to the ESPHome page on HA and tap on the three dots on the right side of your camera card. From the menu Pick “compile”. Once compiled click “Download Binary”
- On the Flasher util click “Browse” and select the .bin file you just downloaded
- Now press “Flash” and wait until finished.
- Unplug the Programmer and then remove the jumper from PiN0 and ground. Plug the programmer back, open the Flasher util, now you should see the output of the camera on the “console”.
- If everything went right you will see a message saying the camera is connected to HA, if you don’t is very likely the wifi credentials are incorrect. Correct them and try again.
- Once your camera is connected to HA, on the ESPhome page your camera’s card edge should turn green from red.
- Go to the Home assistant home page and tap the three dots at the top, and select “Edit Dashboard”
- In the bottom right corner tap “add card”, scroll down and select “Picture Glance”.
- Give a name to your card
- From “Camera entry” select your camera
- From “Entities” select “PIR Sensor”
- Now save and from the home page of HA, you should see a feed of your camera, if you click it a live feed should appear.
Printing the Case
Printing settings are:
- 20% infill
- 4 walls
- 2 top and bottom layer
- No supports required
Once printed the camera and PIR sensor should snap in place, if you want there are two little hooks you can fit a rubber band to secure the camera and sensor in place.
Powering the Camera
- As for the power, you can use a USB charger, It must be able to deliver at least 2A at 5V.
- I did take an old USB cable and cut off the end, to which I have soldered some jumper wires.
- For the connection, connect the GND of the Camera to the GND of the PIR sensor. From the USB cable run the 5V to the camera 5V Pin and to the sensor 5V Pin.
- Connect the signal pin of the PIR sensor to pin 2 of the camera.
- For last the GND from the cable to the GND of the camera
The Moment of Truth
Power up your creation and wait at least 5 minutes to allow the PIR sensor to stabilize.
Your sensor should have two screws to adjust the retrigger time and sensitivity, look up how to adjust them on the manual that came with your sensor otherwise look them up online.
If everything is connected properly on the HA home page you should see an icon-changing state every time the sensor gets triggered.
P.S. the camera has an LED, on my configuration file is connected via GPIO you can add a button via HA to toggle the light but the LDO on the ESP32 cam is barely enough to run the camera, if you leave the led on for too long you will fry the regulator, ask my drawer full of burned esp32 cam to confirm my claims.
Hope you have liked this project as much as I have.
This is just an example of what you can do with HA, ESPHome and some ingenuity, stay curious and keep exploring, life is too short to not DIY!
Special Thanks
This project has been possible to the greats folks over at Home Assistant and ESPHome, they have done all the heavy lifting, I merely put the pieces together. Please go check out these two great projects.
https://www.home-assistant.io/
Special thanks to Rui Santos for his fantastic tutorial about ESP in general

