In this guide, we will be setting up and using YOLO pose estimation with the Raspberry Pi AI HAT, as well as exploring how to use it alongside your own Python code so you can use pose estimation in your projects. We will be taking a look at how to install the required hardware and firmware as well as how to set up and use the pose estimation pipelines. The result of this guide will have you equipped with an understanding of this whole setup, as well as three different example scripts we have prepared. With these demo scripts, we will be using gestures to control media players, controlling servos with the angles of our arms, and playing a game of fruit ninja with our bodies.
Like most of our other computer vision guides this one is a fun one, so let's get into it!
Contents:
- What You Will Need
- Hardware Assembly
- Installing Pi OS
- Installing AI HAT Software and Python Pipelines
- Running Pose Estimation Demo
- Example Code 1: Base Pose Estimation Code
- Changing Camera Resolution
- Example Code 2: Gesture Media Control
- Example Code 3: Servo Control
- Example Code 4: Fruit Ninja
- Where to From Here?
What You Will Need
To follow along with this guide you will need a:
- Raspberry Pi 5 - A 2GB or larger model will work.
- AI HAT+ Board - This guide will work with both the 13 TOPS and 26 TOPS versions. TOPS is a measurement of how fast an AI accelerator is so you can expect the 26 TOPS version of the AI HAT+ to be about twice as fast. This means that it can run more demanding and powerful models with greater FPS than the 13 TOPS version.
- Pin Extender (dependant) - The AI HAT+ comes with a pin extender for your Pi, but they are usually not long enough to poke fully through the HAT. If you intend to plug hardware into your Pi or use your Pins in any other way, you will need an extender like this to access them.
- Pi Camera Module - We are using the Camera Module V3, but nearly any official camera module will work.
- Camera Adapter Cable - The Pi 5 comes with a different-sized CSI camera cable to previous models and your camera may come with the older wider one so it's worth double-checking. The Camera Module V3 WILL need one. You can also get them in longer lengths like 300mm and 500mm!
- Cooling Solution - For the Pi 5 itself we are using the Active Cooler. While the AI HAT+ can run without a cooler, if you are running it for extended periods of time, a small self-attaching heatsink may be a worthwhile investment. A little bit of cooling may go a long way here.
- Power Supply
- Micro SD Card - At least 16GB in size.
- Monitor and Micro-HDMI to HDMI Cable
- Mouse and Keyboard
Hardware Installation
 Before installing any hardware on your Pi ensure that it is turned off and unplugged from any power source.
 Install the 4 standoffs that came with your AI HAT. Four long and four short screws come with the standoffs and it doesn't matter which ones are used.
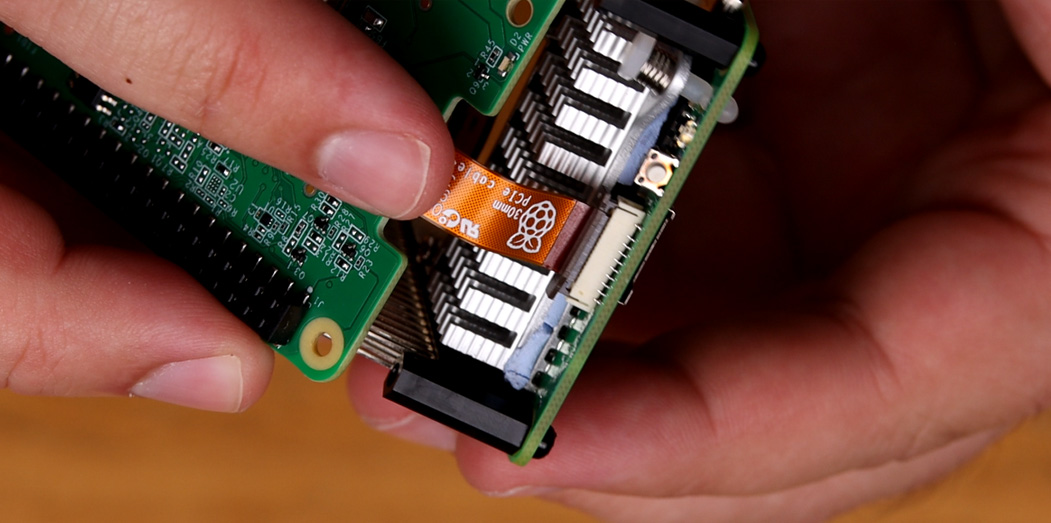 To install the PCIe cable from the HAT into the Pi start by lifting the brown tab on the Pi's PCIe slot. Insert the cable into the slot and ensure it sits nice and square in there. Push the tab back down to secure it in place.
  Now slide the Hat onto the pin extender until it sits flat on the standoffs. Be careful to not damage the PCIe cable in this process.
  The connectors for the camera use a similar tab connectors as the PCIe connector. On both the camera and the Pi's connector slot lift the tab, insert the cable so it sits square, and then push the connector back down to secure it in place.
 And finally secure the HAT down with the remaining 4 screws. If you are opting to use a self-adhesive heatsink on the AI HAT, place it on the silver processing unit in the centre of the board.
Installing Pi OS
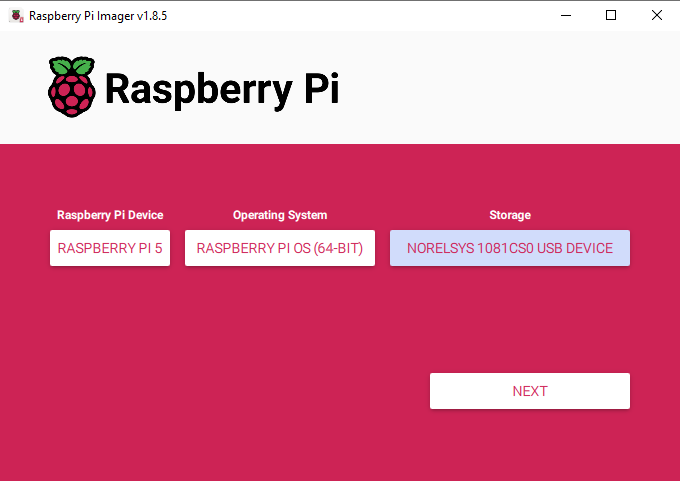
First things first, we need to install Pi OS onto the micro SD card. Using the Raspberry Pi Imager, select Raspberry PI 5 as the Device, Raspberry Pi OS (64-bit) as the Operating system, and your microSD card as the storage device.
NOTE: INSTALLING PI OS ONTO THE MICROSD CARD WILL WIPE ALL DATA ON IT.
This process may take a few minutes to download the OS and install it. Once the process has finished, insert it into the Pi and boot it up. Your Pi will run through a first-time installation and ensure that you connect it to the internet.
Installing AI HAT Software and Python Pipelines
If you have previously set up these pipelines as we did in our object detection guide, you do not need to repeat these steps and can jump straight into the demo codes.
Let's start by installing the required firmware and software to run the AI HAT. Open up a new terminal window and start by updating your Pi with:
sudo apt update && sudo apt full-upgrade
In these steps you may be asked to confirm if you want to install something, just hit "y" and enter.
Now install the HAT firmware with:
sudo apt install hailo-all
This installation may take a good 5 to 10 minutes to complete. Once it has finished restart your Pi. If you want to be a power user you can restart it by typing into the terminal:
reboot

Now we will install Hailo's Python pipeline software and examples, but what is a pipeline?
Communicating with the AI HAT hardware itself is incredibly complicated and the code needed to do that is quite involved. We instead are going to set up and install a pose estimation pipeline which is just a collection of code and software to allow us to more-easily interact with the hat. It is essentially going to take our simpler and more human-readable code and turn all the gears behind the scenes to get the HAT to run it.
To install the pipeline and required libraries to run it, start by copying their GitHub repository by entering into the terminal:
git clone https://github.com/hailo-ai/hailo-rpi5-examples.git
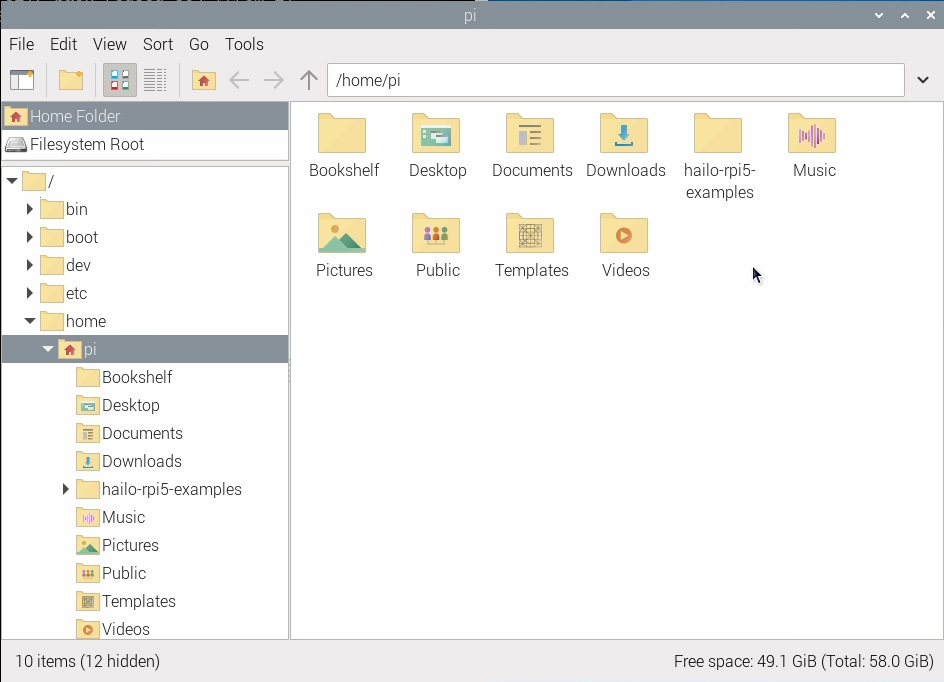
This will download a folder called "hailo-rpi5-examples" into your Pi's home folder and it is going to be an important location that we will be working in.
Before we install the pipeline we need to tell the terminal to work out of that folder with the change directory command:
cd hailo-rpi5-examples
The blue text with the file location in the terminal shows that you have successfully run this command. Now we will run the shell script installer with:
./install.sh
This installation may take 10 - 20 minutes as it also installs all the YOLO models that we will be using.
Once the installation has finished, restart your Pi once more.

Running Pose Estimation Demo
Let's run some demo code! In the previous step, we downloaded some sample pipelines from Hailo as well as a sample Python scripts to use these pipelines. We will be using the pose estimation pipeline in this tutorial - it's called "pose_estimation_pipeline.py" and is located under hailo_rpi5-examples/basic_pipelines.
The easiest way to run these Python scripts is through the terminal. First change the terminal's working location with the change directory command, this is the same as the previous one we used:
cd hailo-rpi5-examples
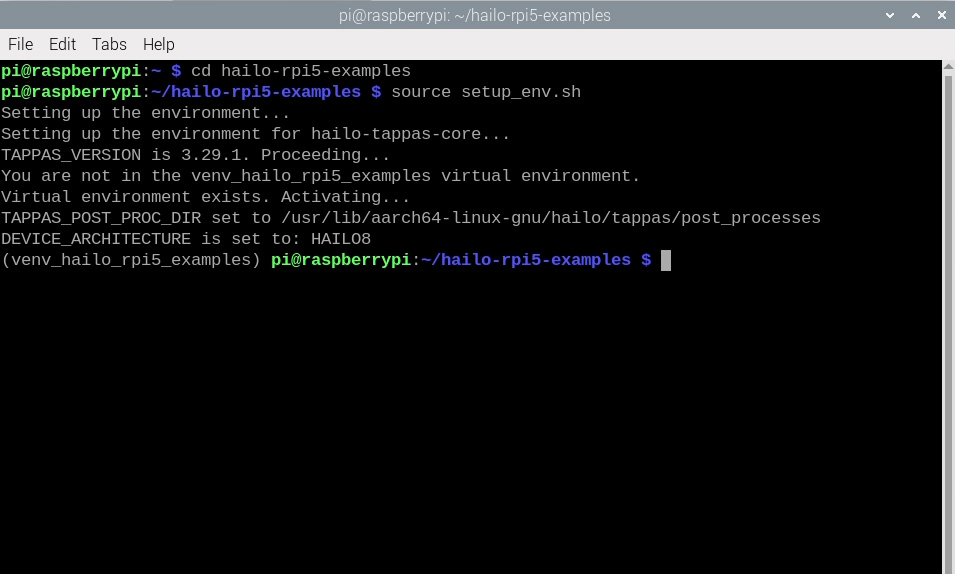
The installation step also created a virtual environment (also called a Venv). This is essentially an isolated virtual workspace we can use to install packages and experiment without the risk of affecting the rest of our Pi OS. All of the packages we need to use were installed in this Venv and we can tell the terminal to enter by typing in:
source setup_env.sh
You can confirm that you are working in a Venv as you will see the name of it on the left in brackets as seen in the image on the right. If you have this and the blue text from the change directory command, you are now ready to run the Python scripts. If you ever close the terminal or restart your Pi, you will need to run these commands again to return to this state.
We are going to run the Demo Python code called "pose_estimation.py" which is located in the "basic_pipelines" folder, so the command for this will be:
python basic_pipelines/pose_estimation.py
You should see a new window appear with a video of people crossing the road as well as the YOLO pose estimation model identifying people and pose estimating. Congratulations! You have successfully set up and run computer vision on your AI HAT.
Like in the image on the left, the HAT should be outputting a few things here. First, it should be identifying humans, drawing a bounding box around them, and placing the confidence of this detection above them. Then for every detected person, it will be placing these purple dots on specific parts of the body and drawing lines between them to visualise the orientation of the person. These dots that it is drawing are called keypoints and these are the essential ingredient we will be using in our code.

To run the Python code with our camera as the input video source, we will need to specify it as an argument or option. We can get a list of all the available options for the pose estimation pipeline by entering:
python basic_pipelines/pose_estimation.py --help
There are a few helpful options here to explore, and you should sometime, but the one we are interested in is changing the source with the "--input" option. Here we can see that we can specify a file or camera as an input and that we can run the detection script with the camera module with:
python basic_pipelines/pose_estimation.py --input rpi

Example Code 1: Base Pose Estimation Code
We now have pose estimation running with our camera, let's dive into how we can start modifying this all to apply in our project. There is a lot of complexity going on here and there are thousands of lines of code being run, but most of that is happening behind the scenes in the pipeline. Because most of this is happening behind the scenes, it means that we only have to deal with a single file that is fairly streamlined and human-readable (we call this high-level code). In the last section, we were running this high-level file and it was called "pose_estimation.py". Even though it has been simplified, it is still quite involved and has a fair few moving parts it in, so we have gone ahead and streamlined it a little further with the demo code we look at in this section. If you instead wish to dig around in the original code, we have a breakdown of it in our object detection guide - it is for object detection, but there is enough to get you going.
Open up Thonny, create a new script, paste this code in, and then save it into the same "basic_pipelines" folder that all of our other scripts are in. Ensure that you name it with .py on the end to ensure it's saved as a Python script. If you need a hand with this step, the video demonstrates this process. Here is the code in its entirety:
import gi
gi.require_version('Gst', '1.0')
from gi.repository import Gst, GLib
import os
import numpy as np
import cv2
import hailo
import threading
import time
from queue import Queue, Empty

from hailo_apps_infra.hailo_rpi_common import (
    get_caps_from_pad,
    get_numpy_from_buffer,
    app_callback_class,
)
from hailo_apps_infra.pose_estimation_pipeline import GStreamerPoseEstimationApp
# Import your libraries up here as usual


# Inside this function is where you place the rest of your code as usual
def custom_processing_thread(pose_estimator):
    # This sleep gives enough time for the HAT to fire up and start detecting - important but not ma mandatory
    time.sleep(2)

    while True:
        # We can call this function to get the latest position of a specific keypoint
        position = pose_estimator.get_body_part_coordinates('left_wrist')
        print(position)

        # Another function but this time we input 3 different keypoints and get the angle between then
        angle = pose_estimator.calculate_body_part_angle('left_shoulder', 'left_elbow', 'left_wrist')
        print(angle)

        time.sleep(0.1)


# The rest of the code starts here and handles the operation of the hat and all other neccesary calculations
# The hat should update all of its detection data 30 times a second.
class PoseDataManager:
    def __init__(self):
        """
        Manages pose estimation data across threads
        Allows safe access to the latest detection data
        """
        self.latest_detection_lock = threading.Lock()
        self.latest_detection = None
        self.latest_width = None
        self.latest_height = None

    def update_detection(self, detection, width, height):
        """
        Update the latest detection data thread-safely

        :param detection: Hailo detection object
        :param width: Frame width
        :param height: Frame height
        """
        with self.latest_detection_lock:
            self.latest_detection = detection
            self.latest_width = width
            self.latest_height = height

    def get_latest_detection(self):
        """
        Retrieve the latest detection data thread-safely

        :return: Tuple of (detection, width, height) or (None, None, None)
        """
        with self.latest_detection_lock:
            return (
                self.latest_detection,
                self.latest_width,
                self.latest_height
            )

class PoseEstimator:
    def __init__(self, pose_data_manager):
        """
        Initialize PoseEstimator with a PoseDataManager

        :param pose_data_manager: Shared data management object
        """
        self.pose_data_manager = pose_data_manager
        self.keypoints = self._get_keypoints()

    def _get_keypoints(self):
        """Get the COCO keypoints correspondence map."""
        return {
            'nose': 0,
            'left_eye': 1,
            'right_eye': 2,
            'left_ear': 3,
            'right_ear': 4,
            'left_shoulder': 5,
            'right_shoulder': 6,
            'left_elbow': 7,
            'right_elbow': 8,
            'left_wrist': 9,
            'right_wrist': 10,
            'left_hip': 11,
            'right_hip': 12,
            'left_knee': 13,
            'right_knee': 14,
            'left_ankle': 15,
            'right_ankle': 16,
        }

    def get_body_part_coordinates(self, body_part, significant_figures=4):
        """
        Get normalized coordinates for a specific body part from latest detection

        :param body_part: Name of the body part (e.g., 'left_eye')
        :param significant_figures: Number of decimal places to round to
        :return: Tuple of normalized (x, y) coordinates or None
        """
        # Get latest detection
        detection, width, height = self.pose_data_manager.get_latest_detection()

        if detection is None or width is None or height is None:
            return None

        # If no landmarks, return None
        landmarks = detection.get_objects_typed(hailo.HAILO_LANDMARKS)
        if len(landmarks) == 0:
            return None

        # Get bbox and points
        bbox = detection.get_bbox()
        points = landmarks[0].get_points()

        # Get the specific keypoint
        keypoint_index = self.keypoints[body_part]
        point = points[keypoint_index]

        # Directly use the normalized coordinates from the point
        # Clamp the values between 0 and 1, then round to specified significant figures
        norm_x = round(max(0, min(1, point.x())), significant_figures)
        norm_y = round(max(0, min(1, point.y())), significant_figures)

        return (norm_x, norm_y)

    def calculate_body_part_angle(self, point_a_name, point_b_name, point_c_name):
        """
        Calculate angle between three body parts directly by name, returning an angle in the full 0 to 360 degree range.

        :param point_a_name: First body part name (e.g., 'left_shoulder')
        :param point_b_name: Vertex body part name (e.g., 'left_elbow')
        :param point_c_name: Third body part name (e.g., 'left_wrist')
        :return: Angle in degrees or None if coordinates can't be retrieved
        """
        # Get coordinates for each body part
        point_a = self.get_body_part_coordinates(point_a_name)
        point_b = self.get_body_part_coordinates(point_b_name)
        point_c = self.get_body_part_coordinates(point_c_name)

        # Check if any coordinates are None
        if any(point is None for point in [point_a, point_b, point_c]):
            return None

        # Convert to numpy arrays
        a = np.array(point_a)
        b = np.array(point_b)
        c = np.array(point_c)

        # Calculate vectors
        ba = a - b
        bc = c - b

        # Calculate angle using arctan2 for full 360-degree range
        angle = np.degrees(np.arctan2(np.linalg.det([ba, bc]), np.dot(ba, bc)))

        # Ensure the angle is between 0 and 360 degrees
        if angle < 0:
            angle += 360

        return angle


class user_app_callback_class(app_callback_class):
    def __init__(self, pose_data_manager):
        """
        Initialize with a PoseDataManager

        :param pose_data_manager: Shared data management object
        """
        super().__init__()
        self.pose_data_manager = pose_data_manager

def app_callback(pad, info, user_data):
    # Get the GstBuffer from the probe info
    buffer = info.get_buffer()
    if buffer is None:
        return Gst.PadProbeReturn.OK

    # Get the caps from the pad
    format, width, height = get_caps_from_pad(pad)

    # Get the detections from the buffer
    roi = hailo.get_roi_from_buffer(buffer)
    detections = roi.get_objects_typed(hailo.HAILO_DETECTION)

    # Find the person detection
    person_detection = None
    for detection in detections:
        if detection.get_label() == "person":
            person_detection = detection
            break

    # If a person is detected, update the shared data
    if person_detection is not None:
        user_data.pose_data_manager.update_detection(person_detection, width, height)

    return Gst.PadProbeReturn.OK

if __name__ == "__main__":
    # Create PoseDataManager first
    pose_data_manager = PoseDataManager()

    # Create an instance of the user app callback class with pose_data_manager
    user_data = user_app_callback_class(pose_data_manager)

    # Create pose estimator
    pose_estimator = PoseEstimator(pose_data_manager)

    # Start the custom processing thread
    processing_thread = threading.Thread(
        target=custom_processing_thread,
        args=(pose_estimator,),
        daemon=True
    )
    processing_thread.start()

    # Run the GStreamer pipeline
    app = GStreamerPoseEstimationApp(app_callback, user_data)
    app.run()
To run this code, we will need to run it from the terminal with the same line as before, but this time with the name of the file that we saved it as. We saved this code as "pose_simple.py", so the line will be:
python basic_pipelines/pose_simple.py --input rpi
And if all when right, you should have the same window pop as before, but this time two extra things should be printed in the shell. These are the result of two handy function in the code - one which finds the position of a specific keypoint (the code will be tracking your left wrist by default), and another which calculates the angle between 3 points (the angle of your elbow by default).
Lets take a dive into the code so we can get an idea of how to use this all, and what this all means.

The code starts like all Python code with a section to house all the import lines. Import your libraries somewhere in here exactly like you normally do.
import gi
gi.require_version('Gst', '1.0')
from gi.repository import Gst, GLib
import os
import numpy as np
import cv2
import hailo
import threading
import time
from queue import Queue, Empty

from hailo_rpi_common import (
    get_caps_from_pad,
    get_numpy_from_buffer,
    app_callback_class,
)
from pose_estimation_pipeline import GStreamerPoseEstimationApp
# Import your libraries up here as usual
Then we get to this function here called "custom_processing_thread". This is going to be where you put all of your regular code. Inside this function is a while true loop which can be treated exactly like the while true loop you would regularly use, and in the section above it you can place all the code that ussually comes after the import section - all the code that runs once like setting up pins and hardware, declaring variables, etc. Very importantly we have a 2 second sleep in this section which gives the HAT time to boot up and start running pose estimation. If you try to get keypoint or angle data before the hat is booted up you may get some errors so this just ensures that it doesn't happen.
# Inside this function is where you place the rest of your code as usual
def custom_processing_thread(pose_estimator):
    # This sleep gives enough time for the HAT to fire up and start detecting - important but not ma mandatory
    time.sleep(2)

    while True:
        # We can call this function to get the latest position of a specific keypoint
        position = pose_estimator.get_body_part_coordinates('left_wrist')
        print(position)

        # Another function but this time we input 3 different keypoints and get the angle between then
        angle = pose_estimator.calculate_body_part_angle('left_shoulder', 'left_elbow', 'left_wrist')
        print(angle)

        time.sleep(0.1)
Inside this are two functions which are being used to get the information we are printing to the shell. The first function allows you to get the x and y coordinate position of a specific keypoint. So in the code here we are getting the position of the left wrist, and this will be retreive the latest pose data calculated by the HAT (which spits out new data about 30 times a second):
position = pose_estimator.get_body_part_coordinates('left_wrist')
This function can be used to get the position data of any of the 17 available keypoints, just input the name of the keypoint. If you scroll down in the demo code a little you will find a list of these, but here it also is for convenience. Note that each keypoint is also associated with a number, you may encounter code that uses this numbering system, but its not required in this code.
'nose': 0,
'left_eye': 1,
'right_eye': 2,
'left_ear': 3,
'right_ear': 4,
'left_shoulder': 5,
'right_shoulder': 6,
'left_elbow': 7,
'right_elbow': 8,
'left_wrist': 9,
'right_wrist': 10,
'left_hip': 11,
'right_hip': 12,
'left_knee': 13,
'right_knee': 14,
'left_ankle': 15,
'right_ankle': 16,
These keypoints are using something called relative coordinates meaning that they range from 0 to 1. On the x-axis running across the screen, the left side of the screen is 0 and the right is 1 with half way between them being 0.5. On the y-axis running up and down, the top of the screen is 0 and the bottom is 1. The image on the right demonstrates a coordinate of the left wrist in the frame.

The second function takes in 3 keypoint names and allows you to calculate the angle formed by these 3 different parts on the body:
angle = pose_estimator.calculate_body_part_angle('left_shoulder', 'left_elbow', 'left_wrist')
The angle it returns is the angle between the first and last keypoint, based on the second keypoint as the reference. It is also always measured clockwise from the cameras point of view. Below are 3 angles that are measured between the left shoulder, left elbow, and left wrist:

After this section is another 200 lines of code and thankfully you don't need to touch or understand it. All of this code is dedicated to operating the HAT and running all the required calculations so that we can use the 2 functions above to get the essential data. The reason that we have placed all of the code above in a function is because this second section runs it in something called a thread. This essentially is a way to run multiple parts of code at the same time - the 200 lines from here on and the code inside our custom_processing_thread both run at the same time and when we call one of those function we simply fetch the latest data calculated in those 200 lines of machinary.
And that is all you need to know about this base demo code! This alone should be enough for most people to go out and start applying pose estimation to their own projects. From here onwards we are just going to be adding a few bells and whistles and looking at some more code examples that utilise this base code in varying ways.
Changing Camera Resolution
You may have noticed by now that the field of view in the camera is quite narrow - it looks a bit zoomed in so let's quickly take a look at how to modify this. In the basic_pipelines folder will be a file called "hailo_rpi_common". This is a file that contains some of the fundamental operations of the HAT such as the camera input resolution. Please note that any behaviour you change here will also affect all the other pipelines operating out of this folder, so if you are also using the object detection scripts out of this pipeline, changes here will also affect it.
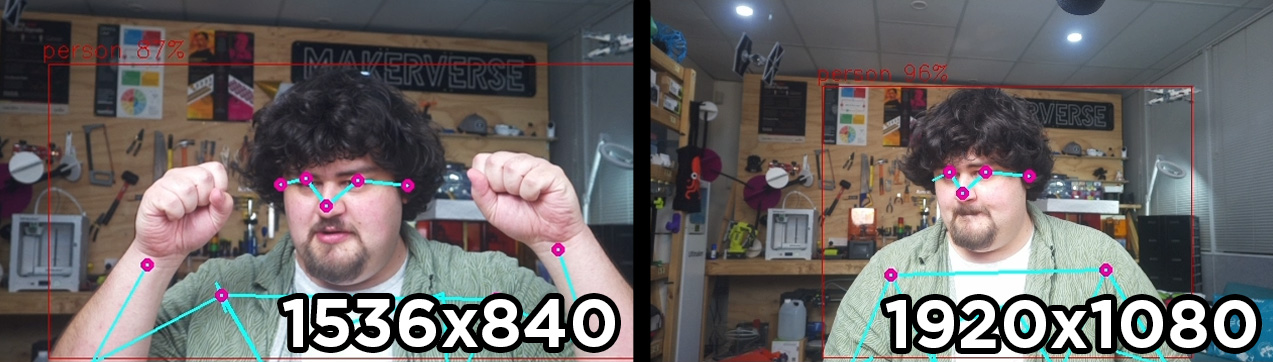
At around line 195, you will find the lines responsible for changing the input resolution of the camera. Please note that this will NOT change the resolution that YOLO processes at, merely the resolution our camera initially captures. By default, it comes at a resolution of 1536x840, but you can change it to another standard resolution size. We have encountered many issues with performance and crashes at certain resolutions so you may need some trial and error. However, we found 1920x1080 to be a stable and high-enough resolution. Here is the result of that:
    if source_type == 'rpi':
        source_element = (
            f'libcamerasrc name={name} ! '
            f'video/x-raw, format={video_format}, width=1920, height=1080 ! '
This change in resolution gives us a bit wider of a field of view as shown below.
Another handy thing we can do in this section is to remove that FPS printout that is clogging up our shell. At around line 385, you will find a function called "on_fps_measurement" (you can also press ctrl + F to search for this function). This line is printing out the fps reading to the shell and you can disable it by commenting it out like so:
    def on_fps_measurement(self, sink, fps, droprate, avgfps):
        #print(f"FPS: {fps:.2f}, Droprate: {droprate:.2f}, Avg FPS: {avgfps:.2f}")
        return True
Example Code 2: Gesture Media Control
In this lot of sample code we are going to be using a library called wtype to simulate keyboard inputs based on a specific gesture. To do so, wtype will need to be installed. We will need to install the library into the same virtual environment that we have been working out of. To do this we will need to ensure that our terminal is set up in the same in the same state that we need it to be in before we run a script like usual with:
cd hailo-rpi5-examples
source setup_env.sh
Once we are in this state, we can install wtype with:
sudo apt install wtype

Now create a new script, paste in the following code, and saved it to the same basic_pipelines folder exactly like the last script. To run this script you will need to use the same line as before but change it to the name that you saved this script as.
import gi
gi.require_version('Gst', '1.0')
from gi.repository import Gst, GLib
import os
import numpy as np
import cv2
import hailo
import threading
import time
from queue import Queue, Empty

from hailo_apps_infra.hailo_rpi_common import (
    get_caps_from_pad,
    get_numpy_from_buffer,
    app_callback_class,
)
from hailo_apps_infra.pose_estimation_pipeline import GStreamerPoseEstimationApp

import subprocess

def custom_processing_thread(pose_estimator):

    # This gives enough time for the HAT to fire up and start detecting
    time.sleep(2)

    while True:
        # get the positions of all the relevant body parts
        left_wrist = pose_estimator.get_body_part_coordinates('left_wrist')
        right_wrist = pose_estimator.get_body_part_coordinates('right_wrist')
        nose = pose_estimator.get_body_part_coordinates('nose')

        # if the second element (the y coordinate) of the wrists are higher than the
        if left_wrist[1] < nose[1] and right_wrist[1] < nose [1]:

            # Pause Youtube
            subprocess.run(['wtype', 'k'])
            # sleep for 2 seconds so we don't trigger this hundreds of times when we raise arms
            time.sleep(2)

        time.sleep(0.1)

class PoseDataManager:
    def __init__(self):
        """
        Manages pose estimation data across threads
        Allows safe access to the latest detection data
        """
        self.latest_detection_lock = threading.Lock()
        self.latest_detection = None
        self.latest_width = None
        self.latest_height = None

    def update_detection(self, detection, width, height):
        """
        Update the latest detection data thread-safely

        :param detection: Hailo detection object
        :param width: Frame width
        :param height: Frame height
        """
        with self.latest_detection_lock:
            self.latest_detection = detection
            self.latest_width = width
            self.latest_height = height

    def get_latest_detection(self):
        """
        Retrieve the latest detection data thread-safely

        :return: Tuple of (detection, width, height) or (None, None, None)
        """
        with self.latest_detection_lock:
            return (
                self.latest_detection,
                self.latest_width,
                self.latest_height
            )

class PoseEstimator:
    def __init__(self, pose_data_manager):
        """
        Initialize PoseEstimator with a PoseDataManager

        :param pose_data_manager: Shared data management object
        """
        self.pose_data_manager = pose_data_manager
        self.keypoints = self._get_keypoints()

    def _get_keypoints(self):
        """Get the COCO keypoints correspondence map."""
        return {
            'nose': 0,
            'left_eye': 1,
            'right_eye': 2,
            'left_ear': 3,
            'right_ear': 4,
            'left_shoulder': 5,
            'right_shoulder': 6,
            'left_elbow': 7,
            'right_elbow': 8,
            'left_wrist': 9,
            'right_wrist': 10,
            'left_hip': 11,
            'right_hip': 12,
            'left_knee': 13,
            'right_knee': 14,
            'left_ankle': 15,
            'right_ankle': 16,
        }

    def get_body_part_coordinates(self, body_part, significant_figures=4):
        """
        Get normalized coordinates for a specific body part from latest detection

        :param body_part: Name of the body part (e.g., 'left_eye')
        :param significant_figures: Number of decimal places to round to
        :return: Tuple of normalized (x, y) coordinates or None
        """
        # Get latest detection
        detection, width, height = self.pose_data_manager.get_latest_detection()

        if detection is None or width is None or height is None:
            return None

        # If no landmarks, return None
        landmarks = detection.get_objects_typed(hailo.HAILO_LANDMARKS)
        if len(landmarks) == 0:
            return None

        # Get bbox and points
        bbox = detection.get_bbox()
        points = landmarks[0].get_points()

        # Get the specific keypoint
        keypoint_index = self.keypoints[body_part]
        point = points[keypoint_index]

        # Directly use the normalized coordinates from the point
        # Clamp the values between 0 and 1, then round to specified significant figures
        norm_x = round(max(0, min(1, point.x())), significant_figures)
        norm_y = round(max(0, min(1, point.y())), significant_figures)

        return (norm_x, norm_y)

    def calculate_body_part_angle(self, point_a_name, point_b_name, point_c_name):
        """
        Calculate angle between three body parts directly by name, returning an angle in the full 0 to 360 degree range.

        :param point_a_name: First body part name (e.g., 'left_shoulder')
        :param point_b_name: Vertex body part name (e.g., 'left_elbow')
        :param point_c_name: Third body part name (e.g., 'left_wrist')
        :return: Angle in degrees or None if coordinates can't be retrieved
        """
        # Get coordinates for each body part
        point_a = self.get_body_part_coordinates(point_a_name)
        point_b = self.get_body_part_coordinates(point_b_name)
        point_c = self.get_body_part_coordinates(point_c_name)

        # Check if any coordinates are None
        if any(point is None for point in [point_a, point_b, point_c]):
            return None

        # Convert to numpy arrays
        a = np.array(point_a)
        b = np.array(point_b)
        c = np.array(point_c)

        # Calculate vectors
        ba = a - b
        bc = c - b

        # Calculate angle using arctan2 for full 360-degree range
        angle = np.degrees(np.arctan2(np.linalg.det([ba, bc]), np.dot(ba, bc)))

        # Ensure the angle is between 0 and 360 degrees
        if angle < 0:
            angle += 360

        return angle


class user_app_callback_class(app_callback_class):
    def __init__(self, pose_data_manager):
        """
        Initialize with a PoseDataManager

        :param pose_data_manager: Shared data management object
        """
        super().__init__()
        self.pose_data_manager = pose_data_manager

def app_callback(pad, info, user_data):
    # Get the GstBuffer from the probe info
    buffer = info.get_buffer()
    if buffer is None:
        return Gst.PadProbeReturn.OK

    # Get the caps from the pad
    format, width, height = get_caps_from_pad(pad)

    # Get the detections from the buffer
    roi = hailo.get_roi_from_buffer(buffer)
    detections = roi.get_objects_typed(hailo.HAILO_DETECTION)

    # Find the person detection
    person_detection = None
    for detection in detections:
        if detection.get_label() == "person":
            person_detection = detection
            break

    # If a person is detected, update the shared data
    if person_detection is not None:
        user_data.pose_data_manager.update_detection(person_detection, width, height)

    return Gst.PadProbeReturn.OK

if __name__ == "__main__":
    # Create PoseDataManager first
    pose_data_manager = PoseDataManager()

    # Create an instance of the user app callback class with pose_data_manager
    user_data = user_app_callback_class(pose_data_manager)

    # Create pose estimator
    pose_estimator = PoseEstimator(pose_data_manager)

    # Start the custom processing thread
    processing_thread = threading.Thread(
        target=custom_processing_thread,
        args=(pose_estimator,),
        daemon=True
    )
    processing_thread.start()

    # Run the GStreamer pipeline
    app = GStreamerPoseEstimationApp(app_callback, user_data)
    app.run()
This code is currently set up to solve a problem I have in my workshop. Often I am watching YouTube and need to pause it, but I may be on the opposite side of the room with my hands full. This code solves this issue by pressing the "K" key (which is the pause/play shortcut in YouTube) when I raise both of my hands above my head.

Here is how we modified the base script to achieve this. Starting off we needed to import the subprocess library which is what we will use to run wtype. This was imported at the top like we usually do.
import subprocess
Then we in the custom_processing_thread we very importantly keep the two second sleep. Then at the start of the while true loop we start by getting the keypoint positions of the left wrist, right wrist, and nose:
def custom_processing_thread(pose_estimator):

    # This gives enough time for the HAT to fire up and start detecting
    time.sleep(2)

    while True:
        # get the positions of all the relevant body parts
        left_wrist = pose_estimator.get_body_part_coordinates('left_wrist')
        right_wrist = pose_estimator.get_body_part_coordinates('right_wrist')
        nose = pose_estimator.get_body_part_coordinates('nose')
Then we have an if statement comparing the coordinates. When we use the functions above to get the coordinates it actually comes in a list of two numbers with the first being x, and the second being the y. If we wanted to just deal with one of the coordinates we can do so by extracting the first or second element. For example, to get the x coordinate from the left_wrist we would simply use something like:
left_wrist_x = left_wrist[0]
And if we wanted to get the y coordinate we would use:
left_wrist_y = left_wrist[1]
So in the next section of the code we compare the y coordinates of each of these keypoints (all using [1] on the end) and if the left wrist's and right wrist's y coordinate is lower than the nose's then it will press k. Remeber that the top of the screen is 0 and the bottom is 1 so if the y coordinate is smaller then it will be higher up.
        # if the second element (the y coordinate) of the wrists are higher than the
        if left_wrist[1] < nose[1] and right_wrist[1] < nose [1]:

            # Pause Youtube
            subprocess.run(['wtype', 'k'])
            # sleep for 2 seconds so we don't trigger this hundreds of times when we raise arms
            time.sleep(2)
Example Code 3: Servo Control
In this demo, we will be controlling servos with the angles created by keypoints on a person. Here is the full code:
import gi
gi.require_version('Gst', '1.0')
from gi.repository import Gst, GLib
import os
import numpy as np
import cv2
import hailo
import threading
import time
from queue import Queue, Empty

from hailo_apps_infra.hailo_rpi_common import (
    get_caps_from_pad,
    get_numpy_from_buffer,
    app_callback_class,
)
from hailo_apps_infra.pose_estimation_pipeline import GStreamerPoseEstimationApp

from gpiozero import AngularServo

def custom_processing_thread(pose_estimator):

    elbow_servo = AngularServo(18, min_pulse_width=0.0006, max_pulse_width=0.0023)

    shoulder_servo = AngularServo(19, min_pulse_width=0.0006, max_pulse_width=0.0023)


    # This gives enough time for the HAT to fire up and start detecting
    time.sleep(2)

    while True:

        elbow_angle = pose_estimator.calculate_body_part_angle('left_shoulder', 'left_elbow', 'left_wrist')
        elbow_angle = max(0, min(elbow_angle, 180))

        shoulder_angle = pose_estimator.calculate_body_part_angle('right_shoulder', 'left_shoulder', 'left_elbow')
        shoulder_angle = max(0, min(shoulder_angle, 180))

        print(elbow_angle, shoulder_angle)


        elbow_servo.angle = elbow_angle
        shoulder_servo.angle = shoulder_angle

        time.sleep(0.05)


class PoseDataManager:
    def __init__(self):
        """
        Manages pose estimation data across threads
        Allows safe access to the latest detection data
        """
        self.latest_detection_lock = threading.Lock()
        self.latest_detection = None
        self.latest_width = None
        self.latest_height = None

    def update_detection(self, detection, width, height):
        """
        Update the latest detection data thread-safely

        :param detection: Hailo detection object
        :param width: Frame width
        :param height: Frame height
        """
        with self.latest_detection_lock:
            self.latest_detection = detection
            self.latest_width = width
            self.latest_height = height

    def get_latest_detection(self):
        """
        Retrieve the latest detection data thread-safely

        :return: Tuple of (detection, width, height) or (None, None, None)
        """
        with self.latest_detection_lock:
            return (
                self.latest_detection,
                self.latest_width,
                self.latest_height
            )

class PoseEstimator:
    def __init__(self, pose_data_manager):
        """
        Initialize PoseEstimator with a PoseDataManager

        :param pose_data_manager: Shared data management object
        """
        self.pose_data_manager = pose_data_manager
        self.keypoints = self._get_keypoints()

    def _get_keypoints(self):
        """Get the COCO keypoints correspondence map."""
        return {
            'nose': 0,
            'left_eye': 1,
            'right_eye': 2,
            'left_ear': 3,
            'right_ear': 4,
            'left_shoulder': 5,
            'right_shoulder': 6,
            'left_elbow': 7,
            'right_elbow': 8,
            'left_wrist': 9,
            'right_wrist': 10,
            'left_hip': 11,
            'right_hip': 12,
            'left_knee': 13,
            'right_knee': 14,
            'left_ankle': 15,
            'right_ankle': 16,
        }

    def get_body_part_coordinates(self, body_part, significant_figures=4):
        """
        Get normalized coordinates for a specific body part from latest detection

        :param body_part: Name of the body part (e.g., 'left_eye')
        :param significant_figures: Number of decimal places to round to
        :return: Tuple of normalized (x, y) coordinates or None
        """
        # Get latest detection
        detection, width, height = self.pose_data_manager.get_latest_detection()

        if detection is None or width is None or height is None:
            return None

        # If no landmarks, return None
        landmarks = detection.get_objects_typed(hailo.HAILO_LANDMARKS)
        if len(landmarks) == 0:
            return None

        # Get bbox and points
        bbox = detection.get_bbox()
        points = landmarks[0].get_points()

        # Get the specific keypoint
        keypoint_index = self.keypoints[body_part]
        point = points[keypoint_index]

        # Directly use the normalized coordinates from the point
        # Clamp the values between 0 and 1, then round to specified significant figures
        norm_x = round(max(0, min(1, point.x())), significant_figures)
        norm_y = round(max(0, min(1, point.y())), significant_figures)

        return (norm_x, norm_y)

    def calculate_body_part_angle(self, point_a_name, point_b_name, point_c_name):
        """
        Calculate angle between three body parts directly by name, returning an angle in the full 0 to 360 degree range.

        :param point_a_name: First body part name (e.g., 'left_shoulder')
        :param point_b_name: Vertex body part name (e.g., 'left_elbow')
        :param point_c_name: Third body part name (e.g., 'left_wrist')
        :return: Angle in degrees or None if coordinates can't be retrieved
        """
        # Get coordinates for each body part
        point_a = self.get_body_part_coordinates(point_a_name)
        point_b = self.get_body_part_coordinates(point_b_name)
        point_c = self.get_body_part_coordinates(point_c_name)

        # Check if any coordinates are None
        if any(point is None for point in [point_a, point_b, point_c]):
            return None

        # Convert to numpy arrays
        a = np.array(point_a)
        b = np.array(point_b)
        c = np.array(point_c)

        # Calculate vectors
        ba = a - b
        bc = c - b

        # Calculate angle using arctan2 for full 360-degree range
        angle = np.degrees(np.arctan2(np.linalg.det([ba, bc]), np.dot(ba, bc)))

        # Ensure the angle is between 0 and 360 degrees
        if angle < 0:
            angle += 360

        return angle


class user_app_callback_class(app_callback_class):
    def __init__(self, pose_data_manager):
        """
        Initialize with a PoseDataManager

        :param pose_data_manager: Shared data management object
        """
        super().__init__()
        self.pose_data_manager = pose_data_manager

def app_callback(pad, info, user_data):
    # Get the GstBuffer from the probe info
    buffer = info.get_buffer()
    if buffer is None:
        return Gst.PadProbeReturn.OK

    # Get the caps from the pad
    format, width, height = get_caps_from_pad(pad)

    # Get the detections from the buffer
    roi = hailo.get_roi_from_buffer(buffer)
    detections = roi.get_objects_typed(hailo.HAILO_DETECTION)

    # Find the person detection
    person_detection = None
    for detection in detections:
        if detection.get_label() == "person":
            person_detection = detection
            break

    # If a person is detected, update the shared data
    if person_detection is not None:
        user_data.pose_data_manager.update_detection(person_detection, width, height)

    return Gst.PadProbeReturn.OK

if __name__ == "__main__":
    # Create PoseDataManager first
    pose_data_manager = PoseDataManager()

    # Create an instance of the user app callback class with pose_data_manager
    user_data = user_app_callback_class(pose_data_manager)

    # Create pose estimator
    pose_estimator = PoseEstimator(pose_data_manager)

    # Start the custom processing thread
    processing_thread = threading.Thread(
        target=custom_processing_thread,
        args=(pose_estimator,),
        daemon=True
    )
    processing_thread.start()

    # Run the GStreamer pipeline
    app = GStreamerPoseEstimationApp(app_callback, user_data)
    app.run()
This code is set up to control two servos plugged into GPIO pins 18 and 19, which in our example we have used to build a 2 part arm out of Lego. The code then gets the angle of a person's left shoulder and elbow and sets the servos to these angles, resulting in the servo arm mimicking the person's.

To achieve this we start by importing angular servo from gpiozero, an easy way method of controlling servos:
from gpiozero import AngularServo
Then in the custom_processing_thread we set up the 2 servos:
def custom_processing_thread(pose_estimator):

    elbow_servo = AngularServo(18, min_pulse_width=0.0006, max_pulse_width=0.0023)

    shoulder_servo = AngularServo(19, min_pulse_width=0.0006, max_pulse_width=0.0023)

    # This gives enough time for the HAT to fire up and start detecting
    time.sleep(2)
And then in our while true loop we get the angle of the left elbow (from the left shoulder, elbow and wrist keypoints) and the left shoulder (from the right shoulder, left shoulder and left elbow keypoints). After each of these lines, we have a line with max and min. This simply ensures that our angle stays between 0 and 180 and ensures that we don't accidentally plug an angle like 190 or 300 into our servo which will give us errors. Then we simply set our servos to these angles.
    while True:

        elbow_angle = pose_estimator.calculate_body_part_angle('left_shoulder', 'left_elbow', 'left_wrist')
        elbow_angle = max(0, min(elbow_angle, 180))

        shoulder_angle = pose_estimator.calculate_body_part_angle('right_shoulder', 'left_shoulder', 'left_elbow')
        shoulder_angle = max(0, min(shoulder_angle, 180))

        print(elbow_angle, shoulder_angle)

        elbow_servo.angle = elbow_angle
        shoulder_servo.angle = shoulder_angle

        time.sleep(0.05)
Example Code 4: Fruit Ninja
In this final code example we have gone ahead and created a game of Fruit Ninja controlled with pose estimation, all from this single Python script:
import threading
import queue
import pygame
import random
import math
from collections import namedtuple
import gi
gi.require_version('Gst', '1.0')
from gi.repository import Gst, GLib
import numpy as np
import cv2
import hailo
from hailo_apps_infra.hailo_rpi_common import (
    get_caps_from_pad,
    get_numpy_from_buffer,
    app_callback_class,
)
from hailo_apps_infra.pose_estimation_pipeline import GStreamerPoseEstimationApp
import time


# Game constants
WINDOW_WIDTH = 900
WINDOW_HEIGHT = 600
FPS = 60
GRAVITY = 0.5
FRUIT_TYPES = ['apple', 'orange', 'watermelon']
BLADE_TRAIL_LENGTH = 8
POSITION_QUEUE_SIZE = 1
INITIAL_SPAWN_RATE = 120  # Higher number means slower spawning
MIN_SPAWN_RATE = 10      # Fastest spawn rate possible
SPAWN_RATE_DECREASE = 1  # How much to decrease spawn rate per fruit
STARTING_LIVES = 3
GAME_OVER_COUNTDOWN = 5  # Seconds before new game starts

# Colors
WHITE = (255, 255, 255)
RED = (255, 0, 0)
GREEN = (0, 255, 0)
BLUE = (0, 255, 255)
BLACK = (0, 0, 0)

# Game objects
Fruit = namedtuple('Fruit', ['x', 'y', 'vel_x', 'vel_y', 'radius', 'type', 'sliced'])
BladePoint = namedtuple('BladePoint', ['x', 'y'])

class PoseNinjaCallback(app_callback_class):
    def __init__(self):
        super().__init__()
        self.left_hand_pos = (WINDOW_WIDTH // 4, WINDOW_HEIGHT // 2)
        self.right_hand_pos = (3 * WINDOW_WIDTH // 4, WINDOW_HEIGHT // 2)
        self.use_frame = True
        self.position_queue = queue.Queue(maxsize=POSITION_QUEUE_SIZE)

class PoseNinja:
    def __init__(self):
        pygame.init()
        self.screen = pygame.display.set_mode((WINDOW_WIDTH, WINDOW_HEIGHT))
        pygame.display.set_caption("Pose Ninja")
        self.clock = pygame.time.Clock()

        # Initialize game state
        self.reset_game()

        # Initialize pose estimation
        self.user_data = PoseNinjaCallback()
        self.app = GStreamerPoseEstimationApp(self.pose_callback, self.user_data)

    def reset_game(self):
        self.fruits = []
        self.score = 0
        self.lives = STARTING_LIVES
        self.frame_count = 0
        self.left_blade_trail = []
        self.right_blade_trail = []
        self.current_spawn_rate = INITIAL_SPAWN_RATE
        self.game_over = False
        self.game_over_timer = 0
        self.running = True

    def pose_callback(self, pad, info, user_data):
        buffer = info.get_buffer()
        if buffer is None:
            return Gst.PadProbeReturn.OK

        roi = hailo.get_roi_from_buffer(buffer)
        detections = roi.get_objects_typed(hailo.HAILO_DETECTION)

        for detection in detections:
            if detection.get_label() == "person":
                landmarks = detection.get_objects_typed(hailo.HAILO_LANDMARKS)
                if len(landmarks) != 0:
                    points = landmarks[0].get_points()
                    bbox = detection.get_bbox()
                    format, width, height = get_caps_from_pad(pad)

                    # Constants for y-axis scaling relative to frame height
                    Y_MIN = 0.22 * height
                    Y_MAX = 0.78 * height
                    Y_RANGE = Y_MAX - Y_MIN

                    # Left wrist (index 9)
                    left_point = points[9]
                    left_x = WINDOW_WIDTH - int((left_point.x() * bbox.width() + bbox.xmin()) * width * WINDOW_WIDTH / width)
                    raw_y = (left_point.y() * bbox.height() + bbox.ymin()) * height
                    normalized_y = (raw_y - Y_MIN) / Y_RANGE
                    left_y = int(normalized_y * WINDOW_HEIGHT)

                    # Right wrist (index 10)
                    right_point = points[10]
                    right_x = WINDOW_WIDTH - int((right_point.x() * bbox.width() + bbox.xmin()) * width * WINDOW_WIDTH / width)
                    raw_y = (right_point.y() * bbox.height() + bbox.ymin()) * height
                    normalized_y = (raw_y - Y_MIN) / Y_RANGE
                    right_y = int(normalized_y * WINDOW_HEIGHT)

                    try:
                        while not self.user_data.position_queue.empty():
                            self.user_data.position_queue.get_nowait()
                        self.user_data.position_queue.put_nowait(((left_x, left_y), (right_x, right_y)))
                    except queue.Full:
                        pass

        return Gst.PadProbeReturn.OK

    def spawn_fruit(self):
        x = random.randint(200, WINDOW_WIDTH-200)
        y = WINDOW_HEIGHT + 50
        vel_x = random.uniform(-3, 3)
        vel_y = random.uniform(-25, -16)
        radius = random.randint(20, 40)
        fruit_type = random.choice(FRUIT_TYPES)
        return Fruit(x, y, vel_x, vel_y, radius, fruit_type, False)

    def update_fruits(self):
        new_fruits = []
        for fruit in self.fruits:
            if not fruit.sliced:
                new_x = fruit.x + fruit.vel_x
                new_y = fruit.y + fruit.vel_y
                new_vel_y = fruit.vel_y + GRAVITY

                # Check if fruit is dropped
                if new_y > WINDOW_HEIGHT + 100:
                    if not fruit.sliced:
                        self.lives -= 1
                        if self.lives <= 0:
                            self.game_over = True
                            self.game_over_timer = GAME_OVER_COUNTDOWN * FPS  # Convert to frames
                else:
                    new_fruits.append(Fruit(new_x, new_y, fruit.vel_x, new_vel_y,
                                         fruit.radius, fruit.type, False))
        self.fruits = new_fruits

    def update_blade_trails(self):
        try:
            left_pos, right_pos = self.user_data.position_queue.get_nowait()
            self.user_data.left_hand_pos = left_pos
            self.user_data.right_hand_pos = right_pos
        except queue.Empty:
            pass

        self.left_blade_trail.append(BladePoint(*self.user_data.left_hand_pos))
        self.right_blade_trail.append(BladePoint(*self.user_data.right_hand_pos))

        while len(self.left_blade_trail) > BLADE_TRAIL_LENGTH:
            self.left_blade_trail.pop(0)
        while len(self.right_blade_trail) > BLADE_TRAIL_LENGTH:
            self.right_blade_trail.pop(0)

    def check_slices(self):
        for blade_trail in [self.left_blade_trail, self.right_blade_trail]:
            if len(blade_trail) < 2:
                continue

            for i in range(len(blade_trail) - 1):
                p1 = blade_trail[i]
                p2 = blade_trail[i + 1]

                for j, fruit in enumerate(self.fruits):
                    if not fruit.sliced:
                        dist = self.point_line_distance(
                            fruit.x, fruit.y,
                            p1.x, p1.y,
                            p2.x, p2.y
                        )
                        if dist < fruit.radius:
                            self.fruits[j] = fruit._replace(sliced=True)
                            self.score += 1
                            # Increase difficulty
                            if self.current_spawn_rate > MIN_SPAWN_RATE:
                                self.current_spawn_rate = max(MIN_SPAWN_RATE,
                                    self.current_spawn_rate - SPAWN_RATE_DECREASE)

    def point_line_distance(self, x, y, x1, y1, x2, y2):
        A = x - x1
        B = y - y1
        C = x2 - x1
        D = y2 - y1

        dot = A * C + B * D
        len_sq = C * C + D * D

        if len_sq == 0:
            return math.sqrt(A * A + B * B)

        param = dot / len_sq

        if param < 0:
            return math.sqrt(A * A + B * B)
        elif param > 1:
            return math.sqrt((x - x2) * (x - x2) + (y - y2) * (y - y2))
        else:
            return abs(A * D - C * B) / math.sqrt(len_sq)

    def draw(self):
        self.screen.fill(BLACK)

        # Draw fruits
        for fruit in self.fruits:
            if not fruit.sliced:
                color = RED if fruit.type == 'apple' else \
                        GREEN if fruit.type == 'watermelon' else \
                        (255, 165, 0)  # Orange
                pygame.draw.circle(self.screen, color,
                                (int(fruit.x), int(fruit.y)), fruit.radius)

        # Draw blade trails
        if len(self.left_blade_trail) >= 2:
            pygame.draw.lines(self.screen, BLUE, False,
                            [(p.x, p.y) for p in self.left_blade_trail], 3)
        if len(self.right_blade_trail) >= 2:
            pygame.draw.lines(self.screen, GREEN, False,
                            [(p.x, p.y) for p in self.right_blade_trail], 3)

        # Draw score and lives
        font = pygame.font.Font(None, 36)
        score_text = font.render(f'Score: {self.score}', True, WHITE)
        lives_text = font.render(f'Lives: {self.lives}', True, WHITE)
        self.screen.blit(score_text, (10, 10))
        self.screen.blit(lives_text, (10, 50))

        # Draw game over countdown
        if self.game_over:
            seconds_left = self.game_over_timer // FPS
            countdown_text = font.render(f'New game in: {seconds_left}', True, WHITE)
            text_rect = countdown_text.get_rect(center=(WINDOW_WIDTH//2, WINDOW_HEIGHT//2))
            self.screen.blit(countdown_text, text_rect)

        pygame.display.flip()

    def run_pose_estimation(self):
        self.app.run()

    def run(self):
        # Start pose estimation in a separate thread
        pose_thread = threading.Thread(target=self.run_pose_estimation)
        pose_thread.daemon = True
        pose_thread.start()

        # Step 1: Wait for pose estimation to initialize (we can use a sleep or a check here)
        # We are ensuring pose estimation has started before opening the game window
        time.sleep(1)  # Give pose estimation a bit of time to start (adjust as necessary)

        # Step 2: Now, create the game window after pose estimation has started
        self.screen = pygame.display.set_mode((WINDOW_WIDTH, WINDOW_HEIGHT))
        pygame.display.set_caption("Pose Ninja")

        # Step 3: Run the game loop
        while self.running:
            for event in pygame.event.get():
                if event.type == pygame.QUIT:
                    self.running = False
                elif event.type == pygame.KEYDOWN:
                    if event.key == pygame.K_ESCAPE:
                        self.running = False

            if self.game_over:
                self.game_over_timer -= 1
                if self.game_over_timer <= 0:
                    self.reset_game()
            else:
                # Spawn new fruits based on current spawn rate
                if self.frame_count % self.current_spawn_rate == 0:
                    self.fruits.append(self.spawn_fruit())

                # Update game state
                self.update_fruits()
                self.update_blade_trails()
                self.check_slices()

            # Draw everything on the game screen
            self.draw()

            # Update frame counter
            self.frame_count += 1
            self.clock.tick(FPS)

        # Cleanup: Close game and pose estimation app when done
        pygame.quit()
        self.app.quit()


if __name__ == "__main__":
    game = PoseNinja()
    game.run()
When I say "we" created this game of Fruit Ninja I actually mean that Claude and I wrote this. Claude is a large language model like Chat GPT and like most LLM's they are very well-versed in writing Python code. To create this game I pasted in the original demo code and simply asked it to generate a game of Fruit Ninja with the following prompt:

"Here is some pose estimation code that runs the Raspberry Pi AI HAT. Modify this to create and control a game of Fruit Ninja. Make the left and right wrists the blades. Maker the fruits jump up and fall back down, include a life system, and after the game ends start a new one after a 5-second countdown. Please make the blades leave behind a trail. Make the game progressively more difficult as time goes on by increasing the fruit spawn rate. To make this please use Pygame and require no additional libraries or assets to be made - all I should need to do is paste in the code you generate and run it."
It did take a few tries to get it to generate something correct, and a little bit of refinement afterwards, but it is very possible to get LLMs to do advanced tasks like this and utilise this pose estimation code in ways that might be beyond your skill range (even I am no master at pygame). It is also exceptionally good at breaking down and explaining the code it generates if you wish to learn it - just ask it!
We aren't going to go through and break apart how this code works as it is quite involved, and we don't expect anyone to. We just included it as a cool example of what can be achieved, the sorts of things that this code can be used for, and to demonstrate the usage of it in combination with LLMs - a very "maker of the 2020s" skill.
Where to From Here?
We now have a Raspberry Pi and AI HAT setup and running pose estimation with a few example codes to give you some ideas on how it can be applied in your project. Now the only thing left to do is to figure out what to do with it. We have a few general guides for the Pi to get you started, for example, how to control DC and stepper motors, servos, or even solenoids with a relay (and you can use a relay to control pretty much anything).
If you make something cool with this, have questions about any of this, or just need a hand, feel free to post in the forum topic at the bottom of this page - there is an army of makers over there who are happy to help out.
Until next time, happy making!

