
2.8 TFT Touch Shield for Arduino with Resistive Touch Screen
In stock, ships same business day if ordered before 2PM
Delivered by Tue, 28th of Jul
Quantity Discounts:
- 10+ $43.69 (exc GST)
- 50+ $42.79 (exc GST)
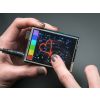
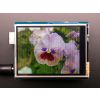
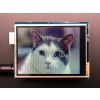
Spice up your Arduino project with a beautiful large touchscreen display shield with built in microSD card connection. This TFT display is big (2.8" diagonal) bright (4 white-LED backlight) and colorful (18-bit 262,000 different shades)! 240x320 pixels with individual pixel control. It has way more resolution than a black and white 128x64 display. As a bonus, this display has a resistive touchscreen attached to it already, so you can detect finger presses anywhere on the screen. (We also have a capacitive-touch version of this shield)
Adafruit have updated Adafruit's original v1 shield to an SPI display - its a tiny bit slower but uses a lot less pins and is now much easier to use with Mega & Leonardo. They also include an SPI touchscreen controller so you only need one additional pin to add a high quality touchscreen controller. Even with all the extras, the price is lower thanks to Adafruit's parts sourcing & engineering skillz!
The shield is fully assembled, tested and ready to go. No wiring, no soldering! Simply plug it in and load up Adafruit's library - you'll have it running in under 10 minutes! Works best with any classic Arduino (UNO/Duemilanove/Diecimila). Solder three jumpers and you can use it at full speed on a Leonardo or Mega as well.
This display shield has a controller built into it with RAM buffering, so that almost no work is done by the microcontroller. This shield needs fewer pins than Adafruit's v1 shield, so you can connect more sensors, buttons and LEDs: 5 SPI pins for the display, another pin for the SPI touchscreen controller and another pin for uSD card if you want to read images off of it.
Adafruit have written a full open source graphics library that can draw pixels, lines, rectangles, circles and text. We also have a touch screen library that detects x, y and z (pressure) and example code to demonstrate all of it. The code is written for Arduino but can be easily ported to your favorite microcontroller and can be found here.
For people who want the same screen but not in a shield form-factor, check out Adafruit's 2.8" TFT breakout
The only mod required is to cut the standard jumpers on the back of the panel, and solder bridge the three Mega jumpers (and then test with a multimeter for continuity on both the severed jumpers, and the bridged ones). No code mods are required, and the SD card will work on the Mega (thanks to Dean for helping Adafruit figure this one out!)
2.8" TFT Touch Shield for Arduino v2 (2:56)
Technical Details
- 240x320 resolution, 18-bit (262,000) color - Adafruit's library uses 16 bit color mode
- High speed SPI display with digital SPI touchscreen driver
- The display uses digital pins 13-9. Touchscreen controller requires digital pin 8. microSD pin requires digital #4. That means you can use digital pins 2, 3, 5, 6, 7 and analog 0-5. Pin 4 is available if not using the microSD
- Works with any classic Arduino '328. Solder closed three jumpers to use the ICSP header for use with Leonardo or Mega
- Onboard 3.3V @ 300mA LDO regulator, current draw depends on usage but is about 100mA for the display and touchscreen
- 4 white LED backlight. On by default but you can connect the transistor to a digital pin for backlight control
- 4-wire resistive touchscreen attached to STMPE610 controller
Exact shipping can be calculated on the view cart page (no login required).
Products that weigh more than 0.5 KG may cost more than what's shown (for example, test equipment, machines, >500mL liquids, etc).
We deliver Australia-wide with these options (depends on the final destination - you can get a quote on the view cart page):
- $3+ for Stamped Mail (typically 10+ business days, not tracked, only available on selected small items)
- $7+ for Standard Post (typically 6+ business days, tracked)
- $11+ for Express Post (typically 2+ business days, tracked)
- Pickup - Free! Only available to customers who live in the Newcastle region (must order online and only pickup after we email to notify you the order is ready). Orders placed after 2PM may not be ready until the following business day.
Non-metro addresses in WA, NT, SA & TAS can take 2+ days in addition to the above information.
Some batteries (such as LiPo) can't be shipped by Air. During checkout, Express Post and International Methods will not be an option if you have that type of battery in your shopping cart.
International Orders - the following rates are for New Zealand and will vary for other countries:
- $12+ for Pack and Track (3+ days, tracked)
- $16+ for Express International (2-5 days, tracked)
If you order lots of gear, the postage amount will increase based on the weight of your order.
Our physical address (here's a PDF which includes other key business details):
40 Aruma Place
Cardiff
NSW, 2285
Australia
Take a look at our customer service page if you have other questions such as "do we do purchase orders" (yes!) or "are prices GST inclusive" (yes they are!). We're here to help - get in touch with us to talk shop.
Have a product question? We're here to help!
 Battery Holder - 2x18650 (wire leads)SKU: PRT-12900 Brand: SparkfunThis is an incredibly simple two cell 18650 Battery Holder. When someone thinks ...
- Polymer Lithium Ion Battery, 18650 Cell (3.7V 2600mAh)SKU: CE04624 Brand: Core ElectronicsNo, these aren’t some sort of weird, blue AA battery, this is actually a 18650 ...
- 2.8 TFT Touch Shield for Arduino w/Capacitive TouchSKU: ADA1947 Brand: AdafruitAdd some sizzle to your Arduino project with a beautiful large touchscreen displ ...
- Weather Station with Anemometer/Wind Vane/Rain BucketSKU: SEN0186 Brand: DFRobotHave you ever had the urge to rush out into your shed and build your own weather ...


- Adafruit DS1307 Real Time Clock Assembled Breakout BoardSKU: ADA3296 Brand: AdafruitThis is a great battery-backed real time clock (RTC) that allows your microcontr ...
- Crystal Oscillator - 20 MhzSKU: CE05230 Brand: Core ElectronicsGood stability and far more accurate than MCU internal oscillators.
-
- Adjustable Switching Power Supply Module IN 4V-35V OUT 1.5V-30V LM2596S Step-Down ConverterSKU: CE05572 Brand: Core ElectronicsA versatile power supply DC-DC converter module that offers a wide range for bot ...


Videos
View AllGuides

How to Rotate Raspberry Pi Video Display / Screen

The Maker Revolution

How to Use a Logic Level Shifter/Converter

Arduino with LattePanda
Projects

Simple e-ink dashboard

Raspberry Pi Desk Clock with Data Display

The Hipster Coaster
Educational Workshops

Arduino Workshop for Beginners

Makers love reviews as much as you do, please follow this link to review the products you have purchased.
Product Comments