The aim of my project was to make a small display to show information such as the clock, weather, calendar, etc. I liked the idea of making a magic mirror, but wanted to try something more unique, less expensive, and easier to assemble (no woodworking required!)
Enter, my framed e-ink dashboard!
There were a few things I wanted to show on my display:
- A greeting that changes with the time of day (e.g. "Good morning!")
- The time and date
- The weather
- My Google calendar
- My tasks from Remember the Milk
It was a bit ambitious to try and cram everything onto a small display, so I decided I'd rotate through different screens, switching every minute. The panel has a refresh time of less than 1 second so it's ideal for this. I ended up with five screens in total: a clock, weather, my calendar, tasks and some artwork.
Each screen was a HTML page rendered in a headless instance of Chromium. I used the Puppeteer API to capture a screenshot of each page, then ran ImageMagick to process and convert the screenshot to a bitmap. Finally, the bitmap was pushed to the display using the code provided by the display's manufacturer. Shell scripts were set up to automate the whole process, running on a cron schedule.
As Chromium was running locally on the Raspberry Pi, I didn't need to bother setting up a webserver.
The great thing about this approach is its simplicity and flexibility: anything that can be rendered in Chromium can be displayed on the panel.
I put the whole thing into an IKEA photo frame. Nice!
- Waveshare 6" e-ink grayscale display with Raspberry Pi HAT (The original display used for this guide is now retired, but we have a similar, larger display you may be able to use with a different sized frame)
- Raspberry Pi Zero WH
- Micro USB Power supply
- Micro SD card
- HAT mounting kit
- IKEA RIBBA 10 x 15 cm photo frame (you could use any frame that fits your screen of choice)
- Mat board. You can use the one that comes with the frame, but I had one custom made to better fit the dimensions of the display [100 x 150 mm, with an 88 x 122 mm opening].
- Double-sided tape
- Double-sided foam adhesive tape
Step 1: Configure the Pi
First thing was to set up the software on the Pi. After flashing the SD card with Raspbian Buster Lite, setting up WiFi and SSH, and updating the system, I needed to...
- Select the correct timezone and enable the SPI interface (in sudo raspi-config)
- Install the software
sudo apt install chromium-browser imagemagick git
- Install node.js. I used an unofficial build (the official version no longer supports the Pi Zero's ARMv6 architecture).
- Install puppeteer
npm i puppeteer-core
- Compile and install the BCM2835 library
- Compile and install the Waveshare IT8951 binary.
- Clone the source:
"git clone https://github.com/waveshare/IT8951.git" - Comment out the following unneeded examples in IT8951/main.c like so:
/*
IT8951DisplayExample();
IT8951DisplayExample2();
printf("IT8951_GUI_Example
");
IT8951_GUI_Example();
*/ - Compile with "make" command
Step 2: Configure the screens
Here are some examples of my JS code to give you the general gist of things. I used jquery, moment.js, ical.js and the FullCalendarJS libraries in my code.
Clock
For the clock, I opted for this stylish word clock by Snapstromegon. I used the Courier Prime font for that retro, typewriter look.

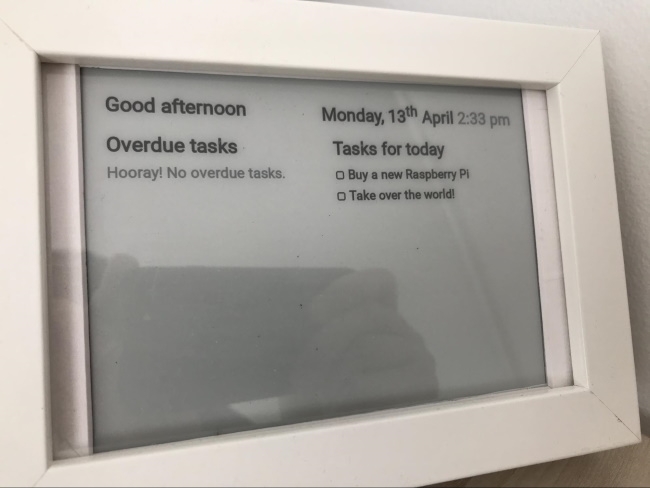
Greeting, date and time
My code looked like this:

// Greeting

n =  new Date();

var greeting;

var time = n.getHours();

if (time < 5) {

        greeting = "Good night";

} else if (time < 12) {

        greeting = "Good morning";

} else if (time < 18) {

        greeting = "Good afternoon";

} else if (time < 22) {

        greeting = "Good evening";

} else {

        greeting = "Good night";

}

document.getElementById("greeting").innerHTML = greeting;


// Date and Time

date_suffix = function(dt){

        slist = [ null, "st", "nd", "rd", "th", "th", "th", "th", "th", "th", "th", "th", "th", "th", "th", "th", "th", "th", "th", "th", "th", "st", "nd", "rd", "th", "th", "th", "th", "th", "th", "th", "st" ]

        return slist[dt.getDate()];

};

document.getElementById("date-time").innerHTML = moment(n).format("dddd, D") + "" + date_suffix(n) + " " + moment(n).format("MMMM h:mm a");
Weather
The weather page was powered by DarkSky (Unfortunately, they're no longer accepting any new registrations for their API.)
The weather icons were made by Freepik from flaticon.com. For simplicity, I named each SVG according to the values returned by data.icon

To return the icons, and the highs and lows for the next five days, I used something like this:
n = new Date();
// dayIndex is the day being forecasted (0 = today, 1= tomorrow, etc.)
function forecast(dayIndex) {
var location = "xxxxxx" // latitude, longitude
var apiKey = "xxxxxxx"
var timeKey = moment(n).add(dayIndex, 'days').format("YYYY-MM-DDTHH:mm:ss")
$("#forecastDay" + dayindex).html(moment(n).add(dayIndex, 'days').format("dddd"));
$.getJSON("https://api.darksky.net/forecast/" + apiKey + "/" + location + timeKey + "?callback=?&units=auto", function(json) {
$.each(json.daily.data, function(i, data) {
$("#forecastIcon" + dayIndex).html("img src=res/" + data.icon + ".svg");
$("#forecastMax" + dayIndex).html(Math.round(data.temperatureHigh) + "°");
$("#forecastMin" + dayIndex).html(Math.round(data.temperatureLow) + "°");
}
)}
)}
var j;
for (j = 0; j < 5; j++) {
forecast(j);
}
Google Calendar
Rather than reinvent the wheel, I used the open source FullCalendarJS library to render a smart looking calendar. While it has a Google Calendar plugin, it only supports public calendars, which was not really what I was looking for.
I then came across Mozilla’s ical.js ICS parser, along with some code that maps parsed ICS data to FullCalendar events.
I just had to point my code to the private ICAL URLs of my Google Calendars. I modified the script to iterate through each calendar, adding them one-by-one.

var calendarEl = document.getElementById('calendar');

var calendar = new FullCalendar.Calendar(calendarEl, { /* FullCalendar options here */  });

var myCalendars = ['calendarURL1', 'calendarURL2', etc];  // Google Calendar ICAL feeds

var j;

for (j = 0; j < myCalendars.length; j++) {

           $.get(myCalendars[j]).then(function (data) {

             // map ics data to variable 'events'

             // see https://stackoverflow.com/a/47259181

             ...

           }

           calendar.addEventSource(events);

                }

calendar.render();
FullCalendar documents how to modify the style and layout. I chose a simple list view which works great on the small screen.
Remember the Milk
Remember the Milk has an API, but for simplicity, I just used the RSS/XML feeds generated for each list of tasks.
function rtm () {

  $.ajax({

        type: "GET",

        url: "https://www.rememberthemilk.com...",   // url of your task feed

        dataType: "xml",

        success: parseXml

  });

function parseXml(xml) {

   if ( xml.getElementsByTagName("entry").length < 1 ) {

          $("#tasks").html("Hooray! All tasks completed!");

          }

   else {

          $("#tasks").html("
- "); $(xml).find("entry").each(function() { $("#list").append("
- " + $(this).find("title").text() + " "); }); $("#list").append("
");

               }

            }

rtm();
I set up two automated smart lists in RTM to appear on my dashboard: one for overdue tasks, and one for tasks due today.
Step 3: Create the scripts
puppeteer.js (to capture the screenshot)
This is where the magic happens.
const puppeteer = require('puppeteer-core');

async function timeout(ms) {

  return new Promise(resolve => setTimeout(resolve, ms));

}

(async () => {

        // As the pages are hosted locally, we need to make a CORS request to get some of the data. Hence the need to run Chromium with the "--disable-web-security" flag

            const args = puppeteer.defaultArgs();

                            args.push('--disable-web-security');

                      const browser = await puppeteer.launch({ ignoreDefaultArgs: true, args, executablePath: '/usr/bin/chromium-browser'});

            const page = await browser.newPage();

            await page.goto('file:///home/pi/yourfile.html');


  // 5 second timeout: allows the page to fully render before taking the screenshot

            await timeout(5000);


  // browser viewport set to the dimensions of the display (800 x 600)

            await page.setViewport({ width: 800, height: 600 });  /

            await page.screenshot({path: '/home/pi/capture.png'});

            await browser.close();

})();
update.sh (to update the display)
# run puppeteer

/usr/local/bin/node /home/pi/puppeteer.js

# convert the screenshot to a BMP

convert -rotate 180 /home/pi/capture.png /home/pi/capture.bmp

# push the BMP to the display

sudo /home/pi/IT8951/IT8951 0 0 /home/pi/capture.bmp
In case you're wondering, I put the display in upside down (silly!), which is why I used -
rotate 180
Crontab
Finally, it was just a matter of creating a cron schedule to run the update scripts. I used separate puppeteer/update scripts for each screen.
Step 4: Assemble the hardware
With that done, it was time to put everything together.
- Disassemble the frame. I discarded the mat board that came with the IKEA frame, as I used the one I had custom made.
- Using a pair of pliers, I pulled out the tabs on the long edges of the photo frame. (The display wouldn't fit otherwise!)

- Next, I attached the mat board to the front of the display with some double sided tape.
- Then I put the plastic panel, display (with mat board attached), and mounting board back into the frame, and used the tabs on the short sides of the frame to hold everything in place. Make sure the e-ink panel's ribbon cable is accessible from behind the mounting board.
- Next step was to attach the e-ink driver HAT to the GPIO header on the Pi and connect all the ribbon cables to the display.
- Final step was to attach the Raspberry Pi/HAT to the frame/mounting board using some double-sided foam tape.


The end result
Overall, I'm pretty happy with how this project turned out, especially given my limited understanding of coding (it's amazing what you can google!)...
I had fun putting this together, so I hope you like it!

