
Makerverse Nano Power Timer HAT for Raspberry Pi Pico
Periodically cycles power to your battery-powered projects
In stock, ships same business day if ordered before 2PM
Delivered by Tue, 4th of Aug
Quantity Discounts:
- 4+ $11.01 (exc GST)
- 12+ $10.44 (exc GST)
- 50+ $9.85 (exc GST)
Recommended Essentials:
 3.7V 400mAh")

")
")
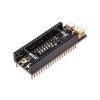
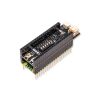
The Makerverse™ Nano Power Timer HAT for Raspberry Pi Pico cycles power to your project periodically, extending battery life. To use the timer, connect it to your Pico via the stackable headers, set your desired interval, and apply power to the battery connector. The timer will run continuously, consuming a (really tiny!) 35nA, before turning your project on after the set interval. Once your project has completed whatever it needs to do (eg. read sensors, log data), your Pico can signal to the timer that it is DONE (on GP22). The timer will remove power and wait for the next interval. Intervals from just a few seconds to one hour are easy to set with the six-position DIP switch and the most useful intervals can be selected with just one switch - refer to the labels on the back of the timer. Switch positions can be combined to create more granular intervals if necessary.
There's also a few lifestyle upgrades on board: A reset button for the Pico allows you to restart your program on the fly, and a Timer Reset button so you don't have to wait a full interval (useful for experimenting on the bench). There's even a PiicoDev compatible connector, to allow easy, solderless connection to PiicoDev devices.
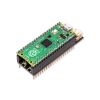
This HAT is a more Pico-friendly version of the Makerverse Nano Power Timer. Connecting to the Nano Power Timer is easy - it comes with pre-soldered stackable headers, ready to plug directly on top, (or underneath) a Pico. Batteries connect via the JST PH connector, compatible with lithium cells or AA/AAA Battery packs.
Setting an Interval
Set one of the six DIP switches to set one of the following intervals. More granular intervals are available by setting more than one DIP switch at a time - the resulting interval will always be shorter than the shortest interval selected.
| Switch | Interval (Approximate) |
| All OFF | 2 hours |
| 1 | 1 hour |
| 2 | 20 minutes |
| 3 | 5 minutes |
| 4 | 1 minute |
| 5 | 15 seconds |
| 6 | 6 seconds |
Battery Charging
The battery charger on-board can only be used with single-cell Lithium Polymer cells. By default, the Makerverse Nano Power Timer HAT ships with charging disabled to allow safe use with other batteries (Alkaline, NiMH). To enable charging for single-cell LiPo, close the CHG EN jumper by adding solder. For charging to commence, the battery must be connected before connecting the Pico to another power source or USB. Connecting a battery to an already-powered Power Timer HAT will not initiate charging. By default, the charge current is set to 100mA. Enable 330mA fast-charging by soldering the CHG FAST jumper.
Charger States and LED Behaviour
The charge indicator LED (CHG) indicates the status of a connected rechargeable battery (if any). The following table summarises its behaviour (while the Pico is plugged into USB power).
| CHG EN Jumper | Battery Connected | CHG LED Behaviour | Charger State |
| Unsoldered (Default) | - | ON | Disabled. Safe for Alkaline or NiMH cells |
| Soldered | NO | Slow Flash | Idle - waiting for battery |
| Soldered | YES | ON | Charging |
| Soldered | YES | OFF | Charge Complete |
By design, the power LED will be on by default when the device has power, if you want to disable it to stretch as much power out as possible, cut the link between the pads marked PWR LED. You can always resolder the bridge later if you decide you want it back on.
PiicoDev Compatibility
A PiicoDev connector is provided, connected to GP8:SDA and GP9:SCL - that makes this HAT compatible with existing PiicoDev tutorials for Pico with no changes to example code.
Specifications
- DONE Pin: Connected to GP22. Send GP22 HIGH to send the DONE signal.
- Timer standby current: 35 nA
- Dimensions: 20.8 x 61.7 mm
- Battery Connector compatibility:
- 3x Alkaline or NiMH cells in series (Charger must be disabled, open the CHG EN jumper)
- Lithium Polymer (single cell)
- Charge current: Selectable 100 mA or 330 mA
The following example works like a simple datalogger. The Pico powers-up, records a single data point (read from the ADC) and then signals to the Power Timer that it is DONE. The process will repeat after the user-set time interval. To read the log file the Pico can be plugged into a PC and Thonny used to open or copy the file. If you haven't used Thonny to program a Pico before, see the getting started guide.
The MicroPython code example below assumes that the Raspberry Pi Pico is disconnected from USB and powered by a battery connected to the Nano Power Timer HAT. This code should be saved as main.py onto the Pico to ensure the program runs on power-up.
from machine import Pin, ADC

DONE = Pin(22, Pin.OUT) # setting this pin High will remove power, and wait for the next interval
adc = ADC(0) # Pin 26

x = adc.read_u16()

# Opening with "a" for appending
with open("log.txt", "a") as logFile:
    logFile.write(str(x))
    logFile.write('\n') # New line
    logFile.flush() # Ensure data is written
    logFile.close() # Really ensure data is written

DONE.on() # Assert DONE signal; powers down Pico
For help getting started with Pico and Thonny, see our guide.
- Hardware Repository (PCB Project)
- Schematic
- Makerverse Nano Power Timer Tutorial - this is the tutorial for the original Nano Power Timer that this design is based off.

This product is listed in:
Makerverse>Makerverse LabsRaspberry Pi>Pico>Modules
Makerverse>Power Management
Exact shipping can be calculated on the view cart page (no login required).
Products that weigh more than 0.5 KG may cost more than what's shown (for example, test equipment, machines, >500mL liquids, etc).
We deliver Australia-wide with these options (depends on the final destination - you can get a quote on the view cart page):
- $3+ for Stamped Mail (typically 10+ business days, not tracked, only available on selected small items)
- $7+ for Standard Post (typically 6+ business days, tracked)
- $11+ for Express Post (typically 2+ business days, tracked)
- Pickup - Free! Only available to customers who live in the Newcastle region (must order online and only pickup after we email to notify you the order is ready). Orders placed after 2PM may not be ready until the following business day.
Non-metro addresses in WA, NT, SA & TAS can take 2+ days in addition to the above information.
Some batteries (such as LiPo) can't be shipped by Air. During checkout, Express Post and International Methods will not be an option if you have that type of battery in your shopping cart.
International Orders - the following rates are for New Zealand and will vary for other countries:
- $12+ for Pack and Track (3+ days, tracked)
- $16+ for Express International (2-5 days, tracked)
If you order lots of gear, the postage amount will increase based on the weight of your order.
Our physical address (here's a PDF which includes other key business details):
40 Aruma Place
Cardiff
NSW, 2285
Australia
Take a look at our customer service page if you have other questions such as "do we do purchase orders" (yes!) or "are prices GST inclusive" (yes they are!). We're here to help - get in touch with us to talk shop.
Have a product question? We're here to help!
 Makerverse Nano Power TimerSKU: CE07927 Brand: MakerversePeriodically cycles power to your project, greatly extending battery life.
- Solderless Breadboard - 830 Tie Point (ZY-102)SKU: CE00304 Brand: Core ElectronicsIf you're prototyping a circuit big or small, then you'll want a quality breadbo ...
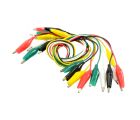
- Alligator Clip Wire / Cable 10 PackSKU: 019-ZY-810 Brand: Core ElectronicsGreat for prototyping and interfacing with devices. 5 colors per pack, 2 of each ...
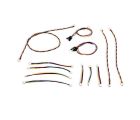
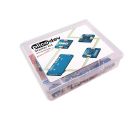
- Jumper Wire Kit for Solderless Breadboard 140 pcsSKU: CE05631 Brand: Core ElectronicsStay organized and create tidy circuits with this pack of breadboard jumper wire ...


- Plant_io - Plant Cultivation KitSKU: CE09696 Brand: Makerverse
Grow and learn! An open-source DIY project kit for plant-cultivation experi ...
-
- PiicoDev Cable Expansion KitSKU: CE09146 Brand: PiicoDev
Top up your PiicoDev Starter kit with a range of the most used cables!
- PiicoDev Starter Kit for Raspberry Pi PicoSKU: CE08256 Brand: PiicoDevGet started coding high-tech sensors and modules with the PiicoDev® Starter Kit ...


Videos
View AllGuides

How to add GPS to a Raspberry Pi Pico | Get Real-Time Location in Your Project!

Raspberry Pi 5 Vs Raspberry Pi 4 Model B | Comparison & Benchmarking

Raspberry Pi 5 | Review, Performance & Benchmarks

3D Printed Case For Raspberry Pi Pico and PiicoDev Boards
Projects
 Weather and Air Quality Station - Full Dashboard (DataCake + TTN), Rain-Proof and Long Range")
Raspberry Pi Pico Long Range Radio (LoRa) Weather and Air Quality Station - Full Dashboard (DataCake + TTN), Rain-Proof and Long Range

safePower

ESP32 IR-Triggered Camera with Home Assistant Integration
Educational Workshops

Raspberry Pi Workshop for Beginners

Makers love reviews as much as you do, please follow this link to review the products you have purchased.
Product Comments