Dual Mode Servo Programming Board
Reprogram your reprogrammable servos with this convenient and easy-to-use board
In stock, ships same business day if ordered before 2PM
Fastest delivery: Tomorrow*
Disclaimer:
For next-day delivery, the shipping address must
be in the AusPost next-day network, eParcel Express must be selected, and the order must be placed
before 2PM AEST Mon-Thurs excluding NSW Public Holidays. Orders may be delayed due to AusPost
pickup timings and order verifications. eParcel Express is typically a 1-day service within the
AusPost next-day network, though it is sometimes 2+ days.
Quantity Discounts:
- 8+ $11.45 (exc GST)
- 50+ $10.72 (exc GST)
Recommended Essentials:
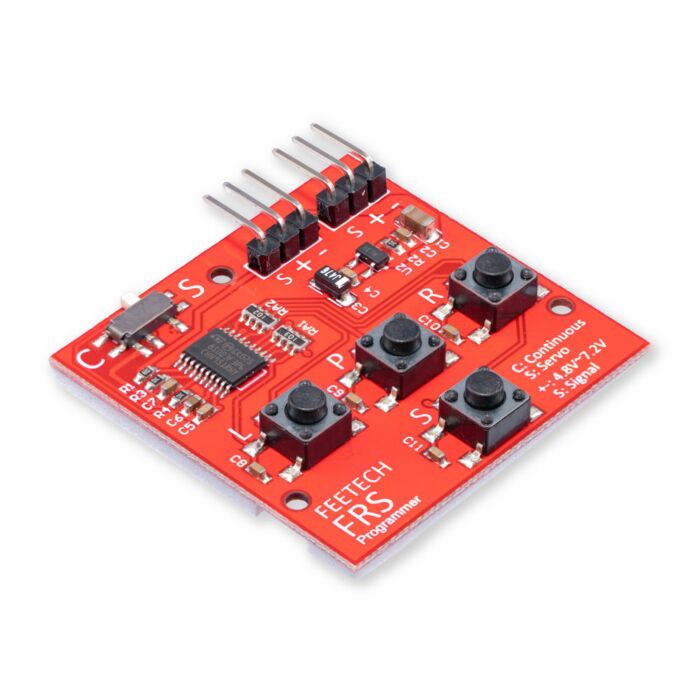
Reprogram dual-mode servo's with this programming board.
This board allows for each of the compatible servos to be programmed with:
- Servo mode (S)- Behaves like a standard limited range servo, range is reprogrammable
- Continuous Mode (C) - Turn the Servo into a motor, a PWM above or below the zero point will let it freely spin
Instructions
Parts required
- DC power supply (DC4.8-7.2V)
- Feetech Dual-Mode Servo Programmer (This product)
- Dual-Mode Reprogrammable Servo and included horn - Refer to the Supported List below
Pinout
- : DC negative
+: DC positive
S: Servo Signal
Program 'Servo' Mode
- Confirm all LEDs are off
- Move Slide switch to S state (Servo)
- Long press the P button (Program)
- Observe all of the LEDs flash to confirm it has been programmed
Testing 'Servo' Mode
- Briefly press the S button once to put the servo into 'Sweep' mode (Quick S LED flashes)
- Briefly press the S button twice to put the servo into '3-point' test mode (Slow S LED flashes)
- Press L Button - Move the servo to the left position
- Press P Button - Move the servo to the middle position
- Press R Button - Move the servo to the left position
- Triple press S Key - Return the programmer into programming mode (All LEDs off)
Set angular 'Servo' mode limit
- Ensure switch is set to S
- Manually move the servo horn to the minimum limit you would like to set
- Briefly press the L button (LED should flash 3x times)
- Manually move the servo horn to the maximum limit you would like to set
- Briefly press the R button (LED should flash 3x times)
- Briefly press the P button, (LED should flash 3x times, indicating programming the end-points it complete)
Test the servo as usual
Program 'Continuous Rotation' Mode
- Confirm all LEDs are off
- Move Slide switch to C state (Continuous Rotation)
- Long press the P button (Program)
- Observe all of the LEDs flash to confirm it has been programmed
Testing 'Continuous Rotation' Mode
- After programming the servo into continuous mode, press the L, R and S buttons to move counter-clockwise, clockwise and stop respectively
Supported Servo Motors
- FT5116M
- FT5118M
- FB5116M
- FB5118M
- FR5311M
- FR5317M
- FT5325M
- FT5825M
- FT5830M
- FT5835M
Exact shipping can be calculated on the view cart page (no login required).
Products that weigh more than 0.5 KG may cost more than what's shown (for example, test equipment, machines, >500mL liquids, etc).
We deliver Australia-wide with these options (depends on the final destination - you can get a quote on the view cart page):
- $3+ for Stamped Mail (typically 10+ business days, not tracked, only available on selected small items)
- $7+ for Standard Post (typically 6+ business days, tracked)
- $11+ for Express Post (typically 2+ business days, tracked)
- Pickup - Free! Only available to customers who live in the Newcastle region (must order online and only pickup after we email to notify you the order is ready). Orders placed after 2PM may not be ready until the following business day.
Non-metro addresses in WA, NT, SA & TAS can take 2+ days in addition to the above information.
Some batteries (such as LiPo) can't be shipped by Air. During checkout, Express Post and International Methods will not be an option if you have that type of battery in your shopping cart.
International Orders - the following rates are for New Zealand and will vary for other countries:
- $12+ for Pack and Track (3+ days, tracked)
- $16+ for Express International (2-5 days, tracked)
If you order lots of gear, the postage amount will increase based on the weight of your order.
Our physical address (here's a PDF which includes other key business details):
40 Aruma Place
Cardiff
NSW, 2285
Australia
Take a look at our customer service page if you have other questions such as "do we do purchase orders" (yes!) or "are prices GST inclusive" (yes they are!). We're here to help - get in touch with us to talk shop.
Have a product question? We're here to help!
Videos
View AllGuides
Servos, Steppers or Solenoids? | Choosing an Actuator to Move Your Project
Getting Started with Servos | Examples with Raspberry Pi Pico
Setting up and Using the Adafruit 16-Channel Servo HAT for Raspberry Pi
How To Control A Motor with the Raspberry Pi
Projects
Pico Baro V2
Micro:bit Random Selector
DIY Pi Buggy
Makers love reviews as much as you do, please follow this link to review the products you have purchased.


Product Comments