Pimoroni Picade - 10-inch Display
Available with a lead time
Expect dispatch between Mar 04 and Mar 09
Quantity Discounts:
- 3+ $621.64 (exc GST)
- 5+ $608.82 (exc GST)
Recommended Essentials:
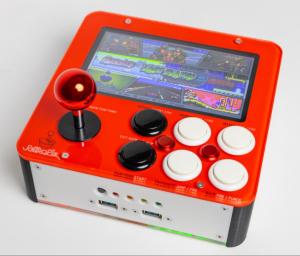
The ultimate desktop retro arcade machine! Picade is a Raspberry Pi-powered mini arcade that you build yourself, with authentic arcade controls, a high resolution 4:3 display that's ideal for retro gaming, and a punchy speaker to hear those 8-bit game soundtracks at their best
Picade is now Raspberry Pi 4 compatible and includes a new USB-C version of Picade X HAT!
The all-new Picade has been completely redesigned, from the inside out! There's new artwork, a new display and display driver board, dedicated power button, an all-new Picade X HAT (now with USB-C), easier wiring, easier access to the interior of the cabinet, beautiful new packaging, a bunch of extra goodies (stickers and an enamel Picade pin), and a gorgeous Picade poster and assembly instructions.
Picade comes in kit form, and it'll take around two to three hours to build. The cabinet is made from powder-coated MDF, giving it a quality look and feel similar to a full-size arcade. All you'll need to add is a Raspberry Pi, USB-C power supply, and micro-SD card.
You can watch Pimoroni's Picade ad below!
Cabinet features
- Black, powder-coated panels
- Acrylic marquee and console with authentic artwork
- Push-fit arcade buttons
- Joystick with black ball top
- 3" speaker (5W, 4Ω)
- Easy access with removable back panel
- Dedicated illuminated power button
- Grippy rubber feet
- Dimensions: 350x230x210mm
10-inch display features
- 1024x768 (4:3 ratio) IPS (wide viewing angle) display
- Pimoroni-designed and manufactured HDMI display driver board and keypad controls
- Powered by micro-USB cable (included) from your Pi
Picade X HAT features
- Easy DuPont connectors for buttons and joystick
- Push-fit speaker terminals
- I2S audio DAC with 3W amplifier (mono)
- USB-C power management, power switch pins, and power button
- 4-way joystick inputs
- 6 player buttons
- 4 utility buttons
- Metal standoffs to hold your Picade X HAT securely
Extras
- Picade enamel pin badge
- Pimoroni Super Sticker Selection
- Picade poster / assembly instructions
What's new!?
The cabinet is more compact, so it fits more neatly on your desk, but has a higher resolution 8" or 10" display (1024x768). The display is driven by a new Pimoroni-designed and manufactured driver board, with keypad controls. It's an IPS panel, so it looks great from any viewing angle!
The all-new Picade X HAT is packed full of useful features. Pimoroni has moved from more fiddly screw terminals to simple DuPont connectors that just push in, and the speaker terminals are the same easy push-fit connectors that we use on pHAT BEAT.
There's dedicated power management on-board Picade X HAT; just plug your USB-C power supply into the HAT and it'll power your Pi through its pins. The power button connected to the HAT means that once your Pi is safely shutdown, the power will be cut completely to the Pi. A simple press of the power button will boot your Picade up again.
The new buttons in Picade are lower profile, and the new joystick has a single connector rather than the eight spade connectors on our previous Picade joystick.
A gorgeous new neon-look Picade logo on the marquee, and rainbow stripes on the console and screen-surround, evoke classic consoles, as do the assembly instructions and poster.
Building your Picade
Pimoroni hope the included assembly instructions have everything you need to build your Picade, but Pimoroni has also filmed a complete build video of Picade that you can watch as you build and learn some handy tips and tricks. It's below.
The sections are also available separately in a playlist here.
Pimoroni has also put together an online tutorial that incorporates the assembly instructions, important tips and amendments, and the videos for each section, so do check that out!
Software setup
Pimoroni recommends the RetroPie operating system for your Picade.
Connect a USB keyboard to your Pi, and connect to Wi-Fi in the RetroPie menu. Press F4 to exit to the terminal and then type curl https://get.pimoroni.com/picadehat | bash to run the Picade HAT installer.
Reboot your Pi, if it doesn't prompt you to. Press the "Alt" key on your keyboard and then select "Configure input" to configure your Picade's controls. You'll find that the sound and power button should both be working now too!
Notes
If your Picade display doesn't show anything when you first power it up, then it could be because the HDMI display is not being detected by the Raspberry Pi. This can happen because power isn't supplied to the USB ports on the Raspberry Pi for the first few seconds of booting. The solution is to edit the /boot/config.txt file on your RetroPie SD card, and add hdmi_force_hotplug=1 on a new line at the bottom of the file.
If you'd like to design your own artwork for your Picade, then Pimoroni made a handy PDF that has the outlines and dimensions of the marquee, screen shim, and console. You can download it from the Picade HAT GitHub repo here.
The top part of the 10” screen assembly is not held together with nuts and bolts, but will be held in place by the tabs and slots once the cabinet is screwed back together. You might want to use a couple of pieces of masking tape to hold things in place until you get the cabinet together.
This product is listed in:
Raspberry Pi>Retro Pi>Gaming KitsRetro Gaming
Retro Gaming>Kits
Other Favourites>Pimoroni>Picade
Gift Ideas>Retro Gaming Goodness
Exact shipping can be calculated on the view cart page (no login required).
Products that weigh more than 0.5 KG may cost more than what's shown (for example, test equipment, machines, >500mL liquids, etc).
We deliver Australia-wide with these options (depends on the final destination - you can get a quote on the view cart page):
- $3+ for Stamped Mail (typically 10+ business days, not tracked, only available on selected small items)
- $7+ for Standard Post (typically 6+ business days, tracked)
- $11+ for Express Post (typically 2+ business days, tracked)
- Pickup - Free! Only available to customers who live in the Newcastle region (must order online and only pickup after we email to notify you the order is ready). Orders placed after 2PM may not be ready until the following business day.
Non-metro addresses in WA, NT, SA & TAS can take 2+ days in addition to the above information.
Some batteries (such as LiPo) can't be shipped by Air. During checkout, Express Post and International Methods will not be an option if you have that type of battery in your shopping cart.
International Orders - the following rates are for New Zealand and will vary for other countries:
- $12+ for Pack and Track (3+ days, tracked)
- $16+ for Express International (2-5 days, tracked)
If you order lots of gear, the postage amount will increase based on the weight of your order.
Our physical address (here's a PDF which includes other key business details):
40 Aruma Place
Cardiff
NSW, 2285
Australia
Take a look at our customer service page if you have other questions such as "do we do purchase orders" (yes!) or "are prices GST inclusive" (yes they are!). We're here to help - get in touch with us to talk shop.
Have a product question? We're here to help!
Videos
View AllGuides
Raspberry Pi 5 Vs Raspberry Pi 4 Model B | Comparison & Benchmarking
Raspberry Pi 5 | Review, Performance & Benchmarks
Workaround for the RetroPie Bluetooth Security Bug
Upgrade your Project for the Raspberry Pi 4
Projects
Portable Arcade Emulator
ESP32 IR-Triggered Camera with Home Assistant Integration
LuMa 1 - The Neo Disco Ball
Educational Workshops
Raspberry Pi Workshop for Beginners
Makers love reviews as much as you do, please follow this link to review the products you have purchased.




Product Comments