
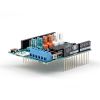
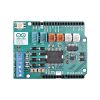
Arduino Motor Shield Rev3
In stock, ships same business day if ordered before 2PM
Fastest delivery: Tomorrow*
Disclaimer:
For next-day delivery, the shipping address must
be in the AusPost next-day network, eParcel Express must be selected, and the order must be placed
before 2PM AEST Mon-Thurs excluding NSW Public Holidays. Orders may be delayed due to AusPost
pickup timings and order verifications. eParcel Express is typically a 1-day service within the
AusPost next-day network, though it is sometimes 2+ days.
Quantity Discounts:
- 5+ $41.08 (exc GST)
- 10+ $40.67 (exc GST)
- 30+ $40.25 (exc GST)
Recommended Essentials:

$88.07
The Arduino Motor Shield is based on the L298 (datasheet), which is a dual full-bridge driver designed to drive inductive loads such as relays, solenoids, DC and stepping motors. It lets you drive two DC motors with your Arduino board, controlling the speed and direction of each one independently. You can also measure the motor current absorption of each motor, among other features. The shield is TinkerKit compatible, which means you can quickly create projects by plugging TinkerKit modules to the board.

Description
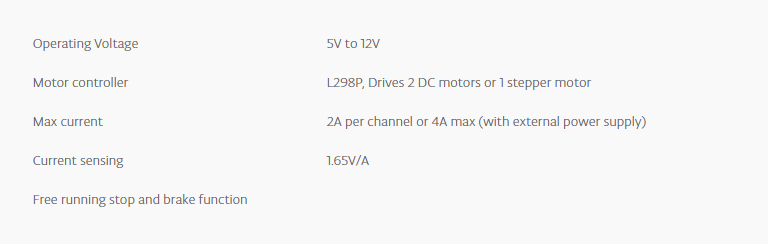
Power
The Arduino Motor Shield must be powered only by an external power supply. Because the L298 IC mounted on the shield has two separate power connections, one for the logic and one for the motor supply driver. The required motor current often exceeds the maximum USB current rating.
External (non-USB) power can come either from an AC-to-DC adapter (wall-wart) or battery. The adapter can be connected by plugging a 2.1mm center-positive plug into the Arduino's board power jack on which the motor shield is mounted or by connecting the wires that lead the power supply to the Vin and GND screw terminals, taking care to respect the polarities.
To avoid possible damage to the Arduino board on which the shield is mounted, we reccomend using an external power supply that provides a voltage between 7 and 12V. If your motor require more than 9V we recommend that you separate the power lines of the shield and the Arduino board on which the shield is mounted. This is possible by cutting the "Vin Connect" jumper placed on the back side of the shield. The absolute limit for the Vin at the screw terminals is 18V.
The power pins are as follows:
- VIN: on the screw terminal block, is the input voltage to the motor connected to the shield. An external power supply connected to this pin also provide power to the Arduino board on which is mounted. By cutting the "Vin Connect" jumper you make this a dedicated power line for the motor.
- GND: Ground on the screw terminal block.
The shield can supply 2 amperes per channel, for a total of 4 amperes maximum.
Input and Output
This shield has two separate channels, called A and B, that each use 4 of the Arduino pins to drive or sense the motor. In total there are 8 pins in use on this shield. You can use each channel separately to drive two DC motors or combine them to drive one bipolar stepper motor.
The shield's pins, divided by channel are shown in the table below:
If you don't need the Brake and the Current Sensing and you also need more pins for your application you can disable this features by cutting the respective jumpers on the back side of the shield.
The additional sockets on the shield are described as follow:
- Screw terminal to connect the motors and their power supply.
- 2 TinkerKit connectors for two Analog Inputs (in white), connected to A2 and A3.
- 2 TinkerKit connectors for two Aanlog Outputs (in orange in the middle), connected to PWM outputs on pins D5 and D6.
- 2 TinkerKit connectors for the TWI interface (in white with 4 pins), one for input and the other one for output.
USB Overcurrent Protection
The Arduino Uno has a resettable polyfuse that protects your computer's USB ports from shorts and overcurrent. Although most computers provide their own internal protection, the fuse provides an extra layer of protection. If more than 500 mA is applied to the USB port, the fuse will automatically break the connection until the short or overload is removed.
Physical Characteristics
The maximum length and width of the Motor Shield PCB are 2.7 and 2.1 inches respectively. Four screw holes allow the board to be attached to a surface or case. Note that the distance between digital pins 7 and 8 is 160 mil (0.16"), not an even multiple of the 100 mil spacing of the other pins.
Motor Connections
Brushed DC motor. You can drive two Brushed DC motors by connecting the two wires of each one in the ( ) and (-) screw terminals for each channel A and B. In this way you can control its direction by setting HIGH or LOW the DIR A and DIR B pins, you can control the speed by varying the PWM A and PWM B duty cycle values. The Brake A and Brake B pins, if set HIGH, will effectively brake the DC motors rather than let them slow down by cutting the power. You can measure the current going through the DC motor by reading the SNS0 and SNS1 pins. On each channel will be a voltage proportional to the measured current, which can be read as a normal analog input, through the function analogRead() on the analog input A0 and A1. For your convenience it is calibrated to be 3.3V when the channel is delivering its maximum possible current, that is 2A.
Exact shipping can be calculated on the view cart page (no login required).
Products that weigh more than 0.5 KG may cost more than what's shown (for example, test equipment, machines, >500mL liquids, etc).
We deliver Australia-wide with these options (depends on the final destination - you can get a quote on the view cart page):
- $3+ for Stamped Mail (typically 10+ business days, not tracked, only available on selected small items)
- $7+ for Standard Post (typically 6+ business days, tracked)
- $11+ for Express Post (typically 2+ business days, tracked)
- Pickup - Free! Only available to customers who live in the Newcastle region (must order online and only pickup after we email to notify you the order is ready). Orders placed after 2PM may not be ready until the following business day.
Non-metro addresses in WA, NT, SA & TAS can take 2+ days in addition to the above information.
Some batteries (such as LiPo) can't be shipped by Air. During checkout, Express Post and International Methods will not be an option if you have that type of battery in your shopping cart.
International Orders - the following rates are for New Zealand and will vary for other countries:
- $12+ for Pack and Track (3+ days, tracked)
- $16+ for Express International (2-5 days, tracked)
If you order lots of gear, the postage amount will increase based on the weight of your order.
Our physical address (here's a PDF which includes other key business details):
40 Aruma Place
Cardiff
NSW, 2285
Australia
Take a look at our customer service page if you have other questions such as "do we do purchase orders" (yes!) or "are prices GST inclusive" (yes they are!). We're here to help - get in touch with us to talk shop.
Have a product question? We're here to help!
 USB to TTL Serial UART RS232 Adaptor (PL2303TA)SKU: 018-USB-PL2303HX Brand: Core ElectronicsUSB to TTL converters are essential for prototyping - they provide a direct inte ...
- SD Card ModuleSKU: CE05113 Brand: Core ElectronicsExpand your memory resources on your next project with the addition of this hand ...
- ADS1115 16-Bit ADC - 4 Channel with Programmable Gain AmplifierSKU: ADA1085 Brand: AdafruitFor microcontrollers without an analog-to-digital converter or when you want a h ...
- Monochrome 0.96 128x64 OLED graphic displaySKU: ADA326 Brand: AdafruitThese displays are small, only about 1" diameter, but very readable due to the h ...


- Arduino Starter Kit R4SKU: K000007_R4 Brand: Arduino
Arduino's latest hands-on beginner electronics kit with a growing list of off ...
- Arduino Modulino ThermoSKU: ABX00103 Brand: ArduinoMeasure temperature and humidity for environmental monitoring, indoor climate co ...
- 12V 5A Power supply and Adapter cable bundleSKU: CE09340 Brand: Core Electronics
Perfect for powering up hungry 12V projects!
- Arduino UNO R4 WiFiSKU: ABX00087 Brand: ArduinoThe Arduino UNO R4 WiFi merges the RA4M1 microprocessor from Renesas with the ES ...


Videos
View AllGuides

The Maker Revolution

How to Use a Logic Level Shifter/Converter

Arduino with LattePanda

Infrared Sensing, Hardware Interrupts, and the Arduino
Projects
Auto Tracking Camera System

Coffee Grinder With Arduino

The Hipster Coaster
Educational Workshops

Arduino Workshop for Beginners

Makers love reviews as much as you do, please follow this link to review the products you have purchased.
Product Comments