In this guide, we’re going to build the ultimate retro gaming setup using Recalbox on the Raspberry Pi 5. This setup will let you play almost any console or handheld released before the Nintendo DS or PSP — with controller support, crisp upscaling, shaders, and even Retroachievements, an online service that adds a modern achievement system to classic games. We’ll go step‑by‑step through installation, setup, adding your games, and unlocking some of the coolest hidden features Recalbox has to offer.
Let’s get started!
What You’ll Need
We have some kits to get you going with Recalbox.
Otherwise, to piece together your own, you will need a:
- Raspberry Pi – We’re using the Pi 5 here for its speed and smooth performance. Recalbox does support older models, but the Pi 5 is fast enough to comfortably run just about any supported console with upscaling turned on. For RAM, Recalbox recommends 4 GB as the sweet spot. You can get by with 2 GB, but newer and heavier systems might struggle. The 8 GB and 16 GB versions work fine too — just total overkill for this use case.
- Micro SD Card – This will hold Recalbox, your games, and any BIOS files. 64 GB is a great starting point. Games for consoles like the NES, SNES and N64 are only a few megabytes each, while titles for PlayStation 1 or Dreamcast can be close to a gigabyte. If you plan to load up a large library, pick a bigger card.
- Micro SD Card Reader – Required to flash Recalbox from your computer before the first boot.
- Cooling and Case – The Pi 5 runs warm, so you’ll want a cooling solution. The official Raspberry Pi Active Cooler is an easy option, or you can grab a retro‑styled case (like this N64 or NES lookalikes) if you want to complete the look — most include small fans or heatsinks that do the job perfectly.
- USB-C Power Supply
- Micro-HDMI to HDMI Cable - The Pi 5 has a micro-HDMI port and requires an adapter or adapter cable.
- Controller(s) - Recalbox supports a huge range of USB and Bluetooth controllers right out of the box, but in general, almost everything works — Xbox, PlayStation, 8BitDo, generic USB pads, etc. Personally, we’re using an 8BitDo controller here (they’re brilliant and chronically underrated), but bring whatever makes you feel most retro.
Installing Recalbox
Recalbox is the operating system that ties everything together — it’s what turns your Raspberry Pi into a clean, seamless retro console experience. There are a few popular alternatives out there like RetroPie and Batocera, and they all have their own strengths, but Recalbox seems to be the easiest and smoothest right out of the box.
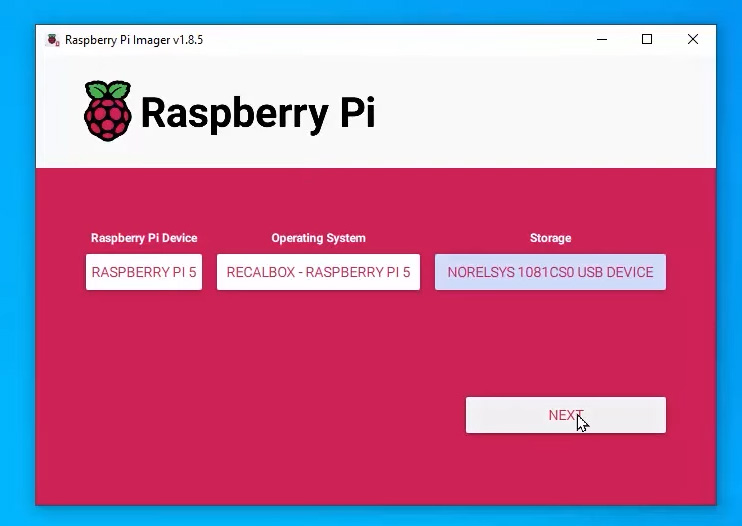
To get started, plug your microSD card into your computer and install the Raspberry Pi Imager if you don’t already have it. Open it up, then:
- Choose your device — select Raspberry Pi 5 from the list.
- Choose an operating system — scroll down to Emulation and game OS → Recalbox.
- Choose storage — select your SD card from the menu. Just a heads‑up: this will erase everything currently on that card.
- Write the image and wait for the install to complete.
Once that’s done, go ahead and assemble your setup — fit your cooler or case, insert the SD card, connect your power supply, plug it into your TV or monitor, and hit the power button.
Controller Setup
When Recalbox first boots, it’ll drop you onto the home screen. Before we can start playing anything, we’ll need to set up our controllers. You can use either a keyboard or a USB gamepad to begin with — we’ll pair Bluetooth controllers after that. We just need a USB device.
Start by pressing Enter (or the Start button on your controller) to open the main menu. From here, head down to Controller Settings → Pair a Bluetooth Controller. While that’s running, put your controller into pairing mode — it should automatically pop up in the list and connect after a few seconds. Once you’ve paired it, Recalbox will remember it and connect automatically every time you boot up. Nice and easy.
If you’re using multiple controllers, you can also assign their player numbers in this menu so you always know who is who (ensure you are always player-1).

While we are here, it’s worth running through Configure Your Controller in the same menu. Most controllers will work by default, but by default, the hotkey button is often assigned to something inconvenient (like the power button). The setup wizard will ask you to press each button it needs — just follow along. When you get to the Hotkey Button prompt, assign it to something convenient and remember it. The Hotkey Button is what allows you to access emulator menus, save states, and even exit games. We like to assign it to the Select button, but anything unused will work just fine.
Once your controller is configured and your buttons feel right, you’re all set! You can navigate through menus, open settings, and (more importantly) jump straight into your first game.

Loading and Managing ROMs
Now that we’ve got Recalbox installed and our controller set up, it’s time to add some games. Out of the box, Recalbox only shows systems that have at least one game on them — so you won’t see things like PlayStation or Dreamcast yet. That’s because, by default, it only lists consoles it can actually launch.
You might notice a few random titles already available though — these are free, open‑source games that Recalbox includes for testing. They’re great for confirming that everything’s working before adding your own library.
To load your own games, you’ll need to transfer ROM files to the right folders on your Pi. The easiest way to do this is over your local network:
- Make sure your Pi is connected to Wi‑Fi or Ethernet. To connect your Recalbox to Wi-Fi, press Start, go to Network Settings, and enter your Wi‑Fi credentials if needed. Once you are connected, you will see an IP address in this menu
- On your desktop or laptop, open your File Explorer and type in the IP address from the previous menu. If the IP address is 192.168.20.214, you would enter:
\\192.168.20.214
You might also be able to access your Recalbox with the follow address:
\\recalbox
Either of these commands will open up the shared folders on your Recalbox system. - Go into the roms folder — you’ll see sub‑folders for every supported system. The names can be a little confusing (for example, PlayStation 1 is listed as psx), so double‑check which one matches your console.
- Inside each folder, you’ll find a helpful README file listing which file extensions are supported — make sure your ROM files match these formats.
- Copy your ROMs into the appropriate system folder.

If you’d prefer to stay offline, you can also transfer games manually: shut down your Pi, remove the microSD card, plug it into your computer, and copy your files into the same roms directory.
Once you’ve added your games, head back to Recalbox, go to the UI Settings Menu, and select Update Game Lists. After a quick refresh (or a reboot), your new games will appear in the menu, ready to play.
And that’s it — your retro console is officially loaded up!
Saving, Loading, and Emulator Controls
When you start up a game in Recalbox, it automatically picks the right emulator behind the scenes. The emulator acts as a virtual version of the original console’s hardware and loads your ROM on top of it - they simulate the console with software and load the ROM as if it were a game disc or cartridge. All of our saving, loading will be done through the emulator itself.
The first thing to talk about is saving your game.
Traditional games on cartridge systems needed you to reach a save point, but in emulation, you can create a save state at any moment — even in the middle of a boss fight. To create one, press your Hotkey + X. This takes a snapshot of the game exactly as it is. To load that save, press Hotkey + Y.
You can toggle between different save slots using Hotkey + Up and Hotkey + Down, which is handy if you want a few checkpoints spread throughout the game. If you accidentally load over your progress (we’ve all done it), don’t panic — open the RetroArch Menu with Hotkey + A, and you’ll find an option to Undo Load State.
While you’re in that menu, you’ll notice a bunch of other useful controls. This is where you can tweak display settings, audio options, shaders, and more. Each console might use a slightly different version of an emulator, but the general layout is the same. To exit the menu, press Hotkey + A again.
To exit back to the Recalbox main menu, press Hotkey + Start. Don’t worry — your save states and configurations will stick around exactly as you left them.
And for a bit of fun, you can even fast‑forward or rewind gameplay. Press Hotkey + Right to fast‑forward, and Hotkey + Left to rewind. It’s great for skipping unskippable cutscenes or undoing that one bad jump you swear you didn’t miss.

Adding BIOS Files
When running certain games on certain consoles, you might run into a message saying that this “requires a BIOS file” or you may run into issues with some titles not running correctly. These BIOS files are small bits of firmware that were built into the original consoles — some emulators need them to accurately reproduce the hardware.
Most older systems will run fine without them, but if you see games not launching, behaving strangely, or producing missing‑sound or graphical issues, it’s worth checking your BIOS setup.
To do this, open the main Recalbox menu and head to System Settings → BIOS Checker. You’ll see a full list of the BIOS files that Recalbox knows about, along with which ones are already found on your system. It also shows the exact file name, expected location, and checksum for each one, which is great for confirming that your file is correct.
Recalbox includes some BIOS files it’s legally allowed to distribute, but many of them can’t be bundled due to licensing restrictions — they fall under the same category as ROMs. Because of that, we can’t tell you where to get those files, only what to do with them once you have them.
Once you’ve acquired your BIOS files, copying them over is done the same way as your game ROMs. Through your network share or by inserting the SD card into your computer, open the bios folder and place your files there. After that, go back to the BIOS Checker to confirm they’re detected and showing a green check mark.

Scraping Games and Artwork
When you first add your own ROMs, you’ll probably notice that they just appear as filenames in a long, plain list. That works — but part of the fun of Recalbox is scrolling through your collection with proper box art, descriptions, and release information. That’s where the scraper comes in.
Scraping is the process of pulling down metadata and artwork for each game in your library. Recalbox handles this automatically once you tell it what to do.
To start, press Start → Scraper from the main menu. Here you can:
- Select which systems you want to scrape for.
- Choose which source to fetch the game info from.
- Choose what you want the scrape to try and fetch.
Make sure your Pi is connected to the internet — the scraper needs online access to pull the game information. Once everything’s set to your liking, start the scraper and let it run. Depending on how many games you have, this process might take a few minutes.
When it’s finished, head back to your system list. Your games should now appear with their official artwork, titles, and details — much nicer than a wall of filenames. You can always re‑run the scraper later if you add new games or want to change how your collection looks.

HD Mode and Shaders
Recalbox includes a few built‑in tools to make your classic games look their best on modern displays. Two of the most useful are HD Mode and Shaders — and while they’re completely optional, they can really change the feel of a game.
HD Mode is a feature that applies resolution upscaling and filtering to your emulator, allowing you to enhance textures and smooth out jagged edges. Some games show a massive improvement — you’ll start noticing background details and sharper sprites that you could barely make out on an old CRT. Others might not change much, so treat it as something to experiment with.
To enable it, press Start → Game Settings → Shader and Video Options, and toggle HD Mode on. If you spot any odd visual glitches or see performance dips in heavier titles, just turn it back off — every console and emulator behaves a little differently.
Next up are Shaders. These are small graphical filters that change how your game image is rendered. You can use them to make your display look like an old CRT, mimic handheld LCD screens, or just give everything a slick modern polish.
Back under Game Settings, you’ll find a whole list of pre‑made shader sets. You can preview and apply any of them right from that menu. Try out a few extremes — a soft scanline CRT effect, a chunky pixel grid, or a crisp raw image to see what you prefer.
There’s no “right” choice here — it’s all about what looks best to you and what suits the games you’re playing. Once you’ve locked in a look, your Pi will remember it for that system.

Using RetroAchievements
One of the coolest things about Recalbox is its integration with RetroAchievements — a community‑driven system that adds achievements to classic games that never had them. Think of it as an online profile and trophy system for your retro library.
RetroAchievements works by monitoring the game’s memory in real time to detect when specific conditions are met — like collecting a certain number of items, beating a level, or finishing the game without dying. When that happens, it unlocks an achievement linked to your account.
To set it up, head over to retroachievements.org and create a free account. Then return to your Recalbox menu and navigate to Start → Game Settings → RetroAchievements. Enable the feature and enter your login details.

Once you’re logged in, any compatible emulator or game will automatically connect in the background. The first time you start a supported game, you’ll see a small notification confirming that you’re logged in and the achievements have been loaded successfully.
If you open the RetroArch Menu (with your Hotkey + A combo), you’ll find an Achievements section that lists which ones you’ve unlocked and what’s still available for that title — just like a modern console.
A quick heads‑up though: RetroAchievements can be a bit picky about ROM versions. Sometimes you’ll need a specific region, release, or edition of a game for it to register properly. If you don’t see any achievements pop up, check the game’s page on the RetroAchievements website to find which version it expects.
Once configured though, it’s a fantastic way to revisit old favourites with a new sense of progression. Whether it’s retro speed‑running or simply ticking boxes for nostalgia’s sake, it breathes new life into those old saves.

Netplay and Online Multiplayer
Alright, time to look at something seriously cool - Netplay. This feature lets you play games on your recalbox - with your friends online through a peer-to-peer connection. They will also need a recalbox set up to do this, but it essentially syncs all your consoles to act as if you were all playing the same game on the same console, in the same room.
You’ll find it under Start → Game Settings → Netplay. Here you can host a game or jump into someone else’s. Make sure you’ve got a solid internet connection (Ethernet is going to be the best here), and you may need to configure your router's NAT configuration.
Netplay can be a little finicky to get working, and could have an entire guide for Netplay alone. That is however outside the scope of this guide, and so we will point you to recalbox's guide on getting Netplay going and the documentation page for it. Netplay is also very picky about which ROM you are using, what version, and even which emulator you are using.
It’s worth trying though, because when you get it running, it usually works well and it is just darn cool to have someone playing with you on an emulated console, over the internet!

Where to From Here?
We now have a full retro gaming setup running beautifully on the Raspberry Pi 5. It’s kind of wild how straightforward this has become. My very first Pi (circa 2014) was purchased to run RetroPie - another retro gaming emulator. Eventually, it moved on from a gaming machine and ended up being a gateway for learning to code and robotics. That’s the real magic of the Pi: once you’ve got it up and running, it becomes a sandbox for just about anything you can imagine.
If you want to stay in the gaming world, you can turn your Pi into a Steam Link system that streams games directly from your main PC — it’s an awesome way to play modern titles on the big screen without needing a console. Or maybe you want to wander into something a bit more technical — your Pi can be an amazing playground for computer vision projects. We have guides on setting up YOLO object detection and Moondream, where your Pi can actually recognise real‑world objects and even describe images much like a human would. You could also branch out into sensor‑based projects. There are loads of great ones to try, from environmental monitors to a lightning sensor that detects strikes happening nearby — all powered by the same Pi sitting on your desk. And finally, your Pi can take on some genuinely useful network tasks, like becoming a Pi‑hole ad‑blocking server to clean up your home network and keep everything running faster and safer.
If you want to keep exploring recalbox though, be sure to check out the official Recalbox documentation, as there are plenty more features we didn’t cover here (and possibly more that were released after we wrote this article).
If you make something cool, or you need a hand with anything from this guide, feel free to post about it on our community forums.
Until next time, happy making!

