Time to create a Little Red Advertisement Devouring Monster. This will be a self-hosted, network-wide, ad-blocking system running on a Raspberry Pi Single Board Computer. It will also stop access to malware sites and phishing websites. Furthermore, Pi-Hole will stop devices from leaking personal information out of your network so if your IoT Fridge is spying on you going to be able to find out. This can also pre-emptively prevent (hidden from you) Crypto-Coin mining from occurring on your network. This will protect your entire local network and data. You can even set up parental controls to censor adult content. Pi-Hole also auto-caches/pre-caches so the response time of your internet browser can be significantly faster if it has already cached the desired webpage information to your system.
Pi-Hole will create and operate as a Domain Name System (DNS) pathway for your internet system. With a completed system your Raspberry Pi Single Board Computer will take all the internet data coming in, filter it meticulously, and only display what you actually want to see. If particular data is blacklisted your Router/Modem won’t even be able to download/cache/pull it from the internet. This saves bandwidth. You set this up once and any internet-connected device (Phone, Ipad, Smart TV, Computer, or IoT Toaster) will have its internet requests pass through the Pi-Hole system and filtered. This system is more efficient and better than downloading Ad Blocking Browser Add-Ons on each of your devices.

For clarity, there are three main ways to set up a Pi-Hole System. First is the easiest and the method I demonstrate in this guide, using standalone hardware like the Raspberry Pi Single Board Computer. Another option is running Pi-Hole as part of a virtual machine. The other option is to run Pi-Hole containerised with Docker or Kubernetes. The latter methods are more technical and make it possible to efficiently multi-task with hardware. The Pi-Hole project is a great platform to jump into these bigger concepts but I will provide the most direct way to get Pi-Hole running on standalone hardware. The contents of this guide are as follows.
- What you need
- Hardware Build
- Software Build
- Modem/Router Set Up
- Demonstration
- Troubleshooting
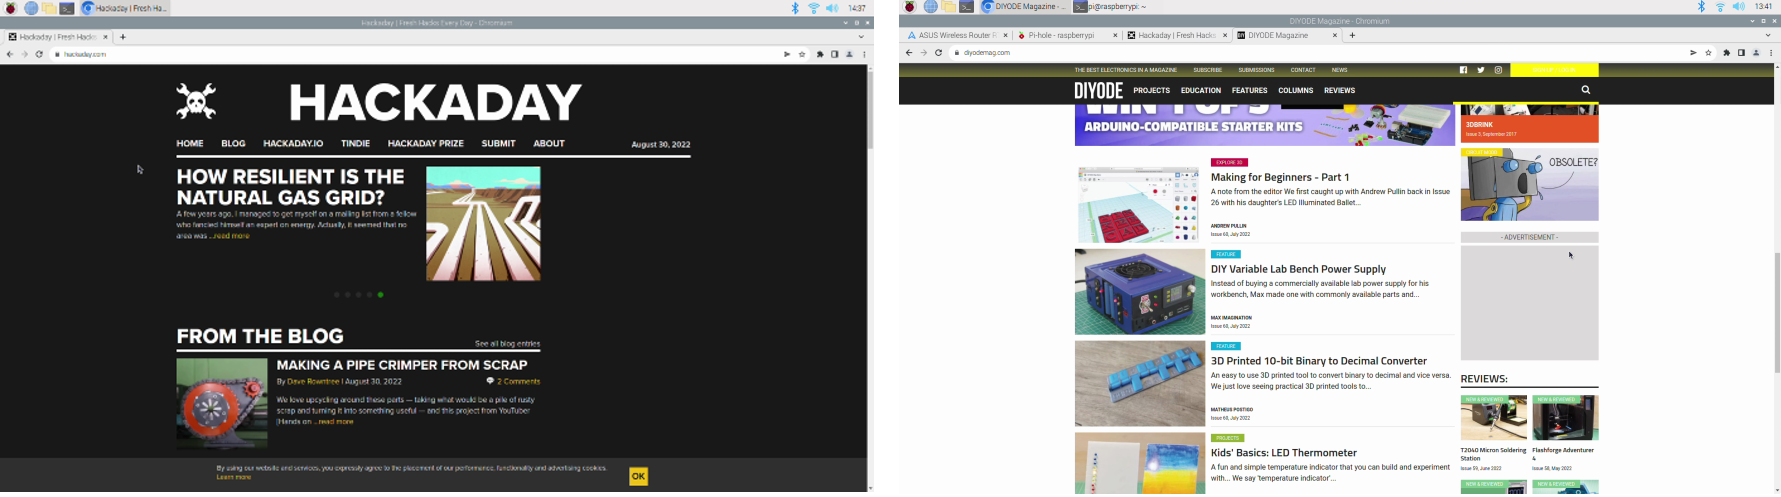
Browsing your favourite website is going to be even better, just check two of my favourites below with a Pi-Hole System up and running. Not an Ad to be seen. Keep in mind though that for many people the advertising revenue is what keeps them afloat financially. This guide will also demonstrate how to remove certain Domains from the Pi-Hole Block List. That way you can continue supporting those you desire.
For those curious, when using a Pi-Hole the internet flow of data in a simple home system is as follows. You, the Client, request a webpage. The PiHole acts as a Domain Name System, logging all DNS requests and filtering the Primary Domain Request. If something found was on the blocklist information it is stopped here. The DNS request is then sent through your router and into the internet. An Online DNS will then serve the DNS request and shoot it back to your Router. Your router then passes the information to the Pi-Hole and checks any secondary domains that have been sent back. If any of them are on the block list they are filtered out. Then the filtered information from the DNS request is provided to the client, materialising as Add Free Website. This all happens in a blink of an eye. See this flow of data in the image below.

Nothing is more valuable than empty space in a house. Your desktop screen is the same. Nobody wants to be bombarded by ads that worm their way into your Desktop Real Estate (even if the AI has tailored them to be perfect for you). Correctly set up this Home DNS Server (Pi-Hole) will block ads on Smart TV, improve network performance and stop all in-game mobile app ads! Literally with this setup on your system people will come over to your house and use the internet as an ad-free oasis. It’ll make you more popular! As always if you have any questions, queries, thoughts, or comments please let me know.
What You Need
Below is everything you need to set up your Raspberry Pi to become a fully functional Pi-Hole.
- A Raspberry Pi Single-Board Computer (in my case I have used a Raspberry Pi 4 Model B 2GB but this can be done perfectly with an earlier lower-spec Pi like the Raspberry Pi 3)
- Micro-SD card flashed with Raspberry Pi OS
- Micro-HDMI to HDMI Cord to connect the system to a Monitor
- Power Supply
- Mouse and Keyboard
- Ethernet Cable (Can use just Wi-Fi if desired)
- Operational Internet Connected Modem/Router
Hardware Build
We will set up our Raspberry PI as a desktop computer as the desktop UI is a much more familiar experience for the everyday maker. Alternatively, we can run this system using a Rasberry Pi set up as a headless (No Monitor) device. It doesn't make it any easier or harder to set up as we will still be typing the same terminal commands into the terminal. Headless set up will re-boot/operate quicker as it will not need to load the Raspberry Pi Desktop UI, however, a PiHole System is not very CPU intensive. We have a guide on how to run a Raspberry Pi headless if you desire to do this.
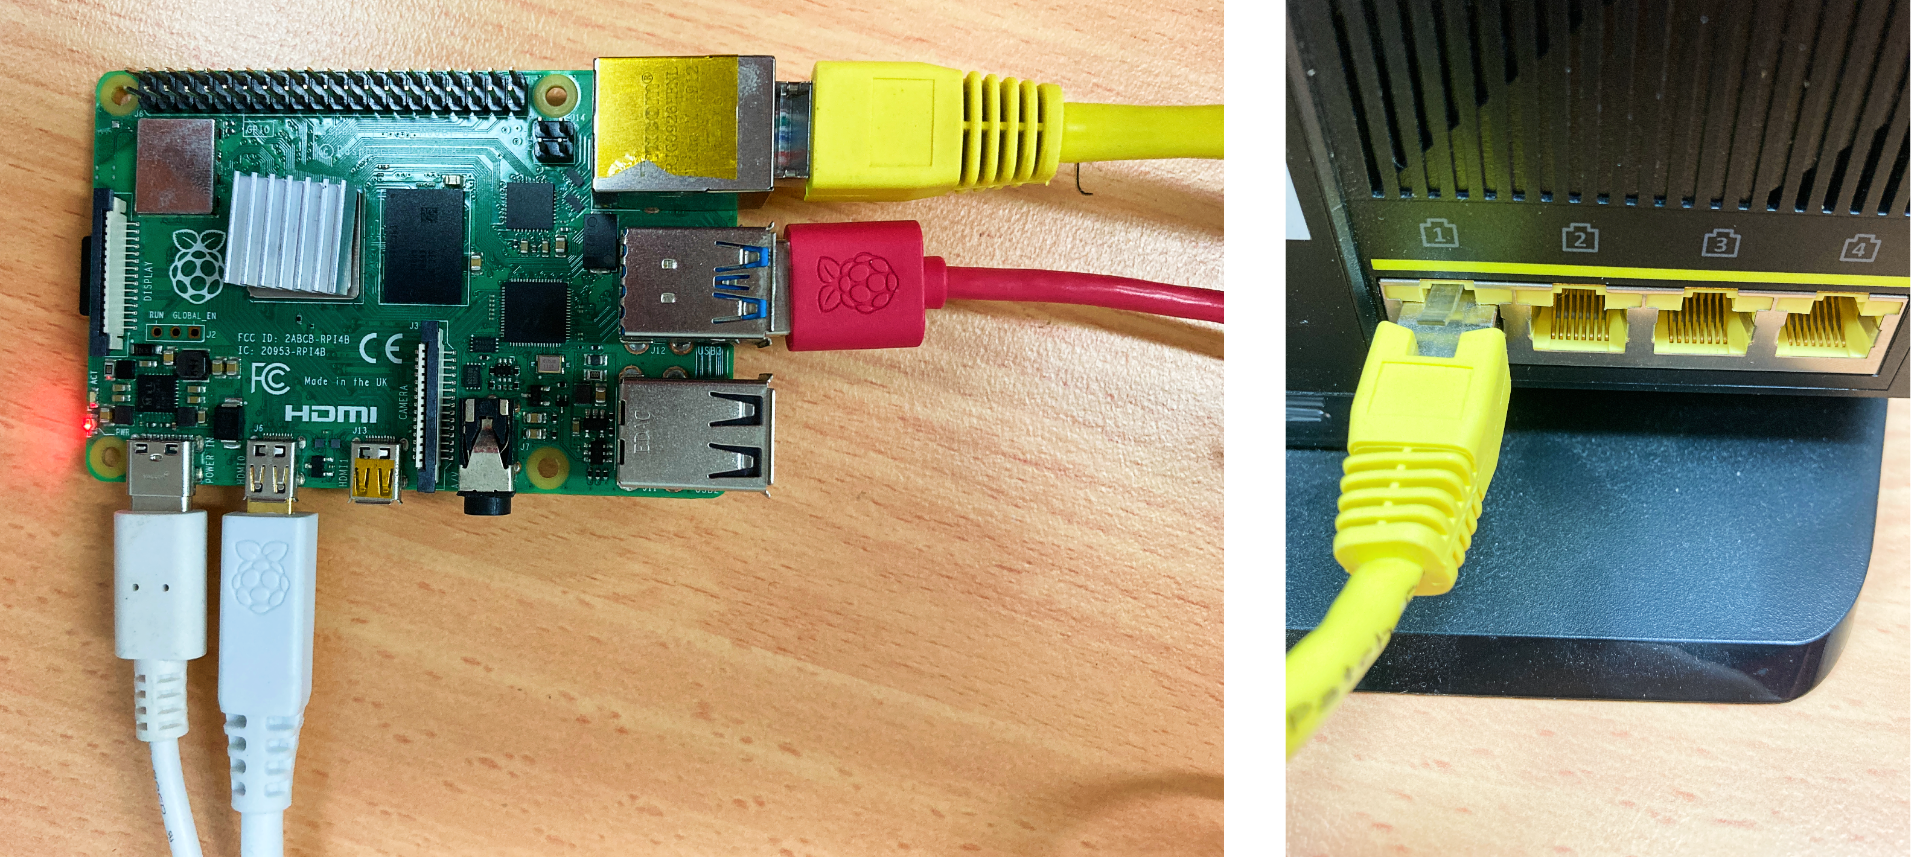
This guide will assume you know how to flash Raspberry Pi OS onto a new Micro-SD Card, check this guide if you need to know how to do this. Thus with the intention of setting up our Raspberry Pi as a desktop computer, insert a micro-SD card flashed with Raspberry Pi OS. Then add a mouse, keyboard, and HDMI out to a monitor. This is also a great time to add a little heatsink to the main CPU Integrated Circuit of your Raspberry Pi Board. Connect up the Ethernet cable to go from the Raspberry Pi Ethernet connector straight into one of your Wi-Fi Router/Modem Connectors. Then power up the Raspberry Pi System by plugging in a USB-C connector (Side note: if your Router/Modem has USB ports you can power your Pi-Hole System utilising one of those instead of the USB-C Powersupply). See the completed PiHole hardware setup below as well as the location where I connected the Ethernet Cable to the Modem/Router.
Software Build
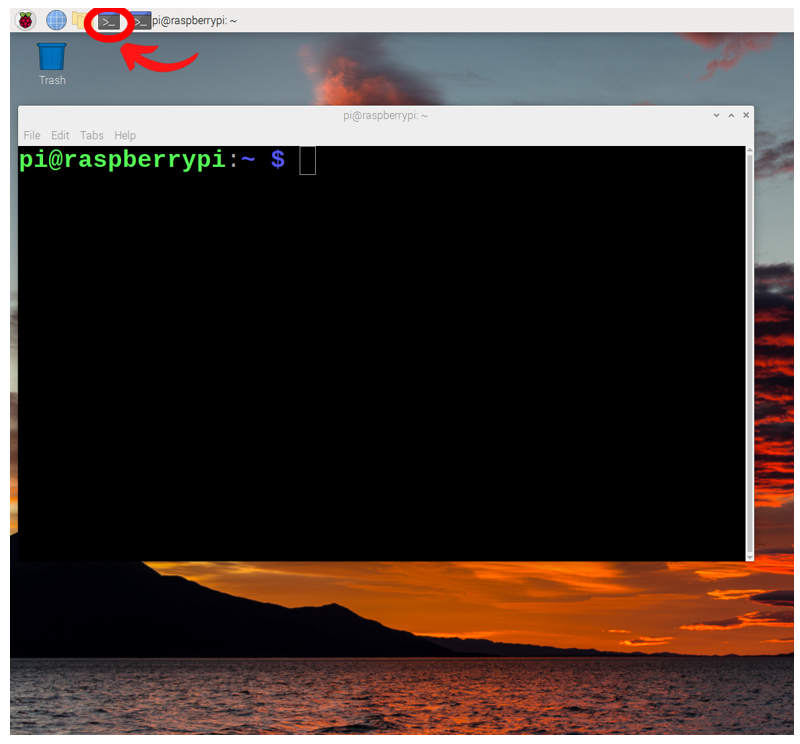
Some packages will need to be installed on your fresh version of Raspberry Pi OS. This will allow the correct operation of our Pi-Hole System. With the power into the system and the (new) first boot-up wizard complete, you will be welcomed by the Raspberry Pi Desktop. Open a new terminal window by pressing the black button on the top left of the screen. This will open up a terminal window. See the image below of this happening and a big red arrow pointing towards the terminal button that was pressed.
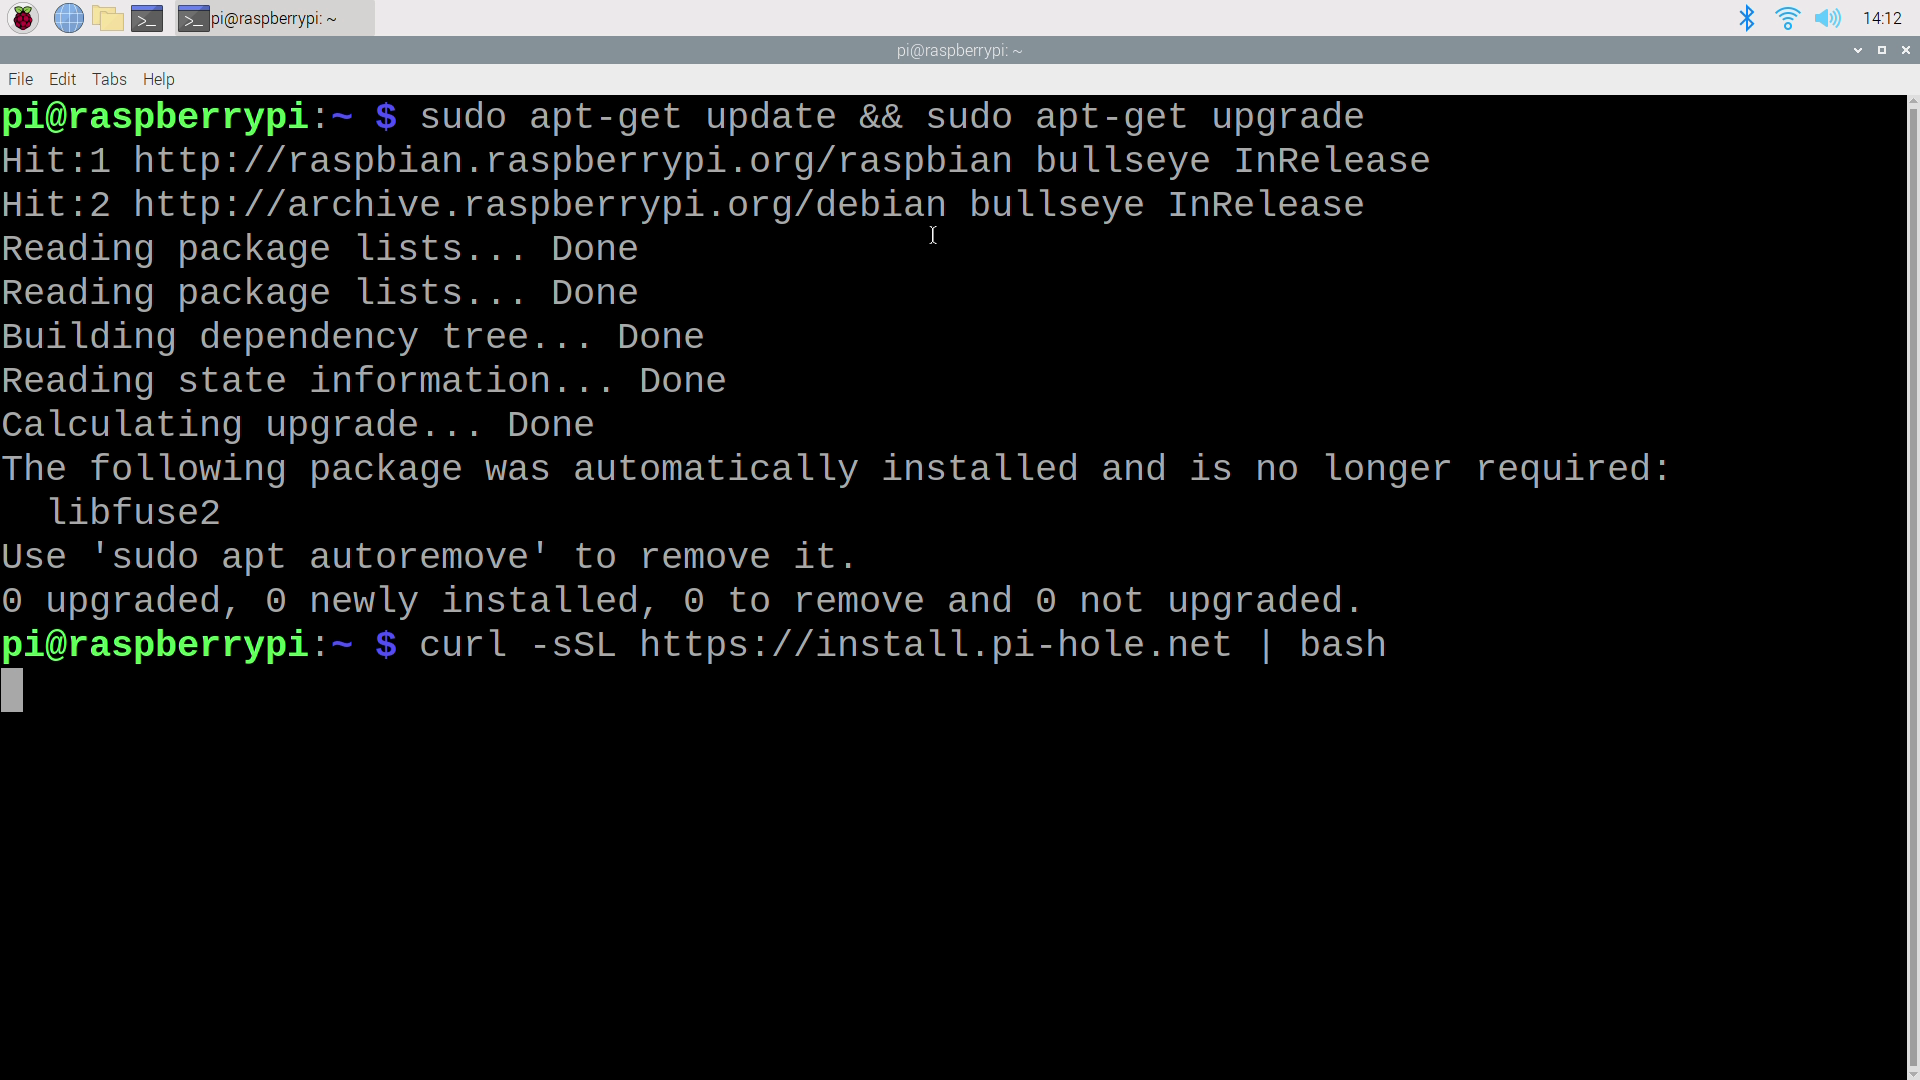
This terminal window will enable us to download from the internet the exact packages we require. So now type and enter the following lines into the terminal to get all the packages that you will need. If prompted, type and enter | Y | to continue/confirm installations. See further below an image of one of these commands being downloaded and requesting this confirmation.
sudo apt-get update && sudo apt-get upgrade
curl -sSL https://install.pi-hole.net | bash
The Pi-Hole software will now be on your hardware and it is time for it to run through a Quick Installation Wizard. This will automatically start once the above terminal commands are completed. See the entirety of the install wizard, starting top left and finishing bottom right in the image below. At no point during this wizard have I touched or done anything to my Modem/Router. This section is solely focused on getting the Pi-Hole software onto our Raspberry Pi Single Board Computer. I've numbered each step from first to last and have provided extra information when required. The curser/highlighted part in the pictures below is always on the step that I have pressed | Enter | on and can be moved around with the Arrow Keys. To be clear, | Eth0 | is Ethernet / Tethered Connection, and | Wlan0 | is Wireless Local Area Connection (LAN). Ethernet connection directly to your Modem/Router is best. Also, Upstream DNS Providers can always be changed at a later date, along with adding/changing the Third Party Block Lists as demonstrated later in the guide. If you are prompted to select which protocols you wish to use select both | IPv4 | and | IPv6 | and hit OK. That will provide us with a custom DNS server for both protocols. If your Modem/Router is older this option may not pop up and is nothing to be concerned about.
Two things to note at the Installation Complete section of the wizard it will provide IP Addresses and a Password to Access the Pi-Hole Web Interface. Make sure to write these down as we will need them in the very next step and to correctly set up the Modem/Router. Right-click the below image and select | Open image in new tab | if you want to zoom in closer to the process.

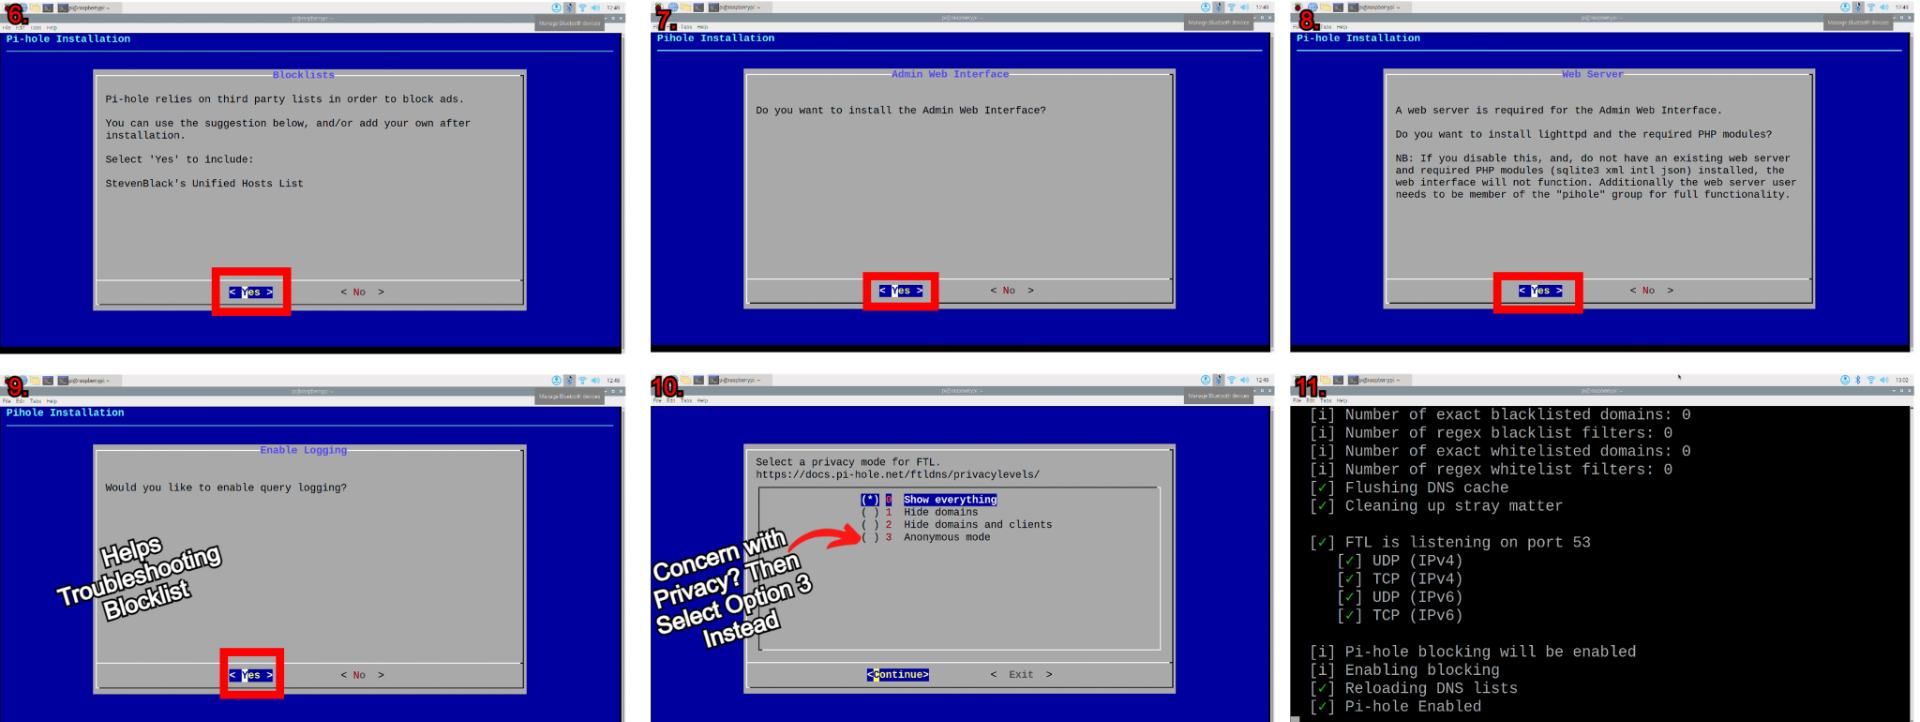

Having done all of this you will now be able to access the Web Interface of your Raspberry Pi Pi-Hole System as you can see occurring in the last three frames of the above image. From any locally connected device you will be able to access this Web Interface. Just type in the provided IP Address followed by | /admin | into the URL of any internet browser. In my case I typed | http://192.168.1.188/admin |. It will then request the Pi-Hole Password to access the Web Interface. If you want to change your unique default Pi-Hole password type and enter into a new Terminal window the following | pihole -a -p |. It will then prompt for a new password, if none is provided the password required to access the Web Interface will be removed.
If you want to make big changes remotely turning on SSH in the Raspberry Pi Configuration at this point would be a great idea. If you are going to install your Pi-Hole in a place that is hard to access/not near a monitor then doing this is a necessity.
Modem/Router Set Up
The goal here is to lock your Raspberry Pi's IP address so that way if it or the Router/Modem ever drops out (be it from a blackout or tsunami) it will come back alive and connect to your Raspberry Pi Single Board Computer with the correct IP Address (the same one that the Pi-Hole Software has set). Otherwise, there is a chance that when the Raspberry Pi Reboot it will be assigned with a new IP Address which would not allow for the correct functioning of our system. We will also change the DNS server in your Modem/Router to steer data flow toward the Pi-hole.
Everyone has a different Router/Modem and different Routers/Modems have different settings menus. Nevertheless, this process must happen for a correctly functioning and resilient Pi-Hole System. So check online and your Modem/Router manual to lock the automatic configuration used on IP Networks for your Pi-Hole. The image below shows the Modem/Router I am using, the ASUS AC1900, as well as the Ethernet Connection that goes to the Raspberry Pi 4 Model B which is directly connected to the Router/Modem through an Ethernet Cord (CAT 6).
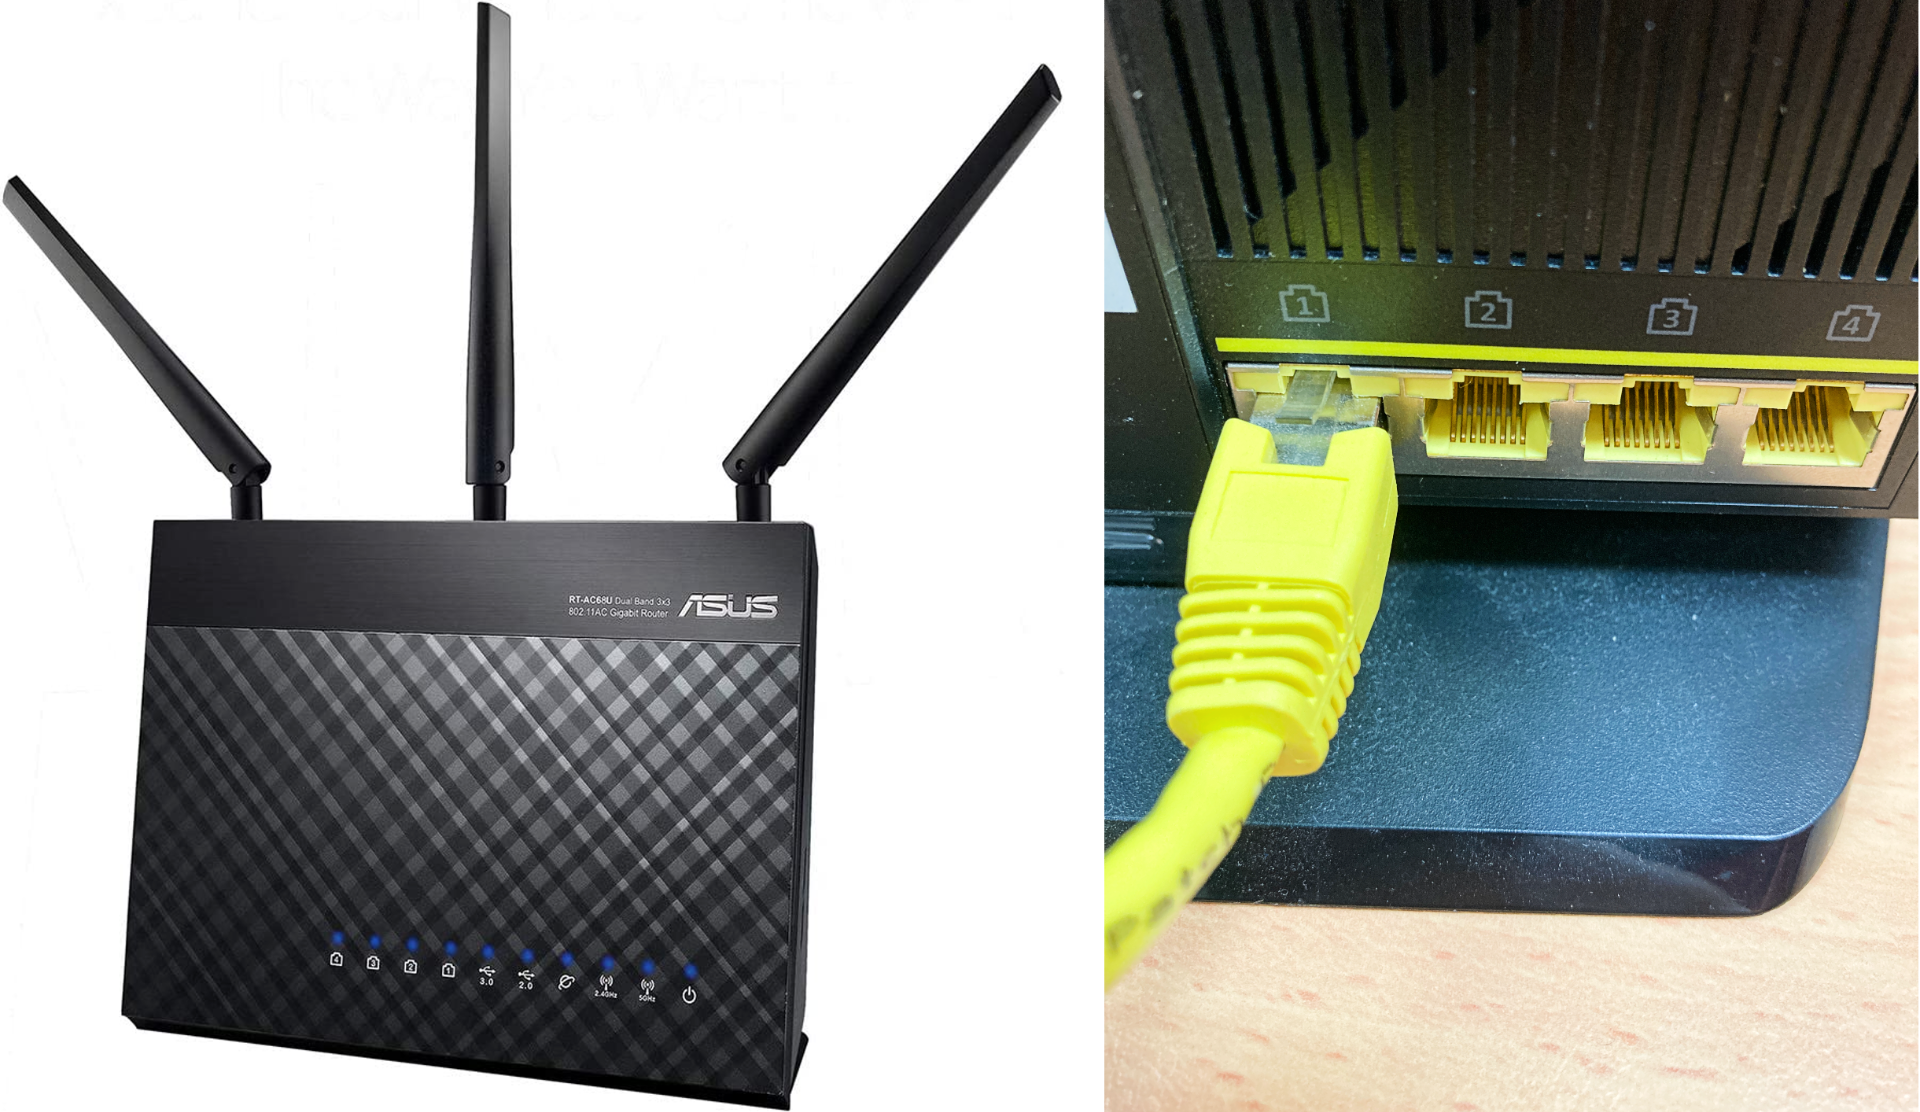
Access the Modem/Router Setting Menu by typing it's IP Address (which can be found on the physical Modem/Router) into the URL of a locally connected Web-browser. Below is the ASUS Router/Modem Setting Menu I have. The Below left image below shows what you see once you have typed in the Modem/Routers Username and Password. The bottom right image shows the location to add a Manually Assigned IP address to my Pi-Hole Computer. This will lock the IP address of our Pi-Hole System once you click Apply. Next, we will change the DNS server in your Modem/Router to steer it toward the Pi-hole. We can do this by defining Pi-hole's IP address as the only DNS entry in the router/modem. There are different ways of achieving this depending on the Modem/Router, check this FAQ here for some help on this.

Now it is not feasible for me to demonstrate how to do this for every possible Modem/Router. If you are having issues with a speedy Google Web Search along the lines of | How do I assign a static IP address to a device connected to my SPECIFIC Router/Modem? |. This will provide step-by-step instructions specific to your hardware.
Demonstration
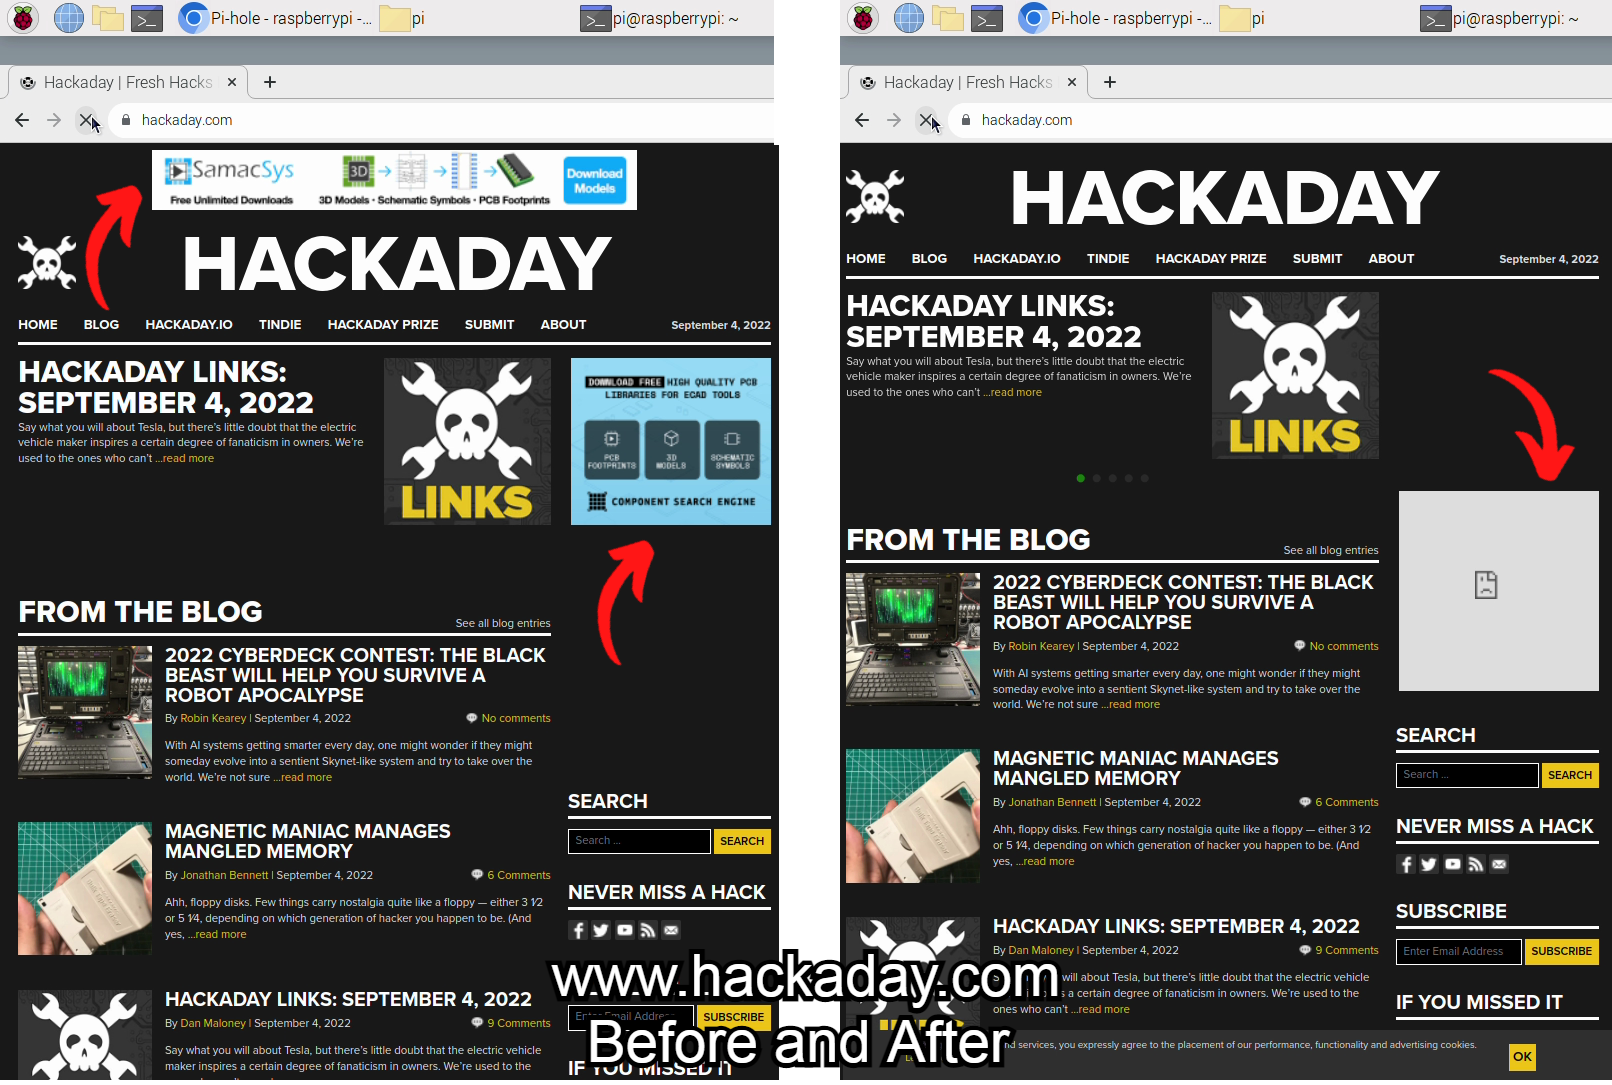
We can see this system working simply by jumping onto a favorite website that before had some sneaky ads). Below shows an image of Hakaday before and after the Pi-Hole system has been active. As you can see the very top banner is missing as well as the ads on the side, the rest of the website has been formatted correctly.
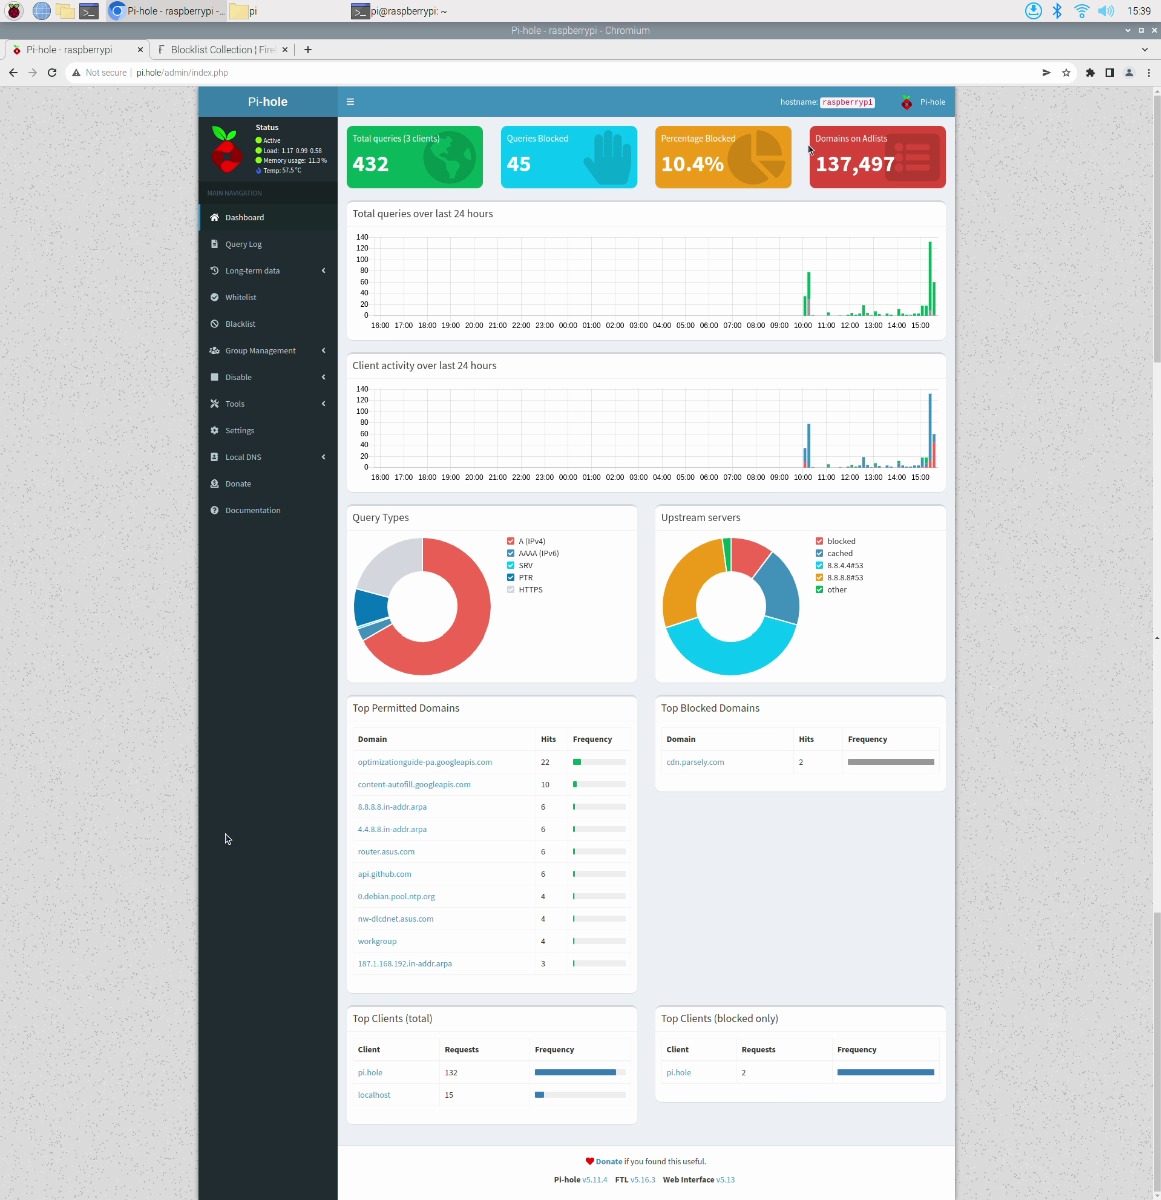
Below shows off the Pi-Hole Website UI that you can access on any locally connected device by typing the IP address of your Pi-Hole Raspberry Pi System followed by | /admin | into the URL section of any internet browser. In my case I typed | http://192.168.1.188/admin |. See this in the image below. Here you can have an overview of your entire system as well as see the leaderboards for the top blocked domains. Also, be aware you can go into the | Settings | and update the Style section to have a Star Trek Theme. If you are a fan you gotta switch it on, it might just make your day.
Adding to the Block List
The default blocklist is well maintained and provides good blocking functionality without breaking normal functionality. For some, it might be enough, but users often find they want to add their own custom lists for enhanced blocking capabilities. Furthermore, Advertisers and Ad-blocking hardware/software are always engaged in a game of cat and mouse. You want to be the Cat in this equation.
There are two ways you can do this. Either by adding in new entries one-by-one or by adding blocklists. One-by-one is much too slow so I'll show you the better way. A fantastic website that offers great 3rd Party Verified Block Lists is FireBog, see the homepage in the image below. This website offers huge collections of Block Lists organised into categories. These are: Suspicious Lists (for blocking potential phishing websites), Advertising Lists, Tracking & Telemetry Lists (for wrenching back personal privacy when using the web), Malicious Lists (for blocking Malware websites) and Other Lists (for preventing background coin mining or prevent websites that are not for the eyes of children). Lists that are highlighted in green are confirmed 3rd Party Verified and are least likely to interfere with general browsing. Lists that are blue are deemed generally safe and lists with a strike through them are not recommended.

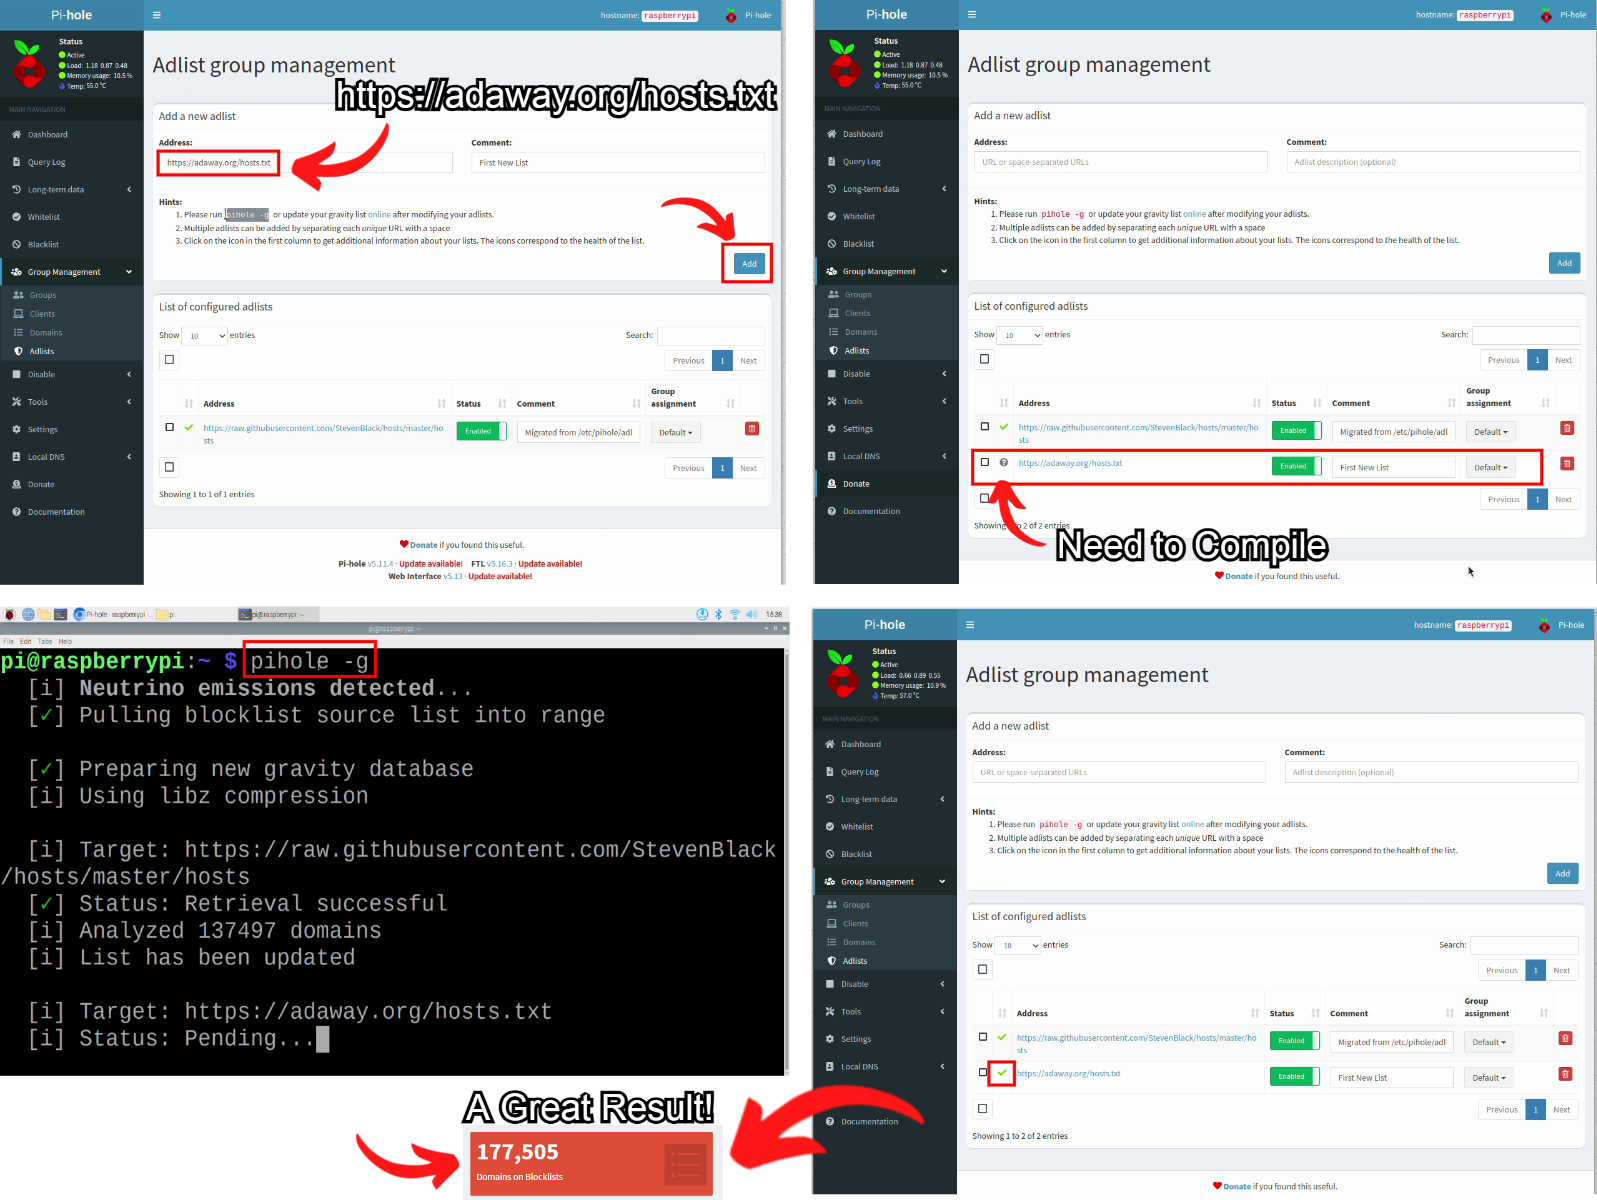
Now, let's jump into the Website User Interface and click on | Group Management | and then | Adlists | from the drop-down Menu. Now we will identify our new desired Blocklist from Firebog, in my case I choose the | https://adaway.org/hosts.txt | blocklist found under the Advertising List. Simply copy and paste that URL into the | Address: | Input Textbox, feel free to add some comments in the adjacent | Comment: | Input Textbox to make it easier for you to remember it at a later date, and simply press the | Add | button. Then open up a new terminal window, then type and enter the following | pihole -g |. This will compile all the new blocked items into our Pi-Hole system. All of this you can see in the annotated image below. If you now go back to the Pi-Hole Home page you will see a higher value of the | Domains on Blocklist | Counter.
If you select Query Log, you will receive a nearly real-time update on which domains are being accessed and by what device on the network. You won't have access to this if you chose Anonymous mode during the installation. This page will allow you to see the pull requests. Green means the connection was allowed and the Pi-hole successfully requested the DNS from the DNS server. Red means the requested domain was blacklisted and the Pi-hole returned an address of | 0.0.0.0 | and no data. You can use this Query Log to help find the domains to block if you find an ad sneaking past and hitting your retinas. For example, let's say you are viewing a News page and an advert starts playing. You can then sleuth through the Query Log and see exactly which domains were accessed at that time and then blacklist the ad serving domains by clicking on the | Blacklist | button on the right, thus adding it to the list.

Troubleshooting Section
Scenario 1. When you try to access the web nothing loads up
Your Raspberry Pi Single board computer is likely turned off. If your Pi-Hole System goes down there won't be able DNS pathways for the requests to get to the internet. The solution is to ensure your Pi-Hole system has constant power.
Scenario 2. When you open a webpage something appears wrong this is the workflow to fix it.
1. Disable for 30 Secs Pi-Hole (able to be done from the Webpage UI)
2. Refresh Webpage
3. Go to Query Logs
4. Compare and contrast Logs of Webpage to when Pi-Hole is ON/OFF
5. Identify the missing piece and add it to the Whitelist.
Scenario 3. When you reboot Pi-Hole System and you cannot access the Internet.
When Pi-Hole is down, nothing on the network can resolve DNS names. So If the DNS is down and you can't resolve any domain names double-check that your Raspberry Pi System has power. If it does your problem is likely due to not having Fixed the Pi-Hole IP address. If you have not done this when the system reboots itself (say due to a blackout) your Raspberry Pi System can get allocated a new one by your Router/Modem and now finds itself with a different IP address. As this is not the same as we configured in our Modem/Router the system then cannot run properly. The solution is to lock down the Pi-Hole IP Address in your Router/Modem Settings as described above.

