Sometimes a good Raspberry Pi project needs to be in a place that just hard to reach. The Raspberry Pi 3 Model A+ has a small form factor and is well suited for being tucked away inside a box, ceiling, or wherever your project demands. It's not practical to drag out a monitor, keyboard and mouse every time you want to make a little change, so let's do it remotely. The idea is that you can still access your Pi's terminal interface over your network using a protocol called SSH.
All we need to do is get our Pi set up with the right WiFi credentials and we'll be able to remotely access it through a terminal program as if we were using the terminal Pi's own desktop.
You will need:
- A Raspberry Pi 3A+ or other WIFI capable Raspberry Pi
- A micro SD card with Raspbian installed
- A power supply for your Pi; we recommend the Raspberry Pi Official Power Supply.
- A computer connected to the same network as the Raspberry Pi you wish to connect to.
- PuTTY, a free SSH program for Windows. If you're on OSx or Linux, you can already SSH from your terminal.
Connect to WIFI
Set up your Raspberry Pi 3A+ with a monitor, keyboard and mouse. Don't worry, we won't need these later on, we are just using it to connect our Raspberry Pi to Wifi. Connect to your WIFI network using the GUI (the desktop).
Enable SSH
By default, the current version of Raspbian has SSH disabled. We're going to enable now from the desktop:
- Launch Raspberry Pi Configuration from the Preferences menu
- Change the Host Name to something unique
- Navigate to the Interfaces tab
- Select Enabled next to SSH
- Click OK
- Reboot your Raspberry Pi
Connect
To connect to the Raspberry Pi 3 A+ we will need to use a device on the same network, and we will need to know the Host Name or IP address of the Raspberry Pi.
To find the IP address of your pi. Simply open the terminal and enter sudo ifconfig
Next to the wlan0 entry, you will see inet addr: 192.168.x.xx, This is the IP address of your Raspberry Pi 3A+. We will use this in the next step.
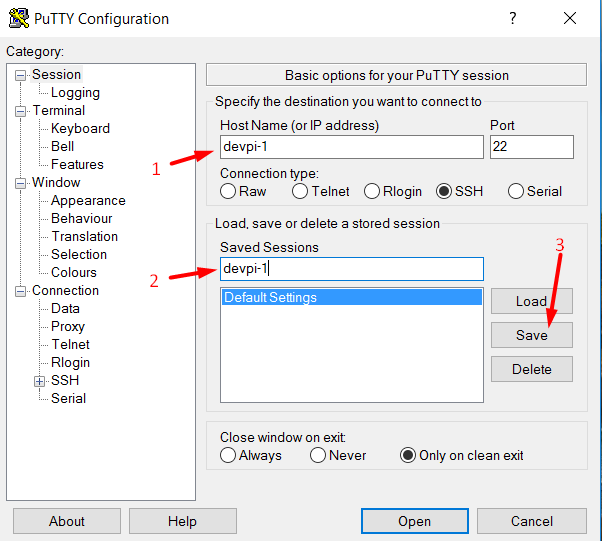
On your computer, open up PuTTY. In the Host Name (or IP address) field enter the Host Name (or IP address) of the Raspberry Pi. Once a connection is established, you'll be prompted by PuTTY to accept the connection to the new machine. You should see a black terminal prompting for a login. If you haven't changed your username and password, enter the default username: pi and the default password: raspberry
If you get an error saying the host does not exist, try the troubleshooting steps.


It's not a clever idea to leave everything at their defaults - for instance, everybody knows the default username and password for Raspbian. What's more, if you want to deploy another Pi onto your network, it'll have the same default host name as your first one. How will you know which Pi you're connecting to? This is a good opportunity to run sudo raspi-config and at least change the host name. Once you've saved these changes and rebooted your Pi, save the SSH details within PuTTY - enter the new host name (or IP address) in the Host Name field and in the Saved Sessions field and click Save. Now you can quickly connect to your Pi, and keep track of multiple Pis from within PuTTY.
Here I changed the host name of my Pi to devpi-1, so I'm creating a PuTTY session to reflect that.
SSH Troubleshooting
If PuTTY tells you that the host does not exist, and your Pi is powered and the WiFi configured correctly:
- Make sure you don't have any other Raspberry Pis on your network with the hostname raspberrypi.
- Try connecting to raspberrypi.local
- If the previous step doesn't work for you, proceed with the following.
- Windows: open command prompt as an administrator:
-
- Windows 10: press Windows-Key + X to bring up the power-user menu. Select Command Prompt (Admin)
- Earlier versions: Start > accessories > Command Prompt (Admin)
- Execute the command ipconfig /flushdns
Going Further
This tutorial demonstrates a simple way to get started with SSH using the Raspberry Pi 3 Model A+, but it will work with any model Raspberry Pi! If you want to connect remotely to a completely headless Raspberry Pi (no keyboard, mouse, display), then check out our How To Setup Raspberry Pi Zero W Headless WiFi Tutorial. Don't forget that we have tons of Raspberry Pi Tutorials and a Raspberry Pi Online Course to help you get your projects off the ground!

