
MikroElektronika Speakup Click
Retired Product
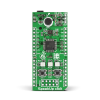
Search for an alternativeThe SpeakUp is a speech recognition click board. You can set it up to recognize over 200 different voice commands and have the on-board MCU carry them out instantly.Using a simple interface on your computer, you record a word or phrase (up to 2 seconds) and assign it an instruction. Repeat for as many commands as you need.When you put it to work, it listens to what you're saying, matches the sound to one of the pre-recorded commands, and triggers the specified action which the on-board MCU executes.
Specifications
- Type: Speech recognition,Audio
- Applications: Voice controlled robots, home automation devices or any human-machine interface
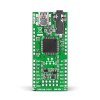
- On-board modules: On-board microphone, VS1053 IC with a built in stereo-audio codec, STM32F415RG MCU
- Key Features: STANDALONE MODE: On-board MCU directly controls external devices using 12 user programmable GPIOs CLICK MODE: Sends index of the matched voice command to a selectable interface: USB or UART
- Key Benefits: Along with its key components, the tiny click board packs other useful bits like two buttons for recording or deleting voice commands manually, three signal LEDs give recognition feedback and indicate power.
- Interface: SPI,PWM,UART,I2C
- Input Voltage: 3.3V
- Compatibility: mikroBUS
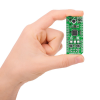
- Click board size: L (57.15 x 25.4 mm)
SpeakUp click and Speakup 2 click are speaker dependent speech recognition click boards with standalone capabilities. They work by matching sounds with pre-recorded commands. The full-featured version (SpeakUp) is powered by an STM32F415RG MCU, has an additional MP3 codec chip, and a connector for an external microphone. The simplified version (SpeakUp 2) is powered by an FT900 32-bit MCU. Both boards are programmed using a dedicated software tool for easy configuration.
This guide uses the original SpeakUp as a reference, but all instruction apply to SpeakUp 2 as well.
Applications
Wouldn't you rather issue verbal commands and have your machines comply, instead of pressing keys, pushing buttons and flipping switches all the time? There's a wide range of applications for the SpeakUp.
Command your lights, doors and home appliances.
Create voice commanded remotes for TVs or media centers.
Reduce complexity and cost of control interfaces.
When doing something with both hands and voice command is the only option.
SpeakUp Firwmware
Algorithm
What gives the SpeakUp its speech recognition capabilities is the firmware we developed for the on-board MCU. It’s based on the DTW algorithm, which makes it decisive, it turns your talk into action almost instantly
The main goal of a speech recognition system is to substitute a human listener, although it is very difficult for an artificial system to achieve the flexibility offered by human ear and human brain. The work principle of speech recognition systems is roughly based on the comparison of input data to prerecorded patterns. These patterns can be arranged in the form of phoneme or word. By this comparison, the pattern to which the input data is most similar is accepted as the symbolic representation of the data. It is very difficult to compare raw speech signals directly. Because the intensity of speech signals can vary significantly, a preprocessing on the signals is necessary. This preprocessing is called Feature Extraction.
First, short time feature vectors are obtained from the input speech data, and then these vectors are compared to the patterns classified prior to comparison. The feature vectors extracted from speech signal are required to best represent the speech data, to be in size that can be processed efficiently, and to have distinct characteristics.
The SpeakUp Firmware uses Dynamic Time Warping (DTW) algorithm - word-based, isolated word, speaker dependent and template matching algorithm:
- In the word based speech recognition the smallest recognition unit is a word
- In the isolated word recognition, words that are uttered with short pauses are recognized,
- Speaker dependent reference patterns are constructed for a single speaker,
- Template matching algorithm is a form of pattern recognition. It represents speech data as sets of feature/parameter vectors called templates. Each word or phrase in an application is stored as a separate template. The input speech is then compared with stored templates and the stored template most closely matching the incoming speech pattern is identified as the input word or phrase.
Configuration Through Software
The SpeakUp software configuration tool is a free PC application for configuring the SpeakUp click board. With it, you can configure the board to recognize over 200 different voice commands and have the on-board MCU carry them out instantly. You can download the software from the following link: The software is designed with ease of use and simplicity in mind. The UI is based on tabs and drop-down menus requiring no programming skills to use. Still, it has all the essential features and options that give you full control of the set-up process.
Typical Workflow
Connect the SpeakUp click board to the computer via the USB cable. It will be recognized as a USB Human Interface Device (HID) in the Device Manager of the Control Panel.
Once you connect the SpeakUp to your computer you’re just a few clicks away from configuring it. The set-up process is dead simple. Launch the application, and it will lead you through the initial steps of recording and assigning commands.
Ambient noise detection
After the successful connection, the SpeakUp click™ board will perform ambient noise detection and calibrate itself. The process lasts about 10 seconds. It’s done when the red signal LED turns off. After that the board is ready for recording voice commands. You can set custom calibration parameters for any subsequent usage in the Project Setting
Creating a new project
To create a new project, press the Create New Project button from the main toolbar of the SpeakUp software.
A new window will open, where you can enter your project’s name and destination folder (if the destination folder doesn’t exist, the software will prompt you to create it). To finish project creation after inputting the required information, press the Create button.
Alternatively, you can choose to open the settings menu as soon as you create a project, by checking the appropriate box
New Voice Command
Configuring Project Settings
In the General Settings you can configure the SpeakUp’s functionality
Acceptance threshold: This is the parameter you should adjust to define how closely your delivery has to match your pre-recorded command. At lower values, you’ll have to deliver the command precisely the way you recorded it. At higher values the matching doesn’t have to be so precise, but this increases the probability that the SpeakUp will pick up irrelevant speech and interpret it as a command. You should be able to reach the sweet spot value through some trial & error.
Recording timeout: Timeframe in which the SpeakUp click board expects recording input after the record button is being pressed. User can choose between 5, 10 and 15 seconds timeframes.
Word Length: Length of the voice command being recorded, in seconds. Can be 1, 1.5, 2, 2.5 and 3 seconds To configure project settings, press the Open Settings Window button and the Settings window will open.
Noise level: Minimal sound volume level that can trigger a voice command recognition. Lower values require quieter pronunciation, resulting in higher noise/hiss sensitivity. On the contrary, higher level values require louder pronounciation and they are less sensitive to noise/hiss.
MikroElektronika recommends that you keep auto detection enabled. That way the SpeakUp Click board will measure the noise level, and perform noise calibration automatically. Auto detection can last a bit longer, usually around 10 seconds. Sudden changes in sound levels will lengthen the time of calibration and will result in improper sound level values.
Notify master: Notifies the master (MCU or PC) when the voice command is recognized by sending a 16-bit index number of voice command via chosen communication interface (UART or USB).
Data rate: Sets the speed used for sending data to the master (MCU or PC)
Pin Aliases And Initial Pin States
In this section, you can rename GPIO pins according to your needs and set their starting conditions. The new GPIO pin aliases will be applied in the main window too. Set the corresponding initial GPIO pin state in the Initial Pin States section. Condition can be either low (logical 0) or high (logical 1).
Assigning An Action
When a new command is recorded, it is time to assign it an action. The action will be performed when the voice command is recognized. Also, a 16-bit index number of the voice command will be sent via chosen communication interface (UART or USB).
There are five types of action that can be assigned:
NONE: When this option is selected, no action will be performed on the corresponding GPIO pin upon voice command matching.
ON: When this option is selected, a corresponding GPIO pin will be set to logical high state upon voice command matching.
OFF: When this option is selected, a corresponding GPIO pin will be set to logical low state upon voice command matching.
TOGGLE: When this option is selected, a corresponding GPIO pin state will be toggled upon voice command matching.
PULSE: When this option is selected, a train of pulses will be sent to the corresponding GPIO pin upon voice command matching.
Pulse parameters
The pulse parameters can be set in the Pulse Parameters window (click on the Edit pulse parameters icon Edit pulse parameters to open it):
A period (T) is the time it takes for a signal to complete a single cycle (sum of the high state and low state time periods).
Duty ratio (D) is the percentage of T in which a signal is active, i.e. ratio of the high state period and a complete period.
N is the number of times the pulse is repeated. Thus, a 60% duty cycle means the signal is ON 60% of the time period but OFF 40% of the time period.
Uploading Project
300px
When you’re finished recording and configuring voice commands, it is time to upload the project to the SpeakUp click™ board. This is done via the Upload Project button. You can monitor the upload process in the Toolbar. After it’s done, an appropriate message will be displayed in the Status Bar.
Exporting Constants
Each recorded voice command is given an index number which is sent to the host MCU. You can export voice command names and their indexes as constants. The exported document will be in the form of a source file (in any of the three languages), as shown below.
1 /*2 This file is generated by SpeakUp Software.
3 It containts voice commands constants.
4 Creation date: 4/3/2014 Creation time: 11:20:09 AM
5 Name: Turn ON Program A Index: 0 Length: 0.0 s
6 Description: Turns on Program A
7 */
8 const VCMD_TURN_ON_PROGRAM_A = 0;
9 /*
10 Name: Turn ON program B Index: 1 Length: 0.0 s
11 Description: Turns on Program A
12 */
13 const VCMD_TURN_ON_PROGRAM_B = 1;
Direct Configuration
You can perform some basic configuration directly on the SpeakUp without using the software. Different combinations of button presses will allow you to record, re-record or erase commands. You’ll get feedback from the on-board LEDs. However you won’t be able to assign specific actions with this method.
Onboard push buttons
Push-button 1 - To record your voice command, press and hold the button while speaking. You must stay within the time limit for each command (default settings: 1 second). You can also record multiple commands at once by pronouncing them one by one while keeping the button pressed. Just make sure to wait for the red LED to flash between pronouncing subsequent commands. Proceed in this way for as many commands as you need. Each command will be assigned a unique index.
Push-button 2 - If you press it for more than 2 seconds, all recorded voice commands will be erased. If both push-buttons are pressed for more than 2 seconds, the SpeakUp click board will reset.
Two indicator LEDs provide the following signals:
Amber LED - the board is ready for recording or listening.
Red LED - the board is perfoming an operation.
When the voice command is recognized, both LEDs are lit for a half a second.
Standalone default settings
- Acceptance Threshold: 15
- Recording Timeout: 5s
- Word Length: 1s
- Noise Level: Auto
- Notify Master: USB
Recording Tips
For better recording results, it is necessary to provide conditions with lowest amounts of ambient noise and speaker distance from the microphone in the range from 10 to 20cm. If there are problems with the voice command detection, please record it several times due to the pronunciation diversity. It is mandatory to play back the recorded voice command in order to hear if some ambient noise was recorded also. Because of this, it is recommended that the SpeakUp click™ board is placed on a surface that doesn’t transfer mechanical vibrations. This is a speaker dependent system. If there are more users, each person should record voice commands separately, due to the pronunciation diversity. Number of voice commands that can be recorded depend on their lengths, typically more than 200 (or 100 for SpeakUp 2) for the voice command length of 1 second. Please keep in mind that the recording is performed by the SpeakUp click board™, not the computer, so there is no need to connect an external microphone to the computer.
Exact shipping can be calculated on the view cart page (no login required).
Products that weigh more than 0.5 KG may cost more than what's shown (for example, test equipment, machines, >500mL liquids, etc).
We deliver Australia-wide with these options (depends on the final destination - you can get a quote on the view cart page):
- $3+ for Stamped Mail (typically 10+ business days, not tracked, only available on selected small items)
- $7+ for Standard Post (typically 6+ business days, tracked)
- $11+ for Express Post (typically 2+ business days, tracked)
- Pickup - Free! Only available to customers who live in the Newcastle region (must order online and only pickup after we email to notify you the order is ready). Orders placed after 2PM may not be ready until the following business day.
Non-metro addresses in WA, NT, SA & TAS can take 2+ days in addition to the above information.
Some batteries (such as LiPo) can't be shipped by Air. During checkout, Express Post and International Methods will not be an option if you have that type of battery in your shopping cart.
International Orders - the following rates are for New Zealand and will vary for other countries:
- $12+ for Pack and Track (3+ days, tracked)
- $16+ for Express International (2-5 days, tracked)
If you order lots of gear, the postage amount will increase based on the weight of your order.
Our physical address (here's a PDF which includes other key business details):
40 Aruma Place
Cardiff
NSW, 2285
Australia
Take a look at our customer service page if you have other questions such as "do we do purchase orders" (yes!) or "are prices GST inclusive" (yes they are!). We're here to help - get in touch with us to talk shop.
Have a product question? We're here to help!
Guides

The Maker Revolution
Projects

FlipperMate: Hands-Free Pinball
")
Raspberry Pi Cyberdeck (SDR Edition)

Pico-Dog Motion Activated Audio Alarm

Makers love reviews as much as you do, please follow this link to review the products you have purchased.
Product Comments