I’ve always wanted a compact, rugged, and portable computer that can withstand any environment thrown at it. I’m a huge fan of Raspberry Pi computers and stumbled across Jay Doscher’s awesome designs for fitting Raspberry Pis in Pelican cases of various sizes on his blog.
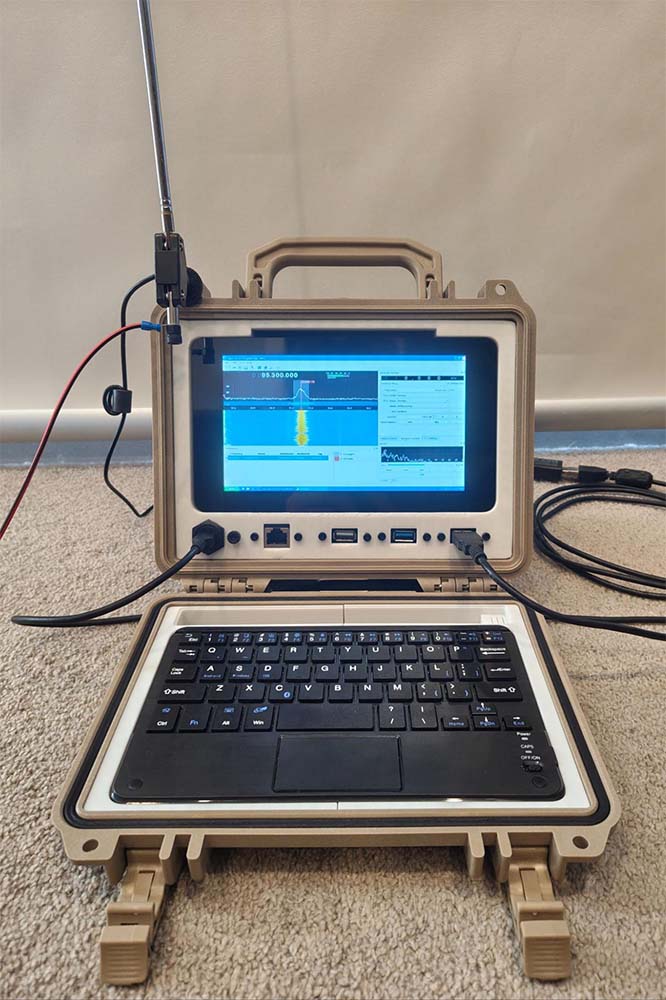
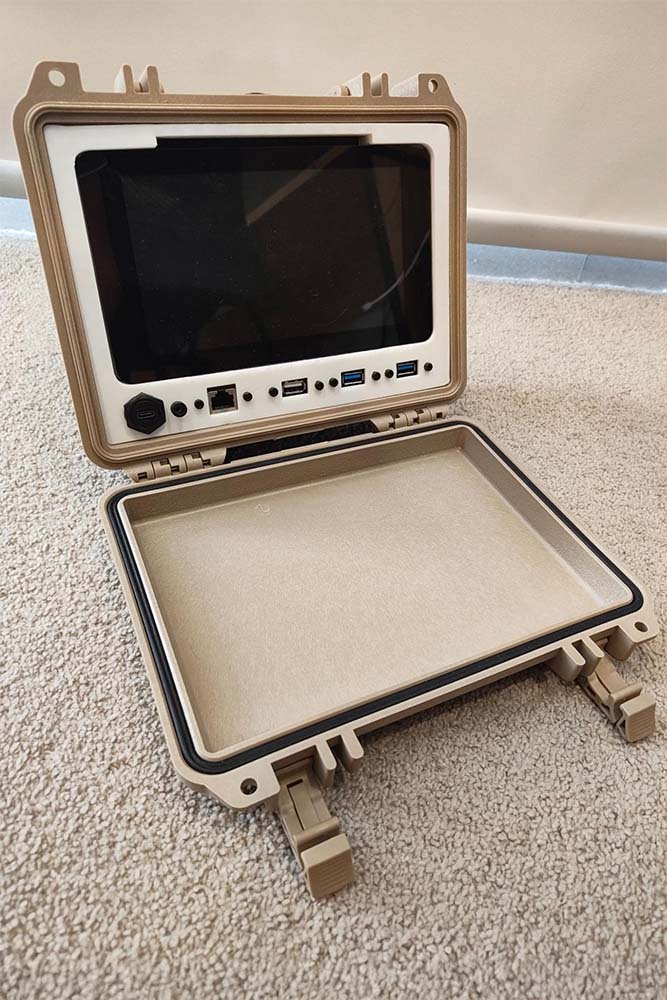
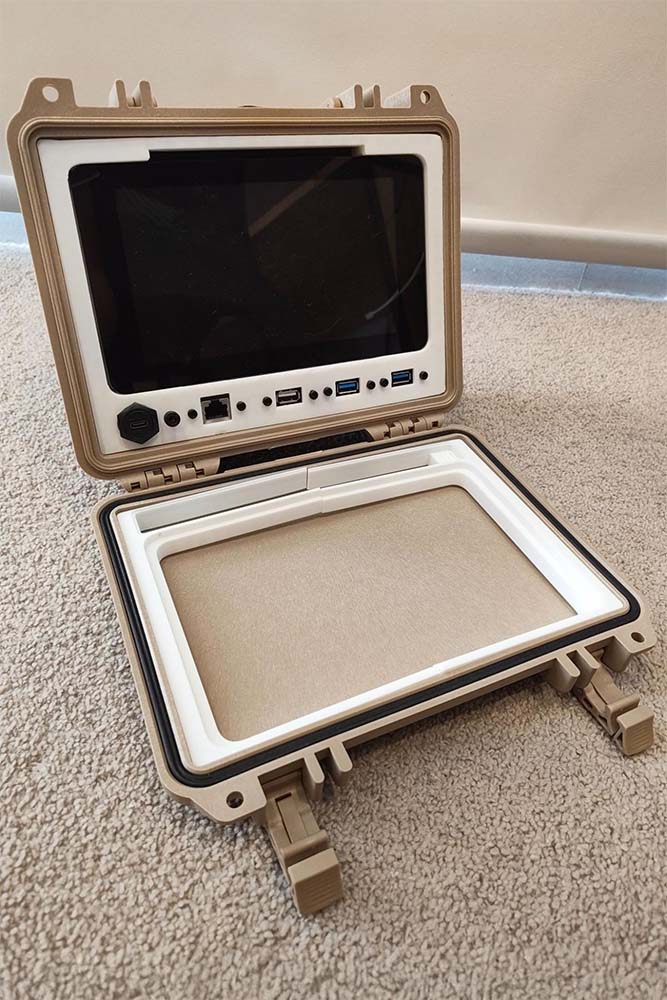
I settled on the simple Raspberry Pi Quick Kit, a 3d printed bracket/panel to mount USB ports, an ethernet port, a USB-C power delivery port, the Raspberry Pi itself, and a 7” touch screen within a Pelican 1150 hard case. I wanted to extend the use case of this computer to offer flexible support for SDR (Software Defined Radio) use out in the field - this is further explained below.
The computer can do anything a Raspberry Pi can do - except now it is portable and protected within the Pelican case as an all-in-one computing solution to be used in the great outdoors. For me, this will include utilising an SDR USB dongle to monitor the airwaves and, in particular, download weather satellite images directly from space! Some sample images of satellite downlinks I’ve received in the past are provided below.
These images and much more can be expected if you decide to get into the diverse hobby of amateur radio. What better than to have a purpose-built cyberdeck accompany you into the field!
Satelite Images Gallery

Slow Scan Television (SSTV) image I received directly from the International Space Station (ISS) as it transited across the sky above me.
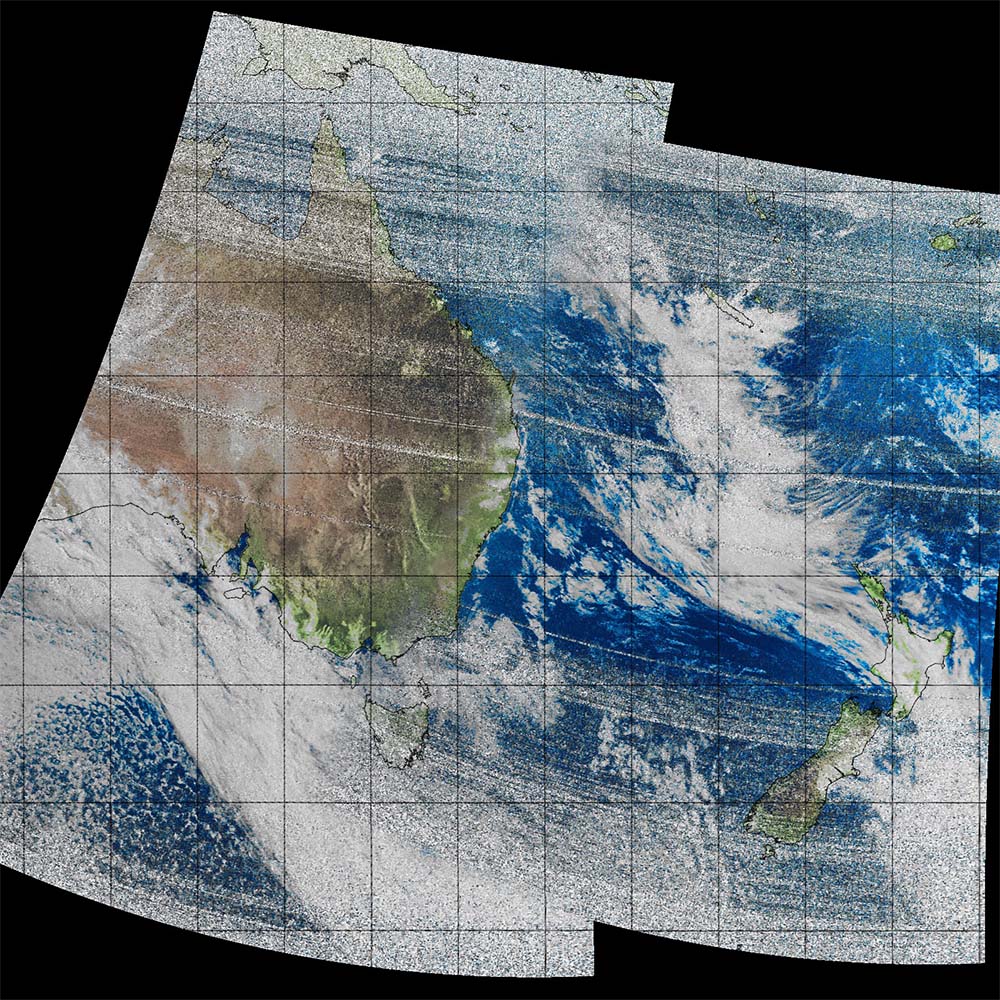
A composite image made from two separate NOAA weather satellite passes.
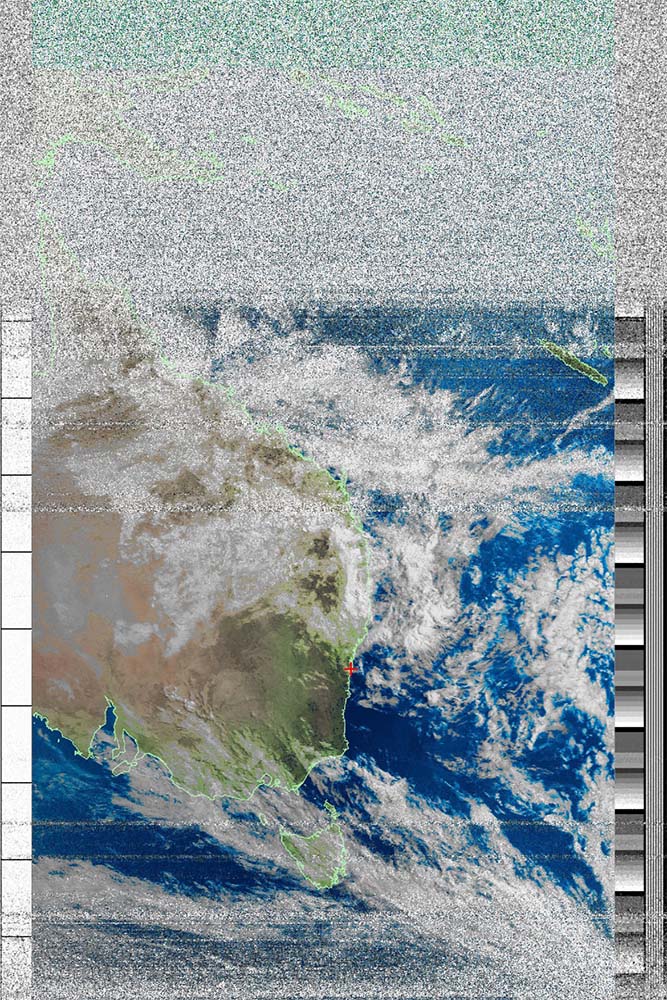
An image of the Earth below a NOAA weather satellite on its pass along a polar orbit.
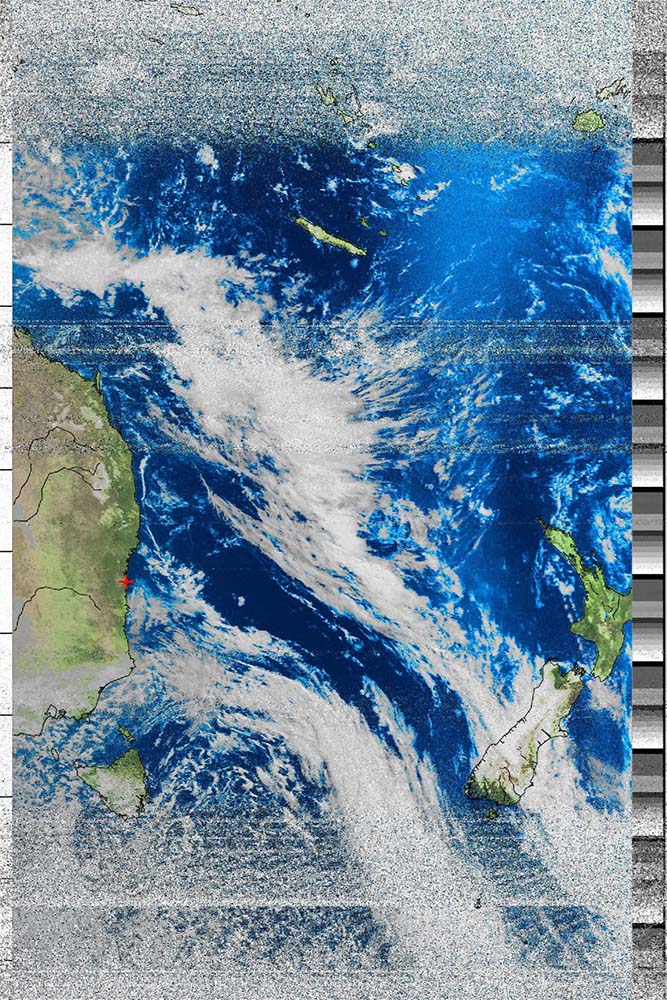
Another NOAA weather satellite image.
Build Guide
- Beginning with the Raspberry Pi of your choice (I’d recommend a Pi 4 in this case as a good balance between performance and ease of power delivery - with only an appetite for 3A, the Pi 4 is far more versatile than the Pi 5 who wants 5A and this will make powering your cyber deck far less cumbersome out in the field) flash the operating system of your choosing to the SD card (I chose Twister OS as it plays nice in this form factor and the variety of themes look fantastic, especially the XP theme).
- Download and print Jay Doscher’s excellent 3d models for fixing the Pi, I/O connectors, and screen neatly into the Pelican case. I used the latest revision (V2) in my build and simply printed with PLA (what I had at hand) - if you’re serious about this, I would probably upgrade to a better filament, which can handle the adverse conditions faced when outdoors - something like ABS or even PETG would fare better than PLA. I managed to print the main panel on my Bambu Lab A1 Mini by rotating the model such that it fit within the build volume bounds of my print bed/arm. This did mean it was printing at an angle with support material, but it turned out fine.
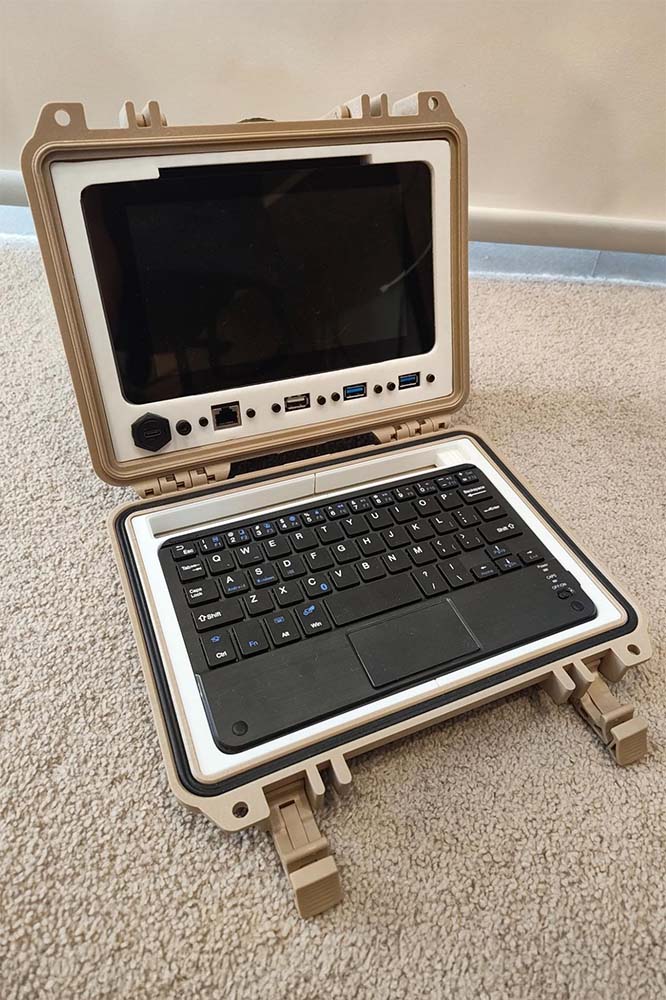
- If you want a “built-in” keyboard to go along with your cyberdeck, then here’s your chance to download and print the frame that supports the keyboard/trackpad combo neatly in the lid of the Pelican case.
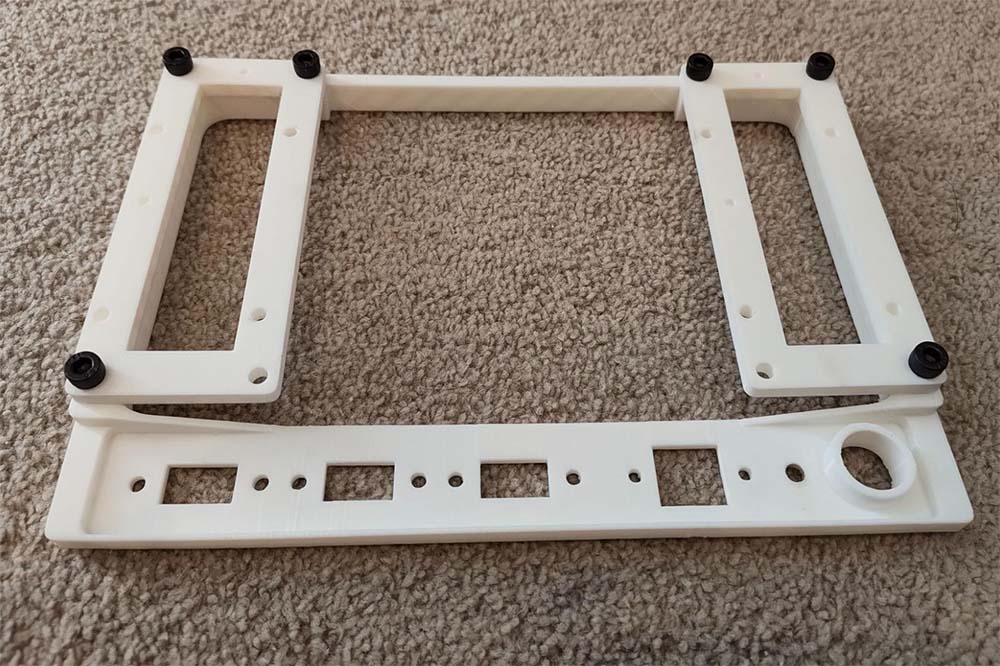
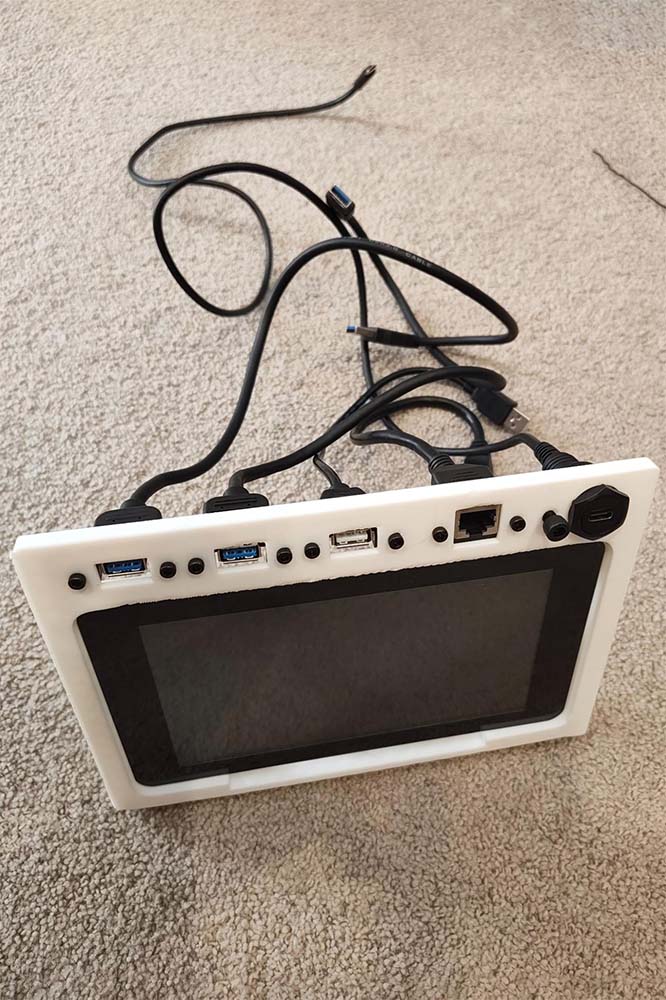
- Secure the x2 USB 3.0, USB 2.0, Ethernet, and USB-C power delivery ports to the main panel using M3 bolts.
- Secure the screen supports to the main panel using M5 bolts; pay attention to lining up the indented indicators, which denote the direction.
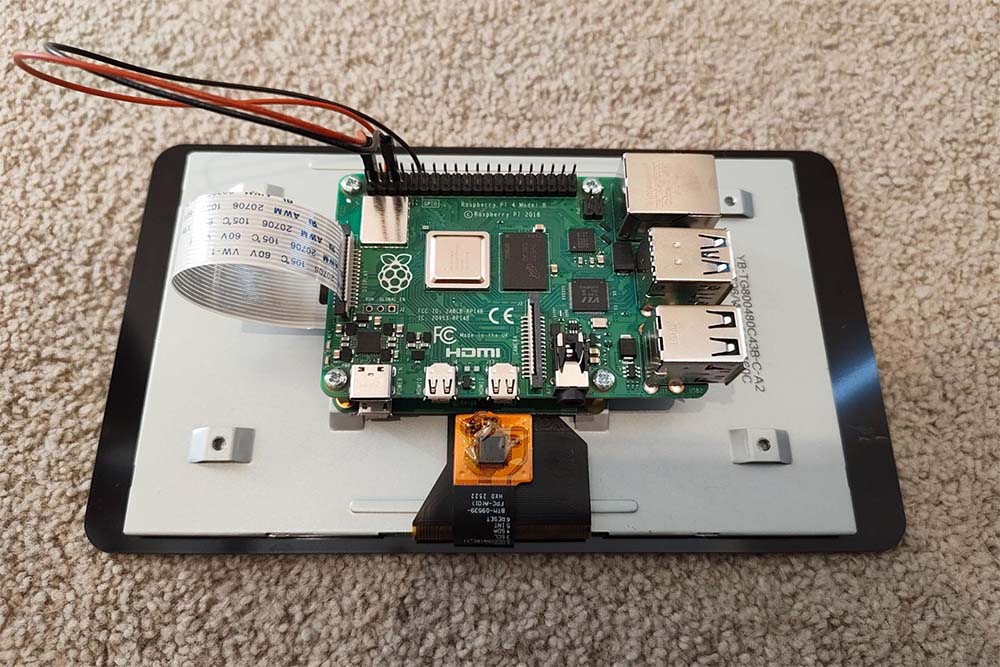
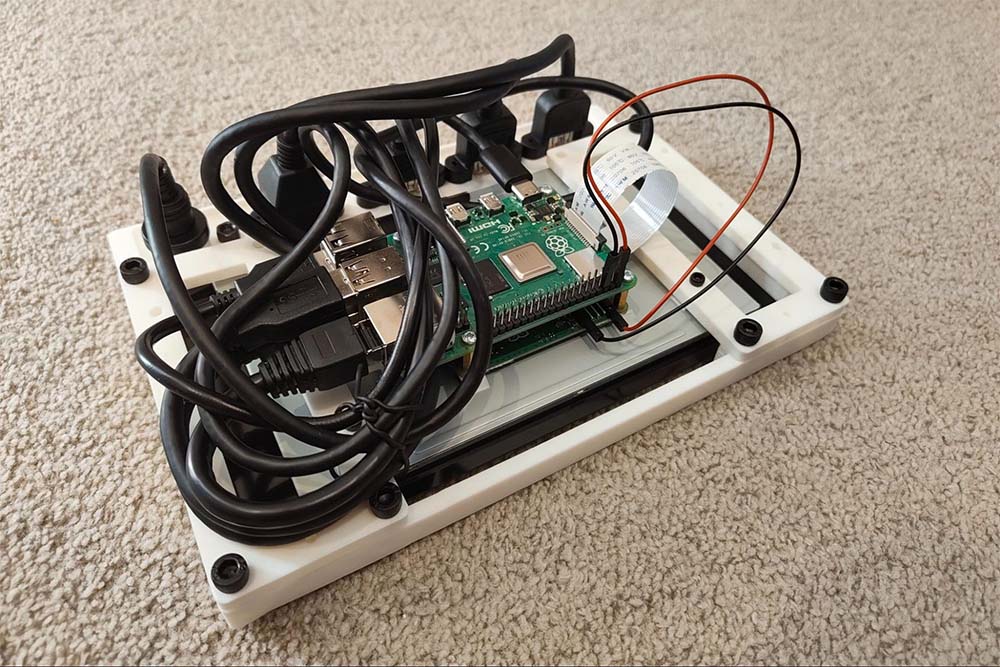
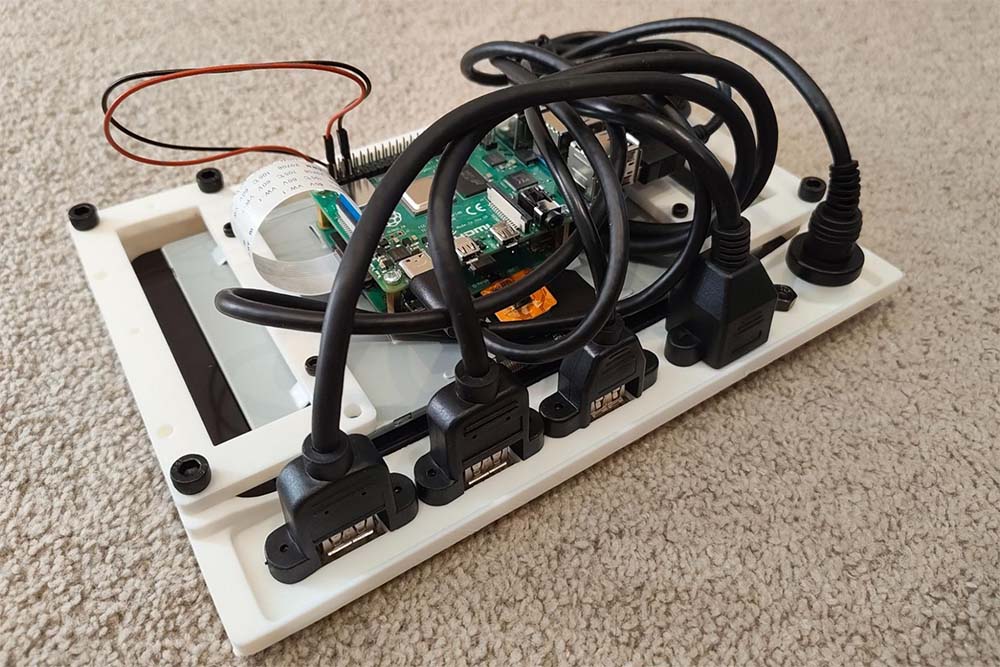
- Fix the official Raspberry Pi 7” touch screen to the 3d printed panel assembly - noting the correct orientation. Attach the provided ribbon cable if using a Pi 4 or the equivalent ribbon cable for the Pi 5, which you must purchase separately.
- Fix the Pi to the 7” touch screen - noting the preferred orientation, which factors in cable management and clearances, etc. Attach the ribbon cable to the appropriate slot on the Pi. Connect the two provided jumper cables between the 7” screen and the Pi’s GPIO pins for 5V (red) and ground (black)
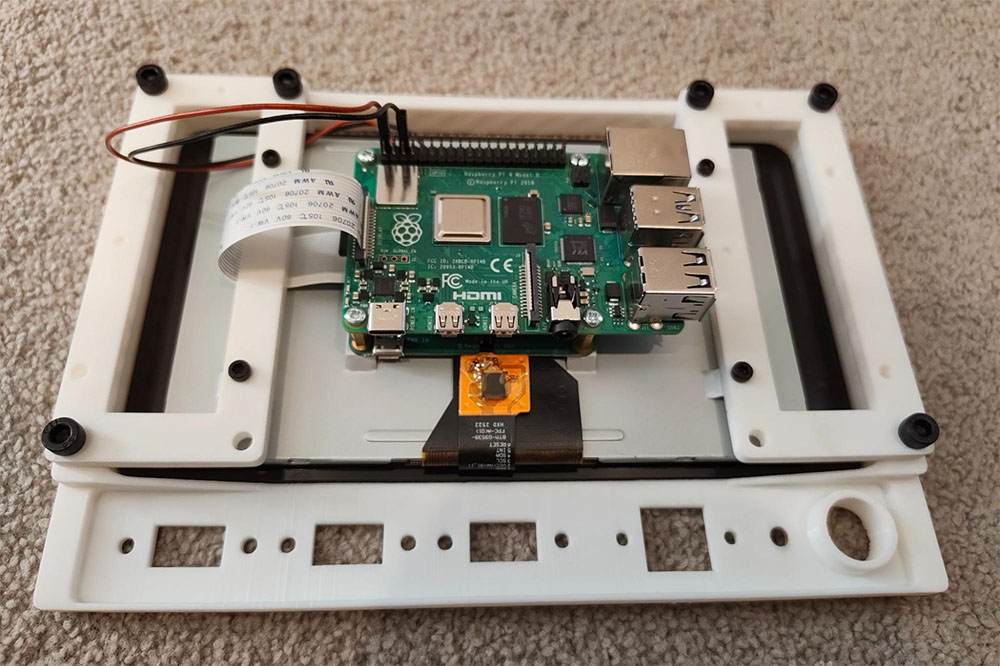
- Plug in all peripherals from the I/O panel to the Pi in such a way as to carefully route/manage the cabling to keep the entire panel assembly as compact as possible - this will help you a lot when fitting the device into the Pelican case.
- Press the panel assembly into the Pelican 1150 case, ensuring there are no loose cables or snags.
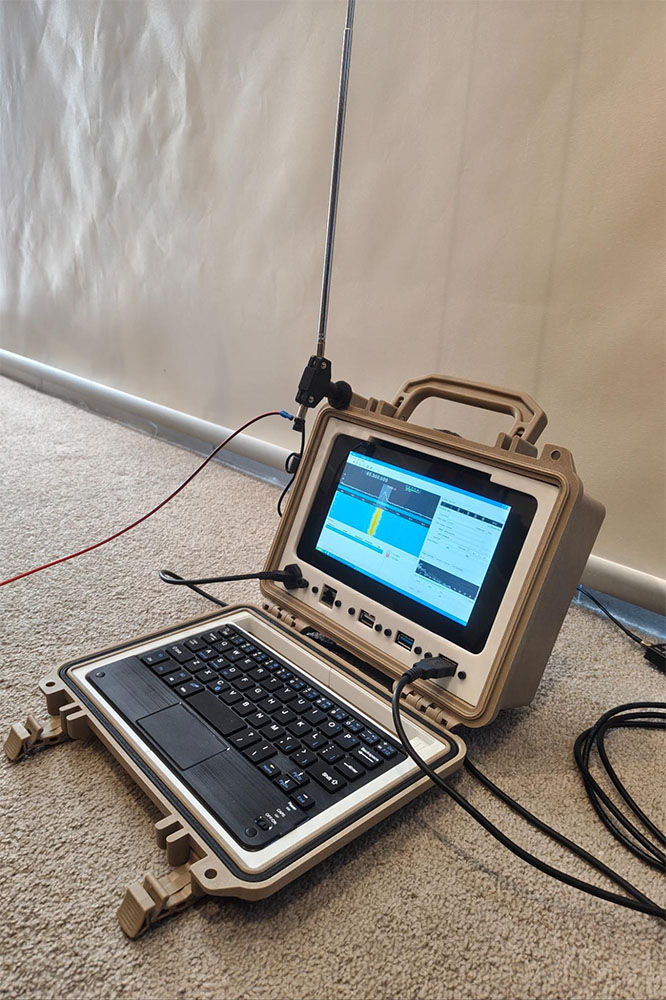
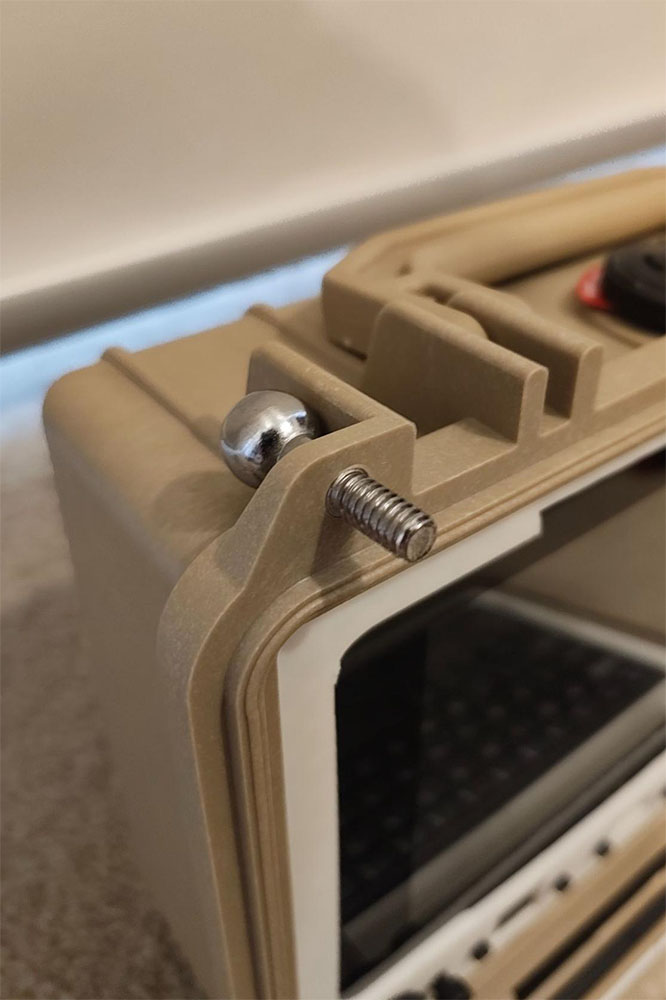
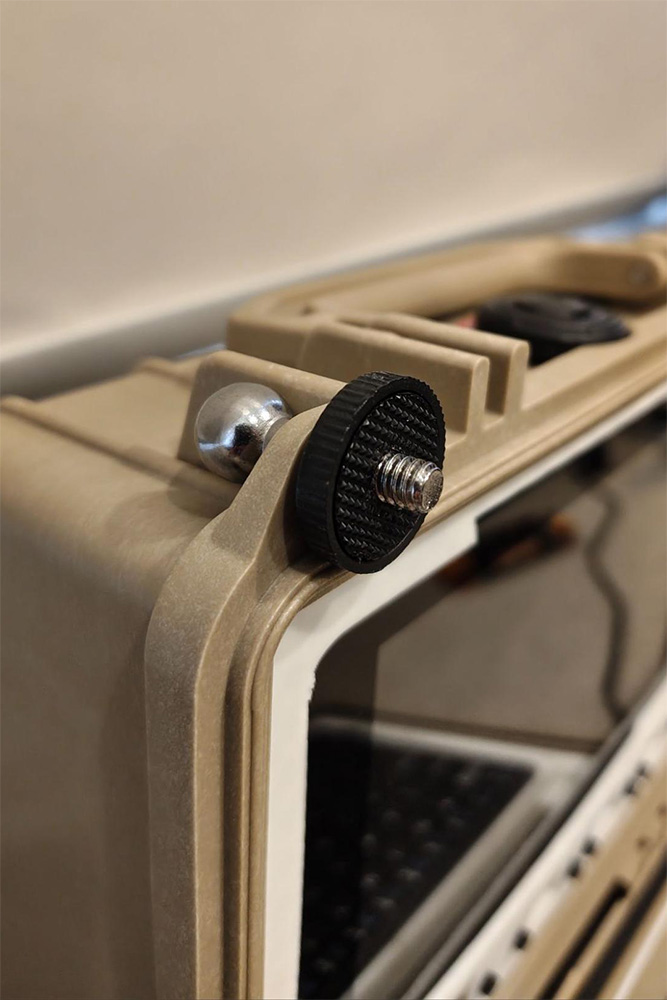
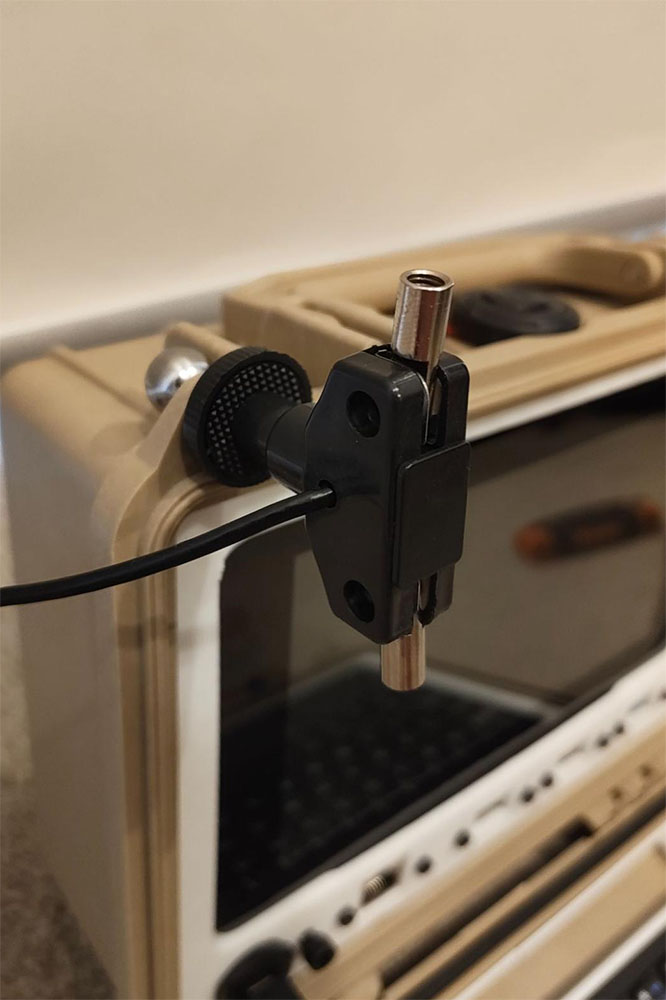
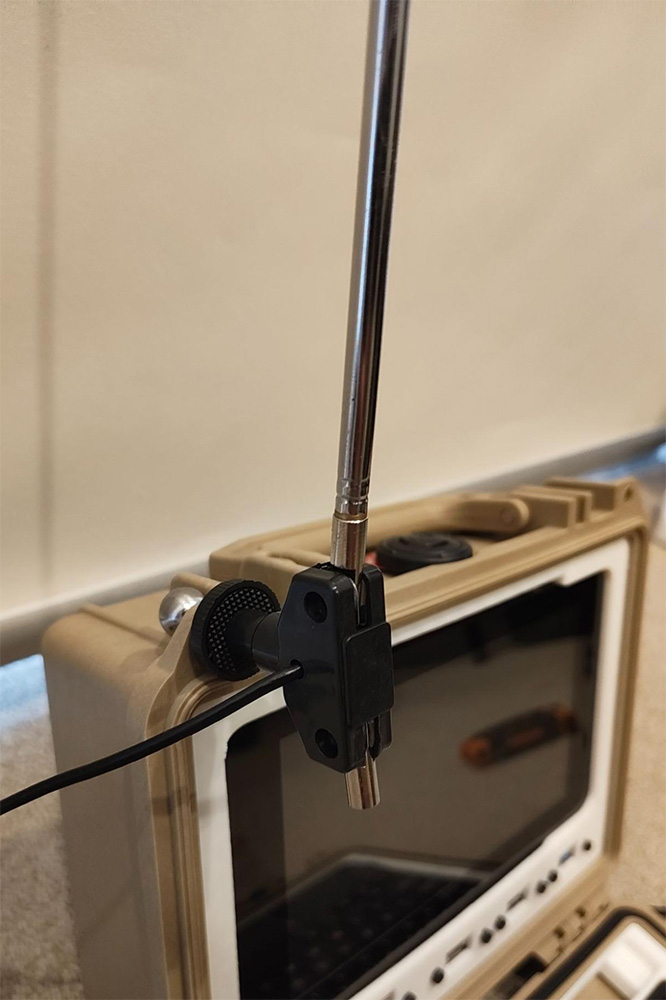
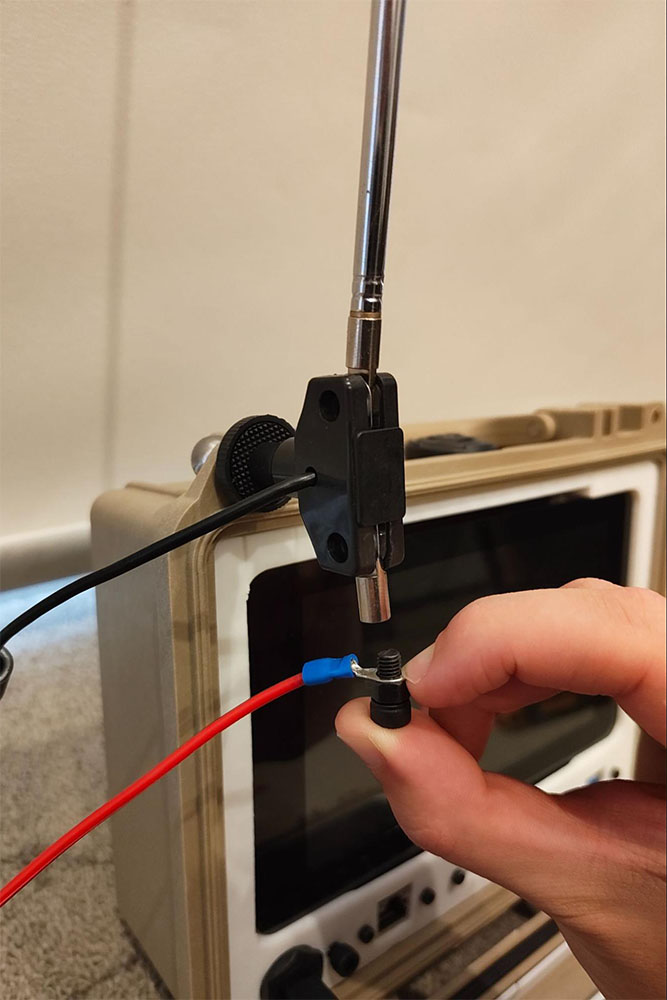
- If you have an RTL-SDR dongle with the antenna kit, you can proceed to use the ball mount from the provided tripod and feed it into one of the corner padlock holes of the Pelican case such that the screw end faces the user (screen side) - from there, you can screw on the textured plastic disc and then the dipole antenna. If you want something that performs arguably better than the stock dipole for minimal effort, I made an adjustable vertical whip with a random length of wire as a ground radial, as shown. The antenna can be tuned to the frequency of choice by lengthening or shortening the vertical telescopic whip. The addition of ground plane radials dramatically improves performance - you can add as many as you like by simply crimping on ring terminals to random lengths of wire and slipping these onto an M5 bolt.
- Plug in the SDR with the antenna attached via the SMA connector.
- Power on the device by supplying 5V-3A (Pi 4) or 5V-5A (Pi 5) via the USB-C port. I can run my Pi 5 off of a 5V-4.8A portable battery pack - I wouldn’t recommend doing this and am only doing it out of necessity (I disabled the power warnings on the desktop to make the experience less annoying). Again, using the Pi 4 is far more forgiving and can easily be powered by almost any USB-C power supply you might run into.
- I use GQRX as my SDR software package of choice when it comes to Linux machines. There are a multitude of options out there, but if you want something that just works, I’d recommend this one. I’ve put together a bash script that can be run to automatically install the drivers needed to run the RTL-SDR V4 dongle on a Raspberry Pi, as well as build GQRX from source on your machine. Feel free to use it if you’re not interested in tackling the challenge yourself.
cd ~
sudo rm -rf GQRX-RTL-SDR-for-Raspberry-Pi
git clone https://github.com/captainchapster/GQRX-RTL-SDR-for-Raspberry-Pi.git
cd GQRX-RTL-SDR-for-Raspberry-Pi
sudo chmod +x install.sh
./install.sh
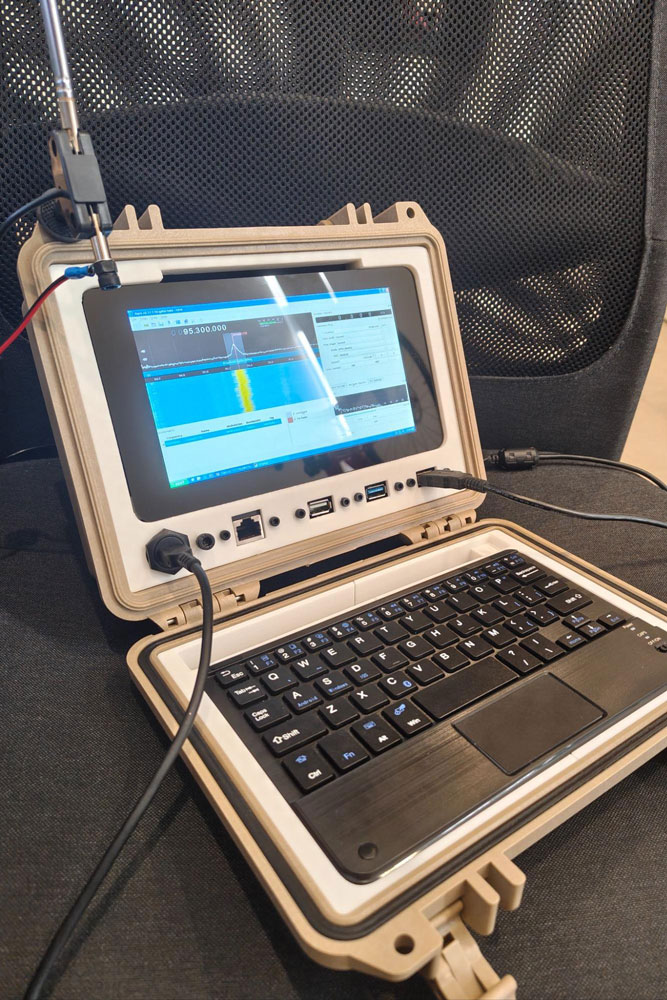
- You should now be equipped to monitor the airwaves on your field computer. A great place to start is with FM radio stations like 101.7 MHz (GOLD) or 95.3 MHz (SMOOTH) if you’re also located in Sydney, Australia. Play around with the settings like gain and bandwidth to get a feel for how it all works. The rest is history when it comes to radio; enjoy simply getting lost in the seemingly endless sea of frequencies to explore. Downloading satellite images is an entire topic worthy of a separate guide (in fact, many great guides exist already and can be googled at your leisure). For now, enjoy using the field computer and listening in on terrestrial radio sources.

Bill of Materials
| Description | Quantity | Price ($) | Subtotal ($) |
| Pelican #1150 Protector Case with Foam, Desert Tan | 1 | 107.22 | 107.22 |
| Bewinner Small Bluetooth Keyboard, Ultra-Slim Mini Wireless Bluetooth Keyboard with Touchpad | 1 | 40.94 | 40.94 |
| iGreely USB Extension Cable 2-Pack 30cm USB 2.0 Panel-Mount Type A Male to Type A Female Cable | 1 | 25.00 | 25.00 |
| RJ45 Ethernet Extension Cable Cat 5E/5 Cat 6 Male to Female Shielded Screw Panel Mount Internet LAN Network Lead (30 CM) | 1 | 23.65 | 23.65 |
| Chenyang USB 3.0 A Type Male to Female Extension Cable with Panel Mount Screws 50cm | 2 | 9.79 | 19.58 |
| Cablecc Waterproof USB-C Type-C USB 3.1 Extension Flush Car Mount Extension Cable for Dashboard Panel | 1 | 16.99 | 16.99 |
| 300pcs M2.5 X 3-20mm 12.9 Grade Black Alloy Steel Hex Socket Head Cap Screw Bolt with Nut, Sturdy and Durable, Anti Rust, for Auto Repair & Household Use | 1 | 16.93 | 16.93 |
| (50 Sets) M5 x 10mm Bolts and Nuts Set Socket Head Cap Screws 12.9 Grade Alloy Steel Black Full Thread | 1 | 17.99 | 17.99 |
| 480PCS M3 x 4/6/8/10/12/16/20mm Hex Socket Head Cap Screw Bolts Nuts Assortment Kit, 12.9 Alloy Steel Metric Screws with Allen Wrench, Allen Socket Hex Drive Black Machine Screws Set | 1 | 15.99 | 15.99 |
| RTL-SDR Blog V4 R828D RTL2832U 1PPM TCXO HF Bias Tee SMA Software Defined Radio with Dipole Antenna Kit, RTLSDR_V4_WITH_ANTENNA | 1 | 104.84 | 104.84 |
| Raspberry Pi 4 Model B 8GB | 1 | 145.00 | 145.00 |
| Pi Foundation PiTFT - 7" Touchscreen Display for Raspberry Pi | 1 | 109.08 | 109.08 |
| 3D printer, filament, and time | - | ||
| Total | 643.21 | ||

