If you ever needed a performance boost when running Machine Learnt AI Systems (like facial recognition) with a Raspberry Pi Single Board Computer then I have a solution for you. The OAK-D Lite. The Oak-D Lite is the Leatherman Multi-tool of the machine learning world, processing on the edge has never been more effective. In combination with a Raspberry Pi Single-Board Computer, you will be able to explore and push the boundaries of the best and current deep learning systems.
OpenCV AI Kit Depth = Oak-D
This is a single USB-C powered module that sports 3 Cameras and a suite of circuitry. It is like a Google Coral but with auto-focusing cameras. It has an autofocus RGB high-resolution 4K central camera that can run at 60FPS and two 480P Binocular Vision (Stereo) Cameras that can run at 200 FPS. There is also internal circuitry to the Oak-D Lite that does the hard yards of machine-learned processing and provides the Raspberry Pi with the results. Thus this offloads the computational operations to the module and leaves your Raspberry Pi free and capable to perform other tasks. The brain of the OAK-D Lite is an Intel® Myriad™ X Visual Processing Unit (VPU).
OAK-D was the world’s first Spatial AI camera and OAK-D Lite is Luxonis's most recent offering. The two stereo cameras pointed forwards enable the OAK-D Lite to create depth maps and determine accurately the distance to identified objects. This is similar to human binocular vision, except much more accurate. They both can run multiple neural networks simultaneously for visual perception tasks like object detection, image classification, segmentation, pose estimation, text recognition, and more while performing depth estimation in real-time. A number of these machine-learned systems I have explored before running directly on a Raspberry Pi 4 Model B, Face Recognition with the Raspberry Pi, Hand and Gesture Control with Raspberry PI, and Object Detection with the Raspberry Pi (to name a few). But none of these guides run at the high FPS (frames per second) or high resolution like the OAK-D Lite. This higher FPS speed unlocks new AI capabilities and ways to stack multiple AI systems in a single Python script that I have not been able to explore with previous hardware.
This guide will demonstrate exactly how this kind of AI processing can be harnessed by the everyday maker, whilst allowing them a peek in the programming back room to see and understand exactly what levers there are to adjust. By the end of this guide, you will have a Raspberry Pi single-board computer with a Spatial AI Camera capable of keeping up with the most current advances in Edge Machine Learnt technologies. Edge computing is the idea of pushing computing and data closer to where they are used, which means no cloud computing. See the contents of this guide below.
- What You Need
- Hardware Build
- Software Set Up
- GUI AI Demo for Speedy Overview of Oak-D Lite AI Systems
- Distance Sensing with Binocular Vision Cameras Machine Learning
- Experimental Luxonis, Face Blurring and Gaze Estimation
- License Plate Tracking, Pushing the Limits
- Cortic Technology Systems, Gesture Control of Virtually Transposed CAD Models and Remote Heartbeat Detection
- 3D Printable Mounts
- Where to Now, A Smorgasbord of Compatible AI Systems
Luxonis’ OAK-D-Lite is the 2022 Edge AI and Vision Product of the Year Award Winner in the Cameras and Sensors category. This camera means business and you can see the OAK-D Lite camera annotated in the below image. Keep in mind there are two M4-sized screw holes that you can use to mount it on the back as well! As a note here the OAK-D Lite can also be used solely as a processing unit, performing machine-learned processing on data it hasn't obtained directly through the cameras.
As always if you have any questions, queries, thoughts, or comments please let me know!
What You Need
Below is everything you need to set up your Raspberry Pi 4 Model B with the OAK-D Lite Camera module.
- A Raspberry Pi Palm-Sized Computer (in my case I have used a Raspberry Pi 4 Model B 2GB but this system is perfect for an earlier lower-spec Pi like the Raspberry Pi 3. You can even use a Raspberry Pi Zero, but it may take some tinkering).
- OAK-D Lite
- USB3.0 to USB-C Cord (or Better) (Very importantly not a USB2.0 to USB-C Cord, this won’t provide enough power/allow Data transfer)
- Tripod
- Micro-SD Card flashed with Raspberry Pi OS (Linked here is a guide on how to do this)
- Raspberry Pi Power Supply
- Micro-HDMI to HDMI Cord to connect to a Monitor
- Mouse and Keyboard
Hardware Build
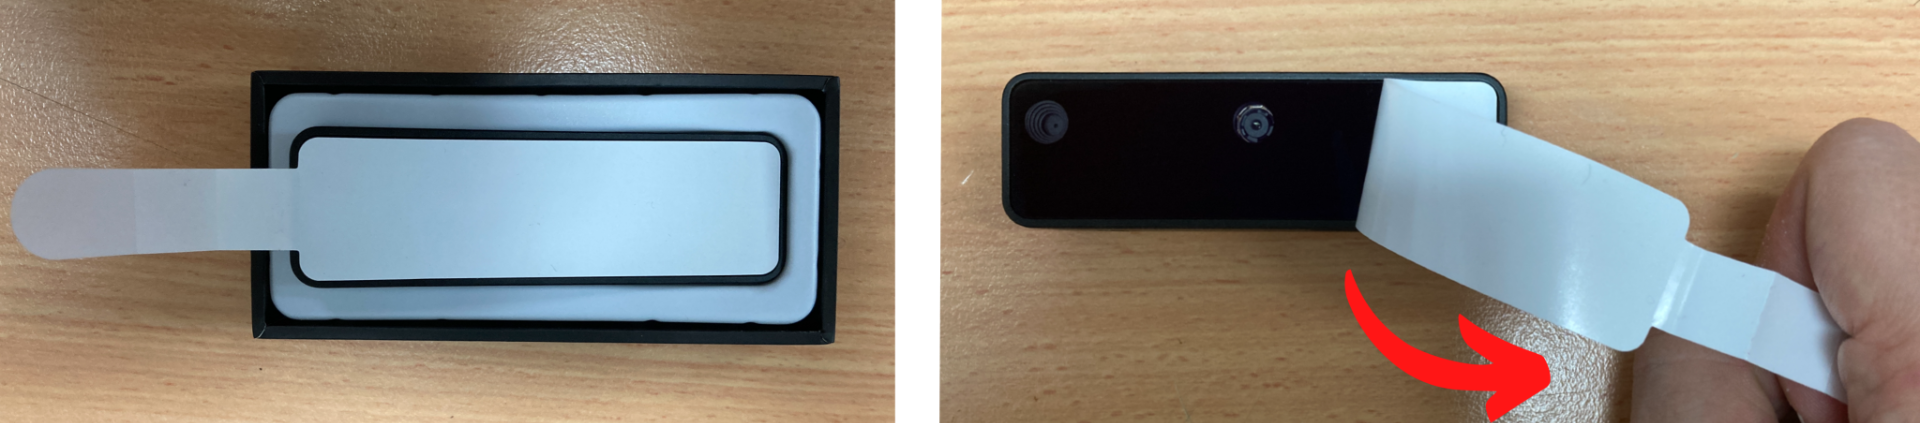
The first natural step is to get all the hardware connected up correctly. To do this go through the following steps. Firstly see the image below for what you are presented with when you have the Oak-D Lite new in hand.

Inside the box, you will find the Oak-D Lite camera with some protective plastics. This device does not come with a USB3.0 to USB-C Cord. I'd recommend using this linked one with the Oak-D lite. You can peel off the protective covering exactly as I am doing in the images below.
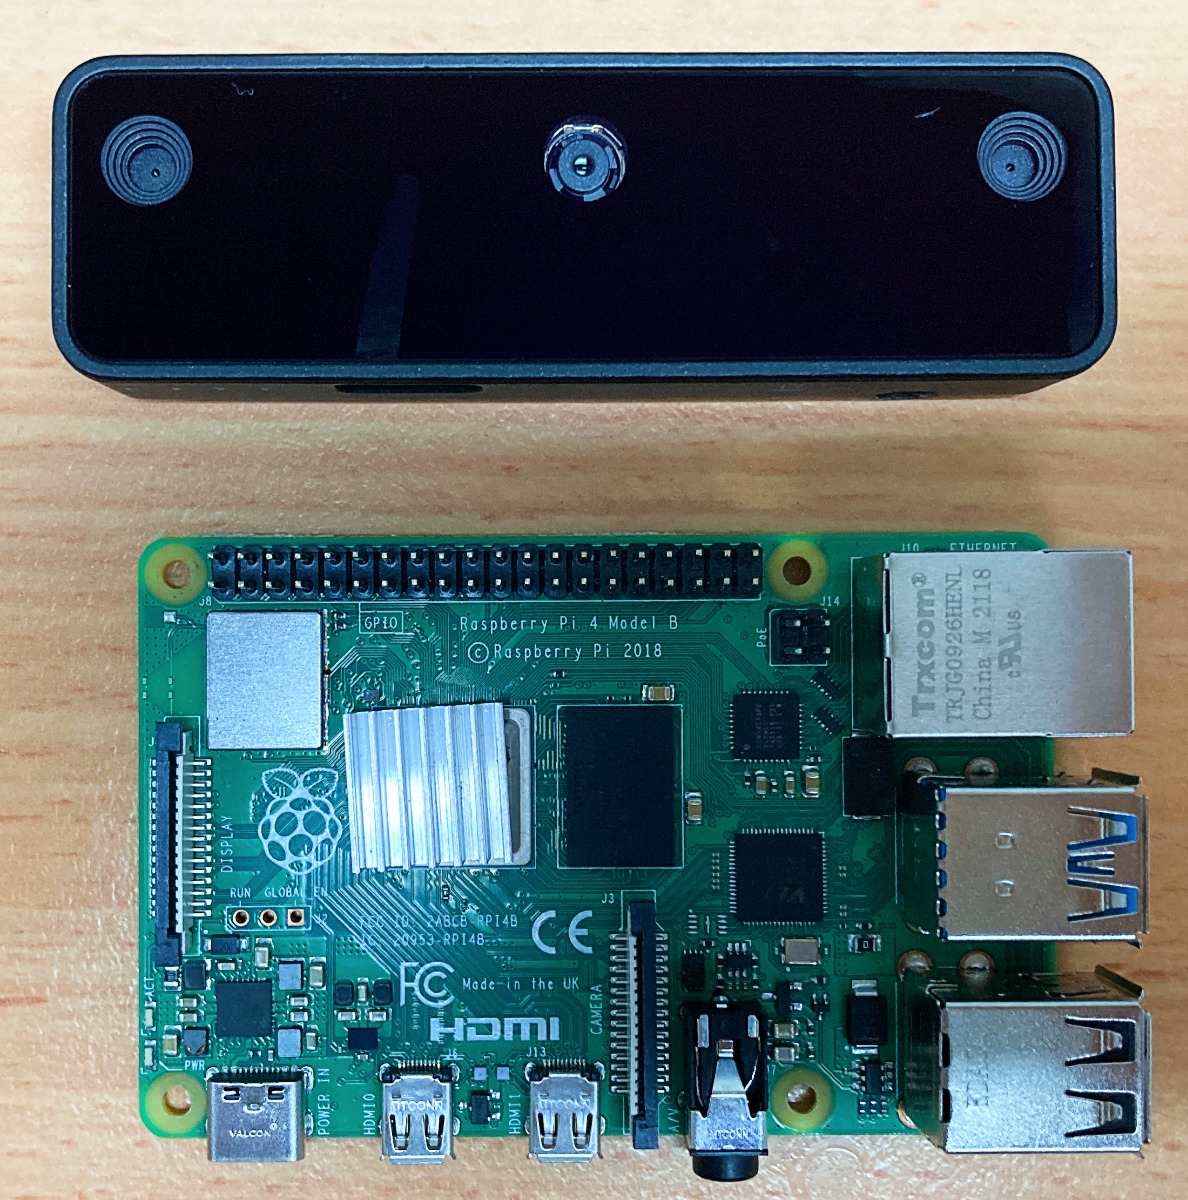
With it out of the box and all the packaging removed you can now start connecting it to a Raspberry Pi Single Board Computer. See the OAK-D Lite camera next to the exact Raspberry Pi 4 Model B that it will be connected to in the image below. They both have similar footprints, the OAK-D Lite is a little taller but significantly thinner.
The next step is to set up the Raspberry Pi as a desktop computer. Don’t supply power through the USB-C connection just yet. If you need a guide to Flash a New Micro-SD card with Raspberry Pi OS and How to Set Up a Raspberry PI as a Desktop Computer, check the linked guides. See the Raspberry Pi 4 Model B Single Board Computer set up correctly in the image below. It has a red USB2.0 connection to the Keyboard and Mouse. It has the HDMI Cord to a monitor/display. USB-C Power supply is ready to be connected to the system.

Next set up the OAK-D Lite onto a tripod mount. With that done connect up the OAK-D Lite USB-C connection using your USB-C to a USB3.0 (or better) Rated Cord to the bottom plug in the middle of the Raspberry Pi 4 Model B board. This connection on the Raspberry Pi 4 Model B is the bottom USB-3.0 receiving end. This will provide power to the OAK-D Lite and the circuitry inside it. Note here - USB3.0 devices can provide 900mA at 5V, which is enough for most use-cases. See all this assembly happening in the image below.

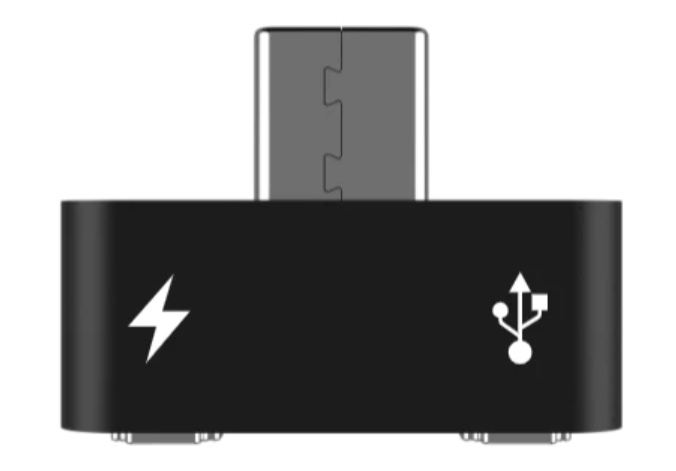
As a note here, it is possible to use a USB-C Power/Data Compatible Splitter (OAK Y-Adapter) on the OAK-D Lite side. This means you will be able to power the OAK-D Lite directly. You may want to do this if you are running power/computationally intensive programs on your Raspberry Pi Single Board Computer. Examples of computationally intensive functions would be ones that use inference or have video encoding as these can cause large current spikes when run. You may want to do this also if you are using the OAK-D Lite with an earlier Raspberry Pi Single Board computer that doesn't have the higher watt USB3.0 outputs or are powering multiple devices from the Raspberry Pi. In these cases, you would want to use an external power adapter for the OAK-D Lite.
 Then with that completed turn on the system by putting power into the USB-C 3.0 port of the Raspberry Pi Single Board Computer by using a USB-C Power Supply. Also, note I've 3D printed a protective case for the OAK-D Lite out of Ultimaker TPU 95A which you can find the 3D print files for it here, all credit goes to YANG_GT. See the image below for the complete hardware assembly.

Software Set Up
With hardware set up complete its time to turn attention to the Software. To be clear I am using Raspberry Pi OS (Bullseye) Linux Version 11. There is a new installation wizard that pops up every time a new Raspberry Pi OS system first boots up. It will enable you to set your country, language, and time zone, change the default password, make sure the screen is set up correctly, make sure you are connected to a WIFI network, and fully update the software. It is very intuitive and once complete your Raspberry Pi system will reboot itself.
Then you will be welcomed by the Raspberry Pi Desktop. This is a machine learning system so we will now need to install the packages to make this camera module work with the Raspberry Pi and provide the Python Programming Language (that runs both on the Raspberry Pi and OAK-D Lite) all the packages needed to function. Luxonis (the manufacturer of this neat device) has done a lot of the hard work for us. Open a new terminal window by pressing the black button on the top left of the screen. See this occurring in the image below.

Inside the Terminal window Type and Enter the following below Terminal commands (or copy and paste them) one by one. Allow each one to finish before moving on to the next command. If ever prompted, “Do you want to continue? (y/n)” press | Y | and then the | Enter | key on your keyboard to continue the process. This whole process should take less than 25 minutes. Commands will be bold.
sudo apt-get update && upgrade
sudo curl -fL https://docs.luxonis.com/install_dependencies.sh | bash
python3 -m pip install depthai
git clone https://github.com/luxonis/depthai-python.git
cd depthai-python
cd examples
sudo python3 install_requirements.py
cd
sudo pip3 install opencv-python
sudo pip3 install -U numpy
sudo python3 -m pip install depthai --user
cd depthai-python/examples
Run the following command just to test the installation so far. If a small Video Preview window pops up all is good to continue the installation. After success type on your keyboard | Ctrl+C | to stop the | rgb_preview | Python script from running.
sudo python3 ColorCamera/rgb_preview.py
Having confirmed success up to this stage continue the process by typing and entering (or copying and pasting) the terminal commands as normal. The last two lines give much need rules to help the Camera module communicate correctly with the Raspberry Pi through the USB-C 3.0 (or better) cable.
sudo git clone https://github.com/luxonis/depthai.git
cd depthai
sudo python3 install_requirements.py
cd
echo 'SUBSYSTEM=="usb", ATTRS{idVendor}=="03e7", MODE="0666"' | sudo tee /etc/udev/rules.d/80-movidius.rules
sudo udevadm control --reload-rules && sudo udevadm trigger
Additional Terminal Commands for Experimental Luxonis Python Script Demos
sudo git clone https://github.com/luxonis/depthai-experiments.git
sudo python3 -m pip install depthai-sdk
sudo python3 -m pip install --extra-index-url https://www.piwheels.org/simple/ depthai-sdk
Additional Terminal Commands for Cortic Technology Python Script Demos
sudo apt-get install freeglut3-dev
sudo pip3 install pywavefront
sudo pip3 install PyOpenGL
sudo pip3 install pygame_gui -U
sudo apt install libsdl2-ttf-2.0-0
sudo pip3 install pywavefront
sudo git clone https://github.com/cortictechnology/vision_ui.git
sudo git clone https://github.com/cortictechnology/heartrate_estimation.git
GUI AI Demo for Speedy Overview of Oak-D Lite AI Systems
OAK cameras can run any AI model, even custom architectured/built ones. You can even run multiple AI models at the same time, either in parallel or in series. That means we have a lot of ground to cover. Now we could go through all the starting Python Script examples one by one that you can find in | /home/pi/depthai-python/examples | (in fact if you are curious like me you likely will) but there is a better way!
Luxonis created a nifty Graphical User Interface (GUI) for their OAK-D Cameras and Python examples that can now be opened up and utilised. This will let us jump between 14 different Machine Learnt Systems, while constantly showing a preview window that can be swapped between all the cameras. Also, it adds heaps of Camera tweaks that you can quickly adjust on the fly with toggles and sliders. When utilising applicable AI system you will also be able to add depth AI layers. See the image below for what this GUI looks like.

To do so we will open up a new terminal window using the black button on the top left of the screen. From here type and enter the following line below to open up a new Thonny IDE with full permissions.
sudo thonny
As soon as you press enter this line will run and open up a new Thonny IDE which has Sudo Level Privileges, you can see this in the image below. Sudo stands for either "substitute user do" or "super user do" and it allows you to temporarily elevate your current user account to have root privileges. Running Thonny IDE this way will stop any issues with Python scripts running that aren't on the default user Path. Thonny IDE is just a Python Programming Language Interpreter and you can use whichever interpreter you desire.

With this now open use the top toolbar of Thonny IDE to open our newly downloaded GUI Python script by pressing the | Load | button. This opens a file browser. The file you are looking for is located here in this directory location | /home/pi/depthai | and is named | depthai_demo.py |. As soon as your run it the GUI system will open up (or automatically start piping any extra packages/machine-learned systems the camera module needs from the Raspberry Pi). Once it has been completed the Sudo Thonny IDE will look a lot like the image below left. The image below right shows the GUI running a Machine Learnt Python Script, as well as the drop-down of all the Machine Learnt Systems currently available that we can easily click between.

Worth noting here, you can also open up all the Python scripts as you would normally (directly from Thonny IDE), however, due to the large amount of AI systems that we now have installed on the system it will be faster to get an overview using this GUI. It can be very easy to spend a morning soaking it all in over a nice cup of coffee (or maybe three). Feel free to potter through and test things out here.
For most of the systems, the FPS will be counted in the top left of the preview window. Object detections using the Yolo3 Library Tiny-TF kept ~28+ FPS. This is a significant FPS improvement over doing all the calculations solely on the Raspberry PI Board as I have done in the tutorial Object and Animal Detection with Raspberry Pi guide (this had a result of sub 10 FPS). This increased FPS happens for all the Machine Learnt Systems that I have previously explored before. Check out the image below for a smorgasbord of Machine Learnt systems (with an FPS count) that I ran using this GUI Demo. Many of them overlap previous AI systems I have created before, but those used only the Raspberry Pi for calculations. The very right is utilising Masking which is more computationally demanding than simply putting a box around the target.
Know that every piece of code that it takes to run these is Open-Source and running directly on the physical system in front of me. This is commonly referred to as edge processing. So if you want to learn from, modify, add or do any script explored in this guide, you can!
Distance Sensing with Binocular Vision Cameras Machine Learning
From above we can clearly see a huge FPS increase when running Machine Learnt Python Scripts when compared with my previous AI and Raspberry Pi Guides. So having cleared that up allow me to demonstrate chapter by chapter what else can be achieved with all this extra computational power and hardware.
First let's explore the advantages gained by the physical location of the hardware, particularly in regard to the two 480P cameras that are spaced apart by 7.5cm. Exactly the same cameras. This shares a lot of similarities with humankind, as they have two light sensors spaced apart by 10ish cm. The human brain automatically sleuths out distances and provides humankind with the ability to roughly judge and understand the distances of objects around them. The OAK-D Lite camera set up can do the exact same thing, except honestly, it does it far more accurately.
To run this have the | depthai_demo.py | GUI up and running talked about in the previous section. On the AI tab select | mobilenet-ssd |. Having done this navigate to the | Depth | tab. Simply switch the | Enabled | toggle to On. Then click the | Apply and Restart | found at the bottom right of the GUI. This will then open up two live feeds from the camera as you can see in the image below. The normally colour window is the central 4K camera and the majority blue window is a combination of the two edge cameras. The sections in dark burgundy are areas that only one of the edge cameras can see and the other cannot. Through AI interpolation distances of targets can be obtained from this information. In regards to targets, this system is using a Machine learned system to identify people and then target their centre. Thus we have two machine-learned systems working together smoothly at ~19+FPS on a Raspberry Pi System.

All non-modular OAK devices are calibrated before shipment. If you find the results are not accurate there is a script you can find in the examples called | rgb-depth-alignment.py |. You can then use this and a known length to dial in the calibration.
Experimental Luxonis, Face Blurring and Gaze Estimation
Having achieved all of the above let us now explore some of the Experimental Luxonis Codes.
This section of Python scripts are not necessarily going to run at 30+ FPS or always be fully functioning without some tweaks. Some code might be at the level of a full-on GitHub advanced tutorial and others might just be a framework. When those criteria are met the AI System then gets upgraded to the main | depthai-python | offerings. Now you have to see this to believe it, below is an image of the directory | /home/pi/depthai-experiments |. Inside each folder is a unique Machine Learned system that we can run. I mentioned at the top of the article that this is the leatherman multi-tool of the machine learning world and here is that evidence. Leatherman comparison is not fair to OAK-D Lite however, this is more like the Wenger Giant Swiss Army Knife 16999.
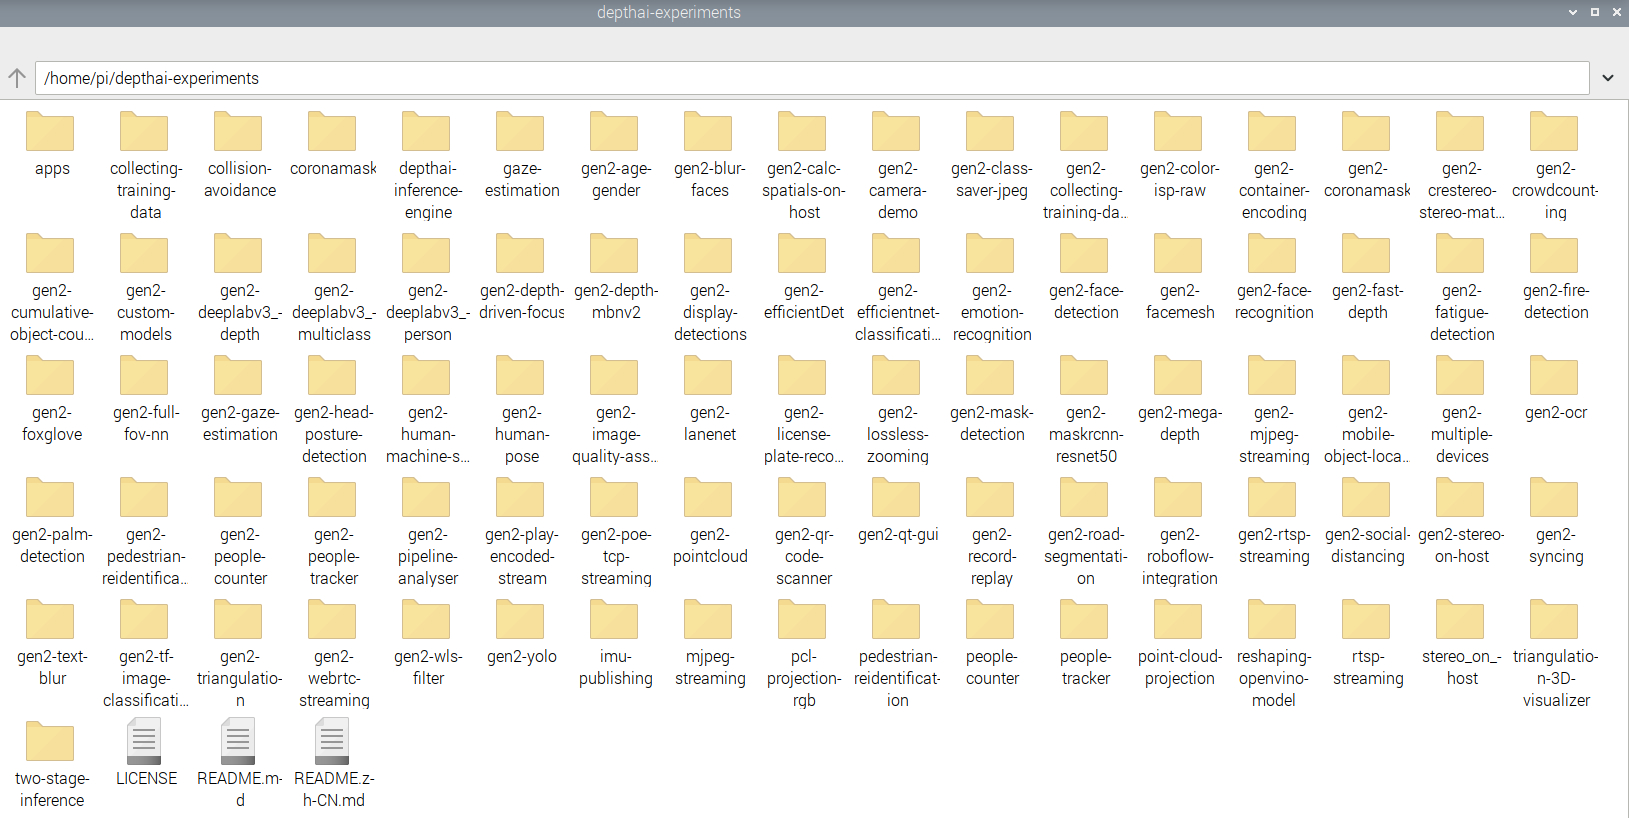
All of this machine-learned content is open source and honestly pretty staggering. The folder titles give great indication to the machine-learned scripts so take some time to look over them. It put me in a spot though, how can I show this all in a single tutorial? The Demo GUI above has covered most previously covered Machine Learnt systems and demonstrated that they run always better (sometimes an order of magnitude better) in conjunction with the OAK-D Lite. So from here on out, I'm cherry-picking my personal favourites. From here on out we are doing the Greatest Hits of 2022 Machine Learnt Deep Learning Edge Systems.
We can use Face detection to enact Face Blurring. This means we can count people without specifically seeing their faces. Neat hey?
The script we will open to do this is called |main.py| and importantly you can find it under the directory | home/pi/depthai-experiments/gen2-blur-faces |. Open it and run it using a Sudo Thonny IDE Instance. See the live window that pops up when this script is run in the image below (given the above you may be able to discern regardless of blur who is in fact behind the blur). This system works with multiple faces and runs very smoothly.

The next script I really admire is found in | gen2-gaze-estimation | with the python file name | main.py |. Open and run it in a Sudo Thonny IDE instance and it will create a video preview window just like the images below. This Machine Learnt system identifies and tracks faces. It then maps the face topology of identified faces. It then focuses on the eyes and extrapolates Pink Arrows in the same direction as where your eyes are looking. At the same time, it keeps track of your nose and provides an XYZ axis of where it believes your face is pointed. Mouse control via eye movement and face direction is definitely a possibility that springs to mind. All the Scripts are open-source thus this is definitely possible.

License Plate Tracking, Pushing the Limits
As were are now in the experimental section of Luxonis offering let's explore some of the scripts that really push our Raspberry Pi system almost to breaking point. Now as we know in this section some of the programming scripts are not necessarily going to run at 30+ FPS or always be fully functioning. When those criteria are met they will be upgraded to the standard Luxonis offerings. Python Scripts that push the systems often utilise multiple layers of machine-learned processes stacked on top of each other.
Inside here are the AI machine-learned systems that push the limits of the Luxonis Oak-D Camera. And my favourite one is the License Plate + Car Identification. This will record all the cars that it sees, classify them (colour and type), and log them. It will also lock on to License plates, decode the Text/Numbers and record them as well. See this occurring for the (already downloaded) video example in the image below.

Now all the previous machine-learned system examples have worked perfectly with the packages we have already installed. Some of these experimental scripts however will require an extra step to get running perfectly. If we try to run them as we have before they will pump out a long string of red error messages to the shell. That's not what we want so to fix this we do the following. Inside almost all of these folders are text files named | requirements.txt |. If we focus our Console Terminal on the directory of the desired machine-learned system we can then type and enter the following.
sudo python3 -m pip install -r requirements.txt
Doing this means our Raspberry Pi System will scour the internet for all the extra Python Packages that we may need for a particular machine learning system. I will go through this workflow for the license plate machine-learned system as that Python Script requires it to run correctly. Thus with a new terminal console open we will type and enter the following one by one.
cd /home/pi/depthai-experiments/gen2-license-plate-recognition
sudo python3 -m pip install -r requirements.txt
This will take a little bit to complete but once done you'll be set. Open up a Sudo Thonny IDE and open up the | main.py | python script in the same way as before. Importantly you can find it under the directory | home/pi/depthai-experiments/gen2-license-plate-recognition |. We will need to add a Pointer/Argument to the Python script so it can run correctly. To add Argument functionality to Thonny IDE make sure its running in Regular Mode. Then using the top toolbar click on | View | and hover down and click on | Program arguments |. This then provides you a section on the top right of Thonny IDE where you can Add arguments. Arguments are independent items, or variables, that contain data or codes. When an argument is used to customize a program for a user, it is typically called a parameter. Thus we will add the Parameter by typing | -vid /home/pi/depthai-experiments/gen2-license-plate-recognition/chinese_traffic.mp4 | into this section as you can see in the image below. You could also add the Parameter | -cam | to get a live feed preview window.

With that done press the big green run button on your script. After a couple of seconds the preview window will pop up and the Default Video will have the Cars and License plate details scraped from the video. This edge system is pushing our hardware and operates at around 7FPS for this HD video. Perhaps with some script/Machine Learning tweaks we will have a system that can run at full speed (30FPS) but I haven't achieved that yet. You can point this script at any video using the argument option. Also, note that the License Plate Machine Detection system was trained on Chinese License Plates so results may vary depending on where you are.
Cortic Technology Systems, Gesture Control of a Virtually Transposed CAD Model and Remote Heartbeat Monitoring
This camera module Crushes. That’s why many Organisations and Open source Entrepreneurs are jumping onto the bandwagon.
One of these intrepid organisations is Cortic Technologies based in Canada. They created a machine-learned system that will take gesture controls and allow you to manipulate STL/CAD models that are projected into Artificial reality in front of you. Open up a Sudo Thonny IDE and open up the | main.py | python script in the same way as before. Importantly you can find it under the directory | home/pi/vision_ui/ |. Run it by pressing the big green run button as normal.
It is kind of complicated to describe in words but much more clear with pictures (and video). So check the image below to get an understanding of what is going on (you can also admire my concentration faces).

We are also going to monitor our heartbeat remotely with a camera! This means we no longer need to wear Apple watches or have wires/sensors attached to our skin to know this information. We can just be under camera vision and see our heartbeat fluctuate in response.
Open up a Sudo Thonny IDE and open up the | main.py | python script in the same way as before. Importantly you can find it under the directory | home/pi/heartrate_estimation-main/heartrate_estimation-main/ |. We will need to alter two lines in the setup. Comment out line | colorCam.initialControl.setManualFocus(130) | by typing a| # |infront of the line. Thus the altered line will look like | #colorCam.initialControl.setManualFocus(130) |. Also understand that the most powerful lever we have is the Pixel Threshold Value. Use a value between | 1.5 | and | 2 |. This will help us get more accurate results and accommodate for environments with different lighting.

Then with those additions run it by pressing the big green run button as normal. A Video Preview window will open up just like below. It will start tracking human faces. Press | S | on your keyboard with that Preview window selected and Heart Rate Estimation will start. Check the image below to see the system running. You will also notice my initially suspicious face looking at the data. Superstar Trent from our phenomenal Core Electronics Support Team happened to be wearing an Apple Watch. So I brought him over for a quick test to confirm the results were within the right ballpark and it was! Accurate to a range of around +-5 BPM.
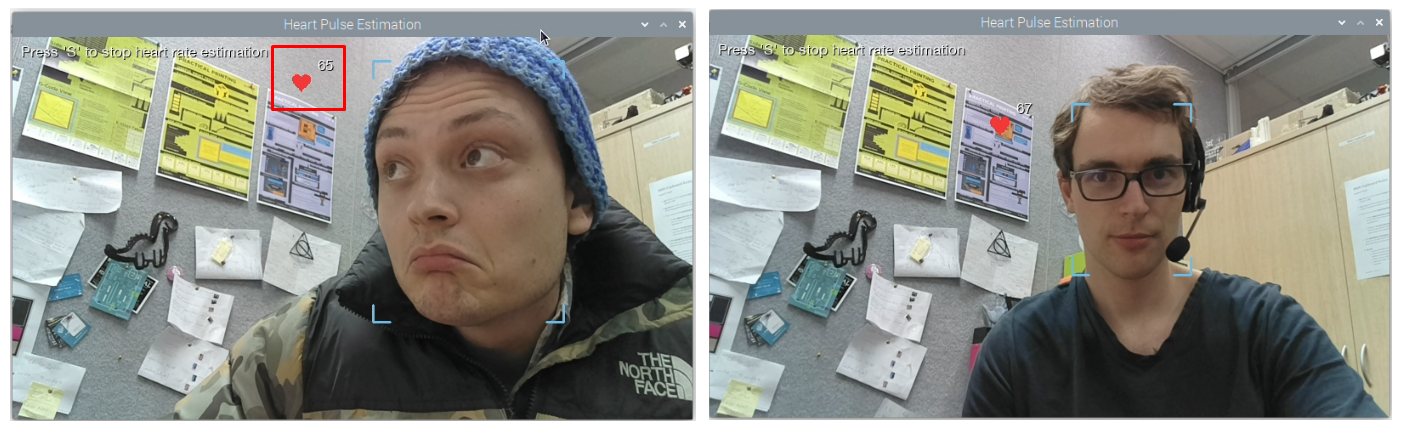
The way this system works is as follows. It starts by focusing and locking onto a human face. It Then hyper focuses on the forehead of that human face. It then uses Edge Detection image manipulation software (which you can see in the image below) to hyper-exaggerate colour/edge changes. This then means it can pick up on the ultra subtle pumps of the veins in the forehead. It then uses a machine-learned system to identify these changes, which occur at the same rate as your heartbeat to determine your BPM. Bonkers!

This seems like a Perfect System for Baby Monitoring, one that doesn't require any wires attached to the infant yet can provide all the positive signs of life data that you would want to have 24/7.
3D Printable Mounts
I have created two 3D printable mounts for this device. I printed both of them in Ultimaker TPU 95 on an Ultimaker 2+ 3D printer. The flexible material is mandatory for these prints as you need that pliability to mount the OAK-D Lite into the mount without causing damage.
The first print is a simple protector for the OAK-D Lite, all credit goes to the original creator YANG_GT, it's a great design. The second is my remix of that original design. It is still a protector but also a mount, allowing it to be easily attached to a Pimoroni Pan-Tilt HAT. I've utilised this Pan-Tilt HAT before in a previous Machine Learning guide so I only thought it appropriate. This means we can now always keep the action in the middle of the frame. See images of these two prints and assembly for both in the image below.

You can download these designs from here and in this Downloadable Zip Folder.
Where to Now - A Smorgasbord of Compatible AI Systems
The OAK-D Lite is ridiculously cool so long as you have a speck of curiosity in your body. Below is a smorgasbord of confirmed OAK-D Lite compatible Machine Learnt Systems. At the very bottom of the image are even some products that used the OAK-D Lite extensively during their prototyping stages. Right-click the image and open the below in a new tab to see it in full size (making it easy to zoom in and see the details).

All of above (except for the last two) are Python Scripts that you can find in the Luxonis Experimental Section. Open and Run them in the exact same ways as demonstrated in above sections of this guide. This is an amazing resource if you get stuck at any point. There are some great distance approximation Machine Learnt Scripts above as well. Safety in regards to proximity to Robot Arms or other dangerous hardware can piggyback off these technologies. You will end up with a supervisor that never sleeps or blinks.
Fire and smoke detection is a solvable problem but I am of the position that they need better datasets. The current models are based solely on colour and thus a red/orange t-shirt would ping the machine-learned system. Fire is easily distinguishable by Humans and Animals yet it takes so many different forms, shapes, and sizes. Perhaps a system that compares the tip of the lick of flame to the smoke with the Edge Detection would produce fewer false positives. The current model still has a place nevertheless.
The Road and Paint Lines Masking AI System is also a really cool insight into the complexities when it comes to self-driving cars. Lossless Zoom is another remarkable thing that the OAK-D Lite camera can also do. This is also in the Luxonis Experimental Section. Using Face Recognition it targeting faces using the edge-mounted cameras. Having found one it locks on and then provides the Raspberry Pi System X and Y Coordinates of the middle of the face. It then takes those coordinates of the face and will then push/zoom in with the 4K camera. This produces a camera preview window pumping out Full-HD videos Zoomed In on the target face/body, see this in the image below. If you move around the room the zoomed-in section will move with you.

Organisations have also turned the OAK-D Lite into a proper serious consumer package. Blue Box Co-Pilot is a camera that tallies Miles, keeps track of your customers, and acts as well as a camera safety device/dash cam. It is remarkable. I believe it also does fatigue detection on the eyes of the driver, thus when Micro-Sleeps start occurring it'll pick it up (along with a tally of Yawns). Black Swift creates OAK-D Lite systems that provide Unmanned Airplanes with locations on the ground that could be safe to land on come an emergency. If you really taken by this and want to get into the deep roots there is a developer version of the Oak-D board called OAK-D-LITE-DEV. Every piece of hardware and software on the OAK-D Lite is open-source except for the Intel® Myriad™ X Visual Processing Unit (VPU). The OAK-D-LITE-DEV replaces that part with an Open-Source Equivalent.
Other places to learn. If you want to learn even more about OpenCV knowledge and Machine learning systems hit up the YouTube channel LearnOpenCV hosted by the CEO of OpenCV himself Dr Satya Mallick. Also, here is Our YouTube Playlist of Machine Learned Systems with Raspberry Pi that I have created.

