[Update – This guide is a little outdated and we have a released a newer version of it. Until there is correct compatibility of OPEN-CV with the new Raspberry Pi ‘Bullseye’ OS I highly recommend at this stage flashing and using the previous Raspberry Pi ‘Buster’ OS onto your Micro-SD for use with this guide – Official 'Buster' Image Download Link Here]
In this guide, I will show you exactly how to have your Raspberry Pi Single Board Computer be able to spot human faces, how to train it to know your face, and run code so that it will successfully identify you when it sees you. Then I'll take it another step and show you how you can use your face to control a servo attached to the Raspberry Pi. Open Source Software and Raspberry Pi go together hand in hand. Two excellent examples of this are Open-CV which provides a huge free resource to solve real-time computer vision problems and the Python Face Recognition Package which computes bounding boxes around a face in real-time.
Once you have all the packages installed you can jump straight into training the system. Installing all the packages can take some time as the install process for Open-CV and Facial Recognition onto a Raspberry Pi requires in-depth use of the terminal. Below are the contents of this guide.
- What You Need
- Training the System
- Demonstration
- Where to Now
- Acknowledgments
- Setting Up Open-CV and Facial Recognition from Scratch
- Downloads
Once complete using video data coming in from the Official Raspberry Pi Camera it will be able to identify your face. You can see how happy and impressed I am by it in the image below.

Machine learning has never been more accessible and this guide will demonstrate thus. Also if you are interested in more Open-CV check out the guides Object and Animal Recognition with Raspberry Pi, Speed Camera With Raspberry Pi, QR codes with Raspberry Pi, Hand Recognition Finger Identification, Pose Estimation/Face Masking with Raspberry Pi or Face and Movement Tracking with a Pan-Tilt System.
As always if you have got any questions, queries, or things you'd like to see added please let us know your thoughts!
What You Need

Below is a list of the components you will need to get this system up and running real fast.
- Raspberry Pi 4 Model B (Having the extra computing power 'oomph' that the Pi provides is invaluable)
- Raspberry Pi Official Camera Module V2 (You can also use the Raspberry Pi High-Quality Camera)
- Micro SD Card
- Power Supply
- Monitor
- HDMI Cord
- Mouse and Keyboard
Training the System
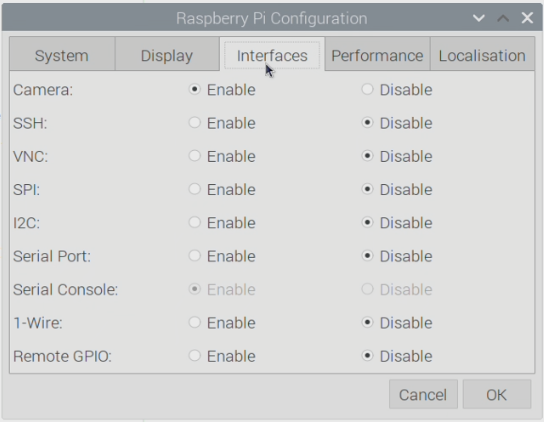
The fast way to get up and running with facial recognition on the Raspberry Pi is to run through the install process found at the bottom of the page. Do this installation on a fresh version of Raspberry Pi OS. Link on how to flash micro-SD with Raspberry Pi OS found here. With that complete, you can get straight into training the system with your face which is where I will start this guide. With the Micro-SD Card flashed you can install it into your Raspberry Pi. Then make sure to have the Raspberry Pi connected to a Monitor with peripheries and that the Pi Camera is installed in the correct slot with the ribbon cable facing the right way. Then open up the Raspberry Pi Configuration menu (found using the top left Menu and scrolling over preferences) and enable the Camera found under the Interfaces tab. After enabling reset the Raspberry Pi. See the image below for the setting location
Once that is complete you can start training the system on what you look like.
There will be a folder located in the | home/pi directory/facial_recognition | called | headshots_picam.py |. This python code will let us take some photos of our faces using the Official Raspberry Pi Camera. See below the location of this file.
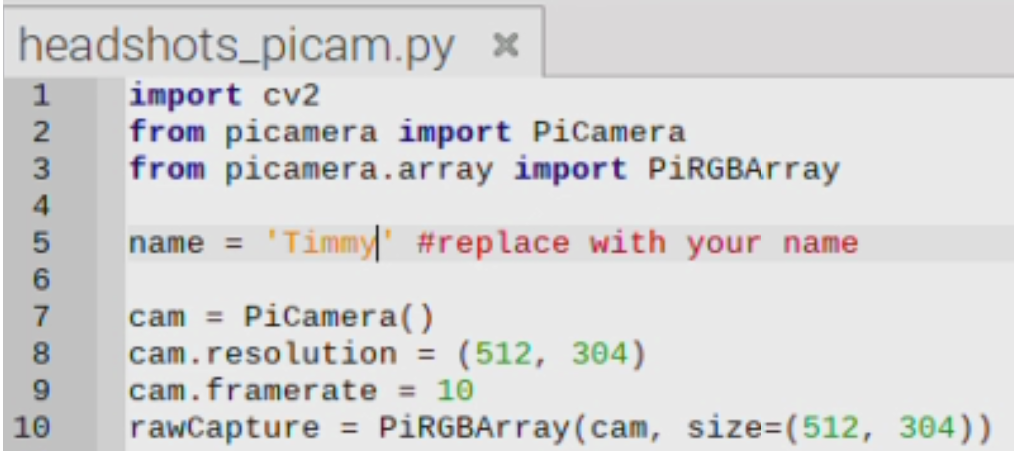
Right-click and open that Python Script up with either Thonny or Geany (both are just Python Language Interpreter Software) and alter the line of code highlighted below with your name (in my case Timmy). Then save this script. You can see the script open in the image below and further below that a close-up of what exactly I am altering.
Next, go back into the folder structure and open up the Photo folder. In here you are going to add another folder with your name. This folder will then be the location where the photo files will be downloaded to. See the image below of my new folder Timmy being created here.

Then jump back to the Python editor that we have | headshots_picam.py | on and run the code. This will then open up a little window and a terminal window which you can use to save images of your face. Press Spacebar Key to take a picture (take around 10) and then Q key to close the window. Provide the software different angles of your face so it can determine your dimensions better. See below for an image of all this happening on screen.
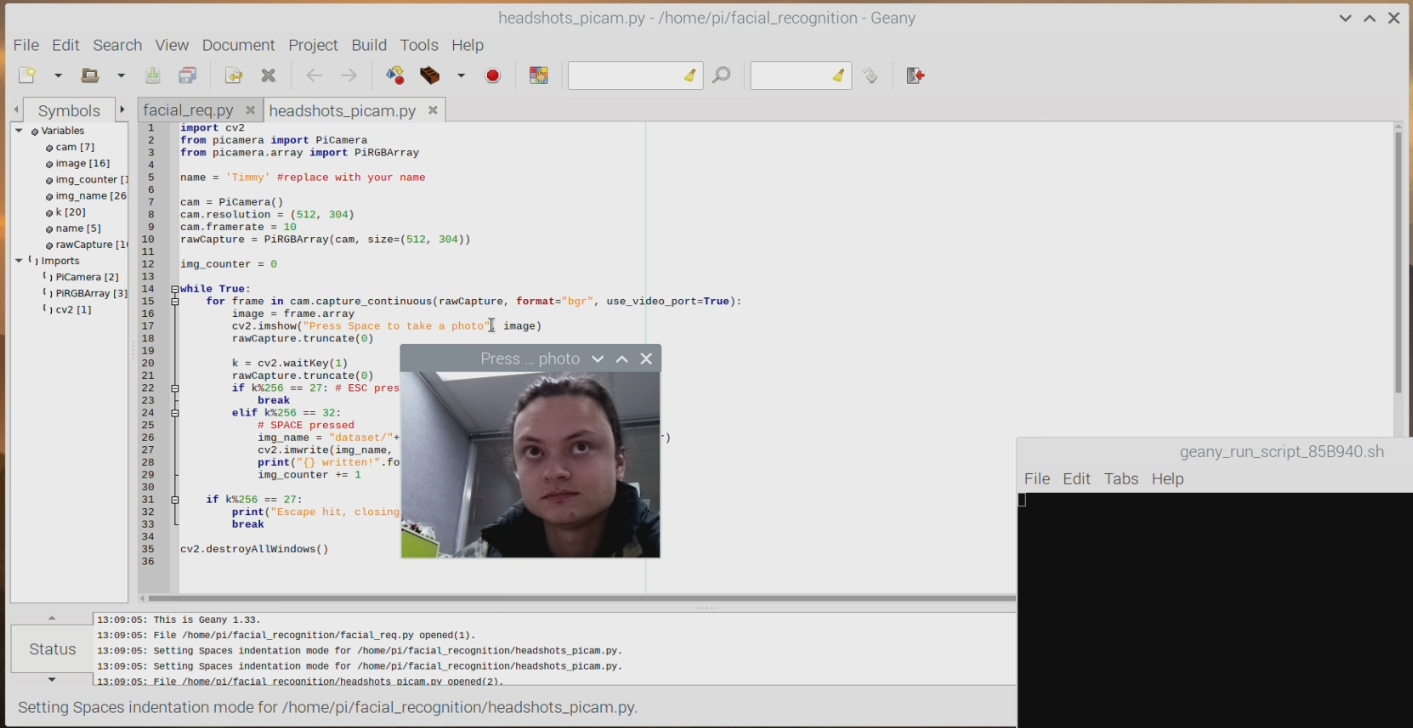
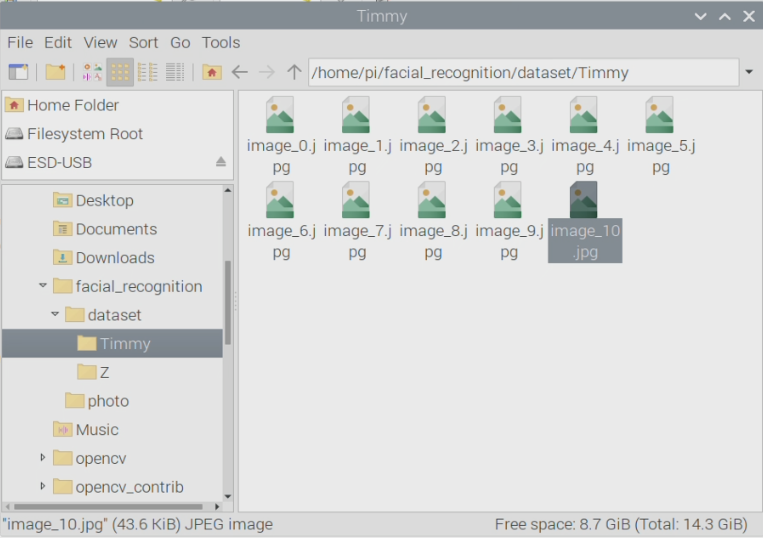
Once you close the software you will be able to see the images of your face stored in the folder you created for your name. You can add other faces using this same method too. Below you can see an image of the photos stored in the Timmy folder.
With that all sorted we can get to the Machine Learning step. The pictures we took will be used by the Python code | train_model.py |. Any pictures in the dataset folder location will be analysed by this code when we run it. Open up a new terminal using the black console button on the top left and type the following pressing enter after each line.
cd facial_recognition
python train_model.py
This will start the training process which you can see occurring for each image that I took of my face in the image below.
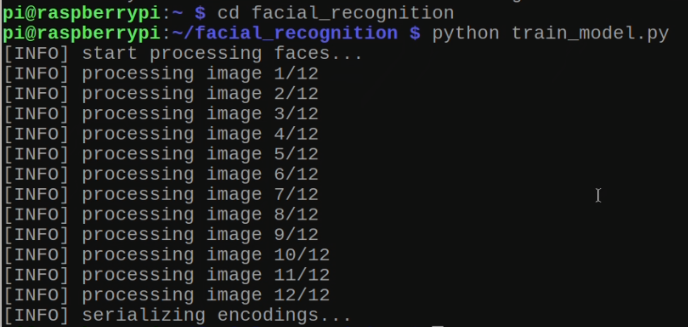
Then with that completed the Raspberry Pi 4 Model B will have learned what your face looks like.
Demonstration
So, let us give this a go. To run example code that will identify faces and if they find a face trained will write their name next to it. Start by opening a new terminal the same as before. Then type the following and press enter after each step.
cd facial_recognition
python facial_req.py
Below is what this looks like typed into the console. It will take ~5 Secs to boot up and run.
Then you will see a small window pop up with a live stream of the Raspberry Pi Camera. Aim the camera at your face and if it puts a yellow box around your head and names you correctly, you have done it! The Raspberry Pi Camera is searching for faces and when it has been supplied with one it will draw a square box around the face. It will also determine if it is a known face displaying Unknown if it is not a known face and the name of the person if it is. See the images below of when I supply my face.
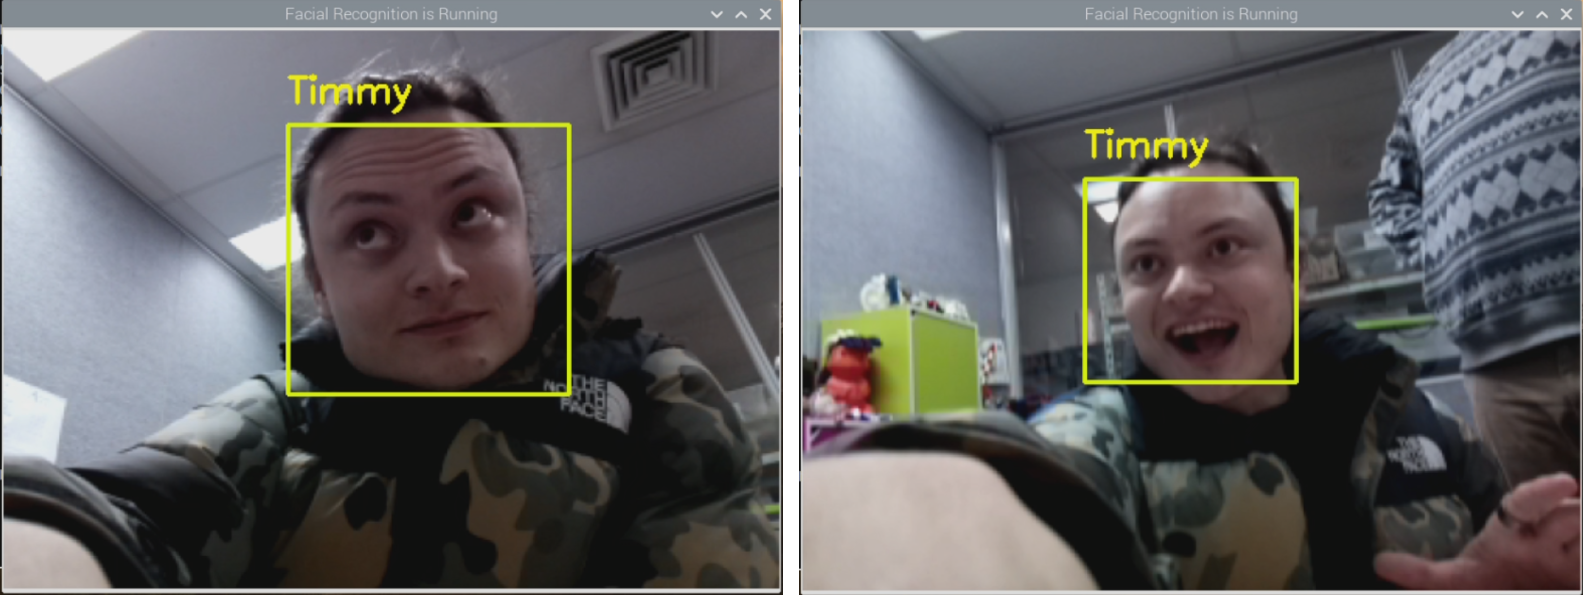
This example code is awesome and lets you experiment to see when the software can or cannot track your face. I find if you tip your head to the side a couple of degrees it will completely disable facial recognition and if you cover your nose it struggles as well. Close the terminal window or press Ctrl C on the Keyboard to stop the script running.
Note - If a Raspberry Pi Camera is attached via the CSI port do the following to the | facial_req.py | code by right-clicking it and opening it with Thonny. Edit the following lines. Delete this line | vs = VideoStream(src=0).start() | and uncomment this line | vs = VideoStream(usePiCamera=True).start()t |. Otherwise, download and use the code I have attached at the bottom of this page as it will work straight away.
Where to Now
So we can do so many things with this now (like imagine making a robot that sings you happy birthday on your birthday when it sees your face). Simply to start can now jump into the folders with the Python code and alter some lines of code in the | facial_req.py | so that every time a known face is seen it will send out signals via the GPIO pin of the Raspberry Pi. These GPIO pins can be used to control an almost endless amount of sensors and mechanisms.
So I will get a servo to rotate when the Raspberry Pi system sees my face. If it sees someone else face or nobody's face it will not activate the servo.
Start by opening up | facial_req.py | file in Thonny. All the code I will be adding to | facial_req.py | is completely explained in the guide Controlling Standard Servos with Raspberry Pi. First I will Import Angular Servo and add the details about my particular servo. You can see this line of code I add in the image below.
Then a little further down in the code you can add these lines which I have highlighted in red below. These lines will turn the servo when the If statement is satisfied which would be when my head is recognised by the software.
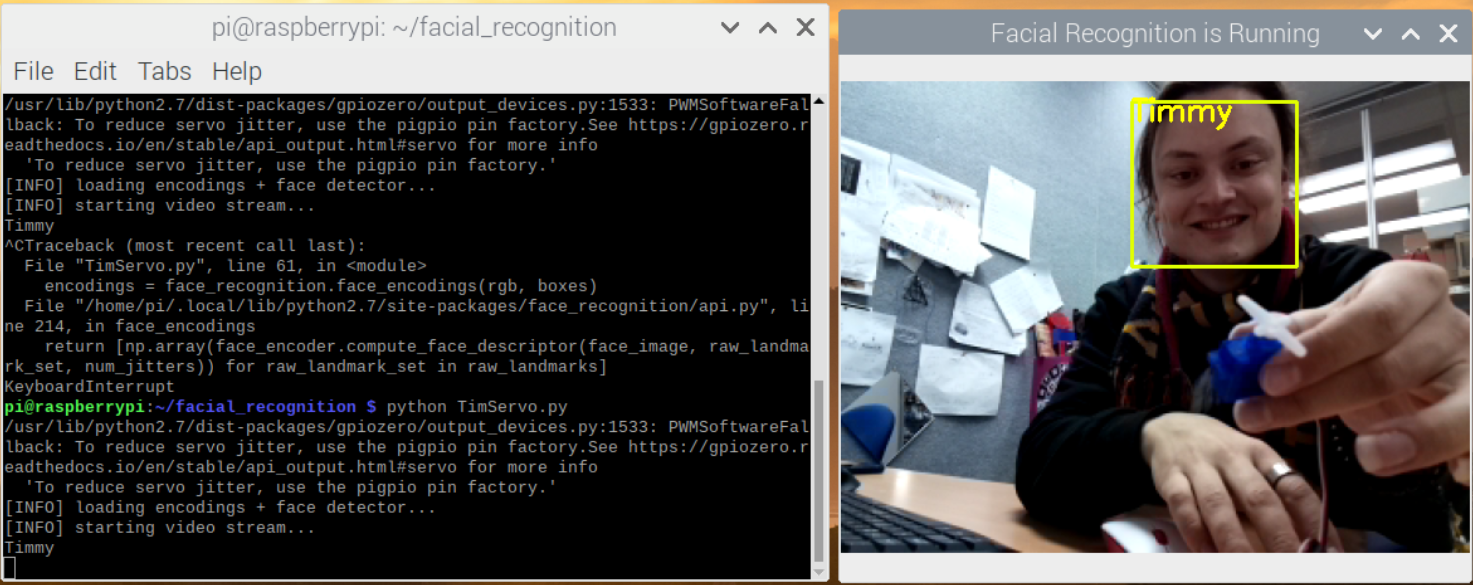
Then I saved the code as a new file (in my case I saved it as | TimServo.py | in the same folder location as the others) and ran the code using the terminal as before. Then once it booted up the servo would rotate whenever it recognised my face. See the image below of this happening.
Acknowledgment
Huge thanks go to the Open-CV and Facial Recognition Package teams that work on the amazing machine learning software that we have running on the Raspberry Pi. Both are really good Open Source software. Also a huge thank you to Caroline Dunn who created the amazing software that makes these two systems work so well together. There is just so much potential with this software to take projects to amazing places.
Setting Up Open-CV and Facial Recognition From Scratch
This will be a long stream of terminal commands forewarning. This will also take a substantial amount of time. I am currently testing out another method to make this process faster
This is an in-depth procedure to follow to get your Raspberry Pi to install Open-CV. Turn on a fresh version of Raspberry Pi running Raspberry Pi 'Buster' OS and connect it to the Internet.
Open up the Terminal by pressing the Terminal Button found on the top left of the button. Copy and paste each command into your Pi’s terminal, press Enter, and allow it to finish before moving onto the next command. If ever prompted, “Do you want to continue? (y/n)” press Y and then the Enter key to continue the process.
pip install picamera[array]
Sudo apt-get update
Sudo apt-get upgrade
sudo apt install cmake build-essential pkg-config git
sudo apt install libjpeg-dev libtiff-dev libjasper-dev libpng-dev libwebp-dev libopenexr-dev
sudo apt install libavcodec-dev libavformat-dev libswscale-dev libv4l-dev libxvidcore-dev libx264-dev libdc1394-22-dev libgstreamer-plugins-base1.0-dev libgstreamer1.0-dev
sudo apt install libgtk-3-dev libqtgui4 libqtwebkit4 libqt4-test python3-pyqt5
sudo apt install libatlas-base-dev liblapacke-dev gfortran
sudo apt install libhdf5-dev libhdf5-103
sudo apt install python3-dev python3-pip python3-numpy
The change the number on CONF_SWAPSIZE = 100 to CONF_SWAPSIZE=2048. Having done this press Ctrl-X, Y, and then Enter Key to save these changes. This change is only temporary and we will be changing it back. To have these changes affect anything we must restart the swapfile by entering the following command to the terminal. Then we will resume Terminal Commands as normal.
sudo systemctl restart dphys-swapfile
git clone https://github.com/opencv/opencv.git
git clone https://github.com/opencv/opencv_contrib.git
mkdir ~/opencv/build
cd ~/opencv/build
cmake -D CMAKE_BUILD_TYPE=RELEASE \
-D CMAKE_INSTALL_PREFIX=/usr/local \
-D OPENCV_EXTRA_MODULES_PATH=~/opencv_contrib/modules \
-D ENABLE_NEON=ON \
-D ENABLE_VFPV3=ON \
-D BUILD_TESTS=OFF \
-D INSTALL_PYTHON_EXAMPLES=OFF \
-D OPENCV_ENABLE_NONFREE=ON \
-D CMAKE_SHARED_LINKER_FLAGS=-latomic \
-D BUILD_EXAMPLES=OFF ..
make -j$(nproc)
This | make | Command will take over an hour to install and there will be no indication of how much longer it will take. It may also freeze the monitor display. Be ultra patient and it will work. Once complete you are most of the way done. Then we will resume terminal commands.
sudo make install
sudo ldconfig
pip install face-recognition --no-cache-dir
This | pip install face-recognition| Command will take over 40 mins to install and there will be no indication of how much longer it will take. Be ultra patient and it will work. Once complete you are most of the way done. Then we will resume terminal commands.
pip install imutils
We must now return the swapfile before running the next set of commands. To do this type into Terminal this line.
sudo nano /etc/dphys-swapfile
The change the number on CONF_SWAPSIZE = 2048 to CONF_SWAPSIZE=100. Having done this press Ctrl-X, Y, and then Enter Key to save these changes. This returns the Swapfile to normal. To have these changes affect anything we must restart the swapfile by entering the following command to the terminal. Then we will resume terminal Commands as normal.
sudo systemctl restart dphys-swapfile
git clone https://github.com/carolinedunn/facial_recognition
Below is all the code you need to get up and running with these examples above. They have been fully commented so you can easily understand and alter them to do exactly what you want for your purposes.


