[Update – We have released a new and updated version of this guide that works on newer Raspberry Pis, runs faster, and uses a more powerful model.
We are leaving this old guide up for legacy reasons and if you do choose to follow this guide, until there is correct compatibility of OPEN-CV with the new Raspberry Pi ‘Bullseye’ OS we highly recommend at this stage flashing and using the previous Raspberry Pi ‘Buster’ OS onto your Micro-SD for use with this guide – Official 'Buster' Image Download Link Here]
This guide is going to blend machine learning and open-source software together with the Raspberry Pi ecosystem. One of the open-source software used here is Open-CV which is a huge resource that helps solve real-time computer vision and image processing problems. This will be a second foray into Open-CV landscape with Raspberry Pi and Facial Recognition being the first. We will also utilise an already trained library of objects and animals from the Coco Library. The Coco (Common Object in Context) Library is large-scale object detection, segmentation, and captioning dataset. This trained library is how the Raspberry Pi will know what certain objects and animals generally look like. You can find pre-trained libraries for all manner of objects, creatures, sounds, and animals so if this particular library here does not suit your needs you can find many others freely accessible online. The library used here will enable our Raspberry Pi will be able to identify 91 unique objects/animals and provide a constantly updating confidence rating. The contents of this guide are as follows.
- What You Need
- Code Demonstration and Explanation
- How to Adjust Code to Look for a Single Object
- Acknowledgments
- Setting Up Open-CV for Object Detection
- Download Location for Codes and Trained Coco Library
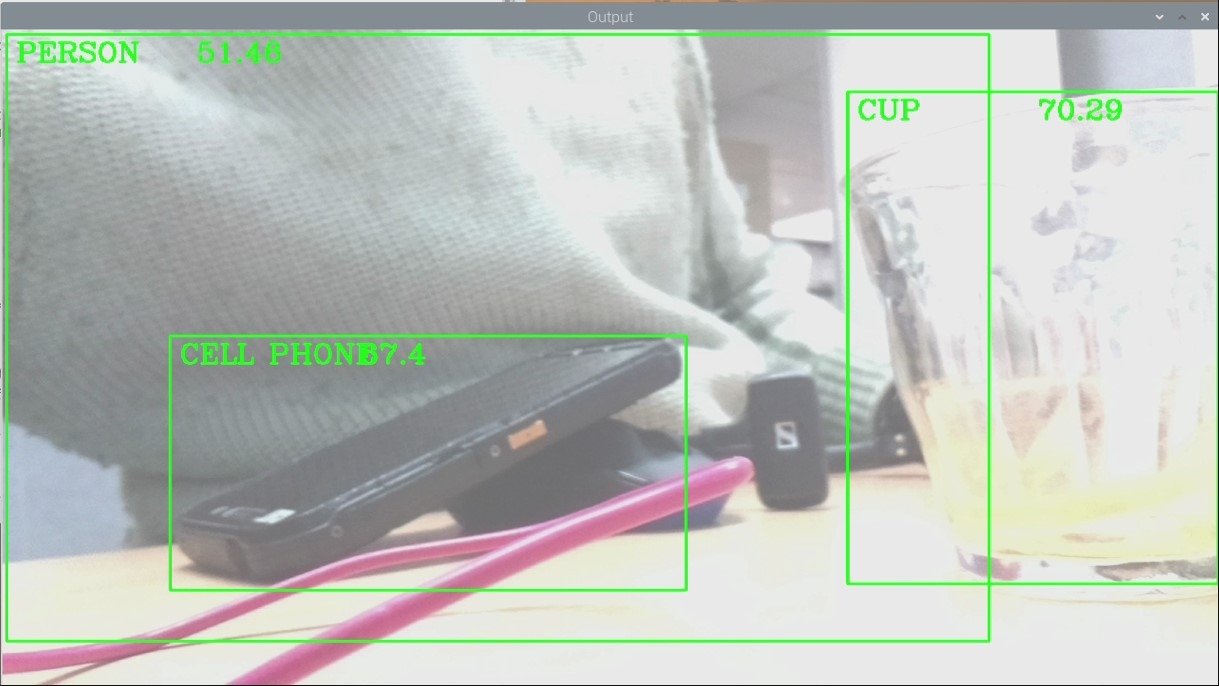
Once set up you will be able to use video data coming in from a Raspberry Pi Camera to identify all kinds of everyday objects. You can see below correctly identifying me in a live feed as a person with 51% certainty, a cup with 70% certainty, and a cell phone with 67% certainty. Super neat for a computer that can fit in the size of your palm particularly when considering there is a lot going on and the camera is at a weird angle.
Machine learning has never been more accessible and this guide will demonstrate this. Attached at the bottom of this page is a downloadable zip file with all the code utilised and the trained COCO library to get you using this ASAP. Also if you are interested in more Open-CV check out the guides Speed Camera With Raspberry Pi, QR codes with Raspberry Pi, Pose Estimation/Face Masking with Raspberry Pi, or Face and Movement Tracking with a Pan-Tilt System. As always if you have got any questions, queries, or things you'd like to see added please let us know your thoughts!
What You Need
Below is a list of the components you will need to get this system up and running real fast.
- Raspberry Pi 4 Model B (Having the extra computing power 'oomph' that the Pi provides is crucial for this task)
- Raspberry Pi Official Camera Module V2 (You can also use the Raspberry Pi High-Quality Camera)
- Micro SD Card
- Power Supply
- Monitor
- HDMI Cord
- Mouse and Keyboard
Code Demonstration and Explanation
The fast way to get up and running with object recognition on the Raspberry Pi is to do the following. Flash a micro-SD card with a fresh version of Raspberry Pi OS. Link on how to flash micro-SD with Raspberry Pi OS found here. With the Micro-SD Card flashed you can install it into your Raspberry Pi.
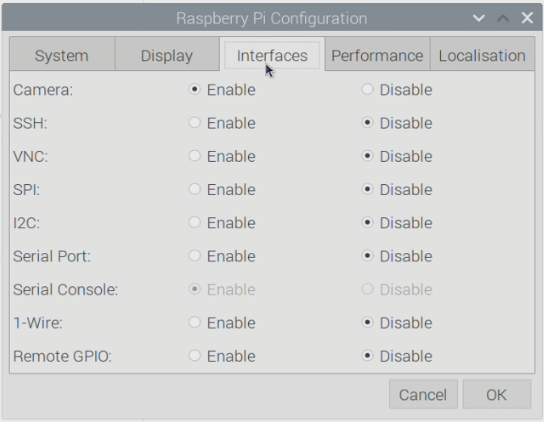
Then make sure to have the Raspberry Pi connected to a Monitor with peripheries and that a Pi Camera is installed in the correct slot with the ribbon cable facing the right way and start the Open-CV install process seen below. With that complete, you will have Open-CV installed onto a fresh version of Raspberry Pi OS. Then open up the Raspberry Pi Configuration menu (found using the top left Menu and scrolling over preferences) and enable the Camera found under the Interfaces tab. After enabling reset your Raspberry Pi. See the image below for the setting location.
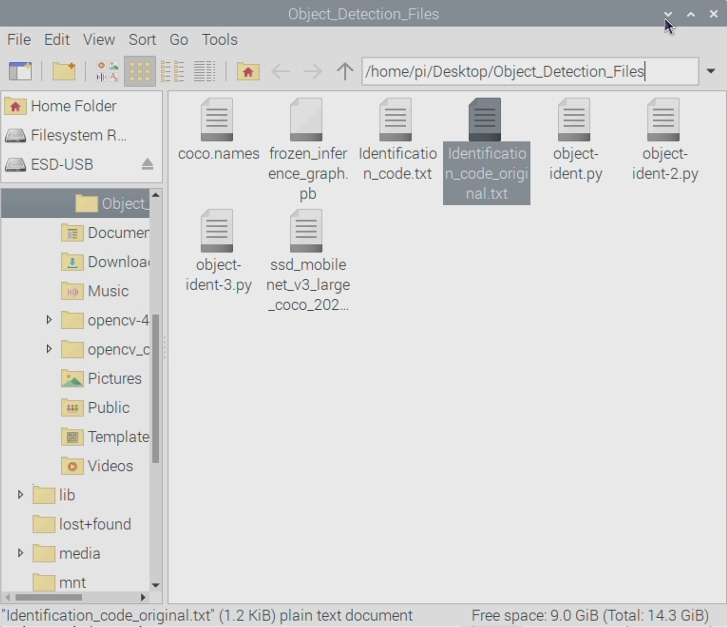
Once that is complete the next step is to download the ZIP file found at the bottom of this page and unzip the contents into the | /home/pi/Desktop | directory. It is important that it goes in this directory as this is where the Code will be searching for the object's name and the trained library data. A Coco Library is being used for this demonstration as it has been trained to identify a whole bunch of normal everyday objects and animals. It also has been trained with some less likely to encounter animals like a giraffe and a zebra. In the ZIP file is a notepad list of all the trained objects.
Below is the code that I use to make this all operate written out longhand. You can copy and paste this into either Thonny or Geany IDE (both are just Python Language Interpreter Software). Otherwise, you can right-click and open the file | object-indent.py | with Thonny IDE. The code is fully annotated to help understanding.
#Import the Open-CV extra functionalities
import cv2

#This is to pull the information about what each object is called
classNames = []
classFile = "/home/pi/Desktop/Object_Detection_Files/coco.names"
with open(classFile,"rt") as f:
    classNames = f.read().rstrip("\n").split("\n")

#This is to pull the information about what each object should look like
configPath = "/home/pi/Desktop/Object_Detection_Files/ssd_mobilenet_v3_large_coco_2020_01_14.pbtxt"
weightsPath = "/home/pi/Desktop/Object_Detection_Files/frozen_inference_graph.pb"

#This is some set up values to get good results
net = cv2.dnn_DetectionModel(weightsPath,configPath)
net.setInputSize(320,320)
net.setInputScale(1.0/ 127.5)
net.setInputMean((127.5, 127.5, 127.5))
net.setInputSwapRB(True)

#This is to set up what the drawn box size/colour is and the font/size/colour of the name tag and confidence label
def getObjects(img, thres, nms, draw=True, objects=[]):
    classIds, confs, bbox = net.detect(img,confThreshold=thres,nmsThreshold=nms)
#Below has been commented out, if you want to print each sighting of an object to the console you can uncomment below
#print(classIds,bbox)
    if len(objects) == 0: objects = classNames
    objectInfo =[]
    if len(classIds) != 0:
        for classId, confidence,box in zip(classIds.flatten(),confs.flatten(),bbox):
            className = classNames[classId - 1]
            if className in objects:
                objectInfo.append([box,className])
                if (draw):
                    cv2.rectangle(img,box,color=(0,255,0),thickness=2)
                    cv2.putText(img,classNames[classId-1].upper(),(box[0] 10,box[1] 30),
                    cv2.FONT_HERSHEY_COMPLEX,1,(0,255,0),2)
                    cv2.putText(img,str(round(confidence*100,2)),(box[0] 200,box[1] 30),
                    cv2.FONT_HERSHEY_COMPLEX,1,(0,255,0),2)

    return img,objectInfo

#Below determines the size of the live feed window that will be displayed on the Raspberry Pi OS
if __name__ == "__main__":

    cap = cv2.VideoCapture(0)
    cap.set(3,640)
    cap.set(4,480)
    #cap.set(10,70)

#Below is the never ending loop that determines what will happen when an object is identified.
    while True:
        success, img = cap.read()
#Below provides a huge amount of controll. the 0.45 number is the threshold number, the 0.2 number is the nms number)
        result, objectInfo = getObjects(img,0.45,0.2)
        #print(objectInfo)
        cv2.imshow("Output",img)
        cv2.waitKey(1)
Then with the code open like in the image below you can press run on your code and you will see a window open up showing a live feed of exactly what the Raspberry Pi 4 Model B is seeing through the Official Raspberry Pi Camera. Whenever it sees an object it knows it will draw a green box around it as well as giving it a label and confidence rating. If it sees multiple objects that it knows then it will create multiple boxes and labels. You can also tinker with the threshold percentage value, increasing this means the software will only draw a box around an object when it is absolutely sure. Another option worth tinkering with is the nms percentage value, increasing this will limit the amount of simultaneously identified objects. Honestly incredible how clever this Raspberry Pi can be with computer vision. Part of the fun now is experimenting with what it can and cannot identify, for example, we found that it can't identify certain shoe brands. Talking of shoes, running this code continuously gets the Raspberry Pi hot so definitely, a good idea to provide it with some cooling.
How to Adjust Code to Look for a Single Object
It is immensely valuable to be able to look just for a single object and ignore all the others. That way you can observe how many cups you see during the day but not how many humans are holding the cups. This is also a very useful way to make the Raspberry Pi run the live preview window with higher frames per second.
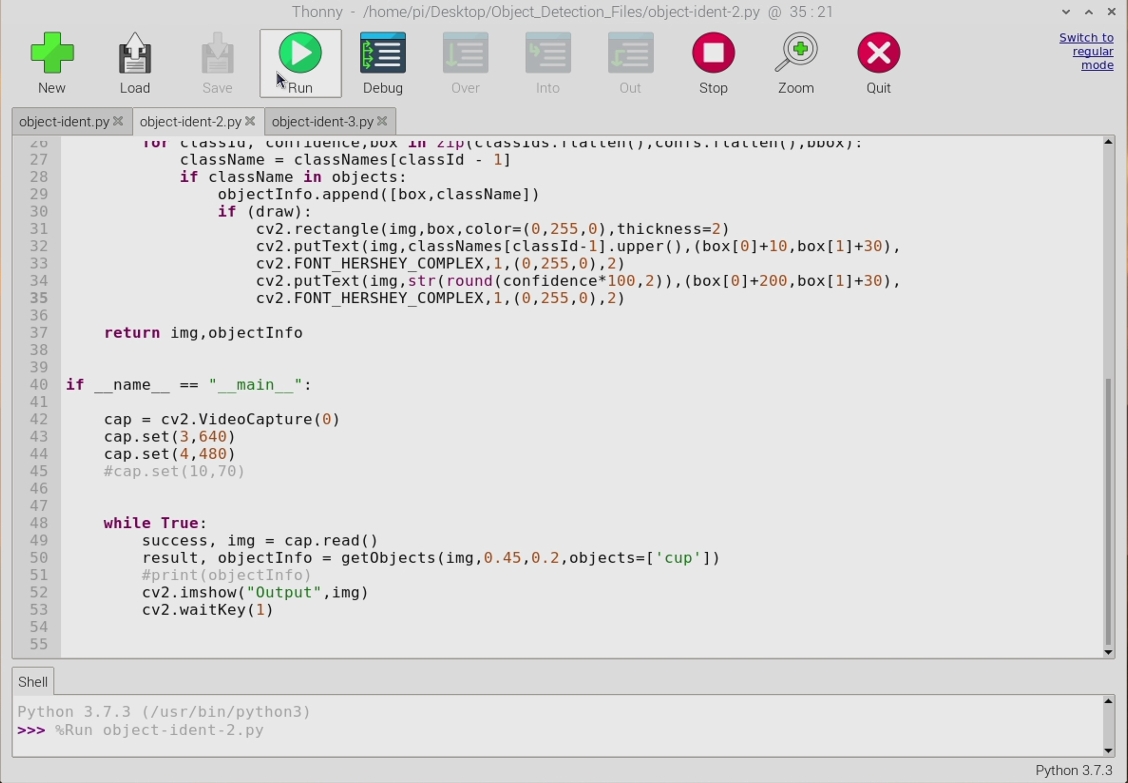
To do this we will alter the supplied code only slightly, literally altering a single line can achieve this for you. I am altering line 50 just slightly at the end to | result, objectInfo = getObjects(img,0.45,0.2,objects=['cup'] |. Having done this save and run this script. You can see the script open in the image below and further below that a close-up with an outline of what exactly I am altering in the code.
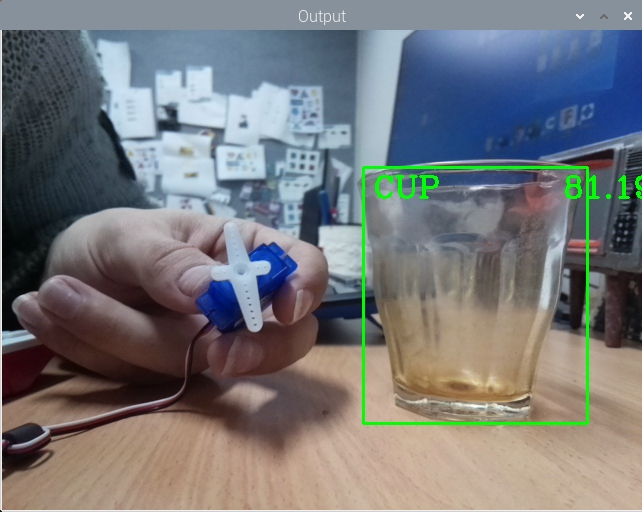
Running the above code will open a new window on the Raspberry Pi OS which will have a live feed showing exactly what the attached Raspberry Pi Camera is seeing. The Raspberry Pi will ignore everything except for cups. Then whenever it sees what it thinks is a cup it will draw a box around it on the live feed, label it and provide a confidence rating. See below for a demonstration of this, my coffee cup below has been identified with a confidence rating of 77% which is pretty swell.
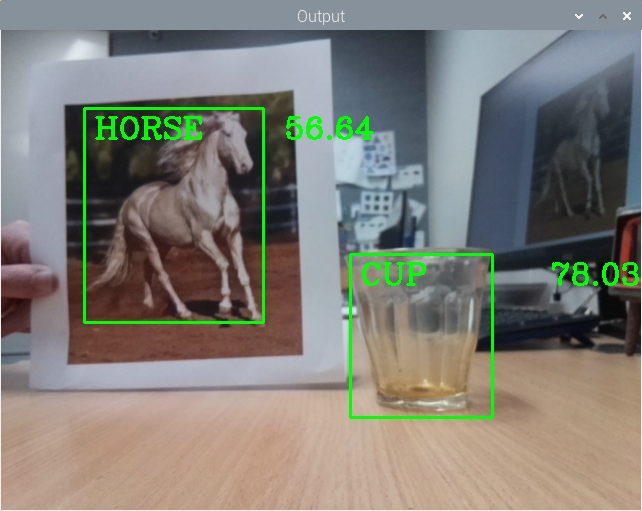
Now if you wanted to identify a cup and a horse and only these two things you would edit line 50 so that it states the following | result, objectInfo = getObjects(img,0.45,0.2,objects=['cup','horse'] |. Then once you save the code and press play it will do just as desired. See below the effects of running the code with this change (doing exactly what we want), the exact code to run this is the | object-ident-2.py | script found at the bottom of this page.
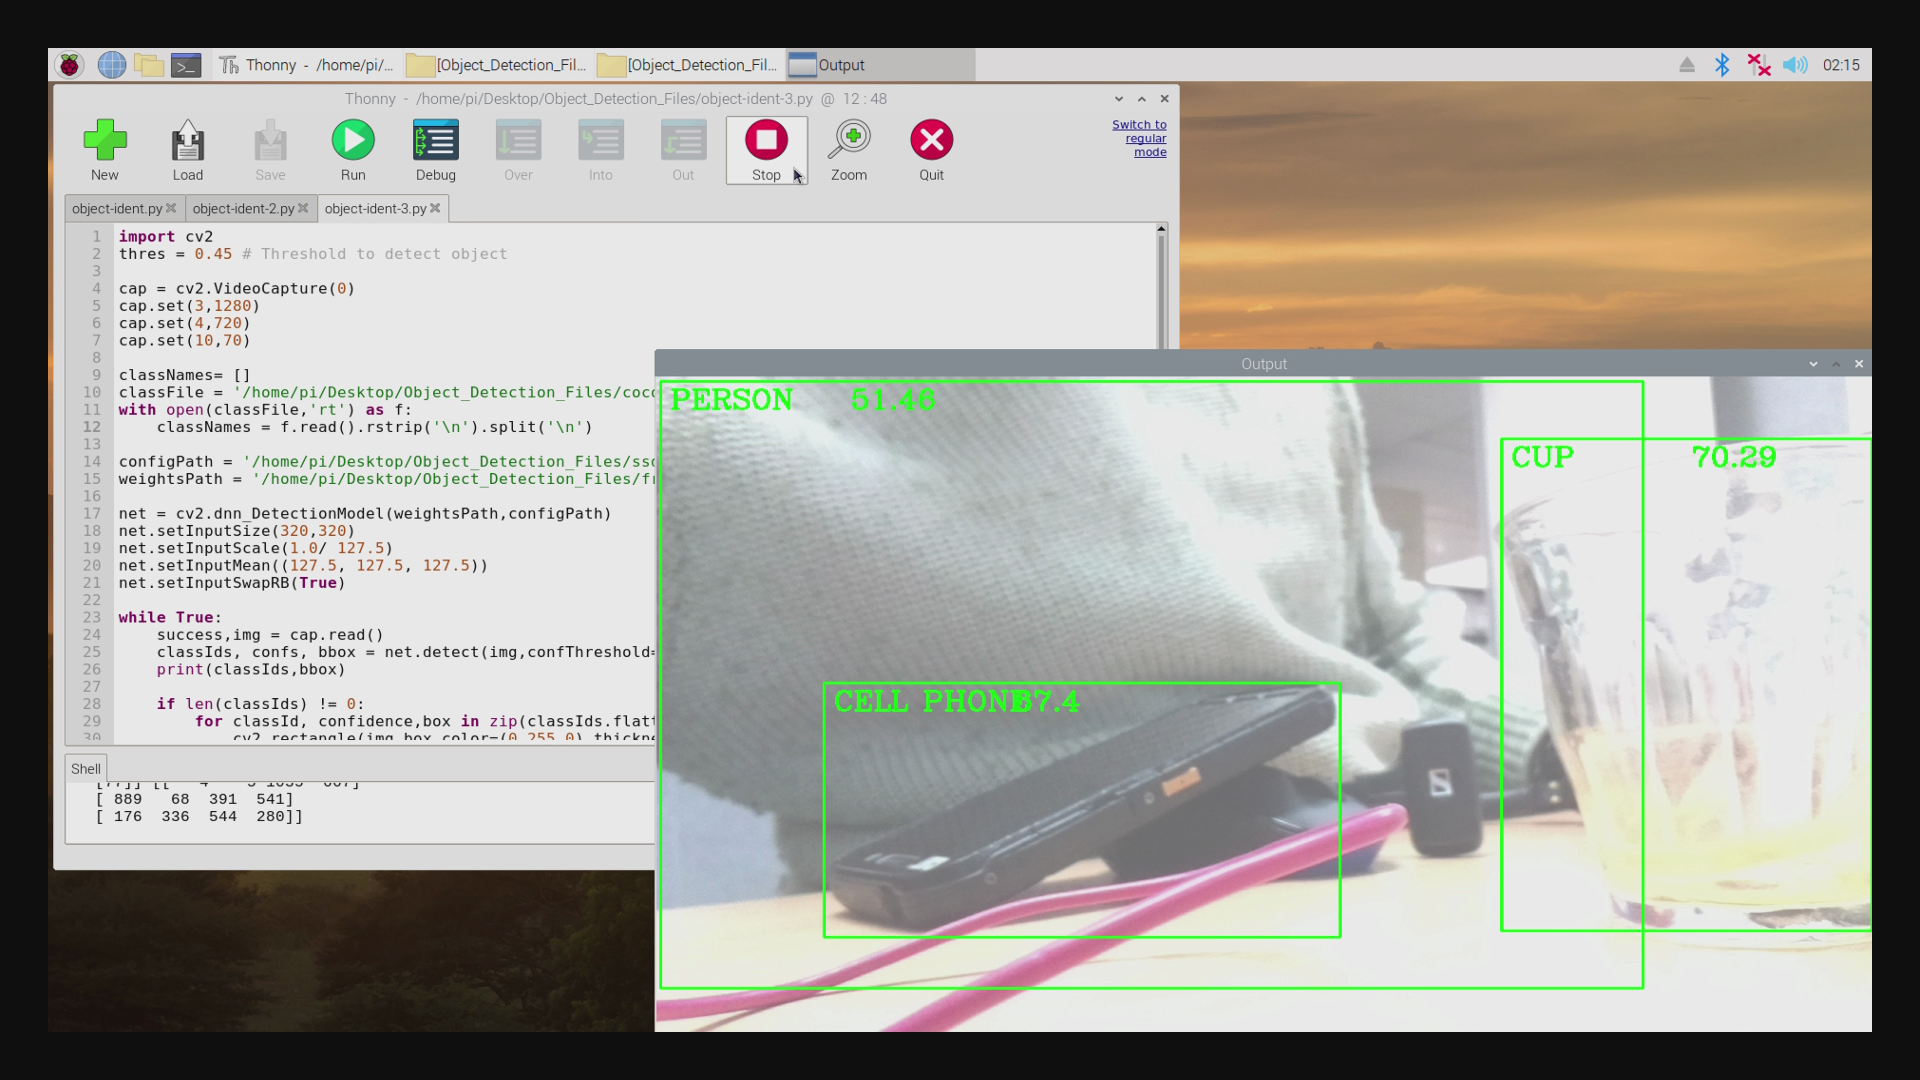
As an interesting note, you can add all kinds of code inside this set-up which will activate hardware whenever your Raspberry Pi identifies an object. The | object-ident-3.py | script adds GPIO control for a Servo done in a very similar vein to the GPIO Servo Control section in the Facial Recognition with Raspberry Pi guide. Therefore whenever your Raspberry Pi identifies a cup it will activate the servo, this you can see occurring in the image below. You can see the exact code running this by downloading the zip file at the bottom of this page.
Acknowledgments
Two websites that are great for open source machine learning for all kinds of platforms and great tool for learning all about deep learning and computer vision are -
1. https://www.computervision.zone/
2. https://www.pyimagesearch.com/
If you are interested in training your own libraries software, controlling drones with body gestures or fostering a deep understanding of this machine learning topic these are great springboards and have been great help to me.
Setting Up Open-CV for Object Detection
This is an in-depth procedure to follow to get your Raspberry Pi to install Open-CV that will work with Computer Vision for Object Identification. Soon I will create either a script/a separate tutorial to streamline this process. Turn on a Raspberry Pi 4 Model B running a fresh version of Raspberry Pi 'Buster' OS and connect it to the Internet.
Open up the Terminal by pressing the Terminal Button found on the top left of the button. Copy and paste each command into your Pi’s terminal, press Enter, and allow it to finish before moving onto the next command. If ever prompted, “Do you want to continue? (y/n)” press Y and then the Enter key to continue the process.
sudo apt-get update && sudo apt-get upgrade
We must now expand the swapfile before running the next set of commands. To do this type into terminal this line.
sudo nano /etc/dphys-swapfile
The change the number on CONF_SWAPSIZE = 100 to CONF_SWAPSIZE=2048. Having done this press Ctrl-X, Y, and then Enter Key to save these changes. This change is only temporary and you should change it back after completing this. To have these changes affect anything we must restart the swapfile by entering the following command to the terminal. Then we will resume Terminal Commands as normal.
sudo apt-get install build-essential cmake pkg-config
sudo apt-get install libjpeg-dev libtiff5-dev libjasper-dev libpng12-dev
sudo apt-get install libavcodec-dev libavformat-dev libswscale-dev libv4l-dev
sudo apt-get install libxvidcore-dev libx264-dev
sudo apt-get install libgtk2.0-dev libgtk-3-dev
sudo apt-get install libatlas-base-dev gfortran
sudo pip3 install numpy
wget -O opencv.zip https://github.com/opencv/opencv/archive/4.4.0.zip
wget -O opencv_contrib.zip https://github.com/opencv/opencv_contrib/archive/4.4.0.zip
unzip opencv.zip
unzip opencv_contrib.zip
cd ~/opencv-4.4.0/
mkdir build
cd build
cmake -D CMAKE_BUILD_TYPE=RELEASE \
-D CMAKE_INSTALL_PREFIX=/usr/local \
-D INSTALL_PYTHON_EXAMPLES=ON \
-D OPENCV_EXTRA_MODULES_PATH=~/opencv_contrib-4.4.0/modules \
-D BUILD_EXAMPLES=ON ..
make -j $(nproc)
This | make | Command will take over an hour to install and there will be no indication of how much longer it will take. It may also freeze the monitor display. Be ultra patient and it will work. Once complete you are most of the way done. If it fails at any point and you receive a message like | make: *** [Makefile:163: all] Error 2 | just re-type and enter the above line | make -j $(nproc) |. Do not fear it will remember all the work it has already done and continue from where it left off. Once complete we will resume terminal commands.
sudo make install && sudo ldconfig
sudo reboot
At this point the majority of the installation process is complete and you can now change back the Swapfile so that the CONF_SWAPSIZE = 100.
Download Location for Codes and Trained Coco Library
Attached below is the Code and Coco library utilised with this set-up. Also inside the zip is a list of all the objects that the Coco library has trained with.
Worth noting - you can find pre-trained libraries for all manner of objects, creatures, sounds, and animals so if this library does not suit your needs you can find many others online. Raspberry Pi hardware can take advantage of these pre-trained libraries but I would recommend against creating trained libraries with a Raspberry Pi because of the intense computing power required to do the training.

