In this guide, we will be learning how to install the Ultralytics YOLO Vision Package on a Raspberry Pi with Conda. This package is going to allow you to run nearly any YOLO model supported by Ultralytics, and we will also give you some demo code for the Pi to get you going.
This is not a comprehensive guide on using YOLO models in your projects, but we do have other guides covering that topic linked in the "Where to From Here?" section of the guide. Also note - there is AI hardware out there for the Pi, like the AI HAT+ and AI camera. This guide will not work for those specialised hardware accelerators. This guide is specifically about running YOLO on the Pi 5's CPU only. It is slower than using dedicated AI hardware, but it's often easier to use and is fast enough for most maker projects. We also have separate guides for those AI-specific boards, which will be linked as well.
One final important note: the instructions we are about to show you work at the time of writing this guide, and should continue to work for a good amount of time. However, just in case there is ever an update in the future that breaks this installation process, you can find a backup set of installation instructions at the end of this guide. This backup method will install an older version that is known to work. But you should try the main installation method first, as the newest version will let you use the latest and greatest YOLO models.
IMPORTANT: This installation method will only work with the 64-bit version of Bookworm OS. This will not fork on Trixie OS or newer, so you will need to install the older Bookworm OS.
What You Will Need
To follow along, you will need a:
- Raspberry Pi 5 - Either a 4GB, 8GB or 16GB model will work here. Although this could technically be done on a Pi 4, it is far slower than the Pi 5 and would not be a very nice experience (expect 2 to 3 times less FPS). We have not directly tested this method on a Pi 4, but theoretically it should work.
- Pi Camera - We are using the Camera Module V3.
- Adapter Cable - The Pi 5 comes with a different-sized CSI camera cable, and your camera may come with the older, thicker cable, so it's worth double-checking. The Camera Module V3 WILL need one.
- Cooling Solution - We are using the active cooler (computer vision will really push your Pi to its limits, hence you will need decent cooling).
- Power Supply
- Micro SD Card - At least 32GB in size.
Hardware Assembly
In terms of hardware assembly, it's pretty light here. Connect the thicker side of the cable to the camera, and the thinner side to the Pi 5. These connectors have a tab on them - lift them up, then insert the cable into the slot. Once it is sitting in there nicely and square, push the tab back down to clamp the cable into place.
Just keep an eye out as these connectors only work in one orientation, and they can be fragile, so avoid bending them tightly (a little bit is okay).

Installing Conda and Libmamba
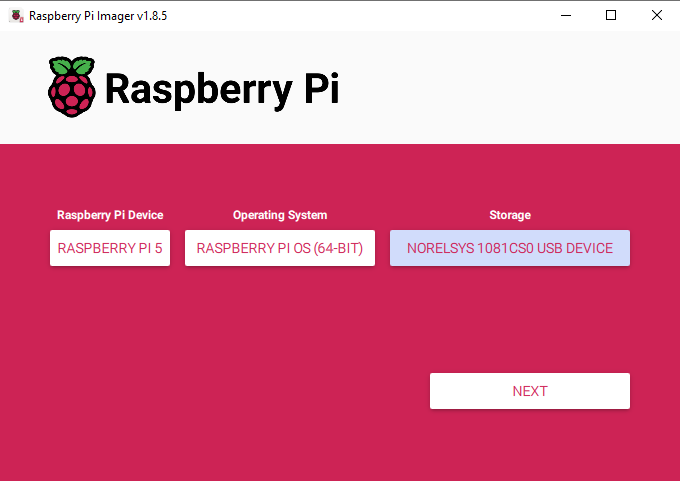
First of all, we need to install Pi OS onto the micro SD card. Using the Raspberry Pi Imager, select Raspberry PI 5 as the Device, Raspberry Pi OS (64-bit) as the Operating system, and your microSD card as the storage device.
NOTE: INSTALLING PI OS ON THE MICROSD CARD WILL WIPE ALL DATA ON IT.
This process may take a few minutes to download the OS. Once the process has finished, insert it into the Pi and boot it up. Your Pi will run through a first-time installation, just ensure that you connect it to the internet.
You will also need to remember the username you created, as it will be needed for the file locations we cover in this guide. For simplicity's sake, you can simply call it "pi" and all the instructions in this guide will work without modification.
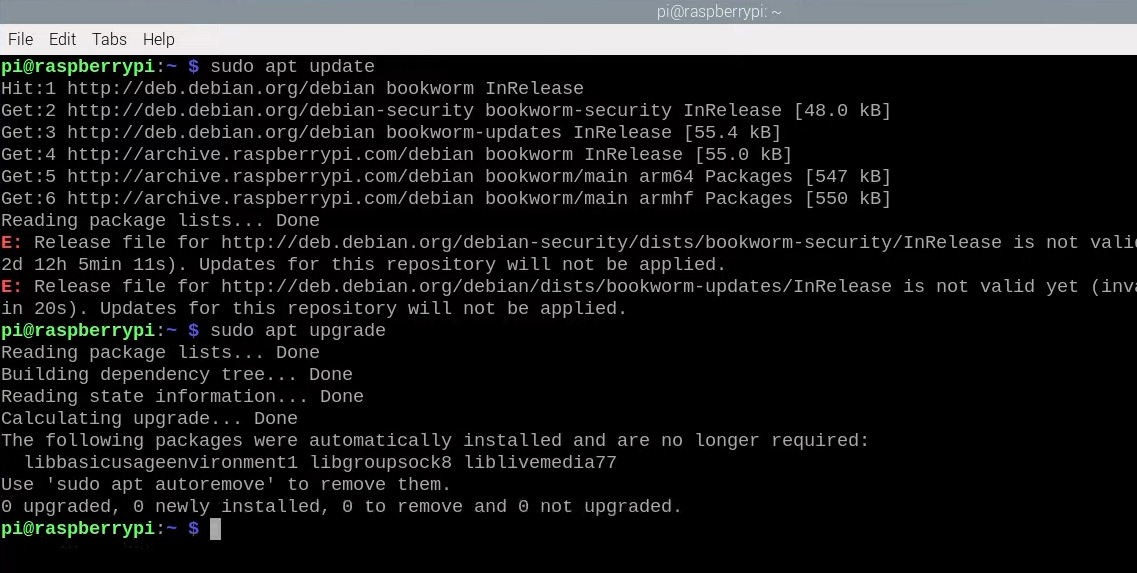
Once you are in the desktop, open a new terminal window and start with some good manners by updating and upgrading your system:
sudo apt update
sudo apt upgrade -y
This ensures we have the latest packages and updates before we begin our installation.
Now, usually we would use something like pip install ultralytics, but recent updates to the Ultralytics package have made it too complex for the standard pip package manager to install reliably on the Pi. There are just so many interdependent packages that pip often can't figure out which versions and in what order to install them. If you are lucky and manage to get it working with pip, you might be looking at a good hour or more of installation time, and chances are it won't be the latest version of the package.
This is why we are using Conda, which is a more advanced package manager that can deal with these complex dependency trees much more intelligently. Conda will not only allow us to actually install Ultralytics successfully, but it will also be much faster and more reliable.
Pip comes with your Pi by default; Conda does not, so we will need to install something called Miniforge. Miniforge is essentially a lightweight version of Conda that's specifically designed to work on ARM-based systems like the Raspberry Pi.
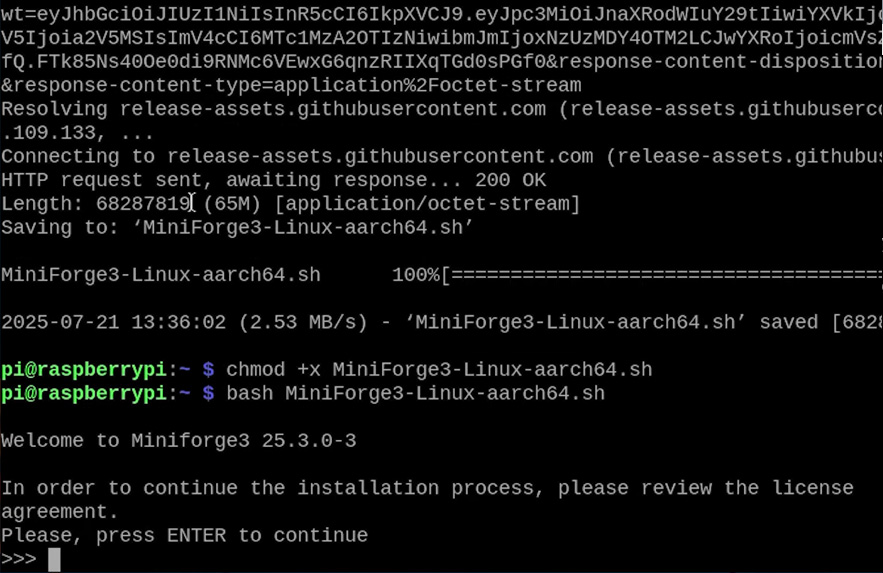
First, we'll download the Miniforge installer from GitHub with:
wget https://github.com/conda-forge/miniforge/releases/latest/download/Miniforge3-Linux-aarch64.sh
Then we will make that an executable file with chmod:
chmod +x Miniforge3-Linux-aarch64.sh
And then we will run it:
bash Miniforge3-Linux-aarch64.sh
You will be prompted to accept the user agreement. Press enter until you get to the end of the agreement, then press ctrl+c, then enter, then type yes to accept it.
After a brief installation, it will ask if you want to set Conda as your default installer. You most likely don't want this and should type no when asked.
Once the installation is finished, we need to activate Conda in our current terminal window:
source ~/miniforge3/bin/activate
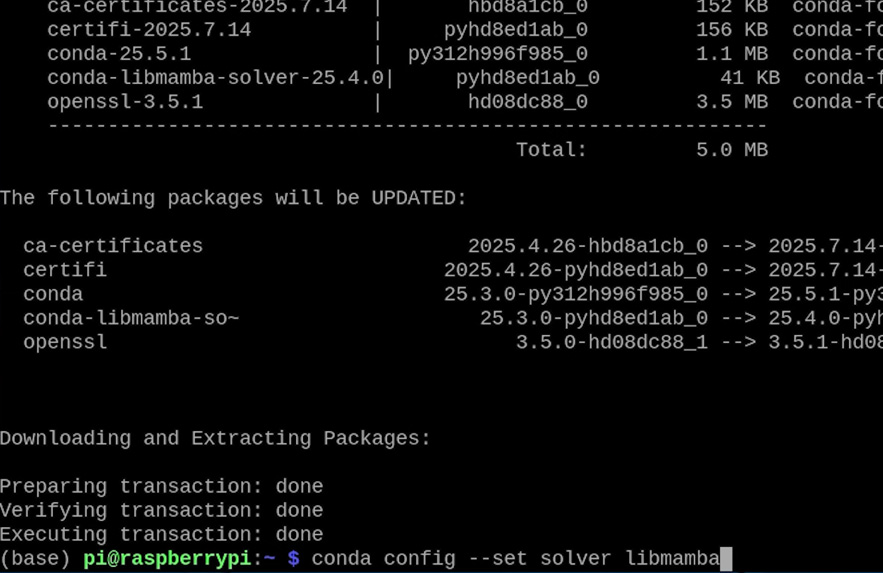
Now we're going to install something called the libmamba package solver. This is essentially going to beef up Conda and allow it to think much smarter about how it's going to resolve and install our complex packages – a really helpful optimisation to have:
conda install conda-libmamba-solver -y
Then we'll tell Conda to use libmamba by default:
conda config --set solver libmamba
And that's it! Conda is now set up and ready to be used for installing our packages.
Installing Ultralytics and Virtual Environments
Before installing anything, we need to create a virtual environment. A virtual environment is essentially a virtual space that all of our libraries will exist in, completely separate from the system's Python installation. This prevents conflicts and makes it easy to manage different projects with different requirements. We will create an environment called "ultralytics-env" with version 3.11 of Python, with the following line:
conda create --name ultralytics-env python=3.11 -y
Once that environment is created, we can set our terminal window to work in that environment:
conda activate ultralytics-env
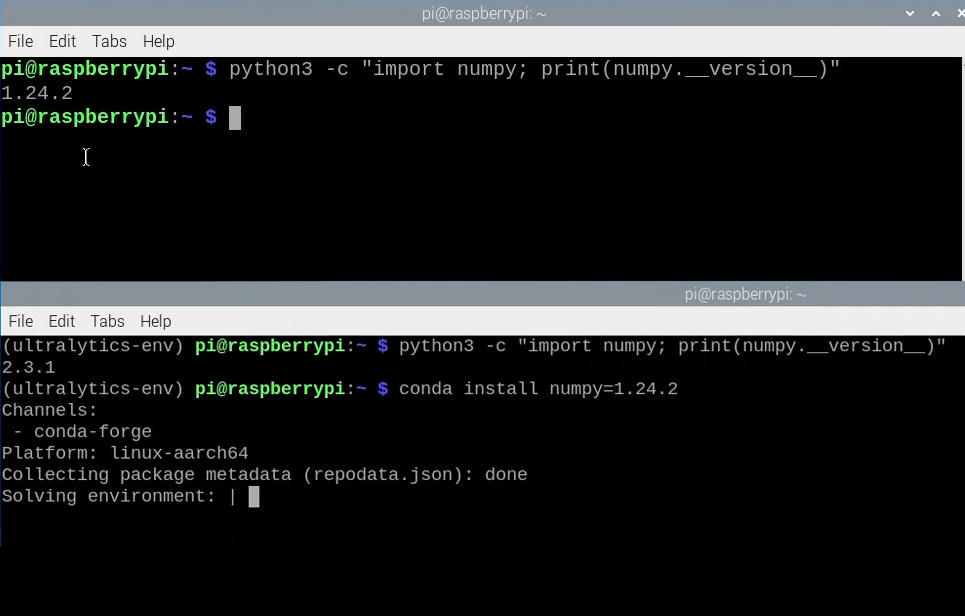
You can see we're now inside the environment because of the brackets showing (ultralytics-env) before our command prompt, like in the image on the right.
If you ever need to come back to this environment at a later date, or if you accidentally close the terminal window and need to get back into this environment, you can get back into it by initialising Conda:
source ~/miniforge3/bin/activate
Then activate the venv again:
conda activate ultralytics-env

Now let's install the Ultralytics package, you will need to enter y to confirm these installations:
conda install -c conda-forge ultralytics
Conda will show you a nice installation interface and handle all the dependencies automatically.
Once that's done, we need to install PyTorch, which is the deep learning framework that Ultralytics uses under the hood:
conda install -c pytorch pytorch torchvision cpuonly
Once that has finished, we have successfully installed the Ultralytics YOLO package! However, there is one more thing we need to do before we start using it...

Setting up Picamera2
We've successfully installed Ultralytics, but there's one more crucial component we need to add: PiCamera2. This is a package that comes with your Pi by default and handles all the camera interaction in our code. The challenge is that we can't just install it with Conda because it's extremely challenging to build from source and usually breaks the installation.
Instead, we need to tell our virtual environment to use the system packages that come with our Pi, including PiCamera2:
echo '/usr/lib/python3/dist-packages' > /home/pi/miniforge3/envs/ultralytics-env/lib/python3.11/site-packages/system-packages.pth
Note: You might need to change the path in this command depending on what username you picked during setup. We used "pi" so the path works as shown, but if you used a different username, you'll need to adjust the path accordingly (change the word pi with your username).
Now we've hit a bit of a compatibility snag. NumPy is a fundamental package used in nearly everything, and the version that PiCamera2 uses is quite a bit older than what Conda installs by default. This version mismatch will cause errors when we try to use the camera.
First, let's check what version of NumPy PiCamera2 is using. Open up a new terminal window (don't close the old one), and punch in the following:
python3 -c "import numpy; print(numpy.__version__)"
This will print out a version number. Get that version number and enter it with the following command, which will tell Conda to downgrade to this compatible version:
conda install numpy=1.24.2
Now, we have fully installed both Ultralytics and Picamera2 into a virtual environment we can use to run YOLO code.
Getting Thonny to use the Virtual Environment
There's one more step before we can run our Python code. We need to tell Thonny (the Python IDE that comes with Raspberry Pi OS) to use the virtual environment that we just created instead of the system Python.
The first time you open Thonny, it will be in the basic, streamlined mode. In the top right, press the button to use the default, advanced mode, and then restart Thonny.
Once you have restarted, select Run > Configure Interpreter and then under Python Executable, press the three dots to select a new one.
We will now need to navigate to /home/pi/miniforge3/envs/ultralytics-env/bin. In this folder, you will find a file called "Python", select it and hit okay.
Now Thonny will use our Conda environment with all the packages we've installed.

Test Code: Have You Installed It Correctly?
Create a new file in Thonny and paste in the following code:
import cv2
from picamera2 import Picamera2
from ultralytics import YOLO

# Set up the camera with Picam
picam2 = Picamera2()
picam2.preview_configuration.main.size = (800, 800)
picam2.preview_configuration.main.format = "RGB888"
picam2.preview_configuration.align()
picam2.configure("preview")
picam2.start()

# Load YOLOE prompt-free model
model = YOLO("yoloe-11s-seg.pt")

while True:
    # Capture a frame from the camera
    frame = picam2.capture_array()

    # Run YOLOE model on the captured fram
    results = model.predict(frame)

    # Output the visual detection data
    annotated_frame = results[0].plot(boxes=True, masks=False)

    # Get inference time
    inference_time = results[0].speed['inference']
    fps = 1000 / inference_time  # Convert to milliseconds
    text = f'FPS: {fps:.1f}'

    # Define font and position
    font = cv2.FONT_HERSHEY_SIMPLEX
    text_size = cv2.getTextSize(text, font, 1, 2)[0]
    text_x = annotated_frame.shape[1] - text_size[0] - 10  # 10 pixels from the right
    text_y = text_size[1] + 10  # 10 pixels from the top

    # Draw the text on the annotated frame
    cv2.putText(annotated_frame, text, (text_x, text_y), font, 1, (255, 255, 255), 2, cv2.LINE_AA)

    # Display the resulting frame
    cv2.imshow("Camera", annotated_frame)

    # Exit the program if q is pressed
    if cv2.waitKey(1) == ord("q"):
        break

# Close all windows
cv2.destroyAllWindows()
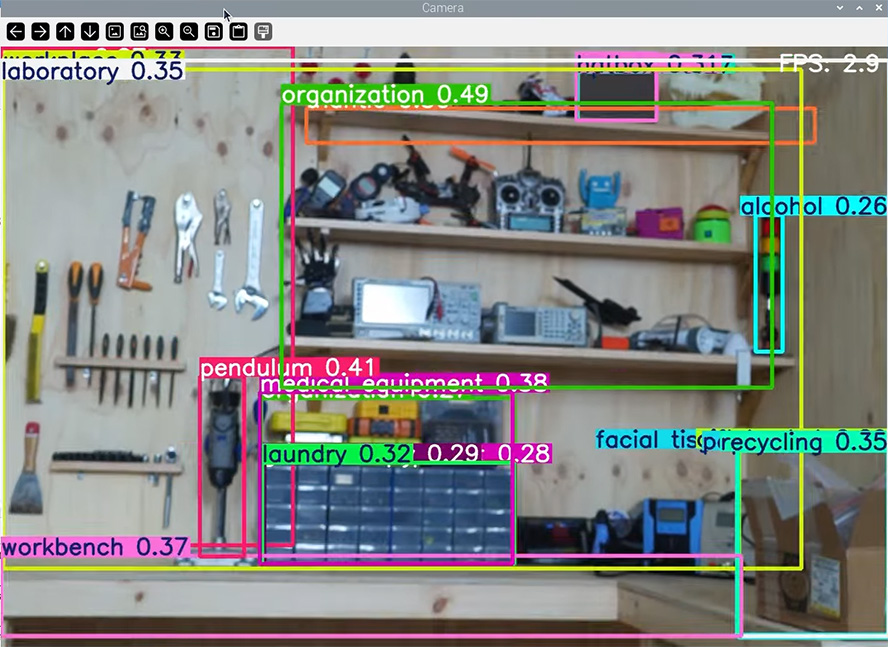
This is some super simple code that runs YOLOE object detection with a video feed from the camera module plugged into the Pi. The first time you run the code with a new installation of Ultralytics, it should automatically download the specified model, as well as any additional packages it needs. If you can run the code and see detection boxes appearing around objects in your camera feed, congratulations! You have set up everything correctly.
If something went wrong in this process, the first thing to do is to retry everything we covered here step by step. It's very easy to miss a step or accidentally type in the wrong command, and about half of the issues that people encounter stem from small mistakes like this.
Alternative Installation: A Backup Method
The instructions we outlined above should work for a good while. However, updates are inevitable, and sometimes this can cause conflicts that break installation methods. If the above doesn't work, in this section, we will outline a backup method that installs a known version that does. This version is likely to be older though so you may not get the newest and flashiest models with all their updates. This method should support all YOLO models up to YOLO12 (which was released a few months before this version)
To start with, follow all instructions until you have Conda and Libmamba installed. Once you have Conda ready to go, create a new file in your Pi's home folder (/home/pi/), and call it:
ultralytics-pi5-environment.yml
Inside that file, paste in the following:
name: ultralytics-env
channels:
  - pytorch
  - conda-forge
dependencies:
  - _openmp_mutex=4.5=3_kmp_llvm
  - alsa-lib=1.2.14=h86ecc28_0
  - aom=3.9.1=hcccb83c_0
  - attr=2.5.1=h4e544f5_1
  - brotli=1.1.0=h86ecc28_3
  - brotli-bin=1.1.0=h86ecc28_3
  - brotli-python=1.1.0=py311h89d996e_3
  - bzip2=1.0.8=h68df207_7
  - c-ares=1.34.5=h86ecc28_0
  - ca-certificates=2025.7.14=hbd8a1cb_0
  - cairo=1.18.4=h83712da_0
  - certifi=2025.7.14=pyhd8ed1ab_0
  - cffi=1.17.1=py311h14e8bb7_0
  - charset-normalizer=3.4.2=pyhd8ed1ab_0
  - colorama=0.4.6=pyhd8ed1ab_1
  - contourpy=1.3.2=py311hc07b1fb_0
  - cpuonly=2.0=0
  - cpython=3.11.13=py311hd8ed1ab_0
  - cycler=0.12.1=pyhd8ed1ab_1
  - cyrus-sasl=2.1.28=h6c5dea3_0
  - dav1d=1.2.1=h31becfc_0
  - dbus=1.16.2=heda779d_0
  - double-conversion=3.3.1=h5ad3122_0
  - ffmpeg=7.1.1=gpl_h30b7fc1_906
  - filelock=3.18.0=pyhd8ed1ab_0
  - font-ttf-dejavu-sans-mono=2.37=hab24e00_0
  - font-ttf-inconsolata=3.000=h77eed37_0
  - font-ttf-source-code-pro=2.038=h77eed37_0
  - font-ttf-ubuntu=0.83=h77eed37_3
  - fontconfig=2.15.0=h8dda3cd_1
  - fonts-conda-ecosystem=1=0
  - fonts-conda-forge=1=0
  - fonttools=4.59.0=py311h164a683_0
  - freeglut=3.2.2=h5eeb66e_3
  - freetype=2.13.3=h8af1aa0_1
  - fribidi=1.0.10=hb9de7d4_0
  - fsspec=2025.7.0=pyhd8ed1ab_0
  - gdk-pixbuf=2.42.12=ha61d561_0
  - gettext=0.25.1=h5ad3122_0
  - gettext-tools=0.25.1=h5ad3122_0
  - giflib=5.2.2=h31becfc_0
  - gmp=6.3.0=h0a1ffab_2
  - gmpy2=2.2.1=py311h8dd2ae4_0
  - graphite2=1.3.14=h5ad3122_0
  - h2=4.2.0=pyhd8ed1ab_0
  - harfbuzz=11.2.1=h405b6a2_0
  - hdf5=1.14.6=nompi_h587839b_102
  - hpack=4.1.0=pyhd8ed1ab_0
  - hyperframe=6.1.0=pyhd8ed1ab_0
  - icu=75.1=hf9b3779_0
  - idna=3.10=pyhd8ed1ab_1
  - imath=3.1.12=hf428078_0
  - jasper=4.2.5=h9d5db0e_0
  - jinja2=3.1.6=pyhd8ed1ab_0
  - keyutils=1.6.1=h4e544f5_0
  - kiwisolver=1.4.8=py311h75754e6_1
  - krb5=1.21.3=h50a48e9_0
  - lame=3.100=h4e544f5_1003
  - lcms2=2.17=hc88f144_0
  - ld_impl_linux-aarch64=2.44=h5e2c951_1
  - lerc=4.0.0=hfdc4d58_1
  - libabseil=20250127.1=cxx17_h18dbdb1_0
  - libaec=1.1.4=h1e66f74_0
  - libasprintf=0.25.1=h5e0f5ae_0
  - libasprintf-devel=0.25.1=h5e0f5ae_0
  - libass=0.17.3=h3c9f632_2
  - libavif16=1.3.0=hb72faec_0
  - libblas=3.9.0=32_h1a9f1db_openblas
  - libbrotlicommon=1.1.0=h86ecc28_3
  - libbrotlidec=1.1.0=h86ecc28_3
  - libbrotlienc=1.1.0=h86ecc28_3
  - libcap=2.75=h51d75a7_0
  - libcblas=3.9.0=32_hab92f65_openblas
  - libclang-cpp20.1=20.1.8=default_hf07bfb7_0
  - libclang13=20.1.8=default_h173080d_0
  - libcups=2.3.3=h5cdc715_5
  - libcurl=8.14.1=h6702fde_0
  - libde265=1.0.15=h2a328a1_0
  - libdeflate=1.24=he377734_0
  - libdrm=2.4.125=h86ecc28_0
  - libedit=3.1.20250104=pl5321h976ea20_0
  - libegl=1.7.0=hd24410f_2
  - libev=4.33=h31becfc_2
  - libexpat=2.7.1=hfae3067_0
  - libffi=3.4.6=he21f813_1
  - libflac=1.4.3=h2f0025b_0
  - libfreetype=2.13.3=h8af1aa0_1
  - libfreetype6=2.13.3=he93130f_1
  - libgcc=15.1.0=he277a41_3
  - libgcc-ng=15.1.0=he9431aa_3
  - libgcrypt-lib=1.11.1=h86ecc28_0
  - libgettextpo=0.25.1=h5ad3122_0
  - libgettextpo-devel=0.25.1=h5ad3122_0
  - libgfortran=15.1.0=he9431aa_3
  - libgfortran5=15.1.0=hbc25352_3
  - libgl=1.7.0=hd24410f_2
  - libglib=2.84.2=hc022ef1_0
  - libglu=9.0.3=h5ad3122_1
  - libglvnd=1.7.0=hd24410f_2
  - libglx=1.7.0=hd24410f_2
  - libgomp=15.1.0=he277a41_3
  - libgpg-error=1.55=h5ad3122_0
  - libheif=1.19.7=gpl_hf91bf23_100
  - libhwloc=2.11.2=default_h6f258fa_1002
  - libiconv=1.18=hc99b53d_1
  - libjpeg-turbo=3.1.0=h86ecc28_0
  - liblapack=3.9.0=32_h411afd4_openblas
  - liblapacke=3.9.0=32_hc659ca5_openblas
  - libllvm20=20.1.8=h2b567e5_0
  - liblzma=5.8.1=h86ecc28_2
  - libnghttp2=1.64.0=hc8609a4_0
  - libnsl=2.0.1=h86ecc28_1
  - libntlm=1.4=hf897c2e_1002
  - libogg=1.3.5=h86ecc28_1
  - libopenblas=0.3.30=pthreads_h9d3fd7e_0
  - libopencv=4.12.0=qt6_py311h6b27ceb_600
  - libopengl=1.7.0=hd24410f_2
  - libopenvino=2025.0.0=hd63d6c0_3
  - libopenvino-arm-cpu-plugin=2025.0.0=hd63d6c0_3
  - libopenvino-auto-batch-plugin=2025.0.0=hf15766e_3
  - libopenvino-auto-plugin=2025.0.0=hf15766e_3
  - libopenvino-hetero-plugin=2025.0.0=ha8e9e04_3
  - libopenvino-ir-frontend=2025.0.0=ha8e9e04_3
  - libopenvino-onnx-frontend=2025.0.0=hd8f0270_3
  - libopenvino-paddle-frontend=2025.0.0=hd8f0270_3
  - libopenvino-pytorch-frontend=2025.0.0=h5ad3122_3
  - libopenvino-tensorflow-frontend=2025.0.0=h33e842c_3
  - libopenvino-tensorflow-lite-frontend=2025.0.0=h5ad3122_3
  - libopus=1.5.2=h86ecc28_0
  - libpciaccess=0.18=h86ecc28_0
  - libpng=1.6.50=hec79eb8_0
  - libpq=17.5=hf590da8_0
  - libprotobuf=5.29.3=h4edc36e_1
  - librsvg=2.58.4=h3ac5bce_3
  - libsndfile=1.2.2=h79657aa_1
  - libsqlite=3.50.2=hdbb6186_2
  - libssh2=1.11.1=h18c354c_0
  - libstdcxx=15.1.0=h3f4de04_3
  - libstdcxx-ng=15.1.0=hf1166c9_3
  - libsystemd0=257.7=h2bb824b_0
  - libtiff=4.7.0=h7c15681_5
  - libtorch=2.7.1=cpu_generic_h1028f2b_2
  - libudev1=257.7=h7b9e449_0
  - libunwind=1.8.2=h9e2cd2c_0
  - liburing=2.11=h17cf362_0
  - libusb=1.0.29=h06eaf92_0
  - libuuid=2.38.1=hb4cce97_0
  - libuv=1.51.0=h86ecc28_0
  - libvorbis=1.3.7=h01db608_0
  - libvpx=1.14.1=h0a1ffab_0
  - libwebp-base=1.6.0=ha2e29f5_0
  - libxcb=1.17.0=h262b8f6_0
  - libxcrypt=4.4.36=h31becfc_1
  - libxkbcommon=1.10.0=hbab7b08_0
  - libxml2=2.13.8=he060846_0
  - libzlib=1.3.1=h86ecc28_2
  - llvm-openmp=20.1.8=he40846f_0
  - lz4-c=1.10.0=h5ad3122_1
  - markupsafe=3.0.2=py311ha09ea12_1
  - matplotlib-base=3.10.3=py311h0385ec1_0
  - mpc=1.3.1=h783934e_1
  - mpfr=4.2.1=h2305555_3
  - mpg123=1.32.9=h65af167_0
  - mpmath=1.3.0=pyhd8ed1ab_1
  - munkres=1.1.4=pyhd8ed1ab_1
  - ncurses=6.5=ha32ae93_3
  - networkx=3.4.2=pyh267e887_2
  - nomkl=1.0=h5ca1d4c_0
  - numpy=1.24.2=py311h71ac5a4_0
  - opencv=4.12.0=qt6_py311hc303290_600
  - openexr=3.3.4=h718fb27_0
  - openh264=2.6.0=h0564a2a_0
  - openjpeg=2.5.3=h3f56577_0
  - openldap=2.6.10=h30c48ee_0
  - openssl=3.5.1=hd08dc88_0
  - optree=0.16.0=py311hc07b1fb_0
  - packaging=25.0=pyh29332c3_1
  - pandas=2.3.1=py311hffd966a_0
  - pango=1.56.4=he55ef5b_0
  - patsy=1.0.1=pyhd8ed1ab_1
  - pcre2=10.45=hf4ec17f_0
  - pillow=11.3.0=py311ha4eaa5e_0
  - pip=25.1.1=pyh8b19718_0
  - pixman=0.46.2=h86a87f0_0
  - psutil=7.0.0=py311ha879c10_0
  - pthread-stubs=0.4=h86ecc28_1002
  - pugixml=1.15=h6ef32b0_0
  - pulseaudio-client=17.0=h2f84921_1
  - py-cpuinfo=9.0.0=pyhd8ed1ab_1
  - py-opencv=4.12.0=qt6_py311h01b6c42_600
  - pybind11=3.0.0=pyh9380348_1
  - pybind11-global=3.0.0=pyhf748d72_1
  - pycparser=2.22=pyh29332c3_1
  - pyparsing=3.2.3=pyhd8ed1ab_1
  - pysocks=1.7.1=pyha55dd90_7
  - python=3.11.13=h1683364_0_cpython
  - python-dateutil=2.9.0.post0=pyhe01879c_2
  - python-tzdata=2025.2=pyhd8ed1ab_0
  - python_abi=3.11=7_cp311
  - pytorch=2.7.1=cpu_generic_py311_hcdfc2e8_2
  - pytorch-mutex=1.0=cpu
  - pytz=2025.2=pyhd8ed1ab_0
  - pyyaml=6.0.2=py311h58d527c_2
  - qhull=2020.2=h70be974_5
  - qt6-main=6.9.1=h13135bf_1
  - rav1e=0.7.1=ha3529ed_3
  - readline=8.2=h8382b9d_2
  - requests=2.32.4=pyhd8ed1ab_0
  - scipy=1.15.2=py311h2973cce_0
  - sdl2=2.32.54=h5ad3122_0
  - sdl3=3.2.18=h506f210_0
  - seaborn=0.13.2=hd8ed1ab_3
  - seaborn-base=0.13.2=pyhd8ed1ab_3
  - setuptools=80.9.0=pyhff2d567_0
  - six=1.17.0=pyhd8ed1ab_0
  - sleef=3.8=h8fb0607_0
  - snappy=1.2.1=hd4fb6f5_1
  - statsmodels=0.14.5=py311h8b8d0ce_0
  - svt-av1=3.0.2=h5ad3122_0
  - sympy=1.14.0=pyh2585a3b_105
  - tbb=2022.1.0=hf6e3e71_0
  - tk=8.6.13=noxft_h5688188_102
  - torchvision=0.22.0=cpu_py311_hb1dc043_1
  - torchvision-extra-decoders=0.0.2=py311h4a11f85_3
  - tqdm=4.67.1=pyhd8ed1ab_1
  - typing-extensions=4.14.1=h4440ef1_0
  - typing_extensions=4.14.1=pyhe01879c_0
  - tzdata=2025b=h78e105d_0
  - ultralytics=8.3.167=pyh2a12c56_0
  - unicodedata2=16.0.0=py311ha879c10_0
  - urllib3=2.5.0=pyhd8ed1ab_0
  - wayland=1.24.0=h698ed42_0
  - wheel=0.45.1=pyhd8ed1ab_1
  - x264=1!164.3095=h4e544f5_2
  - x265=3.5=hdd96247_3
  - xcb-util=0.4.1=hca56bd8_2
  - xcb-util-cursor=0.1.5=h86ecc28_0
  - xcb-util-image=0.4.0=h5c728e9_2
  - xcb-util-keysyms=0.4.1=h5c728e9_0
  - xcb-util-renderutil=0.3.10=h5c728e9_0
  - xcb-util-wm=0.4.2=h5c728e9_0
  - xkeyboard-config=2.45=h86ecc28_0
  - xorg-libice=1.1.2=h86ecc28_0
  - xorg-libsm=1.2.6=h0808dbd_0
  - xorg-libx11=1.8.12=hca56bd8_0
  - xorg-libxau=1.0.12=h86ecc28_0
  - xorg-libxcomposite=0.4.6=h86ecc28_2
  - xorg-libxcursor=1.2.3=h86ecc28_0
  - xorg-libxdamage=1.1.6=h86ecc28_0
  - xorg-libxdmcp=1.1.5=h57736b2_0
  - xorg-libxext=1.3.6=h57736b2_0
  - xorg-libxfixes=6.0.1=h57736b2_0
  - xorg-libxi=1.8.2=h57736b2_0
  - xorg-libxrandr=1.5.4=h86ecc28_0
  - xorg-libxrender=0.9.12=h86ecc28_0
  - xorg-libxtst=1.2.5=h57736b2_3
  - xorg-libxxf86vm=1.1.6=h86ecc28_0
  - yaml=0.2.5=hf897c2e_2
  - zstandard=0.23.0=py311ha879c10_2
  - zstd=1.5.7=hbcf94c1_2
This is essentially a list of all the packages that Ultralytics needs to be installed, and more importantly, what version is installed. In a terminal window, ensure you have activated Conda, then create a new virtual environment with the packages from that list with:
conda env create -f ultralytics-pi5-environment.yml
Once that has finished installing, we can then set up picamera2 with the following echo command:
echo '/usr/lib/python3/dist-packages' > /home/pi/miniforge3/envs/ultralytics-env/lib/python3.11/site-packages/system-packages.pth
Where to From Here?
You now have the Ultralytics YOLO package ready to go. From here, you should be able to run Python code to download and use any models supported by Ultralytics. If you are following another guide, you should be able to continue on from here. If you are looking for some guides, we have the following which explore practical application of YOLO in your projects (including how to increase processing speed!)
- YOLOE - A model that is trained on visual concepts instead of specific objects. This allows it to detect objects that it has never seen before, all with a simple text prompt and no lengthy training processes. One of the most exciting and adaptable YOLO models available. This guide continues on from here and sets up custom object detection with code that counts objects and tracks their location.
- YOLO Pose Estimation - A look at utilising the pose variant of YOLO models to get body tracking data of people. We explore how you can use the keypoint data it generates to control hardware in your project, as well as create a game of space invaders controller by the location of a person's head.
- YOLO Object Detection - A practical look at using YOLOv8 object detection in your maker projects. We explore how to "do something" if certain objects are detected.
If you are looking instead to investigate some AI-accelerated hardware for the Pi and what it offers, you might want to check out the following guides. Note that the YOLO we set up here will not work on these devices; you will need another installation method to run the models on these devices:

