In this guide, we will be getting the Raspberry Pi AI camera up and running as quickly as possible, as well as taking a look at how to get started with it in your own projects.
The Raspberry Pi AI camera is a unique and interesting piece of hardware. It's a standard-sized camera module that not only houses a camera but also a Sony IMX500 AI accelerator chip. This chip is a piece of processing hardware that is optimised to run computer vision tasks such as object recognition, pose estimation, and segmentation. Because this chip is an external piece of processing hardware, the computer vision model is uploaded to the board and all the processing-intensive tasks are run on it instead of the Pi - freeing it up to do other tasks. As it is also a chip designed to run computer vision, it can do so far more efficiently and effectively than even the fastest Pi 5!
It has never been easier to get computer vision in your project so let's get right into it.
What You Will Need
To follow along with this guide you will need a:
- Raspberry PI - While this camera will work on most Raspberry Pis, we used the Pi 5.
- AI Camera Module
- Power Supply
- Micro SD Card
- Monitor and Micro-HDMI to HDMI Cable
- Mouse and Keyboard
Hardware Assembly
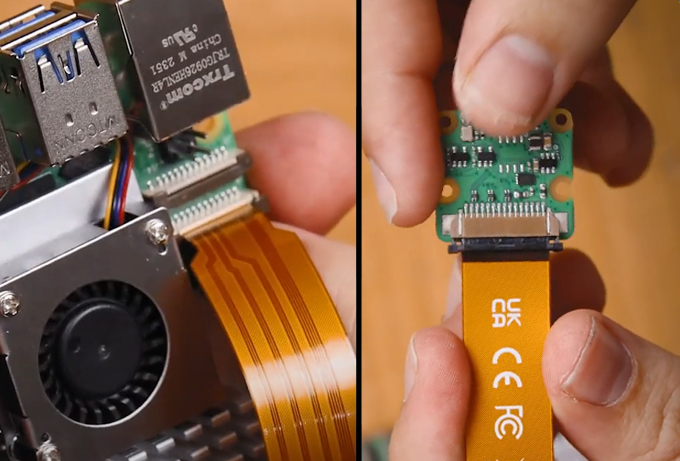
In your Ai Camera box you will find 2 ribbon cables. One of them will have both ends the same size, and another will have a smaller end on one. This cable with the smaller end on is the cable required for the Pi 5, Zero and Zero 2W.
To insert the cable, lift the tab on the bottom of the camera, insert the cable, and then push the tab back down. Ensure that the cable is sitting nice and square in the connector.
Repeat the process on the Pi. If you are using a Pi 5, plug it into camera connector one as shown in the image.
Installing Pi OS
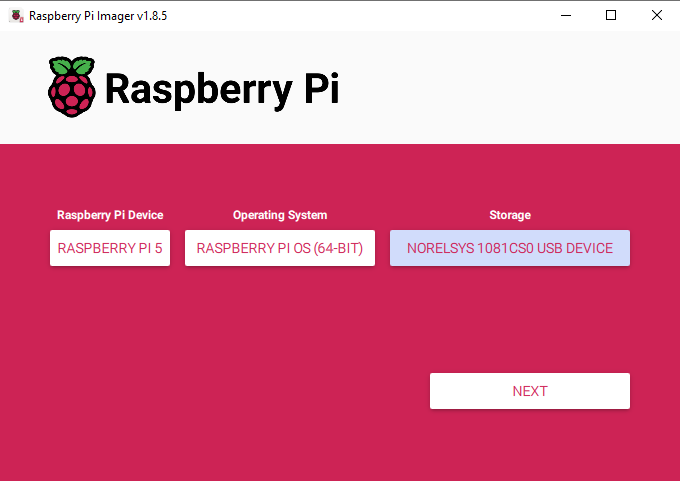
First things first, we need to install Pi OS onto the micro SD card. Using the Raspberry Pi Imager, select Raspberry PI 5 as the Device, Raspberry Pi OS (64-bit) as the Operating system, and your microSD card as the storage device.
NOTE: INSTALLING PI OS ONTO THE MICROSD CARD WILL WIPE ALL DATA ON IT.
This process may take a few minutes to download the OS and install it. Once the process has finished, insert it into the Pi and boot it up. Your Pi will run through a first-time installation and just ensure that you connect it to the internet.
Software Installation
Now we will install the required drivers and software for the camera to operate. Open up a terminal window and type in the following command to double-check check your Pi is updated:
sudo apt update && sudo apt full-upgrade
You may need to hit "y" and "enter" to confirm.
Then install the camera package with:
sudo apt install imx500-all
This process may take 5-10 minutes depending on your model of Pi.
Once that has finished, restart your Raspberry Pi. If you want to be a power user, you can restart the Pi from the terminal with:
reboot

Object Detection and Pose Estimation Demos
Now we are ready to run our first set of demos, starting with object recognition. To do so open a terminal window again and paste in the following command:
rpicam-hello -t 0s --post-process-file /usr/share/rpi-camera-assets/imx500_mobilenet_ssd.json --viewfinder-width 1920 --viewfinder-height 1080 --framerate 30
The object recognition model will be uploaded to the camera, and after a few seconds, you will see a preview window of your camera with boxes being drawn around an object as well as a label and confidence rating.

Implementing it in your own Projects
While it's easy to get Raspberry Pi's demo going, there are a few hurdles in getting it implemented in your own projects. We have however tried our best to simplify this process by adapting some of their code into a library that allows for easy use of the camera in Python. Please note for the time being this is an object detection only example.
Before using this library you will need to install OpenCV. Open a new terminal window and enter:
sudo apt install python3-opencv python3-munkres
Once that has been installed, download and unzip the following zip file to your desktop.
In there you will find 2 files, "ai_camera.py" is the library itself, and demo.py is a demo Python script using the library. Open it in a Python editor like Thonny which comes pre-installed on your Pi.
This code starts the camera, creates a new preview window and then uses the detection results to do something if it detects a certain object. Here is a breakdown of how it works:
The code begins by importing the library ai_camera.py. This file needs to be in the same folder as the demo script for it to work. It also imports the time library.
from ai_camera import IMX500Detector
import time
Then we create an object called camera with the library. This is a variable that will be called to use camera functions. For example we immidiately use camera.start to start the AI camera up. We can also specify whether we want the preview window to appear here or not. At this point the AI camera is running and analysing footage, but we aren't doing anything with it.
camera = IMX500Detector()

# Start the detector with preview window
camera.start(show_preview=True)
Then we enter into our main while true loop. Here we start by getting the detections and labels from the camera. These simply grab what ever the camera has seen in the last frame and could be called at anytime as long as the camera is running.
# Main loop
while True:
    # Get the latest detections
    detections = camera.get_detections()

    # Get the labels for reference
    labels = camera.get_labels()
Then we run through each item detected in the frame and assign the label to it, as well as get the confidence rating of each one. This ranges from 0 (no confidence) to 1.0 (maximum confidence). We also check each detected object and if they are a "person" and have a confidence rating above 0.4, we will print out a sentence.
Here is the main part of the script that you may want to modify as it has the logic to perform an action if a specific object is detected. Change the object to something that can be detected, and set the confidence as needed. You can also change the action that is performed, here we simply print to the shell, but you could turn on an LED, motor or alarm, send an email, or however you want to apply it in your project!
    # Process each detection
    for detection in detections:
        label = labels[int(detection.category)]
        confidence = detection.conf

        # Example: Print when a person is detected with high confidence
        if label == "person" and confidence > 0.4:
            print(f"Person detected with {confidence:.2f} confidence!")
And finally at the end of the loop we sleep for 0.1 seconds. Change this to however frequently you wish to run this entire loop. You will be limited by the FPS of the camera which is about 30.
        # Example: Print when a person is detected with high confidence
        if label == "person" and confidence > 0.4:
            print(f"Person detected with {confidence:.2f} confidence!")
And with this framework you should now be able to utilised the process of the AI camera in your own projects!

