In this guide we'll create a simple HTTP server using a Raspberry Pi Pico W. This server will be accessible from within a local WiFi network and can be used to read sensors and control hardware - in our case we'll drive an LED and read the state of a button. While quite simple, this server code is a great foundation for really useful projects - like our WiFi-connected garage door controller based on a Pico W.
To follow along, it's best if you're already familiar with connecting a Pico W to WiFi. You'll also need the following hardware:
Hardware Connections
We'll start with the hardware connections. Ensure your Pico W is unpowered while you are making connections.
- Connect the LED cathode (+) to Pico W: GP15
- Connect the LED anode (-) to one terminal of a 470 resistor
- Connect the other terminal of the resistor to GND
- Connect a button between Pico W: GP16 and GND
To make sure everything is working, you can try the following test script which will slowly blink the LED while the button is not pressed, and quickly while the button is held down.
Hardware Test Script
# Hardware Test
# Blink and LED (GP15) slowly/quickly while a button (GP16) is not-pressed/pressed
from machine import Pin
from time import sleep_ms

led = Pin(15, Pin.OUT)
button = Pin(16, Pin.IN, Pin.PULL_UP)

while True:
    if button.value() == 0: # button pressed
        delay = 100 # short delay
    else:
        delay = 1000 # long delay

    led.toggle()
    sleep_ms(delay)
If the hardware test works successfully then proceed to the next section. If not, double-check your wiring, and consider reaching out for help in the comments below.
Example Code - Simple HTTP Server
Save the following code to your Pico and fill in your network credentials (ssid, and password) - then run the script.
Note, if you encounter the error OSError: [Errno 98] EADDRINUSE after running the script consecutively, just unplug your Pico, reconnect with Thonny, and re-run the script.
# Simple HTTP Server Example
# Control an LED and read a Button using a web browser
import time
import network
import socket
from machine import Pin
led = Pin(15, Pin.OUT)
ledState = 'LED State Unknown'
button = Pin(16, Pin.IN, Pin.PULL_UP)
ssid = ''
password = ''
wlan = network.WLAN(network.STA_IF)
wlan.active(True)
wlan.connect(ssid, password)
html = """<!DOCTYPE html>
<html>
<head> <title>Pico W</title> </head>
<body> <h1>Pico W HTTP Server</h1>
<p>Hello, World!</p>
<p>%s</p>
</body>
</html>
"""
# Wait for connect or fail
max_wait = 10
while max_wait > 0:
if wlan.status() < 0 or wlan.status() >= 3:
break
max_wait -= 1
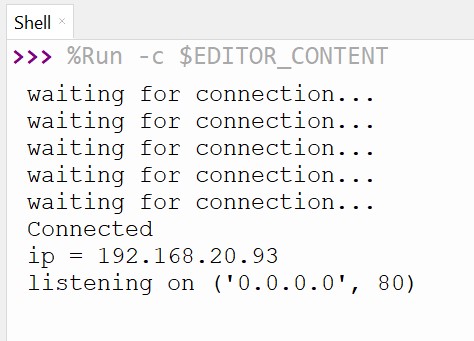
print('waiting for connection...')
time.sleep(1)
# Handle connection error
if wlan.status() != 3:
raise RuntimeError('network connection failed')
else:
print('Connected')
status = wlan.ifconfig()
print( 'ip = ' + status[0] )
# Open socket
addr = socket.getaddrinfo('0.0.0.0', 80)[0][-1]
s = socket.socket()
s.bind(addr)
s.listen(1)
print('listening on', addr)
# Listen for connections, serve client
while True:
try:
cl, addr = s.accept()
print('client connected from', addr)
request = cl.recv(1024)
print("request:")
print(request)
request = str(request)
led_on = request.find('led=on')
led_off = request.find('led=off')
print( 'led on = ' + str(led_on))
print( 'led off = ' + str(led_off))
if led_on == 8:
print("led on")
led.value(1)
if led_off == 8:
print("led off")
led.value(0)
ledState = "LED is OFF" if led.value() == 0 else "LED is ON" # a compact if-else statement
if button.value() == 1: # button not pressed
print("button NOT pressed")
buttonState = "Button is NOT pressed"
else:
print("button pressed")
buttonState = "Button is pressed"
# Create and send response
stateis = ledState + " and " + buttonState
response = html % stateis
cl.send('HTTP/1.0 200 OK\r\nContent-type: text/html\r\n\r\n')
cl.send(response)
cl.close()
except OSError as e:
cl.close()
print('connection closed')
Upon running the script, the Pico W will attempt to connect to your network. If all goes well the Pico W will report its local IP address in the shell eg. 192.168.###.###.
Open your favourite browser and navigate to the IP address provided by your Pico W - you ought to be greeted by the following simple page:
 Signs of life from our Pico W HTTP server. Navigating to the provided IP address loads a simple webpage.
The content of this page is defined by the "html" variable near the top of the script. This variable is just a Python multi-line string containing HTML to describe a simple webpage with a heading and some text. Since "html" is a python string, we can change the contents of the page by using string-formatting (%s) to inject variable content, like the status of the LED and button.
Hold down the button connected to your Pico W, and then refresh the page. You ought to see that the button status is now updated.
To control the LED, add the following text to the end of the IP address: /?led=on . The URL should now look something like this: 192.168.###.###/?led=on
Strike enter, and you ought to see the LED come to life! The text on the page should also update. Try refreshing the page while holding the button - to observe how the page changes.
How it works
The additional text we added to the end of the IP address is called a query string. This is a simple way of sending information to the server, like how to filter a list of data, or in our case, the desired state of an LED. The Pico W server is listening for two specific queries, which we can add to the request: ?led=on and ?led=off. If it finds one, it executes the appropriate command.
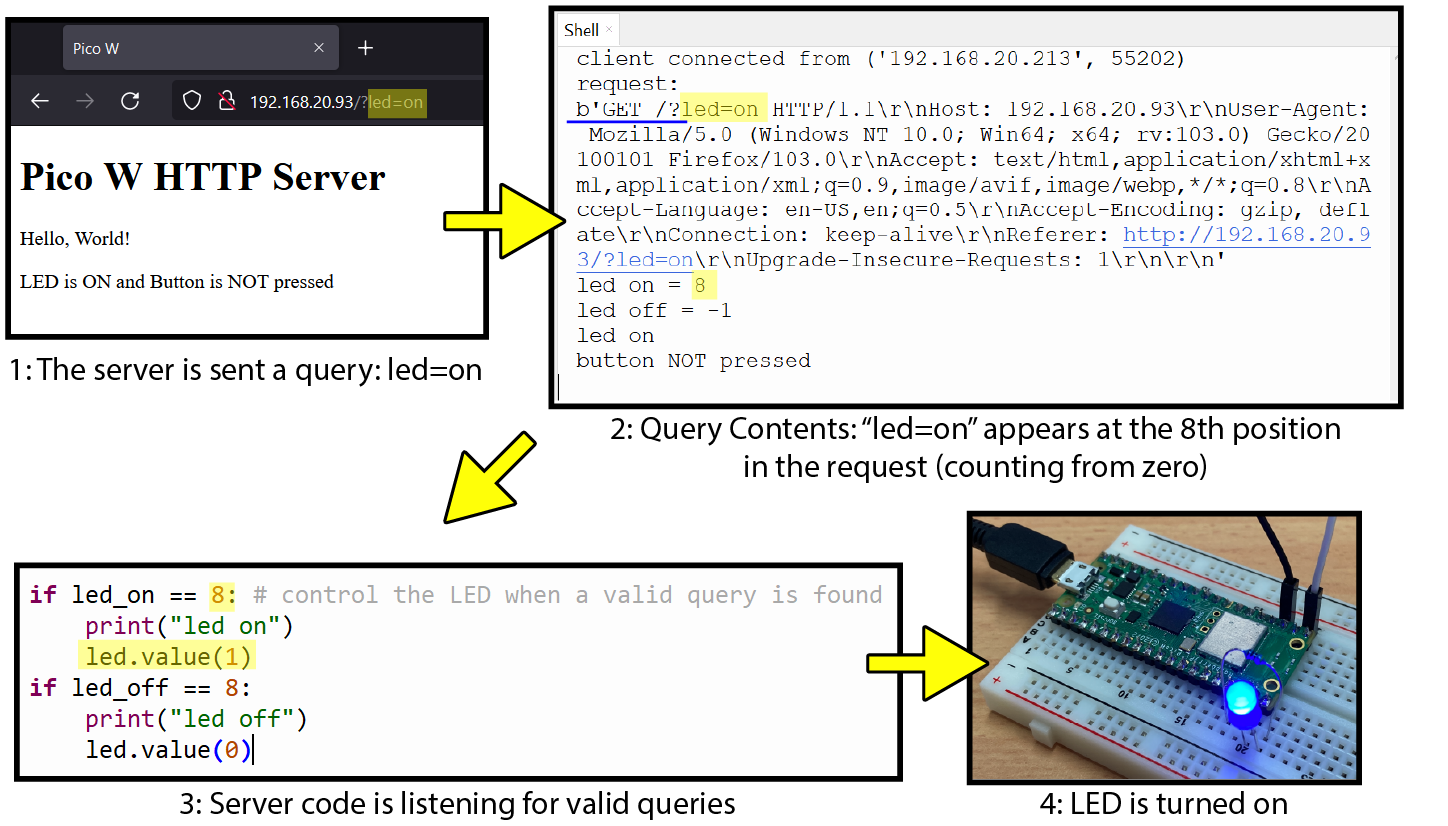
How a query can be used to control real hardware. The request is parsed by the server, which listens for valid queries (in the correct location). If one is found, the program uses simple logic to control the state of connected hardware.
You may also notice the query contains a lot of other information about the connected client. We can safely ignore this information for now, though some users may wish to delve deeper.
Remix - Control Panel with Buttons
The previous example code established that it is possible to use queries to send information to our server - like the intended state of an LED. This is a little cumbersome - wouldn't it be nice to have a webpage that presents some kind of button interface for controlling our hardware?
The following example features modified HTML to build a simple form with two buttons (ON and OFF). Clicking one of these buttons will automatically send the corresponding query to our Pico W Server - making for a much nicer user experience.

Copy the following definition for the "html" variable and replace the existing definition for html, from the previous example.
# replace the "html" variable with the following to create a more user-friendly control panel
html = """<!DOCTYPE html><html>
<head><meta name="viewport" content="width=device-width, initial-scale=1">
<link rel="icon" href="data:,">
<style>html { font-family: Helvetica; display: inline-block; margin: 0px auto; text-align: center;}
.buttonGreen { background-color: #4CAF50; border: 2px solid #000000;; color: white; padding: 15px 32px; text-align: center; text-decoration: none; display: inline-block; font-size: 16px; margin: 4px 2px; cursor: pointer; }
.buttonRed { background-color: #D11D53; border: 2px solid #000000;; color: white; padding: 15px 32px; text-align: center; text-decoration: none; display: inline-block; font-size: 16px; margin: 4px 2px; cursor: pointer; }
text-decoration: none; font-size: 30px; margin: 2px; cursor: pointer;}
</style></head>
<body><center><h1>Control Panel</h1></center><br><br>
<form><center>
<center> <button class="buttonGreen" name="led" value="on" type="submit">LED ON</button>
<br><br>
<center> <button class="buttonRed" name="led" value="off" type="submit">LED OFF</button>
</form>
<br><br>
<br><br>
<p>%s<p></body></html>
"""
Taking a closer look at the new HTML code, we can see the name of each button is the name for a valid query ("led"), and the value for each button is the value we wish to send with the query ("on" or "off").
There are some nice extras, like button classes called buttonGreen and buttonRed to make coloured buttons with custom styling. If no class is provided then a default button will be presented instead.
Where to from here?
This simple HTTP server is a really practical starting point for other projects - controlling an LED and reading a button are very simple examples, but this hardware can be replaced by any sensor or actuator you can interface to a Pico W. For example, we made WiFi-Connected Garage Door Controller with minimal changes to what is shown in this guide.
This server is what's known as a synchronous server - you can see that all queries are handled by the while True: loop. To make a more robust asynchronous server, have a read of the Pi Foundation's document: Connecting to the Internet with Raspberry Pi Pico W.
We encourage you to stay curious and keep experimenting! If you make something cool from this guide or have any questions, please leave a comment below - we're full-time makers and happy to help!
Happy Making!
