 The built-in remote monitoring camera and the live feed it provides makes for a fantastic tool of the Ultimaker S5 and Ultimaker S3 3D printers. You can now keep tabs on your prints remotely, easing the pain of a long-distance relationship with your machine. To the right is an image of the built-in camera feed working perfectly. It is displaying a live feed of the Ultimaker S5 build platform as it is laying down the first layers of a print. There are two different ways to access this live feed via a computer. Either through Ultimaker Cura by clicking on the Circle Camera Icon in the Monitor Workflow Stage. Or by typing the IP address of your 3D printer into a web browser and then by clicking on the Digitial Factory option. On this webpage there will be a Circle Camera Icon, clicking this overlays the live feed.
There are times when the built-in camera looses focus of the build platform. This leaves your live stream from your Ultimaker printers looking blurry. Have yet to see anyone explain about how to easily go about fixing this so here I will give you a rundown. Also sometimes the live feed drops out leaving you completely in the dark. So save yourself heaps of time by following these steps instead of pulling your Ultimaker S5 completely apart. This guide provides fixes for both of these and the contents can be seen below.
- Update Ultimaker Cura and Update the 3D Printer Firmware
- Reset Cura Connect and Check IP Address
- Replace the Built-in Remote Monitoring Camera
There is an swell Ultimaker Cura Overview Guide on our website which is a great reference point if this is your first time encountering Cura and you want to hit the ground running. Put simply Ultimaker Cura is a software which allows you to turn the computer file of your model into a recipe for a 3D printer to follow. It is completely free, available online with a great track record, used by over a million users worldwide and handles around 1.4 million prints per week. If solutions and advice on how to solve 3D print errors are desired an excellent tutorial on this is Improving 3D Printed Models - Ultimaker Cura.
As always if you have any questions, queries or things to add please let us know your thoughts!
Update Ultimaker Cura and Update the 3D Printer Firmware
The first point of call whenever an issue like this comes up is making sure you are running the most up to date version of your 3D printers firmware. For Ultimaker 3D printers the firmware can be found at this location. Ultimaker S5 also has the ability to update the firmware from the 3D printer itself which you can do by utilising the internal menus. Some of the older firmware would stop sending a live feed if the computation being done by 3D printer got too intense.
After this the next step is to make sure that your running the most up to date, latest version of Ultimaker Cura. For Cura the offical download location can be found at this location.
Reset Cura Connect and Check IP Address
 Now if the built-in camera feed has dropped out and there is no longer a live feed being displayed it will look like the image to the right. The inital best plan is to do a Cura Connect Reset. To do this on the Ultimaker S3 follow these steps. Go to the menu and select | System | -> | Maintenance | -> | Cura Connect Reset |. The option will be found right next to the Firmware Reset button. A similar process can be done for the Ultimaker S5 3D Printer to do a Cura Connect Reset.
Following this, make sure the IP address you are using to access your 3D printer is the correct one. Every 3D printer connected to a network will have a unique IP address. You can find out what the IP address is by checking inside the Network Menus on the 3D printer screen. Another way to find the IP address is by clicking the Manage in Browser button found in the Monitor Workflow Stage within Ultimaker Cura. This will take you to the webpage for your connected 3D printer. The URL (web address) of this page browser will have the IP address of the 3D printer inside it.
Also double check any firewalls or security measures on your computer or network. It may be that the connection is refused because of an over-zealous network security reason. Ultimaker 3D printer utilise different network ports for discovery, printer controls and camera feed.
Replace the Built-in Remote Monitoring Camera
Finally, if the 3D printer is having an issue where the camera is not focused at all or not showing anything still, the best step is to replace the camera. Now Ultimaker will send you a replacement camera as a module with a USB plug cord coming out of the camera housing. Changing the camera can be done by replacing the entire module with another new one however doing this method requires a large deconstruction of the 3D printer.
A better method, which involves significantly less work, is to replace only the built-in camera PCB which is found inside the camera housing. The tools for this job are a Torx Screwdriver of 2mm size and an Allen Key of 2mm size. This is the same for both the Ultimaker S5 and Ultimaker S3 3D printer however it is worth noting the camera housing has a slightly different shape between the two printer models.
Now start by cracking open the replacement Ultimaker camera housing by following the images below. Doing so will give access to the camera PCB. There is 2 Torx screws on the back of the housing keeping the component together. On the Ultimaker S3 these bolts are in the inside of the camera housing. Then you can carefully unplug the PCB (which has the camera attached) from the micro USB lead that feeds out into a USB connection. Below you can see an image of this occurring for a replacement built-in camera for an Ultimaker S5. Yellow circles are annotated to emphasise the steps. The process of getting into the Ultimaker S3 camera housing is very similar as below.

Now turning your attention the 3D printer make sure it is unplugged and not turned on. You can now pull the camera housing off the inside top right corner of your printer (when it is facing you) by undoing two Allen head bolts using a 2mm Allen Key. Doing this will allow you to access the back of the camera housing. Then by doing the same as above you can remove the backing of the camera housing giving access to the camera PCB. Make sure not to lose any of the screws.
Below are images of the steps for an Ultimaker S5 3D Printer. Yellow circles are annotated to emphasise the steps.
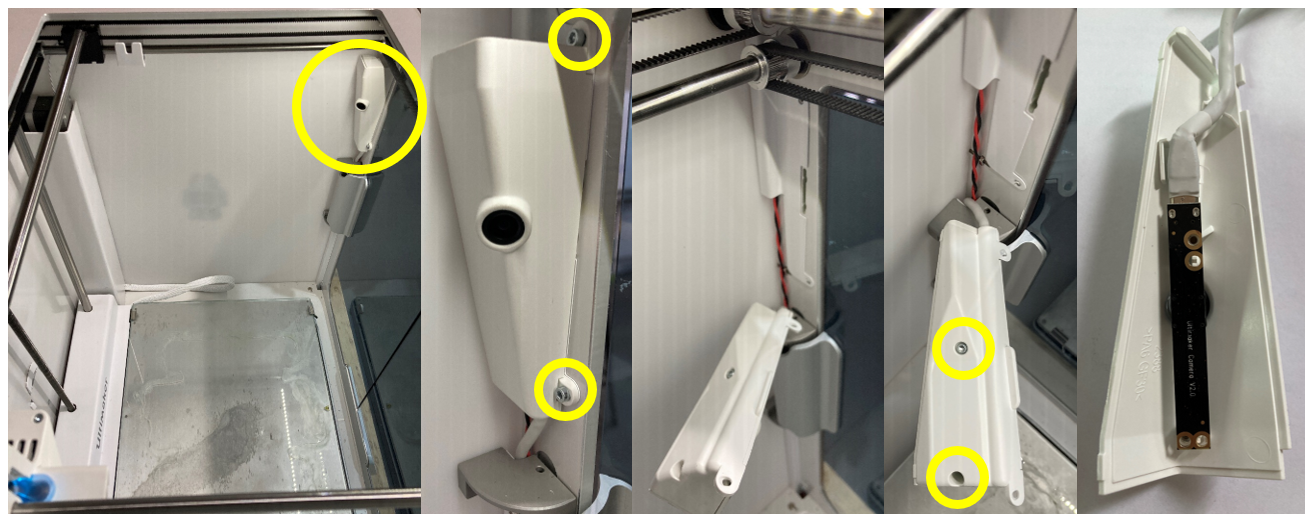
Below are images of the steps for an Ultimaker S3 3D Printer. Yellow circles are annotated to emphasise the steps.

Now you can unplug the old PCB and replace it with the new one. See below for images of the Ultimaker Camera PCB.

Then replace the back of the camera housing, making sure it clips together correctly. Then reattach to the top right inside corner. The neat part of doing it this way is that is all done without needing to remove the full sized USB cable which attaches underneath the base of the Ultimaker Printer. There is an image below which shows in red the path of the USB cable going down and under the base of the Ultimaker. To replace the whole camera unit you would need to uncover all of these sections. It would be a really big job. Much easier to do it the way described above.

Now by turning your 3D printer back on and having it connecting correctly to your computer all should be good. Clicking on the Camera symbol in the Monitor Workflow Stage and you should now see a live feed of your build platform in focus. If you are operating with an Ultimaker S5 it should look exactly like the image below.

With that you can get back to 3D printing and walking away from the job with a proper piece of mind and tranquility that can only be achieved by knowing you can remotely check on your 3D print whenever your big heart desires.
