Perhaps you’ve read our Gaming Kit for RetroPie tutorial on how to setup a RetroPie console and wondered what’s required to actually build one, or heard about it and not been sure what you need. Well, today is your lucky day because we’re going to go through everything you need to build your very own RetroPie setup. Today we’ll look at building a typical console, and also how you can create a portable setup that will allow you to game on the go.
What is RetroPie?
In case you weren’t sure, RetroPie is an operating system designed to run on the Raspberry Pi boards. It allows you to play vintage video games using software emulators, creating the perfect nostalgic environment for an avid gamer.
What You’ll Need
The best way to create your own RetroPie setup is with one of our Gaming Kits for RetroPie. They have everything you need to get started, however, we'll take a look at what specifically is involved in building your very own RetroPie gaming console.
To create your very own RetroPie setup you’ll, of course, need a Raspberry Pi. We recommend the Raspberry Pi 3 as it’s the most recent and most powerful board which will provide a better gaming experience with certain emulators.
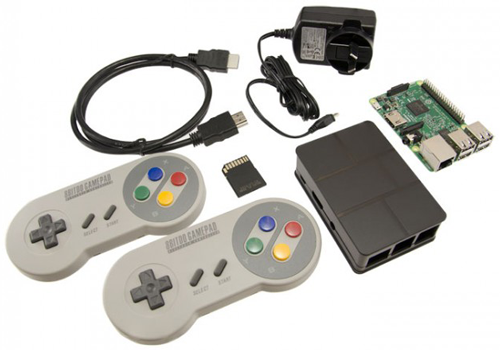 Official Raspberry Pi Power Supply or USB Power Bank (portable)
A board by itself isn’t much good with power, and with the Raspberry Pi 3 requiring more power than its predecessor, the Official Raspberry Pi Power Supply is the best option. It has a 5V 2.5A output which is perfect for the Pi 3.
However, if you want to create a portable RetroPie console then you’ll want a portable power bank. Not just anything will work, though, you’ll want one that has an output of at least 2 Amps. The larger the capacity, the more play time you’ll get. If you want at least a couple of hours, then you’ll want to be looking for a capacity of at least 6000mAh.
The Pi has no onboard storage, the entire operating system and files are read from a microSD card. Fortunately, we’ve got microSD cards pre-flashed with RetroPie, however, if you already have a microSD card lying around at home, then you can download the RetroPie image here (make sure you get the 2/3 version).
Controllers
Whilst that’s all you need to get the Raspberry Pi up and running, you’ll want a controller of some sort to play your favourite games. You can use any USB or Bluetooth device for this, but for the complete experience, one of our USB Gaming Controllers or 8Bitdo Bluetooth Gaming Controllers will be the perfect companion for your vintage adventures.
Display/Screen
If you’re building a standard RetroPie setup then any standard HDMI display can be used. However, if you want to create a portable RetroPie console, we recommend the Official Raspberry Pi 7” Touchscreen which is perfect for gaming on the go.
Case
While not strictly required, putting your Pi in a case not only makes it look the part but also helps protect it against static damage, accidental contact, impacts and more. Check out our Raspberry Pi Cases Comparison tutorial for more info on which case is going to be right for you.
Connecting it All Up
Now here comes the fun part, plugging everything in and seeing it work. It’s also really straight forward.
- Insert microSD card with RetroPie into the microSD card slot.
- Connect Pi to display using HDMI cable or follow the instructions for the 7” Touchscreen.
- Attach keyboard or gaming controller via USB (or take a look at the 8Bitdo Bluetooth Controller setup)
- Connect power
- Play!
And that’s all there is to it folks. From there, the Pi should boot up into RetroPie for the first time, and you can move on to our Gaming Kit for RetroPie tutorial for info on how to configure your console and load some games onto it.

