[Update – Until there is correct compatibility of OPEN-CV with the new Raspberry Pi ‘Bullseye’ OS I highly recommend at this stage flashing and using the previous Raspberry Pi ‘Buster’ OS onto your Micro-SD for use with this guide – Official 'Buster' Image Download Link Here]
It's time for some real-time multiple hand recognition with finger segmentation and gesture identification using artificial intelligence and computer vision. Have you ever wanted to get your Raspberry Pi 4 Model B to be able to identify every joint in your fingers of your hands, live? Or perhaps use hand gestures to send commands. Or hand keypoint detection or hand pose detection? Then this page is exactly where you need to be.
Follow through this guide and you will know exactly how to do this so you can set up a similar system in your Maker-verse that suits your project (even if you are a vtuber). See below for the contents of this guide.
- What You Need
- Initial Set-Up and Install Process
- Functional Hand Tracking Script
- Finger Count and Identify Fingers Up/Down Script
- Where to Now (GPIO Control and Other Applications)
- Setting Up Open-CV on Raspberry Pi 'Buster' OS
- Download Scripts
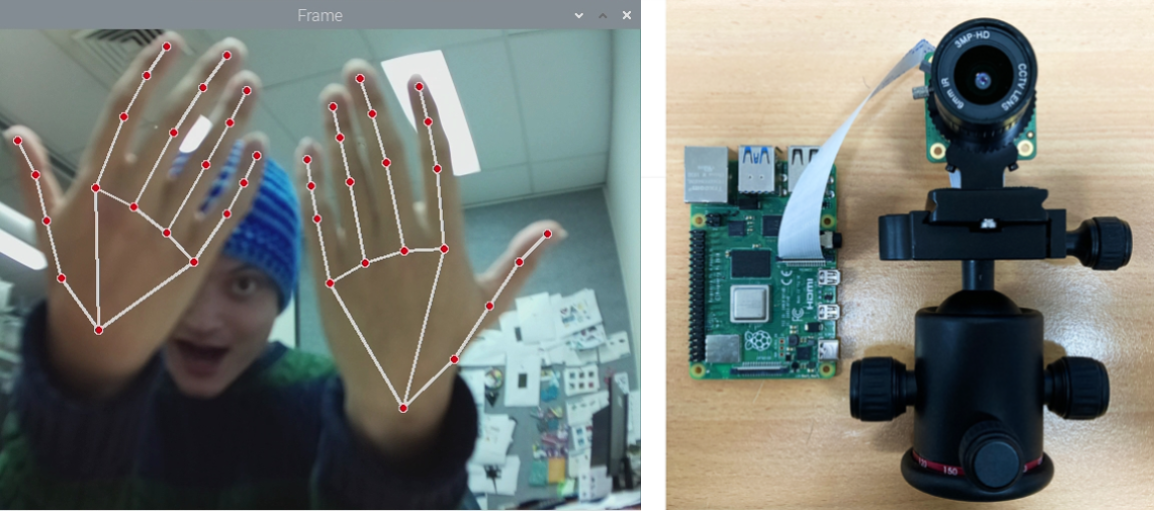
Machine and deep learning have never been more accessible, and this guide will be a demonstration of this. The system built here will use Open-CV, particularly CVzone. This is a huge resource that helps solve real-time computer vision and image processing problems. If you are interested in more Open-CV check out the guides Raspberry Pi and Facial Recognition, Object and Animal Recognition with Raspberry Pi, Speed Camera With Raspberry Pi, Scan QR codes with Raspberry Pi, Pose Estimation/Face Masking or Face and Movement Tracking with a Pan-Tilt System. See an image below of the Hand Tracking Software running on the Raspberry Pi 'Buster' OS when using a Raspberry Pi 4 Model B with High-Quality Camera Module and Lens.
Find at the bottom of this page the process to install Open-CV to your Raspberry Pi. This system will be using MediaPipe for real-time Hand Identification which runs a TensorFlow Lite delegate during operation for hardware acceleration (this guide has it all!). There are other types of gesture recognition technology that will work with a Raspberry Pi 4 Model B. For instance, you can also do hand identification or gesture identification with Pytorch, Haar cascades, or YOLO/YOLOv2 Packages but the MediaPipe dataset and system used in this guide is far superior. All scripts explored here will utilise the Python Programming Language (come check the Python Workshop if you need it).
As always if you have got any questions, queries, a hand, or things you'd like to see added please let us know your thoughts!
What You Need
Below is a list of the components you will need to get this system up and running real fast.
- Raspberry Pi 4 Model B (Having the extra computing power 'oomph' that the Pi provides is super helpful for this task but this set-up will work with a Raspberry Pi 3 Model B it'll just a little slower)
- Raspberry Pi High-Quality Camera and Camera Lens (You can also use a Raspberry Pi Official Camera Module V2)
- Micro SD Card
- Power Supply
- Monitor
- HDMI Cord
- Mouse and Keyboard
Initial Set-Up and Install Process
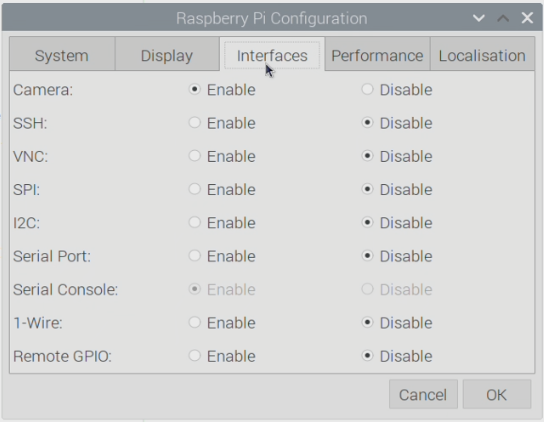
Have the Raspberry Pi connected as a desktop computer with it connected to a monitor, mouse, and keyboard. Make sure a Pi Camera is installed in the correct slot with the ribbon cable facing the right way and start the Open-CV install process seen below. With that complete, you will have Open-CV installed onto a fresh version of Raspberry Pi 'Buster' OS. Then open up the Raspberry Pi Configuration menu (found using the top left Menu and scrolling over preferences) and enable the Camera found under the Interfaces tab. After enabling restart your Raspberry Pi to lock in this change. See the image below for the setting location.
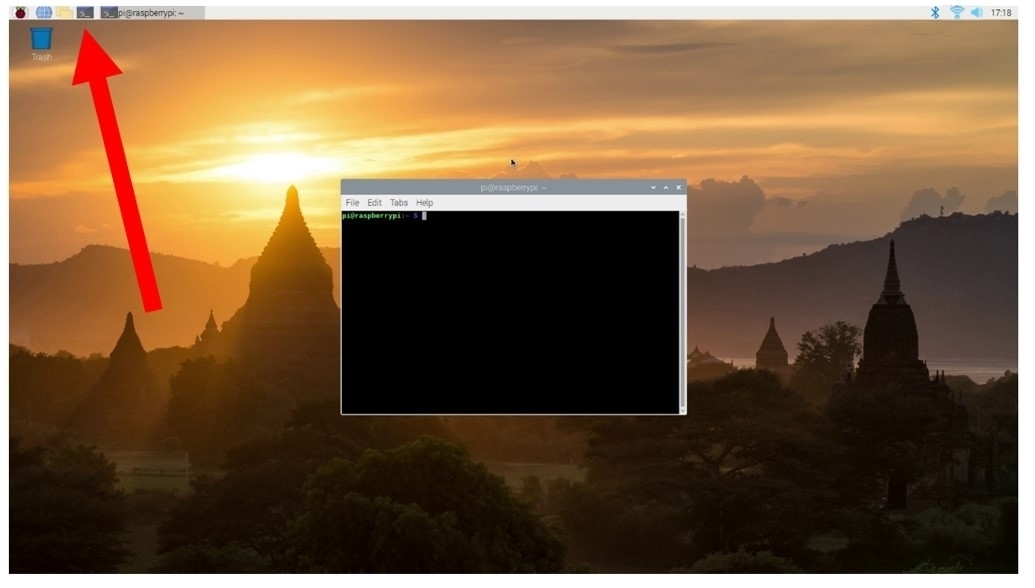
Once that is complete the next step is to open up a new Terminal using the black button on the top left of the screen. Below you can see what it looks like when you open a Terminal on the Raspberry Pi 'Buster' Desktop and in that image there is a big arrow pointing to the icon which was clicked with the mouse to open it.

Now we will type and enter each of the below lines to install the necessary packages into the terminal window. Press | Y | on your keyboard when it requires you to do so to continue the installation of these packages. The most important package we will install here is MediaPipe. This has specific packages that work with Raspberry Pi 4 and Raspberry Pi 3, you can install both to your system. These commands are going to provide us with our MediaPipe Package. See further below for an image of this functionality that MediaPipe provides for hand recognition, this package is able to identify, locate and provide a unique number for each joint on both your hands.
sudo pip3 install mediapipe-rpi3
sudo pip3 install mediapipe-rpi4
sudo pip3 install gtts
sudo apt install mpg321

Troubleshooting Addition: If you're running into this Compatability Issue | RuntimeError: module compiled against API version 0xe but this version of numpy is 0xd | type and enter the following into your terminal to fix it
sudo pip install numpy --upgrade --ignore-installed
sudo pip3 install numpy --upgrade --ignore-installed
Functional Hand Tracking Script
With that done let's get into it. Below is the script we will use to get our Hand Tracking system up and running. When run it will identify any hands seen in front of it through computer vision and then use machine learning to draw a hand framework over the top of any hands identified. The script is fully annotated so you can understand what each section is doing and the purpose for it. Find this script in the download section below called | Simple-Hand-Tracker.py |. Copy, paste, save and run the below or run the downloaded script in Thonny IDE. Thonny IDE is just my preferred Python Interpreter software that is installed by default into Raspberry Pi OS, you can use any one you prefer.
#Import the necessary Packages for this software to run
import mediapipe
import cv2

#Use MediaPipe to draw the hand framework over the top of hands it identifies in Real-Time
drawingModule = mediapipe.solutions.drawing_utils
handsModule = mediapipe.solutions.hands

#Use CV2 Functionality to create a Video stream and add some values
cap = cv2.VideoCapture(0)
fourcc = cv2.VideoWriter_fourcc('m', 'p', '4', 'v')

#Add confidence values and extra settings to MediaPipe hand tracking. As we are using a live video stream this is not a static
#image mode, confidence values in regards to overall detection and tracking and we will only let two hands be tracked at the same time
#More hands can be tracked at the same time if desired but will slow down the system
with handsModule.Hands(static_image_mode=False, min_detection_confidence=0.7, min_tracking_confidence=0.7, max_num_hands=2) as hands:

#Create an infinite loop which will produce the live feed to our desktop and that will search for hands
     while True:
           ret, frame = cap.read()
           #Unedit the below line if your live feed is produced upsidedown
           #flipped = cv2.flip(frame, flipCode = -1)

           #Determines the frame size, 640 x 480 offers a nice balance between speed and accurate identification
           frame1 = cv2.resize(frame, (640, 480))

           #Produces the hand framework overlay ontop of the hand, you can choose the colour here too)
           results = hands.process(cv2.cvtColor(frame1, cv2.COLOR_BGR2RGB))

           #In case the system sees multiple hands this if statment deals with that and produces another hand overlay
           if results.multi_hand_landmarks != None:
              for handLandmarks in results.multi_hand_landmarks:
                  drawingModule.draw_landmarks(frame1, handLandmarks, handsModule.HAND_CONNECTIONS)

                  #Below is Added Code to find and print to the shell the Location X-Y coordinates of Index Finger, Uncomment if desired
                  #for point in handsModule.HandLandmark:

                      #normalizedLandmark = handLandmarks.landmark[point]
                      #pixelCoordinatesLandmark= drawingModule._normalized_to_pixel_coordinates(normalizedLandmark.x, normalizedLandmark.y, 640, 480)

                      #Using the Finger Joint Identification Image we know that point 8 represents the tip of the Index Finger
                      #if point == 8:
                          #print(point)
                          #print(pixelCoordinatesLandmark)
                          #print(normalizedLandmark)

           #Below shows the current frame to the desktop
           cv2.imshow("Frame", frame1);
           key = cv2.waitKey(1) & 0xFF

           #Below states that if the |q| is press on the keyboard it will stop the system
           if key == ord("q"):
              break
So as soon as you run it (by pressing that large green Run button in Thonny IDE) it will open up a new window and initiate hand identification. This script as written will accommodate two hands but alter it to accommodate more hands if you desire. See below for this occurring.
Finger Count and Identify Fingers Up/Down Script
The natural next step is to add code to the above script so that it can know when we have a finger up/down and to give a total for how many fingers are up/down. Download this script at the bottom of the page. You will find after unzipping the downloaded script to your desktop the fully annotated scripts | Are Fingers Up or Down.py | and | module.py |. Make sure when running the first main script that | module.py | is in the same directory. This | Are Fingers Up or Down.py | script is very similar to the one above but will also provide a total finger count (up and down) and specific details on each Finger on whether it is up or down. This statement then gets printed to the Shell. See an image below of this occurring, right-click it and open it into a new window to see it full size if you need. Notice how it has been identified that the Index Finger and the Pinky finger are Up. Also, that 2 Fingers are Up and 3 Fingers are Down.
This is very useful as we can then expand on this to control GPIO pins using our up/down fingers or gestures (like the Rock n Roll Symbol). As it currently stands this count works for a single hand but code can be altered so it can accommodate for more.
Also as an Easter Egg, I've added a small Text to Speech feature. Whenever you enter | q | on your keyboard as the script is running a nice robot lady voice will tell you how many fingers are up and how many fingers are down. All code has been fully annotated to aid understanding.
Where To Now (GPIO control and Other Applications)
Naturally, the next step is to use this Code to control the GPIO Pins. Now I have done servo controls, LED light control, and LED matrix control before using interesting inputs, like face recognition, speed recognition, or NFC Tags, but this time let's start by controlling a whole bunch of Servos. All scripts talked about in this section can be downloaded at the bottom of this article.
The included code, | Are Fingers Up Servo Control.py |, has highlighted in it exactly where I altered the previous script to add this functionality. Very few added lines can turn your Raspberry Pi Single Board Computer into a gesture-activated system. Very exciting! In my case, I have hooked it up to a Mechanical Hand which is powered by 5 servos for each finger-tip. These servos all connect up to an Adafruit 16-Channel Servo HAT that mounts directly on top of our Raspberry Pi. This HAT (Hardware Attatched on Top) is hands down the simplest way to control multiple servos with a Raspberry Pi. When I raise my fingers in front of the Raspberry Pi Camera with the code running it will raise the fingers of the mechanical hand. See this happening in the image below. Also here is an excellent Bionic Lego Hand created by Garry who expanded on this code and used a Raspberry Pi Build HAT.

Also in the downloadable scripts, you will be able to find | Glowbit-Gesture-Control.py |. If you then hook up a Glowbit Matrix 4x4 just like in the guide here to your Raspberry Pi you will have created a gesture-controlled light system. Check out this in action below. Depending on how many fingers you show the camera it will produce different colours on the matrix. Very little extra code was added to the previous script to achieve this and has been fully commented.

This kind of gesture control can also be used not to control hardware but software. For a simple example, open up | Computer-Gesture-Control.py | as in it I have coded in the ability to start and pause videos, control the sound, as well as shut down the device all through hand commands. If you put down 1 finger it will play the media. If you put down 2 fingers it will pause the Media. Then 3 fingers down will turn the sound on, and 4 fingers down will mute the sound. See the VLC starting to be played in the image below that started playing through the use of the adjacent hand gesture.

If you continued to code down this direction you could easily control a YouTube video to play, pause, fast-forward, and thumbs-up depending on the gestures you provide the camera. The limits are your imagination!
Setting Up Open-CV on Raspberry Pi 'Buster' OS
This is an in-depth procedure to follow to get your Raspberry Pi to install Open-CV that will work with Hand Identification talked about above. Soon I will create either a script/a separate tutorial to streamline this process. Turn on a Raspberry Pi 4 Model B running a fresh version of Raspberry Pi 'Buster' OS on a Micro-SD card inserted and connect your system to the Internet.
Open up the Terminal by pressing the Terminal Button found on the top left of the button. Copy and paste each command into your Pi’s terminal, press Enter, and allow it to finish before moving onto the next command. If ever prompted, “Do you want to continue? (y/n)” press Y and then the Enter key to continue the process.
sudo apt-get update && sudo apt-get upgrade
We must now expand the swapfile before running the next set of commands. To do this type into terminal this line.
sudo nano /etc/dphys-swapfile
The change the number on CONF_SWAPSIZE = 100 to CONF_SWAPSIZE=2048. Having done this press Ctrl-X, Y, and then Enter Key to save these changes. This change is only temporary and you should change it back after completing this. To have these changes affect anything we must restart the swapfile by entering the following command to the terminal. Then we will resume Terminal Commands as normal.
sudo apt-get install build-essential cmake pkg-config
sudo apt-get install libjpeg-dev libtiff5-dev libjasper-dev libpng12-dev
sudo apt-get install libavcodec-dev libavformat-dev libswscale-dev libv4l-dev
sudo apt-get install libxvidcore-dev libx264-dev
sudo apt-get install libgtk2.0-dev libgtk-3-dev
sudo apt-get install libatlas-base-dev gfortran
sudo pip3 install numpy
wget -O opencv.zip https://github.com/opencv/opencv/archive/4.4.0.zip
wget -O opencv_contrib.zip https://github.com/opencv/opencv_contrib/archive/4.4.0.zip
unzip opencv.zip
unzip opencv_contrib.zip
cd ~/opencv-4.4.0/
mkdir build
cd build
cmake -D CMAKE_BUILD_TYPE=RELEASE \
-D CMAKE_INSTALL_PREFIX=/usr/local \
-D INSTALL_PYTHON_EXAMPLES=ON \
-D OPENCV_EXTRA_MODULES_PATH=~/opencv_contrib-4.4.0/modules \
-D BUILD_EXAMPLES=ON ..
make -j $(nproc)
This | make | Command will take over an hour to install and there will be no indication of how much longer it will take. It may also freeze the monitor display. Be ultra patient and it will work. Once complete you are most of the way done. If it fails at any point and you receive a message like | make: *** [Makefile:163: all] Error 2 | just re-type and enter the above line | make -j $(nproc) |. Do not fear it will remember all the work it has already done and continue from where it left off. Once complete we will resume terminal commands.
sudo make install && sudo ldconfig
sudo reboot
Download Scripts
Below is all the code you need to get up and running with these examples above. They have been fully commented so you can easily understand and alter them to do exactly what you want for your purposes.


