The Micro:bit by BBC is a great data collection tool, it just needs a little help remembering what it has measured! This tutorial is made for those Micro:bit projects where transmitting your sensor data over radio or Bluetooth to a computer just won’t cut it. To take it one step further, this solution uses MakeCode (it works with any code).
Enter the SparkFun OpenLog. The OpenLog is an open source data logger that works over a simple serial connection and supports microSD cards up to 64GB. The OpenLog can store or “log” huge amounts of serial data and act as a black box of sorts to store all the serial data that your project generates. It only uses up to 6mA of power at rest and max 23mA when writing and accepts 3.3v-12v power. So you can power it directly off your Micro:bit’s 3.3v no problem! (the Micro:bit can handle a maximum of 90mA draw from its 3.3v pin.
All you need to do to get OpenLog working is power it up and send it serial data and it saves it all to a micro SD card. We will need a breakout for the Micro:bit so we can utilize all the available pins. Let's break it down into parts, for this project, you will need the following parts:
- A Micro:bit
- A Sparkfun Micro: bit Breakout w/ Headers (or equivalent)
- A Sparkfun OpenLog
- A Micro SD Card
- Jumpers, M-M
- A breadboard
- 6-pin Headers
- A MicroSD card reader
Setting up the Hardware
The first thing you will notice when you receive the Sparkfun OpenLog is that it doesn’t have any headers. You will need to solder some on. The pins on the Openlog are arranged so you can plug it straight into an Arduino board once the headers are installed. The SD card should be on the bottom side of the board.
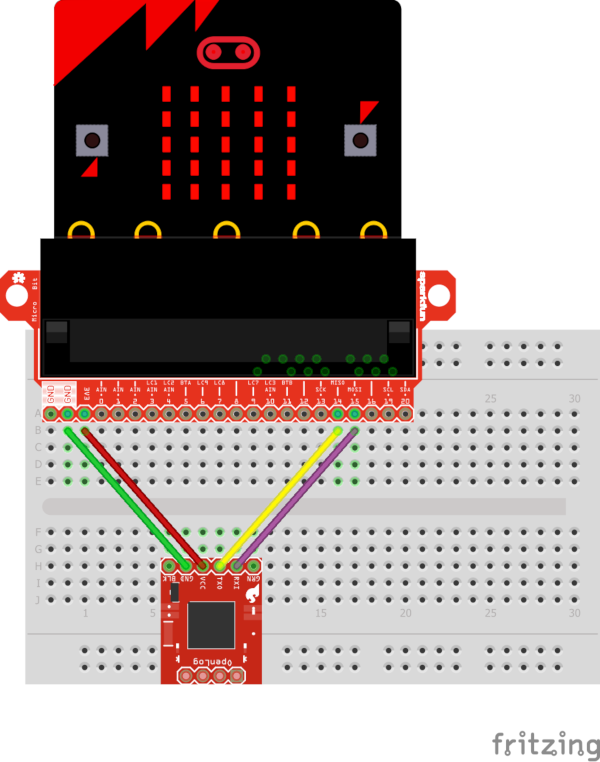
Put your Micro:bit Breakout and OpenLog into your breadboard, and connect your power, ground, and RX and TX. The MISO and MOSI pins (14 and 15) on the breakout are our serial pins. MISO stands for Master In Slave Out, and MOSI stands for Master Out Slave In. The Micro:bit is the Master, so connect the MISO(14) to the TX pin of the OpenLog, and MOSI(15) to RX.
Now put your Micro SD card into the Openlog. It's best to start with a clean SD. The OpenLog will work with anything between 64MB and 64GB.
Program the Micro:bit
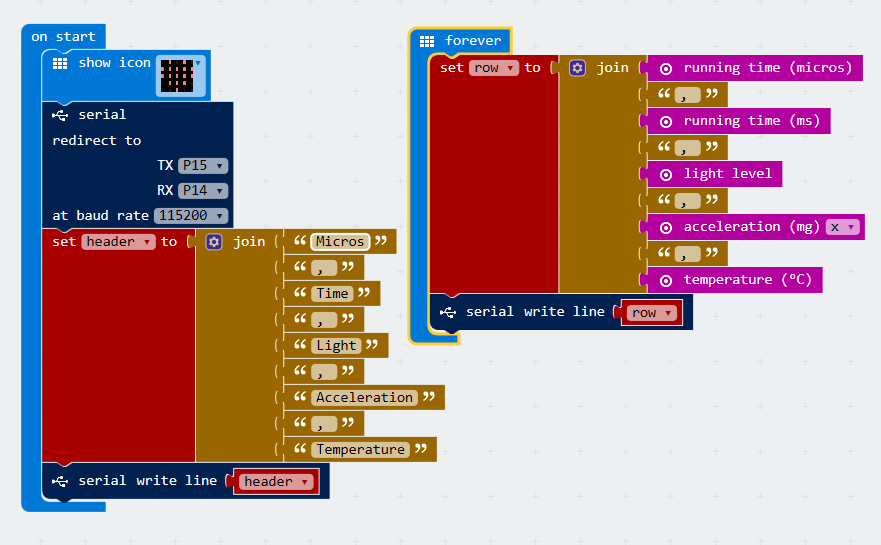
The first step to logging our data with the Micro:bit and the Openlog is redirecting our serial output to the OpenLog. MakeCode conveniently has a block made just for this! Just set the serial redirect to TX: P15, and RX: P14. Connecting serial devices together is not a straight match up, the TX from on device will be the RX on the other.
The first time that you power on the OpenLog it will be set to a baud rate of 9600, so set your baud rate to 9600 for now and we’ll go over changing it later in the tutorial.
To keep our logged data understandable without saving unnecessary bytes, its best to make a single header with rows of data. This way we only save text strings once, and can still tell what each logged value means. The real reason to format your data this way is so you end up with a text file that is formatted as a CSV. All you’ll need to do is open Excel and use Data>Get Data>From Text/CSV. You can either use the block “Serial write line” and enter the text string, or you can use a Join block, join your strings, and then set that as a variable. Then you use the “serial write line” block to write the variable. We’ve gone with the second option because it allows us to most easily rearrange our variables or change them.
In the forever loop we duplicate the join and save it as the variable “row”, we replace our text strings for the various data that we want to log. It’s a good idea to include a running time value in here so you have a reference for your readings.
Each time the OpenLog is powered up it will create a new Log.TXT file. Plug your SD card into a card reader on your computer to view your logs. The log from this sketch looks like this:
To really use this data, we can import it as a CSV into Excel. Using the comma as the delineator, we get this:
Log Intervals
There are a few quirks to squeezing as many measurements as you can out of the OpenLog and the Micro:bit when using MakeCode. If you want to squeeze as many data points as possible out of every second, then you need to turn your baud rate up to 115200. The baud rate on the Micro:bit and Openlog need to match. To change the baud rate on the Openlog, open your SD card on a pc, and open the config.txt file. This file controls the configuration of the OpenLog. Change the 9600 baud rate to 115200, save the file, and reboot your Openlog once its reinserted. That’s all there is to it!
We noticed a considerable increase in readings per second with the higher baud rate (no surprise!). I also found that if I included running time in microseconds I got more entries per second. It seems that the more data you save per entry the more frequently the entries are saved. This is evident by the average entries per second nearly doubling after the microsecond and millisecond values have climbed up pretty high. This is unusual and is likely caused by something going on behind the scenes within MakeCode, luckily, it’s easy to work around, just save a lot of bytes! Here is a summary of the intervals with different settings:
Using a radio to transmit to another Micro:bit:
4 entries per second
OpenLog at 9600 baud:
8-12 entries per second
OpenLog at 9600 baud with running time in microseconds included:
10-15 entries per second
Openlog at 115200 baud:
10-15 entries per second
Opendlog at 115200 baud with running time in microseconds included:
15-30 entries per second
When logging for very long periods of time, it's important to note that the running time values will reach a maximum number, then switch to negative and countdown. This is important to keep your log from being filled up by microseconds alone. If you are going to leave your device logging for a long time, you should put in a formula that calculates, minutes/hours/days for you so it's easier to determine when things occurred on your timestamp.
We tested let this program run for an hour, and the log file was only 2,349 KB. We are using a 16GB card, so we could continuously log our sensor data for 283 days before running out of memory!
The OpenLog is capable logging device and this is just scratching the surface, but it unlocks a lot of data collection potential from the Micro:bit with very little effort! Now get out there and get logging! Want to learn more about the Micro:bit? Check out our Micro:bit Tutorials!


